Windows 10에서 minikube 및 VirtualBox 설정
minikube 는 학습 또는 개발 목적으로 로컬 Kubernetes 클러스터를 설정하고 실행할 수 있는 도구입니다. minikube를 사용하여 가상 머신(VM)에 포함된 Kubernetes 클러스터를 생성할 수 있습니다.
VirtualBox 는 전용 하드웨어를 사용하지 않고도 다양한 운영 체제에서 VM(가상 머신)을 빠르게 가동하는 데 사용할 수 있는 무료 오픈 소스 도구입니다.
이 튜토리얼에서는 로컬 Kubernetes 클러스터를 호스팅할 일부 Linux VM을 생성하기 위해 minikube를 사용하여 VirtualBox와 인터페이스할 것입니다.
minikube와 VirtualBox를 설치하기 위해 우리는 설치 프로세스를 크게 단순화하는 Windows용 패키지 관리자인 Chocolatey를 사용할 것입니다 .
Windows 10에서 minikube 및 VirtualBox를 설정하는 단계
- 설치된 Windows Powershell 버전을 확인하고 필요한 경우 업그레이드하십시오.
- Windows .Net 버전 확인 및 필요한 경우 업그레이드
- 초콜릿 설치
- 미니큐브 설치
- Hyper-V가 꺼져 있는지 확인
- 버추얼박스 설치
- Minikube 시작(VirtualBox로 정의된 드라이버 사용)
1단계. Windows Powershell 버전 확인
초콜릿을 사용하려면 Powershell V3 이상이 설치되어 있어야 합니다.
Powershell 자체 내에서 명령을 사용하여 Powershell 버전을 확인할 수 있습니다. 시작하자!
시작하려면 "시작" 메뉴를 열고 "PowerShell"을 검색한 다음 검색 결과에서 클릭하십시오.

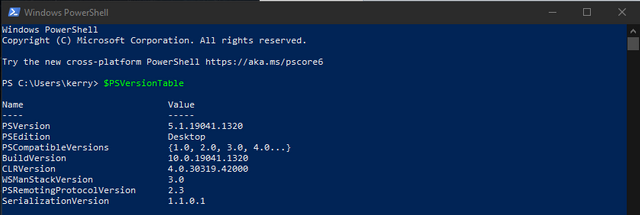
Powershell 창에서 다음 명령을 입력합니다.
$PSVersionTable
The value of PSVersion will indicate the current version of Powershell, which in this case is version 5.1.19041.1320
Step 2. Check .NET version
To use chocolatey we need .NET Framework 4.5 or greater to be installed.
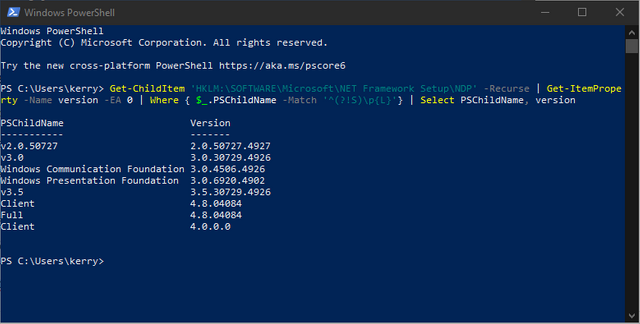
We can check the .Net version using another Powershell command.
Open Powershell as before, and then enter the following command:
Get-ChildItem 'HKLM:\SOFTWARE\Microsoft\NET Framework Setup\NDP' -Recurse | Get-ItemProperty -Name version -EA 0 | Where { $_.PSChildName -Match '^(?!S)\p{L}'} | Select PSChildName, version
The current version of .Net will be shown
Step 3. Install Chocolatey
Open Powershell as an administrator and run the following commands.
First, check that the execution policy is not restricted:
Get-ExecutionPolicy
If it is restricted, then set the policy to All-Signed
Set-ExecutionPolicy AllSigned
Run the following command to install chocolatey:
Set-ExecutionPolicy Bypass -Scope Process -Force; [System.Net.ServicePointManager]::SecurityProtocol = [System.Net.ServicePointManager]::SecurityProtocol -bor 3072; iex ((New-Object System.Net.WebClient).DownloadString('https://community.chocolatey.org/install.ps1'))
Wait a few seconds for the command to complete.
Wait a few seconds for the command to complete, and if you don’t see any errors, then you should be ready to use Chocolatey! Try the following to command to check the installation:
choco -?
For more information see chocolatey.org
Step 4. Install minikube
With chocolately installed, we can now install minikube with the following command:
choco install minikube -y
Running the above command will install minikube and kubernetes-cli tools in your system.
Step 5. Disable Hyper-V
We’re going to use VirtualBox to provide our VMs, but Windows already has a built in virtualization technology called Hyper-V. VirtualBox and Hyper-V cannot run at the same time, so we are going to disable Hyper-V.
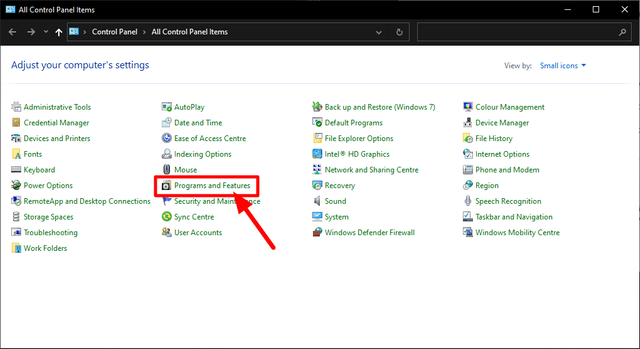
Press Windows Start and search for “control panel” and run the app

Select Programs and Features
In the left pane, click the Turn Windows features on or off link
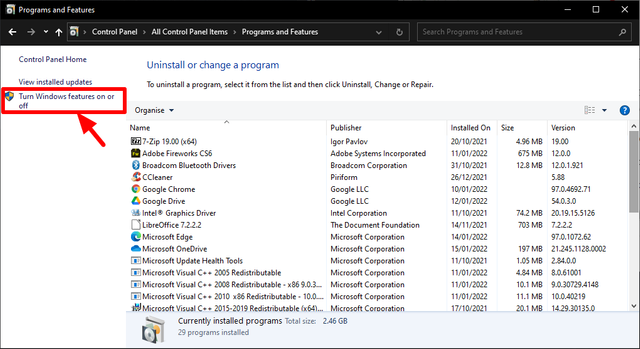
Find the Hyper-V option and deselect it using the tick box.
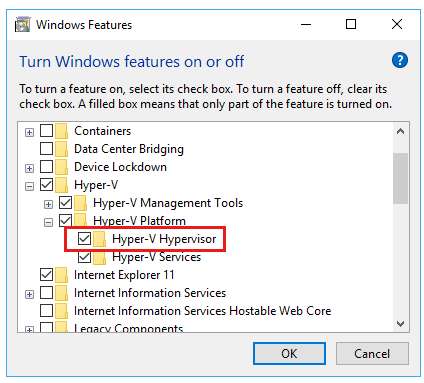
Click OK to save the changes and reboot your PC.
Step 6. Install VirtualBox
Install Virtualbox using chocolatey:
choco install virtualbox -y
Step 7. Start minikube
Start minikube with the following command:
minikube start --driver=virtualbox
If minikube started successfully, you should now be able to interact with the local kubernetes cluster. In a Powershell window, try some of the following commands:
kubectl version
kubectl get nodes
kubectl get namespaces
kubectl config view
[광고] STEEM 개발자 커뮤니티에 참여 하시면, 다양한 혜택을 받을 수 있습니다.