Game Finishing and Packaging Tutorial – Step by Step with Flame and Flutter (Part 5 of 5)
Finishing a project is one of the best feelings in the world. You spent time and effort on something and finally, you’ll see the idea turn into a tangible reality.

At long last, welcome to the final part of the game development tutorial series with Flame and Flutter. I’m thinking this part would only make sense if you’ve been following the tutorial from the beginning.
So, if you haven’t read the previous parts, I recommend you start there first.
Note: Flutter apps can be compiled for both Android and iOS but we will be focusing on releasing only for Android in this part.
Here’s the whole series:
- Introduction to game development
- Set up a playable game
- Graphics and animation
- Views and dialog boxes
- Scoring, storage, and sound
- Finishing up and packaging (you are here)
Prerequisites
- The previous parts.
- More graphics assets – Graphics assets can be found all over game resource sites on the internet (Open Game Art for example). Just make sure to credit the makers. In this part though, the graphics asset we need should somewhat be unique as it will serve as the brand icon of the game we are making.
- Google Play Developer/Publisher activated Google account – To upload apps and games to the Google Play Store, you must register for and activate a developer/publisher account by paying the one-time fee of $25.
We will be using the conventions from the previous parts regarding code and file path references.
All the code for this tutorial is available for viewing and download on this GitHub repository.
Final resource pack
This final resource pack contains only one image but in five different sizes. The image will be used as the launcher icon in the players’ app drawer when the game is installed on their phones.
Click the image above or this link to download!
Important Note: The resource pack above can be used if you’re following along with this tutorial. It is part of the Langaw project on GitHub which is licensed with a CC-BY-NC-ND license.
It means that you can share, copy, and redistribute the material in any medium or format with some restrictions.
- You must give appropriate credit, provide a link to the license, and indicate if changes were made.
- You may not use the material for commercial purposes.
- If you remix, transform, or build upon the material, you may not distribute the modified material.
- You may not apply legal terms or technological measures that legally restrict others from doing anything the license permits.
Learn more about the CC-BY-NC-ND license by clicking here.
Let’s finish this!
We have three major tasks ahead of us.
First, we need to sweep our project and eliminate bugs to give our players a smooth problem-free gameplay experience.
Second, the game must be customized with its own branding so that it’s easily recognizable in the list of applications our players have on their phones.
Last, we need to publish this game into the Google Play Store so that actual users will be able to download, install, and play our game.
Are you ready?
Step 1: Bugs
No one likes bugs. Yet they’re an inevitable part of developing any kind of software.
Let’s not give our players any reason to uninstall our game by squashing any known bugs before we release our game.
Sizing bug
In Part 2 (Game Graphics and Animation), we have resized the flies based on their graphics so that taps should be on or very near the body in order to kill the fly.
This isn’t really the case.
The difference between “the rectangle that the fly image is being rendered on” is calculated from “the rectangle being tested if the tap hit a fly” using the inflate method.
This can be seen in the code below from ./lib/components/fly.dart:
void render(Canvas c) {
  if (isDead) {
    deadSprite.renderRect(c, flyRect.inflate(2));
  } else {
    flyingSprite[flyingSpriteIndex.toInt()].renderRect(c, flyRect.inflate(2));
    if (game.activeView == View.playing) {
      callout.render(c);
    }
  }
}
As I was writing Part 2, I was actually just learning Dart, Flutter, Flame, and their features at the same time as I go.
Given that, I thought that the inflate method accepts a percentage (or a factor) as a parameter. I assumed that inflate(2) will double (2 = 200%) the size of the rectangle.
Upon inspection at a later time, the documentation for this method, although a bit unclear, (and its actual code) says otherwise.
Returns a new rectangle with edges moved outwards by the given delta.
The parameter passed, called delta in the documentation, should be in logical pixels rather than a percentage (or a factor) of the rectangle the method was called on.
In the screenshot below, you’ll see that I’ve added two lines of code that will render the flyRect rectangle and an inflated copy of it.
The gray area is flyRect (which is used to test if the player’s tap hit the fly) and the white area around it is the inflated copy of flyRect.
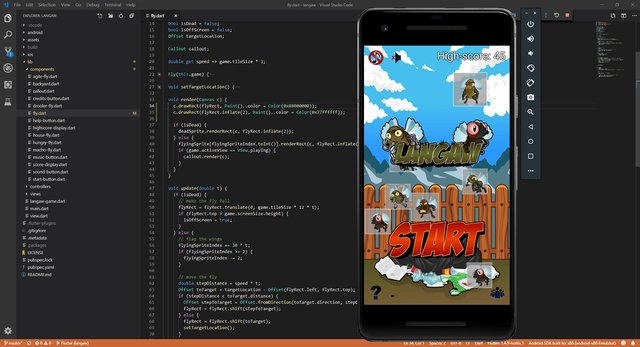
This isn’t what we want.
We want the sprite to be double the size of the hit test rectangle.
To fix this, open up ./lib/components/fly.dart and replace the rendermethod with the following code.
void render(Canvas c) {
  c.drawRect(flyRect.inflate(flyRect.width / 2), Paint()..color = Color(0x77ffffff));

  if (isDead) {
    deadSprite.renderRect(c, flyRect.inflate(flyRect.width / 2));
  } else {
    flyingSprite[flyingSpriteIndex.toInt()].renderRect(c, flyRect.inflate(flyRect.width / 2));
    if (game.activeView == View.playing) {
      callout.render(c);
    }
  }

  c.drawRect(flyRect, Paint()..color = Color(0x88000000));
}
Breakdown: The first and last lines inside the method are the lines that draw the white and gray rectangles. We’ll remove this later.
Everything else is almost the same but the main thing that changed here is the parameter that we pass to the inflate method. Instead of giving it a hard-coded logical pixel value of 2, we pass the width of flyRect divided by two.
This adds half of the width of the rectangle on all sides which results in a new rectangle whose side lengths are double of the original rectangle’s side lengths.
Note: Since flyRect is actually a square, you can use height when calculating for the value if you want.
If you run the game with the above code change, you should see something like this:
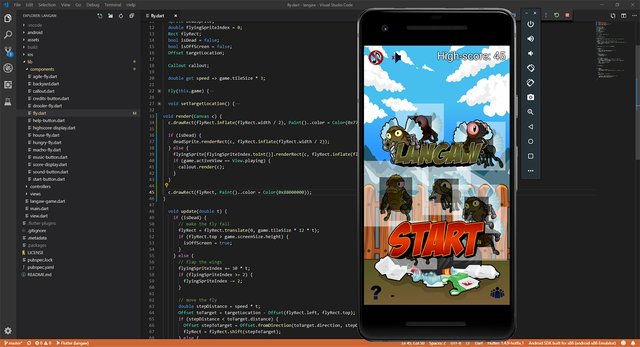
It’s a bit messy but you should be able to see that this is more in line with what we originally planned in Part 2.
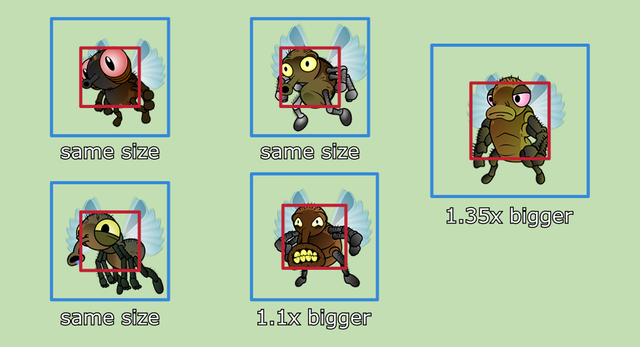
Let’s delete the two lines that render the white and gray rectangles:
c.drawRect(flyRect.inflate(flyRect.width / 2), Paint()..color = Color(0x77ffffff));
c.drawRect(flyRect, Paint()..color = Color(0x88000000));
We could just call it fixed.
But the flies are so much bigger now so let’s tone their sizes down a bit.
Let’s open each of the fly sub-class files and edit their constructors so that flyRect is initialized with more acceptable sizes.
House Fly (./lib/components/house-fly.dart):
flyRect = Rect.fromLTWH(x, y, game.tileSize * 1, game.tileSize * 1);
Drooler Fly (./lib/components/drooler-fly.dart):
flyRect = Rect.fromLTWH(x, y, game.tileSize * 1, game.tileSize * 1);
Agile Fly (./lib/components/agile-fly.dart):
flyRect = Rect.fromLTWH(x, y, game.tileSize * 1, game.tileSize * 1);
Hungry Fly (./lib/components/hungry-fly.dart):
flyRect = Rect.fromLTWH(x, y, game.tileSize * 1.1, game.tileSize * 1.1);
Macho Fly (./lib/components/macho-fly.dart):
flyRect = Rect.fromLTWH(x, y, game.tileSize * 1.35, game.tileSize * 1.35);
If you do a test run you should see something like the screenshot below where the flies now have acceptable sizes:
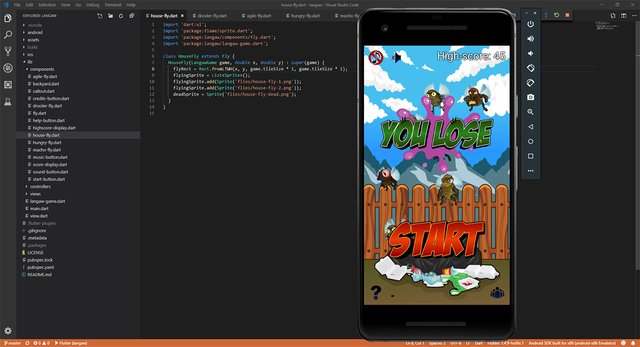
Now that’s something we can call fixed!
Frame skipping bug
Next, we have the frame skipping bug. This bug is barely noticeable since most phones are now equipped with high-end CPUs and GPUs.
It’s not just unnoticeable, it actually doesn’t exist on most devices.
The bug is caused by the CPU of the devices not getting enough time to run the game loop to keep up with 60 FPS the game is supposedly running on.
You may have a different setup, but I’m test-running the game using an emulator. The emulator takes a percentage of my computer’s resources and when my computer runs other processes, a frame skip happens in the game.
It shouldn’t really matter because our update method “updates” the game based on the amount of time that has passed since the last time updatewas called.
But it does matter.
The problem is with our animation. The fly’s animation loops over just two frames with the following code.
// flap the wings
flyingSpriteIndex += 30 * t;
if (flyingSpriteIndex >= 2) {
  flyingSpriteIndex -= 2;
}
Quick recap: We want 15 wing flaps per second, multiply that by the number of frames (which is two) and we get 30.
This value is multiplied by the amount of time (in seconds) since the last time update was called (ideally 0.0166... or 1/60 for a running rate of 60 FPS).
In perfect conditions, the final value will always be .5. This value is added to the flyingSpriteIndex variable. We then check if the variable’s value goes over 2 and if it does, we subtract 2 from that value, effectively resetting it to zero.
When rendering, we use this code to get the sprite index of the correct animation frame:
flyingSpriteIndex.toInt()
The problem arises when the CPU doesn’t give enough cycles for our game. This causes a frame skip and the t variable (time passed since the last time update was ran) gets a large number.
Let’s say the frame skipped processing for half a second. This will give the tvariable a value of .5 (half a second).
The line flyingSpriteIndex += 30 * t; will make flyingSpriteIndex‘s value equal to 15 (30 * .5), assuming it started from zero.
Next, this value is checked if it has a value greater than two, which it has. So we subtract a value of 2 leaving us with 13.
In the render method, flyingSpriteIndex.toInt() is executed and returns a value of 13 ((13).toInt() is still equal to 13).
In this situation flyingSprite[flyingSpriteIndex.toInt()].renderRect(...); is actually equivalent to flyingSprite[13].renderRect(...);.
The problem is that we only have two frames (0 and 1). We definitely do not have frame #13!
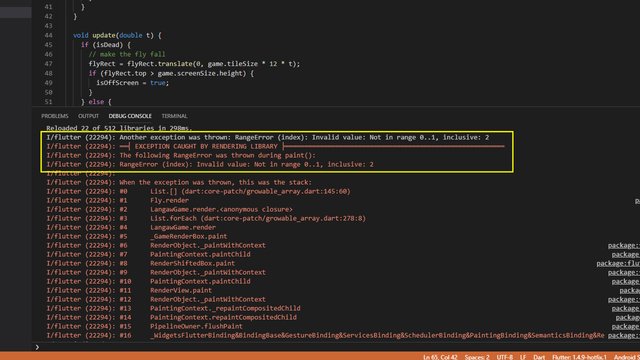
This give’s out a RangeError, invalidates the current render call, and makes the screen flicker. Not a good bug to be left alone before we release.
Here’s a screenshot of the error in the Debug Console.
To fix this error, we need to check if the value is overflowing not just once. We have to always assume that each update method run was after a huge frame skip.
Still in ./lib/components/fly.dart, let’s convert the “flap the wings” block to the following:
// flap the wings
flyingSpriteIndex += 30 * t;
while (flyingSpriteIndex >= 2) {
  flyingSpriteIndex -= 2;
}
Breakdown: We just replaced the if block with a while loop. Since, as stated in Part 1, this tutorial assumes that you’re already a developer, I won’t go into too much detail on how while loops work.
What it does is check for a condition and run the loop body if the condition returns true. After running the body, it checks the condition again, and if it’s true, run the body again.
This is repeated over and over as long as (or while) the condition returns true. So if a frame skip happens and we end up with a large value, for example 15, inflyingSpriteIndex, the while loop runs over and over again until flyingSpriteIndex is no longer greater than 2.
On the first iteration 15 becomes 13, then 13 becomes 11, this pattern goes over and over until the value is 3.
The while loop checks the value of flyingSpriteIndex (3 >= 2) which should return true so it subtracts 2 from that value again giving us a value of 1.
This time when the while loop checks the value, 1 >= 2, it no longer returns true. So it doesn’t run the body and moves to the next line of code.
This one can be considered fixed!
Fly area limit
Imagine you are the player. You’ve been playing a while and are about to break the hypothetical worldwide high-score record of 7,331.
It’s all chaos in the screen, flies flying around and as soon as you kill one, another gets spawned.
There’s this one Drooler Fly that’s lazily hovering on the upper left corner of the screen where the sound control buttons are. He’s about to get full eating the trash with his number down to 1.
You tap him as he slowly slides right under the BGM control button. The fly annoyingly laughs at you and you lose the game at the score of 7,329.
Just because of that button that blocked the tap.
We can fix that!
This situation can be avoided by limiting the area the flies can fly in.
Sound control buttons are 1 tile in height and are position at 1/4 tilefrom the top edge of the screen. If we add another 1/4 tile at the bottom for margin, we get a total of 1.5 tile.
This one and a half tile area at the top of the screen should be a no-fly zone. Pun definitely intended!
There are two places that control the area in which the flies are allowed to fly in. One when spawning a fly (spawnFly in ./lib/langaw-game.dart) and another when a fly chooses a random target location (setTargetLocation in ./lib/components/fly.dart).
First, let’s deal with the spawnFly method. Open up ./lib/langaw-game.dart and replace the following lines:
double x = rnd.nextDouble() * (screenSize.width - (tileSize * 2.025));
double y = rnd.nextDouble() * (screenSize.height - (tileSize * 2.025));
With the following:
double x = rnd.nextDouble() * (screenSize.width - (tileSize * 1.35));
double y = (rnd.nextDouble() * (screenSize.height - (tileSize * 2.85))) + (tileSize * 1.5);
What’s happening: The value we subtract from the right and bottom edge of the screen’s width and height (respectively) is changed to 1.35 since when fixing the sizing bug above, the largest fly is now only 1.35 tileswide.
We then added 1.5 (sound controls height) to the value that we subtract from the height of the screen (now 2.85). This limits the flies against flying in the area that is 1.5 tiles from the bottom of the screen.
But we wanted to limit them from going to the top, not the bottom. To shift the allowed fly-zone downwards, we add 1.5 tiles to the final value we get.
We just need to copy this change to setTargetLocation and we should be done fixing this bug.
Open ./lib/components/fly.dart and inside the setTargetLocationmethod, replace the x and y definitions with the following:
double x = game.rnd.nextDouble() * (game.screenSize.width - (game.tileSize * 1.35));
double y = (game.rnd.nextDouble() * (game.screenSize.height - (game.tileSize * 2.85))) + (game.tileSize * 1.5);
It’s literally the same concept and the same change as the above.
And with that, we’re done with the all the known bugs as of writing.
View the code at this step on GitHub.
Step 2: Android Data
For this step and the next, I could just send you to Flutter’s Guide on Releasing for Android.
But this tutorial series is targeted towards beginners so here’s a more hands-on approach.
Note: As stated above, we’ll only be focusing on releasing for Android. If you want to release for iOS, you can follow this guide.
App label
In preparation for the release of our game, we must make sure that it is properly branded.
It also has to have its own recognizable name and a unique application ID (in our game’s case, it can also be called a Java package name).
Right now, what we have in the launcher is something like this:
![]()
Let’s open the manifest file and deal with the label first. This label is what gets shown in the app drawer when our game is installed on phones.
The Android manifest file is in ./android/app/src/main/AndroidManifest.xml.
To change the label, find the following line:
android:label="langaw"
Then replace the value with the name of the game we’re developing. In this case Langaw.
android:label="Langaw"
Application ID (and Java package name)
Next, we have to give our game a unique application ID. This is important so that the Android operating system can uniquely identify our game from the other apps and games installed on the device.
Click here to know more about application ID conventions, how it differs with an actual Java package name, and how to choose your own.
According to the Java package naming conventions, to avoid conflict, programmers name their packages by starting it with the reversed domain name of the company they work for.
If you’re an independent programmer and working on a personal project, you can use the reversed version of your personal blog’s domain (io.alekhin.jap. for example).
Since I’m going to actually publish and further develop this game after the tutorial, I’ll put it under a game development company I’m trying to start. I already have a domain name for it, alekhin.games.
Reversed, it’s games.alekhin. If we add the project name to it, the final application ID (and Java package name) becomes games.alekhin.langaw.
Note: For this, you have to use your own! If you don’t have a domain name, you can use your full name (japaalekhinllemos.langaw for example).
The application ID must also be changed in a few different places and requires some directory restructuring.
First, we edit the Android manifest file (./android/app/src/main/AndroidManifest.xml).
At the very top of the file (inside the manifest tag), look for a part that looks like this:
package="com.example.langaw"
Once there, replace it with the package name of your choosing (as mentioned above, I’ll use games.alekhin.langaw):
package="games.alekhin.langaw"
Open the debug Android manifest file at ./android/app/src/debug/AndroidManifest.xml and do the same change above.
Next, we have to open ./android/app/build.gradle and look for the android section. Inside this section, look for the following block:
    defaultConfig {
        applicationId "com.example.langaw"
        minSdkVersion 16
        targetSdkVersion 28
        versionCode flutterVersionCode.toInteger()
        versionName flutterVersionName
        testInstrumentationRunner "android.support.test.runner.AndroidJUnitRunner"
    }
Then change the value of applicationId to the chosen package name. It should then look something like this:
    defaultConfig {
        applicationId "games.alekhin.langaw"
        minSdkVersion 16
        targetSdkVersion 28
        versionCode flutterVersionCode.toInteger()
        versionName flutterVersionName
        testInstrumentationRunner "android.support.test.runner.AndroidJUnitRunner"
    }
One other place we need to change package name on is the main activity file (./android/app/src/main/java/com/example/langaw/MainActivity.java).
Replace the first line (package line) with the following:
package games.alekhin.langaw;
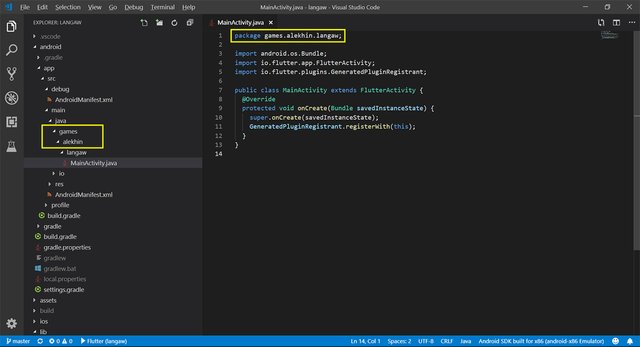
As you can see, the main activity file is inside a directory structure that matches the package name. For Java apps (which our game will finally be compiled into) to work properly, this directory structure must match with the package names.
The final change is to rename these folders so that they match the package name and that the main activity file will now be in ./android/app/src/main/java/games/alekhin/langaw/MainActivity.java).
Here’s a screenshot of how it should look like:
Launcher icon
The final and probably most important customization when it comes to branding (or being recognizably unique) is the launcher icon.
This is the icon that gets shown for our game in the app drawer.
There are also conventions and guidelines about launcher icon design but we’ll stick to what we already have from the resource pack.
Feel free to use your own icons. Just make sure you have them sized properly for the following dimensions:
48 x 48(mdpi)72 x 72(hdpi)96 x 96(xhdpi)144 x 144(xxhdpi)192 x 192(xxxhdpi)
Since we’re going to use the icons from the resource pack, we can just safely copy the android folder from the resource pack to the root folder of our project (./).
After copying the launcher icons, the following files should now be changed/updated:
./android/app/src/main/res/mipmap-hdpi/ic_launcher.png
./android/app/src/main/res/mipmap-mdpi/ic_launcher.png
./android/app/src/main/res/mipmap-xhdpi/ic_launcher.png
./android/app/src/main/res/mipmap-xxhdpi/ic_launcher.png
./android/app/src/main/res/mipmap-xxxhdpi/ic_launcher.png
If you try running the game now, you should see that the launcher label and icon is now properly set for our game as in the screenshot below.
![]()
Different devices may show the icon differently (borders, background color, just to name a few) but it will always show the icon we set.
View the code at this step on GitHub.
Step 3: Preparing to publish
We have more to do as we prepare to publish our game. First, we have to create a self-signed certificate in a key store that we will use to sign the APK with as we build it for production.
Signing the build with a certificate
To create the key store, the following command should be typed into a terminal (or command line):
keytool -genkey -v -keystore ~/key.jks -keyalg RSA -keysize 2048 -validity 36500 -alias key
The tool will ask for some information that will be recorded in the certificate like your full name, organization details, and address.
But first, it will ask for a password and make sure to remember what you type in.
After answering all the questions, keytool should create a key store file named key.jks in the home directory of the currently logged in user.
Note: This file must be kept private! Preferably, it should be kept outside of the project folder and somewhere safe with backup.
Second note: If you’re using some form of source control for your project and you can’t keep the key store out of the project folder, do NOT check this file into the repository. Also, make sure to add it to the ignored list.
The keytool command might not be registered in the current session’s PATH. To find it, you can follow the instructions in the Create a Keystore section on Flutter’s guide in preparing for an Android release.
I’m running Windows 10 and the keytool command wasn’t available globally. The actual command I ran for this to work on my computer was:
"/c/Program Files/Android/Android Studio/jre/bin/keytool" -genkey -v -keystore ~/key.jks -keyalg RSA -keysize 2048 -validity 36500 -alias key
The next step is to create a file in our project that will act as a reference and will point to our key store. Create a file in ./android/key.properties and enter the following block.
storePassword=PASSWORDHERE
keyPassword=PASSWORDHERE
keyAlias=key
storeFile=D:\\example\\directory\\key.jks
Replace PASSWORDHERE with the actual password that you entered when creating the key store. The value for storeFile should also be replaced with the actual location of the key store file.
Note: Because this file contains the password to the key store and the certificate, it must also be kept as private as possible. Do NOT check this file into the source control repository if you’re using one. Also, make sure to add this file to the ignore list.
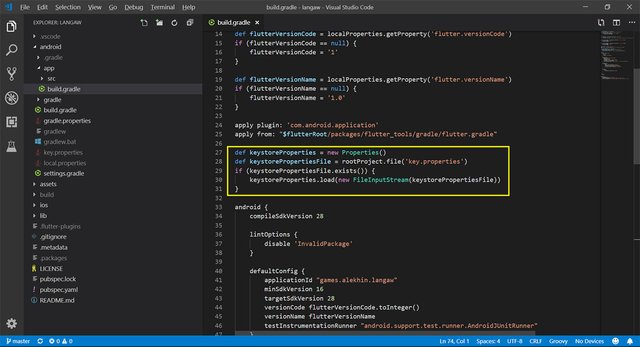
Finally, let’s jump back to the ./android/app/build.gradle file. Just before the android section, we have to load the key.properties file we just created.
Type in the following block just above the android { line.
def keystoreProperties = new Properties()
def keystorePropertiesFile = rootProject.file('key.properties')
if (keystorePropertiesFile.exists()) {
    keystoreProperties.load(new FileInputStream(keystorePropertiesFile))
}
Note: The code above is part of the Gradle build configuration which is out of the scope of this tutorial series. For now, just copy and paste the code in the appropriate location and make sure that key.properties file is already created (see above).
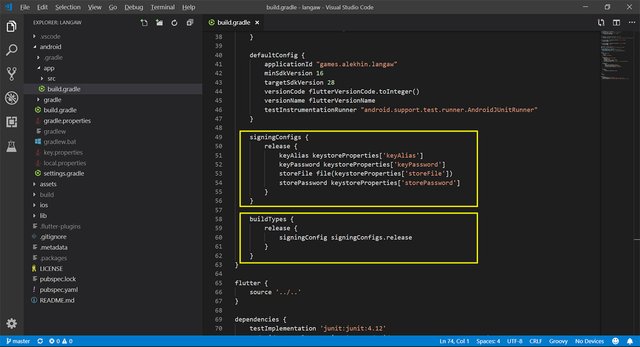
After that, go inside the android section and insert the following block just above buildTypes:
    signingConfigs {
        release {
            keyAlias keystoreProperties['keyAlias']
            keyPassword keystoreProperties['keyPassword']
            storeFile file(keystoreProperties['storeFile'])
            storePassword keystoreProperties['storePassword']
        }
    }
Then replace the whole buildTypes block with the following block:
buildTypes {
    release {
        signingConfig signingConfigs.release
    }
}
After those edits, the file should look like this:
Congratulations!
This marks the end of the development phase. That was the last source code change in this tutorial. We have “developed” a game.
View the code at this step on GitHub.
Build the APK
Let’s now build the release APK of our game so we can upload it to the Google Play Store.
An APK (somewhat short for Android Package) is the application package format for Android applications. Our game needs to be built into an APK.
For an APK to be accepted by the Google Play Store, it must be signed. We’ve already done that and set it up so we’re good to go.
A release version means that the app will no longer communicate with the hot-reload functionality and debugging code will not be attached to it. It will be as slim as possible and when installed it will behave as if it’s installed in a target device (which is what it’s intended for).
To build a release APK, simply open a terminal and navigate to the project directory (./) and type the following command:
$ flutter build apk
Once done it should show something like the following:
$ flutter build apk
Initializing gradle...                                              1.2s
Resolving dependencies...                                           2.4s
Running Gradle task 'assembleRelease'...
Running Gradle task 'assembleRelease'... Done                      11.2s
Built build\app\outputs\apk\release\app-release.apk (14.4MB).
The release APK can be found in ./build/app/outputs/apk/release/app-release.apk.
Step 4: Publish to Google Play Store
The following screenshots are the actual steps I did to release the Langaw Game on the Google Play Store.
Open up your favorite browser and go to [https://play.google.com/apps/publish](https://play.google.com/apps/publish). If you have a developer account (if you have paid the $25 one-time fee), you should be redirected to the dashboard. Otherwise, you’ll be taken to the sign-up page.
Inside the dashboard, click All Applications from the navigation panel on the left. Then click the Create Application button.
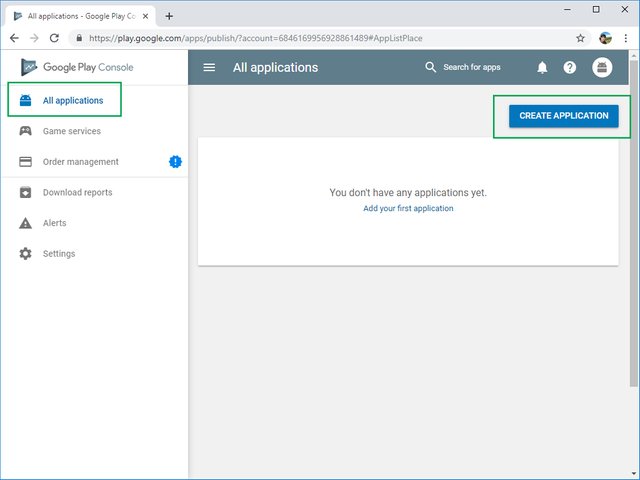
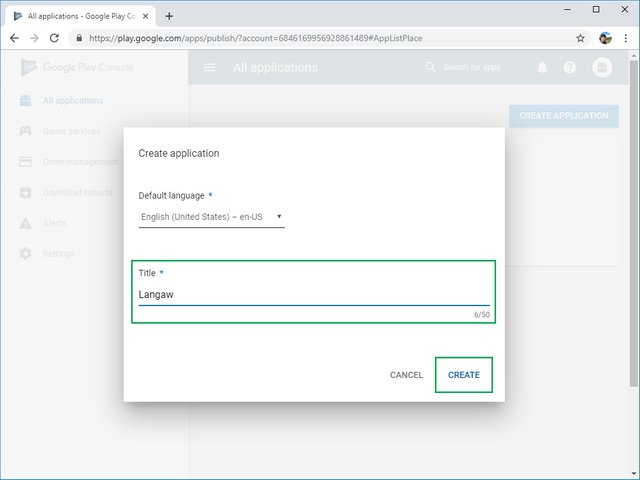
Enter the name of the game. In this case, I entered Langaw. Then click the Create button.
You should be taken to the newly created application’s Store Listing page.
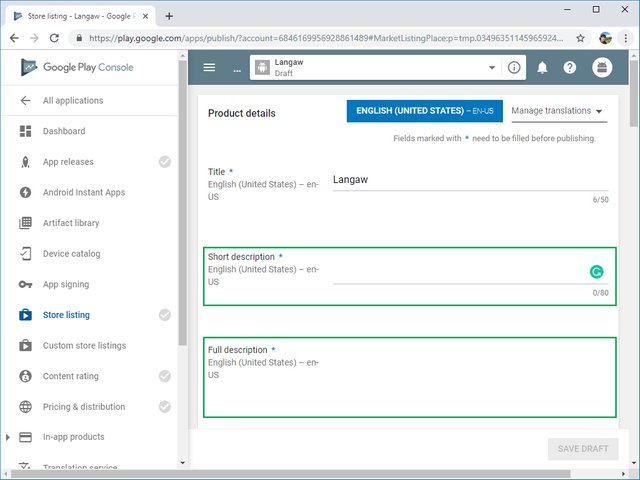
Enter all the required information (marked with an *).
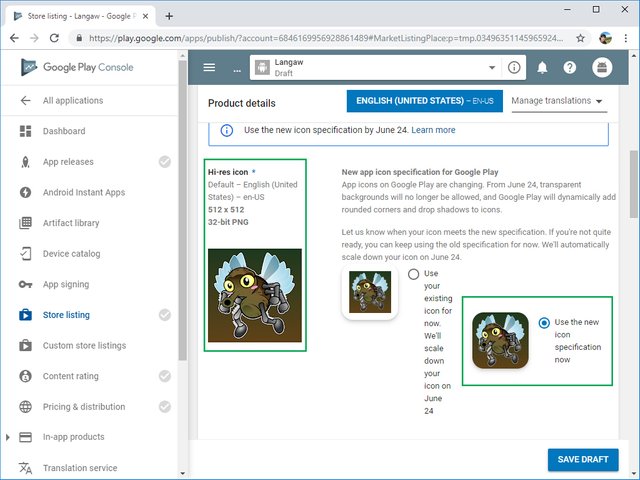
Upload a high-resolution icon for the app. I used the same icon from the resource pack but the 512 x 512 version (not included in resource pack).
Important: If possible, select the Use the new icon specification nowoption to be compliant with the new icon formatting.
Still on the same page, upload some screenshots.
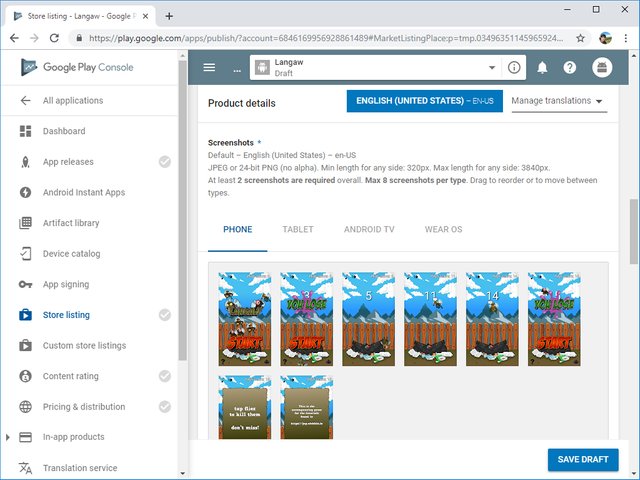
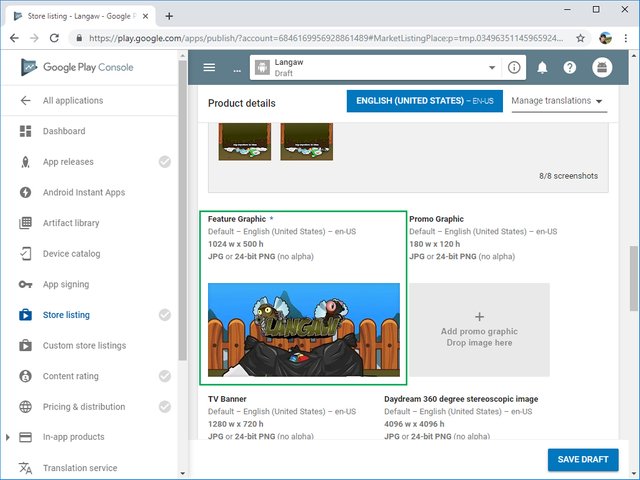
After that, upload a Feature Graphic. It’s like a cover photo for your app and will appear in the Google Play Store app when the game is viewed.
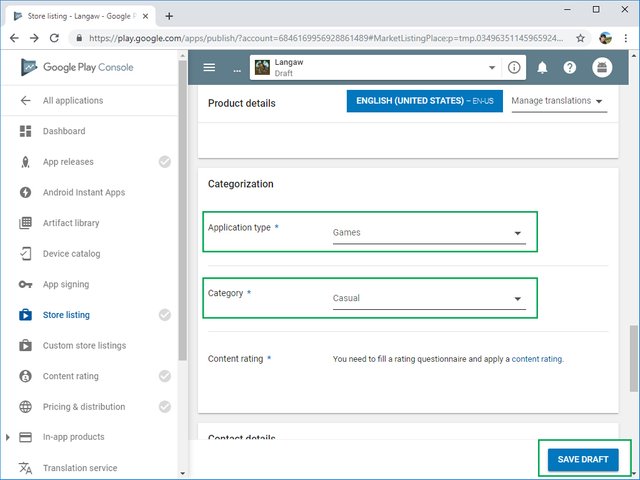
Finally, select the proper categorization values for this app, and then click the Save Draft button.
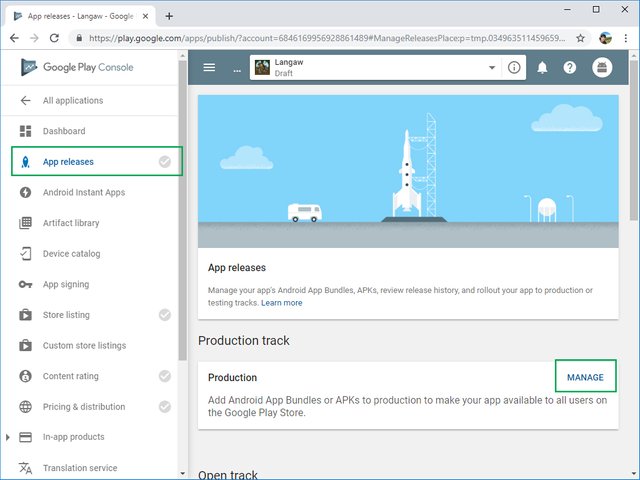
Let’s move on to the App releases page.
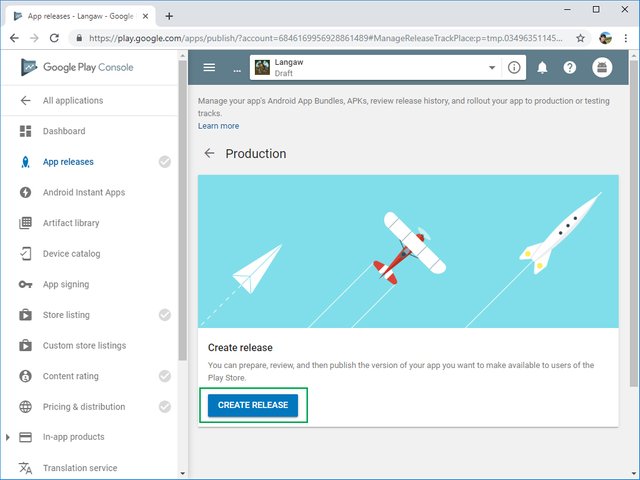
In the production section, click the Manage button.
Click the Create Release button.
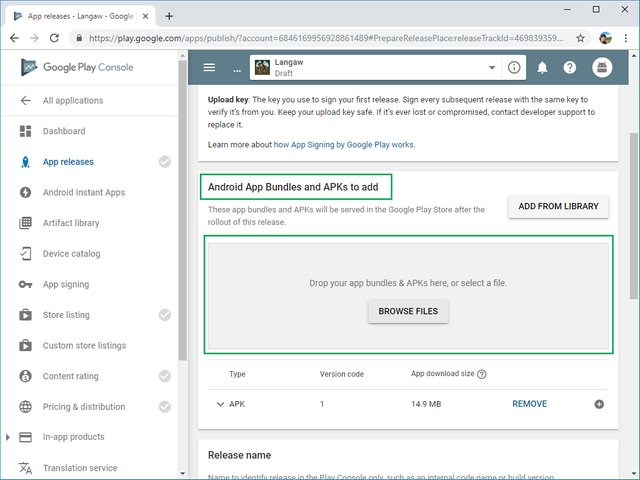
Then in the Android App Bundles and APKS to add section, browse for the release APK built in the previous step (or drag and drop it to the gray area).
Note: The release APK can be found in ./build/app/outputs/apk/release/app-release.apk.
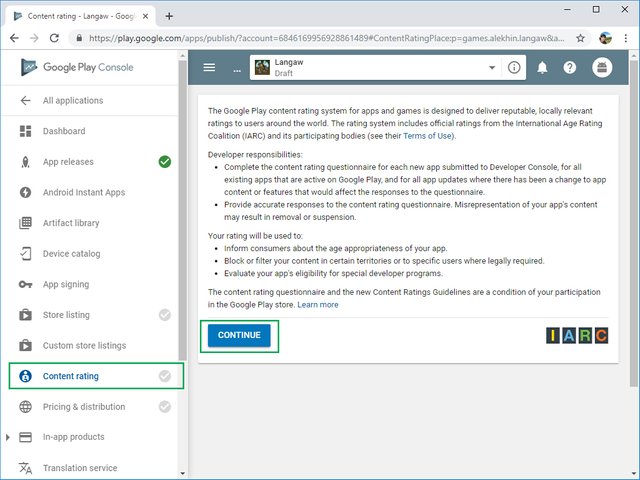
Before we can finish and roll the release out to the public, we first need to submit a content rating.
Click on the Content rating item in the navigation panel and then click the Continue button.
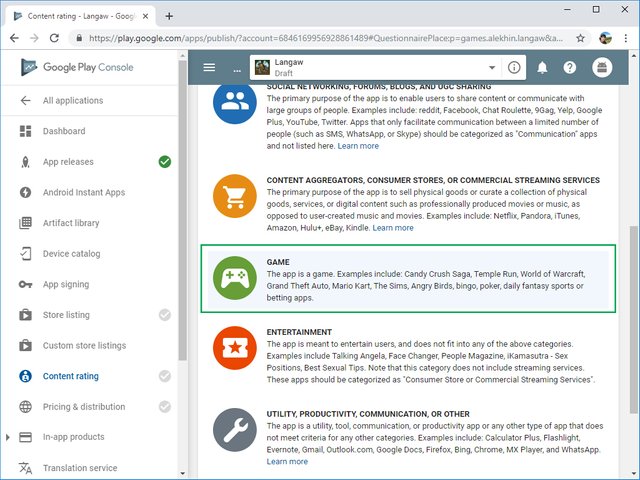
Select the Game option.
Answer all the questions in the content rating questionnaire and when you’re done click Save Questionnaire.
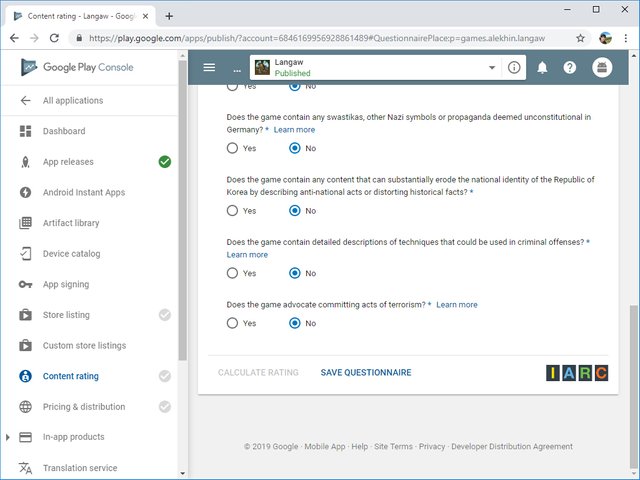
Then click Calculate Rating.
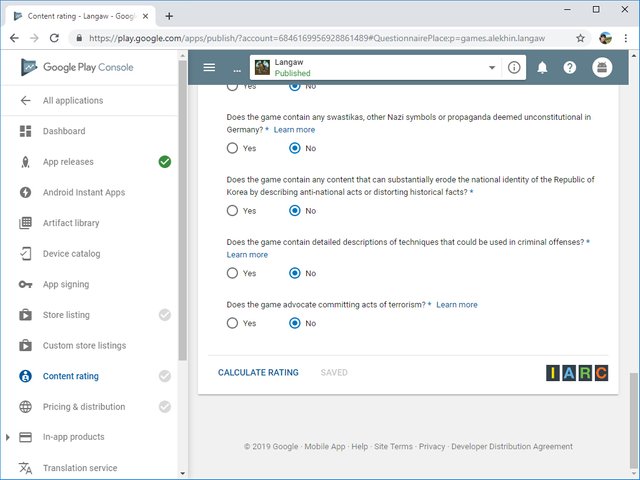
You should be presented with the result Rating. If you’re happy with it, click the Apply Rating button.
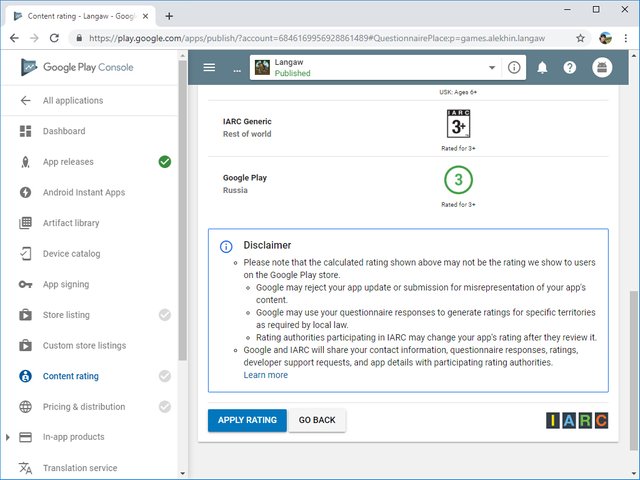
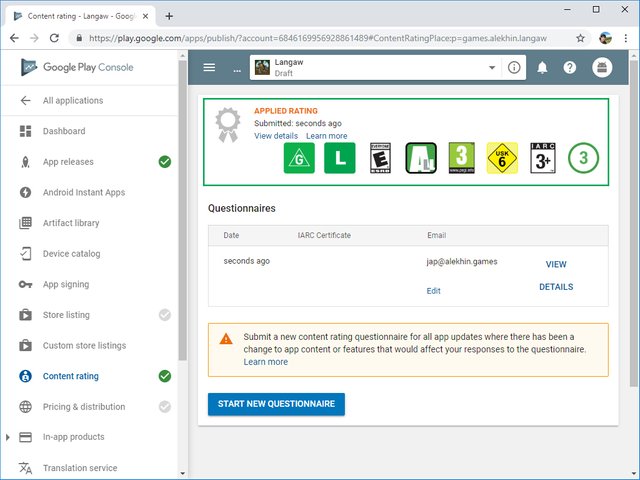
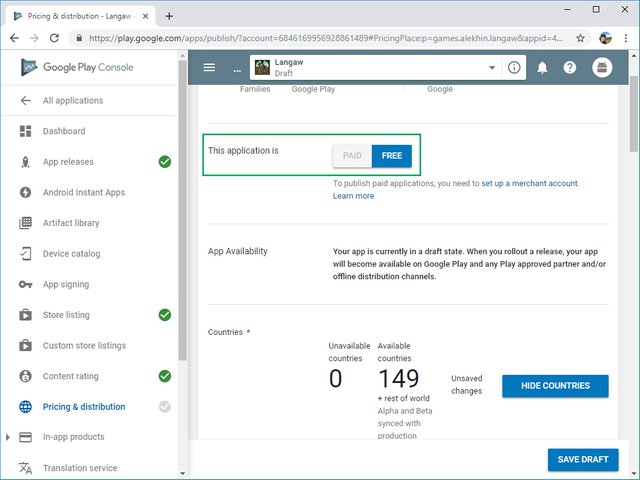
Next up is the Pricing & distribution page. Choose the pricing option you want for your app (or game). I chose free.
Note: If you’re releasing a paid app, you will need to set up a merchant account which is outside the scope of this tutorial series. Just click on the link below the options.
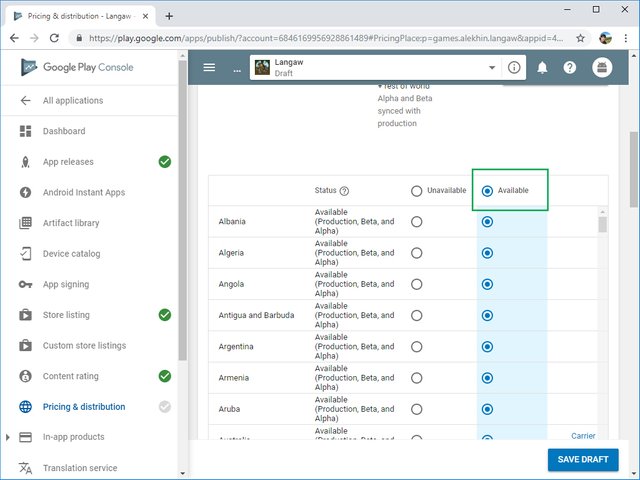
Scroll down a little and select the countries where you want your app to be available in. I want everyone to play my game so I just clicked the Availableradio button at the top of the countries list.
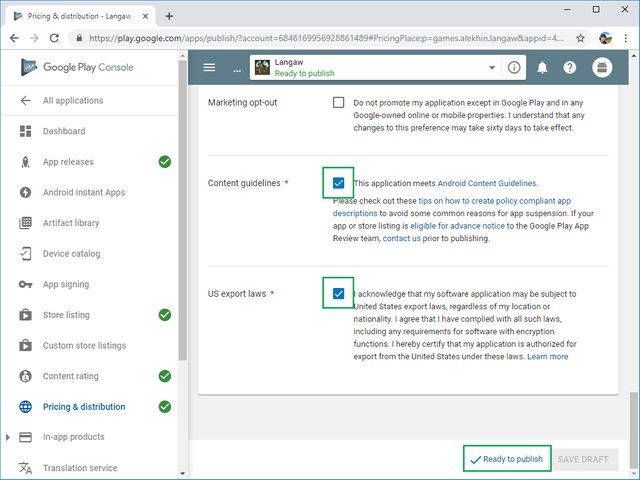
Lastly, make sure you agree to the content guidelines and that the app will be subject to US export laws and check the corresponding checkboxes.
After that, click on Ready to publish.
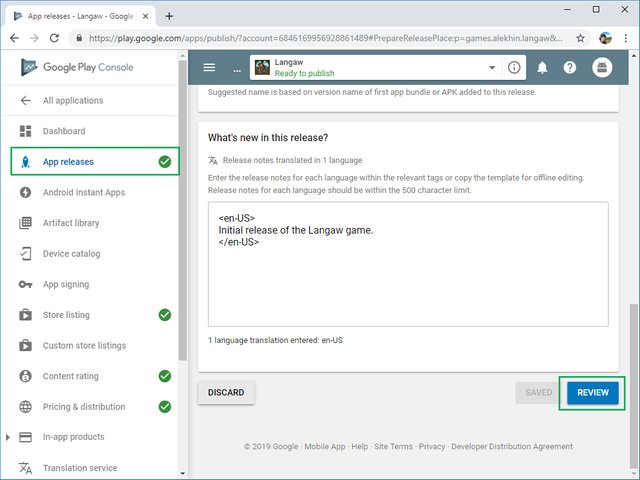
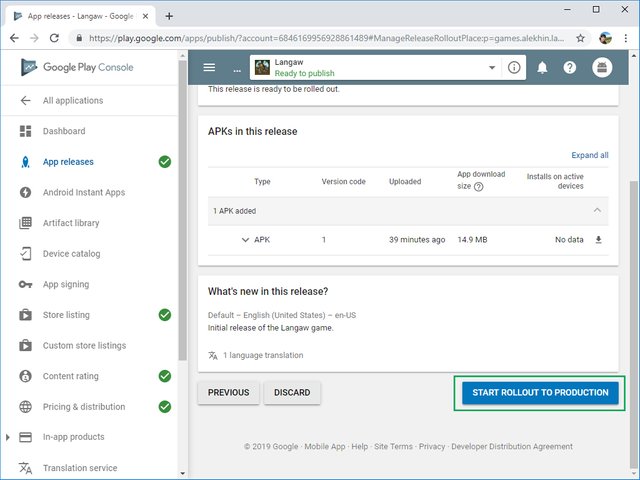
Back on App releases page, scroll to the bottom and specify what’s new in this release. In this case, it’s the initial release.
Click on the Review button when you’re happy with the release notes.
To roll out the app to everyone and make it available in the Google Play Store, just click the Start Rollout To Production button.
Google will review the app and verify the content rating you submitted.
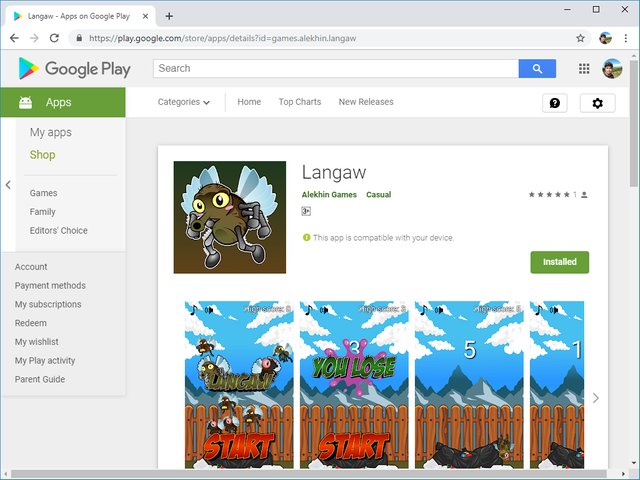
After a few hours, the game will be available and searchable in the Play Store.
Conclusion
Glad to finally have here! In the last five parts, we have built a game from scratch. From Flutter project creation to publishing a game on the Google Play Store.
I hope you’ve enjoyed the journey.
But more importantly, I’m hoping I have been a successful guide pointing you to a direction that will take you to the next level of game development. Maybe the creator of the next big hit, who knows.
Thank you.
If you have any questions, don’t hesitate to contact me by sending me an email or dropping a comment below. Also, please join my Discord server to communicate in real time.
What’s next
What’s next is up to you.
Challenge yourself, create another game.
It doesn’t matter if it’s too similar (just a few changes to graphics maybe) or you use the concepts you’ve learned to create a totally different and unique game.
As for me, I’ll focus on porting a huge library and write some WordPress-related articles for a bit.
I’ll be back with game development articles soon though. I’ll also be actively developing the Langaw further with more features. I might write tutorials for some of the interesting features (opinionated) I add.

@originalworks