SLC S23 Week3 || Geometry with GeoGebra: Circles and its elements
Thumbnail from Pixabay
This is the homework for @sergeyk's tasks from here SLC S23 Week3 || Ge◯metry with Ge◯Gebra: Circle, Its Elements, and ◯thers, feel free to take a look and join!

Construct a circle and show its main elements.
To create the main elements of a circle we are going to use the tools and techniques presented by @sergeyk all the classes until now, his theory and explanations were on point so creating these should not be difficult.
| Property | Description |
|---|---|
 | Center is the point placed in the middle of the circle at an equal distance to all the other points on the circle, also known as equidistant. |
 | Radius is represented by the distance from the center to any point on the circle |
 | Diameter is known as the distance across the circle but this distance needs to be passing through the center of the circle |
 | Circumference is the distance around the circle |
 | Arc is a region on the circle's circumference |
 | Sector is the area/region bounded by two radii and the included arc. |
 | The Chord is defined by a segment that connects two points on the circle |
 | Segment is a region created by the chord and it's arc subtended by the chord. |
 | Tangent is a line that touches the circle in exactly one point |
 | Secant is the line that intersects the circle in no more no less than two points |
In the table above I've added a picture with a small description as a presentation of the circle's element. I know this might look weird with all these elements on one circle but below I have prepared a GIF with my circle and the main elements all on the same circle.

Construct circle O and chord AB on it. On this chord, construct the central angle. Place point D on the circle, and construct the inscribed angle ∠ADB on the same chord AB. Show the degree measures of these two angles (∠AOB and ∠ACB). Move point D. What conclusion can be drawn?
We start by creating our circle and naming the Center O and the point on the Circle A, from point A we create a chord to a random point B on the Circle. With the Chord and Center of the Circle created we measure the <AOB angle.
Now we randomly pick a point D on the Circle and with the points A and B we measure the angle <ADB.
Let's see a live example with this:
What can conclusions can be drawn from this?
Well by moving the D, A and B Points we can see that no matter what we are doing the angle <ADB will always be half of angle <AOB.
Also doesn't matter where we are moving the D point on the Circle, the angle <ADB will always have the same value.

Construct segment CD. On this segment CD, as the diameter, construct a semicircle. Take point F on the semicircle and form the angle ∠CFD. Move point F. What conclusion can be drawn?
I started by creating the Segment with the specific tool, renamed the two points to C and D as specified by the @sergeyk.
Here using the Midpoint tool I marked the center of the Segment with Point O.
Now with the Semicircle tool I created a Semicircle between the C and D points. On this Semicircle I added the F point and measured the angle <CFD which resulted in a 90 degree measurement.
Here's a live representation:
What conclusion can be drawn while we are moving the F point on the Semicircle? Well as you can observe in the GIF no matter where we move the F point on that Semicircle the angle will always be at 90 degrees. This is also described by the Thales Theorem that any angle inscribed in a semicircle is a right angle.

Construct triangle ABC. Construct two circles – the inscribed and circumscribed circles. (Do not use the "circle through three points" tool for the circumscribed circle.)
Let's start by creating a Triangle using the Polygon tool, we'll name the Points A,B,C. Now from each vertex we are going to draw a bisector and create an intersection point between the 3 bisectors, in our case, point G. Now from the intersection of the bisectors we are going to draw a perpendicular line to one of the triangle's sides, in this example I drew the perpendicular from G to the side BC and marked their intersection with H.
To draw the inscribed circle we now use the Circle tool and place the center of the circle on G and it's second point in the H Point, this way we drew the inscribed Circle. Here's a picture with the steps used.
And also a GIF with the inscribed circle before we move on:
Now for the Circumscribed circle I need to use the perpendicular bisectors of two sides of my ABC triangle, I'll pick AB and BC and create a point at their intersection, that point will be M in my case.
Now we are ready to draw the Circumscribed circle from point M to any of the triangle's main points (A, B or C) and this way we have the circle done:
Here's a live representation of both the circles and the triangle:

Use your imagination – construct something similar to this. Do you know what it is called?
As an alternative, it is possible to depict the arrangement of two (three) circles. They intersect/do not intersect or touch. Show the touch as internal and external.
 |  |
In the 2 GIFs presented by @sergeyk I first wanted to write down that we are having a Steiner chain but I did some research and as far as I read in the first GIF it's not a Steiner Chain because we need at least 3 circles inside to be considered a Steiner Chain, here we have a Tangent Circles Configuration meaning each circle touches the others.
In the second GIF we have a Steiner Chain within a Triangle.
Here is my attempt to create something similar:
I created a Circle with two triangles that share one side (creating a rectangle when taken together) and on each side I added a Circle that touches the triangle's side and the circle in one point. Each triangle also got it's own inscribed circle. Once we move one point of the triangles we can see the circles changing size.
Now let's see an arrangement of three circles in various combinations:
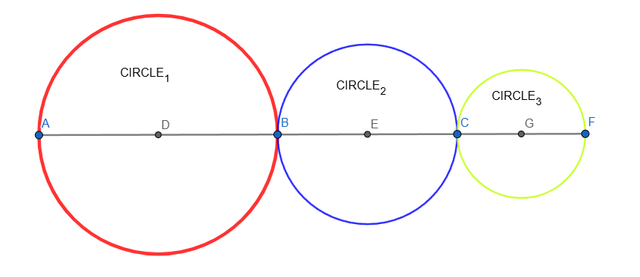
In this case we have:
- CIRCLE1 has an external touch with CIRCLE2
- CIRCLE2 has an external touch with CIRCLE3
- there is no intersection between CIRCLE1 and CIRCLE3
In the second case we have:
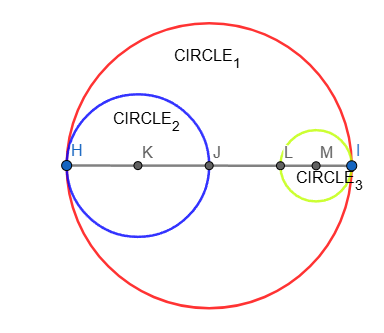
- CIRCLE1 has an internal touch with CIRCLE2
- CIRCLE1 has an internal touch with CIRCLE3
- there is no intersection between CIRCLE2 and CIRCLE3
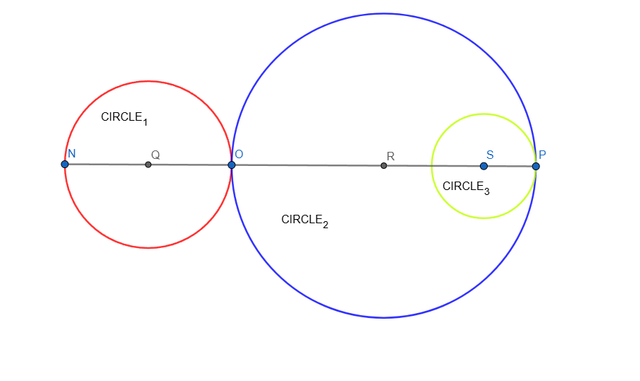
In the third case we have:
- CIRCLE1 external touch CIRCLE2
- CIRCLE2 internal touch CIRCLE3
- no intersection CIRCLE1 and CIRCLE3
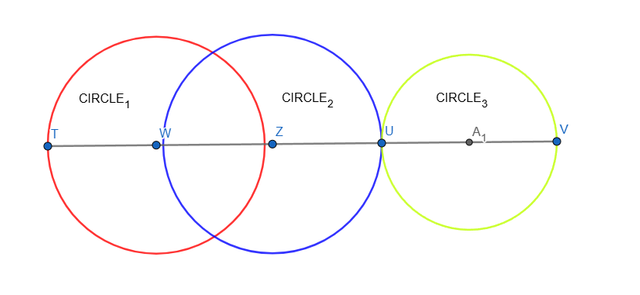
And fourth and last case:
- CIRCLE1 intersects CIRCLE2
- CIRCLE2 externally touches CIRCLE3
- there is no intersection between CIRCLE1 and CIRCLE3
That was it for this week's geometry challenge, in the end I'd like to invite @mojociocio, @r0ssi and @titans to take a chance at it.
Until next time I am wishing you a great day!
Forgot to mention, I wanted to leave a cringe Joke at the end of the task:
0.00 SBD,
0.42 STEEM,
0.42 SP
I understand, but in our language, the phrase would sound like...
"Because it had nothing but exercises!"
its wouldn't convey the joke as well.
The joke doesn't translate well because, in English, "problems" can mean both math tasks and difficulties in life, but in Ukrainian, "problems" (проблеми) and "tasks" (задачі) have different meanings.
0.00 SBD,
0.06 STEEM,
0.06 SP
Oh true, I didn't think it like that, in Romanian it translates correctly it sounded funny and cringe at the same time, didn't think that it might be different depending on the language, I'll try a better one next week :)
no, how could you know what it would be like in Ukrainian))
I often look for an English narrator when I want to write an idiom.
0.00 SBD,
0.05 STEEM,
0.05 SP