Web Development: A Symfony based application capable of sending push messages to mobile devices via FCM

Source: pixabay.com. Licensed under CC0 Creative Commons
What will I learn?
- How to create a HTTP Client to send upstream messages via Firebase Cloud Messaging
- How to create a device entity mapping
- How to create a service to manage devices FCM tokens
- How to create an interface to dispatch push messages
Requirements
- UNIX/Linux based OS
- Apache2 server with PHP7 installed
- MySQL database
- Existing Symfony based project
- Text editor of choice
- Existing Firebase project
- Composer
Difficulty
- Intermediate
Tutorial contents
The guidelines which are to be found in this tutorial will allow you to successfully implement functionalities required to communicate with FCM servers, manage a list of devices FCM tokens and dispatch push notifications to those devices directly from a Symfony command.
The logic behind the chosen coding solutions is to make the code clean, portable and easily extendable.
Usage examples are listed at the end of the tutorial.
A sample project can be found on github.com.
Note: Symfony 4 based project was used in this tutorial. Since Symfony 4 projects differ from those written in Symfony 3, the bundle generation process described below will not apply to Symfony versions prior to 4. Information on how to generate a Symfony 3 bundle can be found here.
How to create a HTTP Client to send upstream messages via Firebase Cloud Messaging?
Let’s start with a client. An object that is capable of communicating with FCM servers is needed. It has to be authorized to make requests that will trigger the dispatch procedure.
The client class from the guzzlehttp library will be extended, as it provides all the necessary functionalities to make HTTP requests. It can be installed with Composer.
$ composer require guzzlehttp/guzzle
Creating a bundle
This section explains how to create and enable a Symfony 4 bundle.
Start off by creating a src/Ptrio/MessageBundle directory where Ptrio is an example name that can be replaced with the actual vendor. Next add a file called PtrioMessageBundle.php.
<?php
// src/Ptrio/MessageBundle/PtrioMessageBundle.php
namespace App\Ptrio\MessageBundle;
use Symfony\Component\HttpKernel\Bundle\Bundle;
class PtrioMessageBundle extends Bundle
{
}
The bundle can be enabled by adding the following to the config/bundles.php file.
return [
    // other bundles
    App\Ptrio\MessageBundle\PtrioMessageBundle::class => ['all' => true],
];
Note: The src/Ptrio/MessageBundle directory is the bundle’s root directory.
Creating a client
Create a Client directory within the bundle’s root directory and add an interface file called ClientInterface.php.
<?php
// src/Ptrio/MessageBundle/Client/ClientInterface.php
namespace App\Ptrio\MessageBundle\Client;
interface ClientInterface
{
    public function sendMessage(string $messageBody, string $recipient);
}
Note: A class that implements the ClientInterface will also have to implement the sendMessage(string $messageBody, string $recipient) method.
The concrete class implementing the ClientInterface will be called FirebaseClient.
<?php
namespace App\Ptrio\MessageBundle\Client;
use GuzzleHttp\Client;
class FirebaseClient extends Client implements ClientInterface
{
    public function __construct(string $apiURL, string $serverKey)
    {
        parent::__construct([
           'base_uri' => $apiURL,
            'headers' => [
                'Authorization' => 'key='.$serverKey,
            ],
        ]);
    }
    public function sendMessage(string $messageBody, string $recipient): string
    {
        $response = $this->post('/fcm/send', [
            'json' => [
                'to' => $recipient,
                'notification' => [
                    'body' => $messageBody,
                ],
            ],
        ]);
        return (string) $response->getBody();
    }
}
$apiURL is the address of the FCM’s REST API.
$serverKey is the server key of the mobile application registered with the FCM services.
Creating dependency injection classes
Both parameters will be passed in client’s constructor through dependency injection.
Start by creating a directory called DependencyInjection inside the bundle’s root dir and add a Configuration.php file to it.
<?php
// src/Ptrio/MessageBundle/DependencyInjection/Configuration.php
namespace App\Ptrio\MessageBundle\DependencyInjection;
use Symfony\Component\Config\Definition\Builder\TreeBuilder;
use Symfony\Component\Config\Definition\ConfigurationInterface;
class Configuration implements ConfigurationInterface
{
    public function getConfigTreeBuilder()
    {
        $treeBuilder = new TreeBuilder();
        $rootNode = $treeBuilder->root('ptrio_message');
        $rootNode
            ->children()
                ->arrayNode('firebase')
                    ->children()
                        ->scalarNode('api_url')->isRequired()->cannotBeEmpty()->end()
                        ->scalarNode('server_key')->isRequired()->cannotBeEmpty()->end()
                    ->end()
                ->end()
            ->end()
        ;
        return $treeBuilder;
    }
}
The Configuration.php file is responsible for defining the configuration structure for the bundle. This structure then is used when merging the values from the bundle’s configuration file.
A file called PtrioMessageExtension.php will handle the configuration file and load services and parameters from the container.
<?php
// src/Ptrio/MessageBundle/DependencyInjection/PtrioMessageExtension.php
namespace App\Ptrio\MessageBundle\DependencyInjection;
use Symfony\Component\Config\FileLocator;
use Symfony\Component\DependencyInjection\ContainerBuilder;
use Symfony\Component\DependencyInjection\Loader\YamlFileLoader;
use Symfony\Component\HttpKernel\DependencyInjection\Extension;
class PtrioMessageExtension extends Extension
{
    public function load(array $configs, ContainerBuilder $container)
    {
        $loader = new YamlFileLoader($container, new FileLocator(dirname(__DIR__).'/Resources/config'));
        $loader->load('services.yaml');
        $configuration = $this->getConfiguration($configs, $container);
        $config = $this->processConfiguration($configuration, $configs);
        $container->setParameter('ptrio_message.api_url', $config['firebase']['api_url']);
        $container->setParameter('ptrio_message.server_key', $config['firebase']['server_key']);
    }
}
Creating a service configuration
Start the process by creating a directory called src/Ptrio/MessageBundle/Resources/config and add a file named services.yaml inside it.
# src/Ptrio/MessageBundle/Resources/config/services.yaml
services:
    ptrio_message.firebase_client:
        class: 'App\Ptrio\MessageBundle\Client\FirebaseClient'
        arguments:
            - '%ptrio_message.api_url%'
            - '%ptrio_message.server_key%'
Note: The bundle’s services are not autowired, which means the autowire value in the config/services.yaml file has to be set to false for the above service configuration to work.
Adding bundle configuration file
The configuration file called ptrio_message.yaml should be added to the config/packages directory.
# config/packages/ptrio_message.yaml
ptrio_message:
    firebase:
        api_url: "https://fcm.googleapis.com"
        server_key: "AAAARwFTzY4:APA91b…”
How to create a device entity?
A MySQL database will be used to store devices data.
The device class will be mapped to a database table through Doctrine ORM, which will allow for slick object management.
Creating an abstraction layer
Begin by adding a directory called src\Ptrio\MessageBundle\Model and create the device interface file named DeviceInterface.php.
<?php
// src/Ptrio/MessageBundle/Model/DeviceInterface.php
namespace App\Ptrio\MessageBundle\Model;
interface DeviceInterface
{
    public function getId(): int;
    public function setName(string $name);
    public function getName(): string;
    public function setToken(string $fcmToken);
    public function getToken(): string;
}
Next create an abstract class in a file called Device.php in the previously created directory.
<?php
// src/Ptrio/MessageBundle/Model/Device.php
namespace App\Ptrio\MessageBundle\Model;
abstract class Device implements DeviceInterface
{
    protected $id;
    protected $name;
    protected $token;
    public function getId(): int
    {
        return $this->id;
    }
    public function getName(): string
    {
        return $this->name;
    }
    public function setName(string $name)
    {
        $this->name = $name;
    }
    public function getToken(): string
    {
        return $this->token;
    }
    public function setToken(string $token)
    {
        $this->token = $token;
    }
}
A Device object will have two parameters: it’s name and FCM token.
Configuring database connection
Start by installing Doctrine library with Composer.
$ composer require doctrine
Provide the database name, host and login credentials such as username and password by adjusting the .env file.
DATABASE_URL=mysql://db_user:[email protected]:3306/db_name
Creating a device entity
A directory called src/Ptrio/MessageBundle/Entity should be created to begin with. Then the entity file named Device.php can be added.
<?php
// src/Ptrio/MessageBundle/Entity/Device.php
namespace App\Ptrio\MessageBundle\Entity;
use App\Ptrio\MessageBundle\Model\Device as BaseDevice;
use Doctrine\ORM\Mapping as ORM;
/**
 * @ORM\Entity
 */
class Device extends BaseDevice
{
    /**
     * @ORM\Column(type="integer")
     * @ORM\Id
     * @ORM\GeneratedValue(strategy="AUTO")
     */
    protected $id;
    /**
     * @ORM\Column(type="string")
     */
    protected $name;
    /**
     * @ORM\Column(type="string")
     */
    protected $token;
}
Executing database migrations
To update MySQL database schema, Doctrine migrations script has to be executed.
$ php bin/console doctrine:migration:diff # generates mysql queries
$ php bin/console doctrine:migration:migrate # executes queries
How to create a service to manage devices FCM tokens?
At this stage, a service to manage device entities will be created.
Creating an abstraction layer for the service
Start off by adding an interface file called DeviceManagerInterface.php.
<?php
// src/Ptrio/MessageBundle/Model/DeviceManagerInterface.php
namespace App\Ptrio\MessageBundle\Model;
interface DeviceManagerInterface
{
    public function createDevice(): DeviceInterface;
    public function updateDevice(DeviceInterface $device);
    public function removeDevice(DeviceInterface $device);
    public function getClass(): string;
    public function findDeviceByName(string $name);
    public function findDeviceBy(array $criteria);
}
Create an abstract class within a file named DeviceManager.php.
<?php
// src/Ptrio/MessageBundle/Model/DeviceManager.php
namespace App\Ptrio\MessageBundle\Model;
abstract class DeviceManager implements DeviceManagerInterface
{
    public function createDevice(): DeviceInterface
    {
        $class = $this->getClass();
        return new $class;
    }
    public function findDeviceByName(string $name)
    {
        return $this->findDeviceBy(['name' => $name]);
    }
}
Creating a device manager concrete class
The concrete class of the device manager will be placed in a src/Ptrio/MessageBundle/Doctrine/ directory in a file called ‘DeviceManager.php.
<?php
// src/Ptrio/MessageBundle/Doctrine/DeviceManager.php
namespace App\Ptrio\MessageBundle\Doctrine;
use App\Ptrio\MessageBundle\Model\DeviceInterface;
use App\Ptrio\MessageBundle\Model\DeviceManager as BaseDeviceManager;
use Doctrine\Common\Persistence\ObjectManager;
class DeviceManager extends BaseDeviceManager
{
    private $objectManager;
    private $repository;
    private $class;
    public function __construct(ObjectManager $objectManager, string $class)
    {
        $this->objectManager = $objectManager;
        $this->repository = $objectManager->getRepository($class);
        $metadata = $objectManager->getClassMetadata($class);
        $this->class = $metadata->getName();
    }
    public function getClass(): string
    {
        return $this->class;
    }
    public function findDeviceBy(array $criteria)
    {
        return $this->repository->findOneBy($criteria);
    }
    public function updateDevice(DeviceInterface $device)
    {
        $this->objectManager->persist($device);
        $this->objectManager->flush();
    }
    public function removeDevice(DeviceInterface $device)
    {
        $this->objectManager->remove($device);
        $this->objectManager->flush();
    }
}
Now is the time to let the container know which dependencies should be injected to create a device manager instance. This can be achieved by adding the following code to the src/Ptrio/MessageBundle/Resources/config/services.yaml file.
    # src/Ptrio/MessageBundle/Resources/config/services.yaml
    ptrio_message.device_manager:
        class: 'App\Ptrio\MessageBundle\Doctrine\DeviceManager'
        arguments:
            - '@doctrine.orm.entity_manager'
            - 'App\Ptrio\MessageBundle\Entity\Device'
Creating commands to manage devices
Command-line interface implementation will be described in this section. It will allow for adding and removing devices from the database.
AddDeviceCommand
The code, responsible for adding devices to database, should reside in the src/Ptrio/MessageBundle/Command/AddDeviceCommand.php file.
<?php
// src/Ptrio/MessageBundle/Command/AddDeviceCommand.php
namespace App\Ptrio\MessageBundle\Command;
use App\Ptrio\MessageBundle\Model\DeviceManagerInterface;
use Symfony\Component\Console\Command\Command;
use Symfony\Component\Console\Input\InputArgument;
use Symfony\Component\Console\Input\InputInterface;
use Symfony\Component\Console\Output\OutputInterface;
class AddDeviceCommand extends Command
{
    public static $defaultName = 'ptrio:message:add-device';
    private $deviceManager;
    public function __construct(DeviceManagerInterface $deviceManager)
    {
        $this->deviceManager = $deviceManager;
        parent::__construct();
    }
    protected function configure()
    {
        $this->setDefinition([
            new InputArgument('name', InputArgument::REQUIRED),
            new InputArgument('token', InputArgument::REQUIRED),
        ]);
    }
    protected function execute(InputInterface $input, OutputInterface $output)
    {
        $name = $input->getArgument('name');
        $token = $input->getArgument('token');
        if (null === $this->deviceManager->findDeviceByName($name)) {
            $device = $this->deviceManager->createDevice();
            $device->setName($name);
            $device->setToken($token);
            $this->deviceManager->updateDevice($device);
            $output->writeln('Device `'.$name.'` created!');
        } else {
            $output->writeln('Device with this name already exists!');
        }
    }
}
Note: The command will need two arguments to run: a device name and a related FCM token.
RemoveDeviceCommand
Create a file called src/Ptrio/MessageBundle/Command/RemoveDeviceCommand.php with the following contents:
<?php
// src/Ptrio/MessageBundle/Command/RemoveDeviceCommand.php
namespace App\Ptrio\MessageBundle\Command;
use App\Ptrio\MessageBundle\Model\DeviceManagerInterface;
use Symfony\Component\Console\Command\Command;
use Symfony\Component\Console\Input\InputArgument;
use Symfony\Component\Console\Input\InputInterface;
use Symfony\Component\Console\Output\OutputInterface;
class RemoveDeviceCommand extends Command
{
    public static $defaultName = 'ptrio:message:remove-device';
    private $deviceManager;
    public function __construct(DeviceManagerInterface $deviceManager)
    {
        $this->deviceManager = $deviceManager;
        parent::__construct();
    }
    protected function configure()
    {
        $this->setDefinition([
            new InputArgument('name', InputArgument::REQUIRED),
        ]);
    }
    protected function execute(InputInterface $input, OutputInterface $output)
    {
        $name = $input->getArgument('name');
        if ($device = $this->deviceManager->findDeviceByName($name)) {
            $this->deviceManager->removeDevice($device);
            $output->writeln('Device `'.$name.'` removed!');
        } else {
            $output->writeln('Device with this name does not exist!');
        }
    }
}
Update thesrc/Ptrio/MessageBundle/Resources/config/services.yml service configuration file.
    # src/Ptrio/MessageBundle/Resources/config/services.yml
    ptrio_message.add_message_command:
        class: 'App\Ptrio\MessageBundle\Command\AddDeviceCommand'
        arguments:
            - '@ptrio_message.device_manager'
        tags:
            - { name: 'console.command' }
    ptrio_message.remove_message_command:
        class: 'App\Ptrio\MessageBundle\Command\RemoveDeviceCommand'
        arguments:
            - '@ptrio_message.device_manager'
        tags:
            - { name: 'console.command' }
How to create an interface to dispatch push messages?
The SendMessageCommand class will be responsible for sending push notifications to devices in the existing database.
<?php
// src/Ptrio/MessageBundle/Command/SendMessageCommand.php
namespace App\Ptrio\MessageBundle\Command;
use App\Ptrio\MessageBundle\Client\ClientInterface;
use App\Ptrio\MessageBundle\Model\DeviceManagerInterface;
use Symfony\Component\Console\Command\Command;
use Symfony\Component\Console\Input\InputArgument;
use Symfony\Component\Console\Input\InputInterface;
use Symfony\Component\Console\Output\OutputInterface;
class SendMessageCommand extends Command
{
    private $client;
    private $deviceManager;
    protected static $defaultName = 'ptrio:message:send-message';
    public function __construct(ClientInterface $client, DeviceManagerInterface $deviceManager)
    {
        $this->client = $client;
        $this->deviceManager = $deviceManager;
        parent::__construct();
    }
    protected function configure()
    {
        $this
            ->setDefinition([
            new InputArgument('body', InputArgument::REQUIRED),
            new InputArgument('recipient', InputArgument::REQUIRED),
        ]);
    }
    protected function execute(InputInterface $input, OutputInterface $output)
    {
        $messageBody = $input->getArgument('body');
        $recipient = $input->getArgument('recipient');
        if ($device = $this->deviceManager->findDeviceByName($recipient)) {
            $response = $this->client->sendMessage($messageBody, $device->getToken());
            $output->writeln('Response: '.$response);
        } else {
            $output->writeln('No device found!');
        }
    }
}
Note: The command will need two arguments to run: message body and device name.
In the next step, the src/Ptrio/MessageBundle/Resources/config/services.yaml file should be updated.
    # src/Ptrio/MessageBundle/Resources/config/services.yaml
    ptrio_message.send_message_command:
        class: 'App\Ptrio\MessageBundle\Command\SendMessageCommand'
        arguments:
            - '@ptrio_message.firebase_client'
            - '@ptrio_message.device_manager'
        tags:
            - { name: 'console.command' }
Examples
Adding a device to database
A new device can be added with the ptrio:message:add-device command.
$ php bin/console ptrio:message:add-device iphone-piotr dN0NEC9aN_w:APA91b…
Removing a device from database
The ptrio:message:remove-device command is used to remove a device.
Note: A device is looked up by name.
$ php bin/console ptrio:message:remove-device iphone-piotr
Sending a push notification to a device
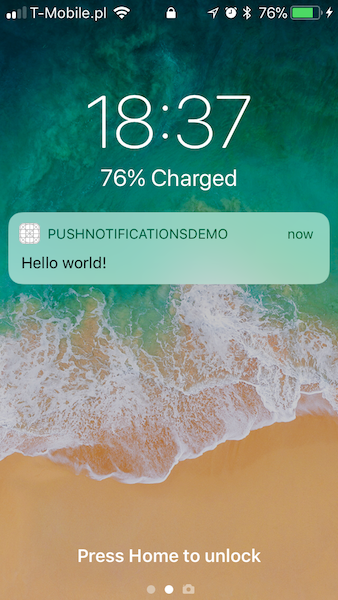
The messages with be dispatched with the ptrio:message:send-message command.
$ php bin/console ptrio:message:send-message 'Hello world!' iphone-piotr
Example response:
Response: {"multicast_id":5653186898440485701,"success":1,"failure":0,"canonical_ids":0,"results":[{"message_id":"0:1520875479975905%7167cd087167cd08"}]}
Once the message is delivered, it should be displayed on a target device.
Posted on Utopian.io - Rewarding Open Source Contributors
As a follower of @followforupvotes this post has been randomly selected and upvoted! Enjoy your upvote and have a great day!
Your contribution cannot be approved because it does not follow the Utopian Rules.
Violated Rules:
My Opinion:
Congratulations! This post has been upvoted from the communal account, @minnowsupport, by piotr42 from the Minnow Support Project. It's a witness project run by aggroed, ausbitbank, teamsteem, theprophet0, someguy123, neoxian, followbtcnews, and netuoso. The goal is to help Steemit grow by supporting Minnows. Please find us at the Peace, Abundance, and Liberty Network (PALnet) Discord Channel. It's a completely public and open space to all members of the Steemit community who voluntarily choose to be there.
If you would like to delegate to the Minnow Support Project you can do so by clicking on the following links: 50SP, 100SP, 250SP, 500SP, 1000SP, 5000SP.
Be sure to leave at least 50SP undelegated on your account.