[Tutorial] Kivy App Development(Animating the first block)Part 2

image source
Repository: Python, Open Source Repository
Software Requirements: For software download python 3.0 compatible with your OS here
What you will learn:
In this tutorial you will learn how to
Automating block generation using a loop in
kivyfor our tetris appUsing the
kivy.clockandkivy.windowmodulesHow to use
kivys built inEventDispatcherto add properties to our super classesinitfunction
Difficulty : Intermediate
Tutorial
The topics covered in this tutorial are:
Creating block widgets
Making our widgets fall
Defining how our application will build
In the last of this series we saw the basics for startup for a kivy applications visiting the basic layout and how to startup an application using kivy syntax. Today we will be going on to the development of the application starting out with its widgets.
As earlier stated it is advisable to divide files into graphics and logic for better assesment and easier coding. We will be building six blocks for the tetris game. Each block will have a different color and be drawn on a different canvas addreses as different widgets.
Creating the block widgets
We start by creating six new classes of widgets
#Create the classes and pass them
class Block1(Widget):
    pass
class Block2(Widget):
    pass
class Block3(Widget):
    pass
class Block4(Widget):
    pass
class Block5(Widget):
    pass
class Block6(Widget):
    pass
You then link all these to consecutive kv styles in your .kv file
<Block1>:
    canvas:
        Color:
            rgb: 0,0,255
        Rectangle:
            size: root.width/5, root.height/20
            pos: self.pos
<Block2>:
    canvas:
        Color:
            rgba:1,0,0,1
        Rectangle:
            size: root.width/10, root.height/20
            pos: self.pos

<Block3>:
    canvas:
        Color:
            rgba:1,0,0,1
        Rectangle:
            size: root.width/10, root.height/20
            pos: self.pos

<Block4>:
    canvas:
        Color:
            rgba:1,0,0,1
        Rectangle:
            size: root.width/10, root.height/20
            pos: self.pos

<Block5>:
    canvas:
        Color:
            rgba:1,0,0,1
        Rectangle:
            size: root.width/10, root.height/20
            pos: self.pos

<Block6>:
    canvas:#A canvas is kivys default work area where things can be drawn
        Color:#This is the color intruction in rgba
            rgba:1,0,0,1
        Rectangle:
            size: root.width/10, root.height/20
            pos: self.pos
For now we have widgets but they wont show on our window if run because they have not been called in our app build function.
Defining how our app will build
This tetris app generates a random block out of the six gives it to our console at intervals. To do this we have to create a loop in our build function. First we set our Tetris game as our root layout and then add the widgets systematically using the loop. We write our code like this.
class TetrisApp(App):
    def build(self):#This is the root component of our app or rather where it loads
        game = TetrisGame()
        x = Window.width#Using our kivy.window module
        block1 = Block1(pos=(randint(0,x),Window.height))#We use this code to determine where the widget will load
        block2 = Block2(pos=(randint(0,x),Window.height))#We want it to load at a random x axis but on a constant y axis
        block3 = Block3(pos=(randint(0,x),Window.height))
        block4 = Block4(pos=(randint(0,x),Window.height))
        block5 = Block5(pos=(randint(0,x),Window.height))
        block6 = Block6(pos=(randint(0,x),Window.height))
        allblocks = (block1, block2, block3, block4, block5, block6)
        while game:#This is where we create our loop
            blockchoice = randint(1,6)
            if blockchoice == 1:
                game.add_widget(block1)
                Clock.schedule_interval(block1.fall,1/60)
                for i in allblocks:
                    if block1.collide_widget(i):
                        block1.position[1] = 0
            elif blockchoice == 2:
                game.add_widget(block2)
                Clock.schedule_interval(block2.fall,1/60)
                for i in allblocks:
                    if block2.collide_widget(i):
                        block2.position[1] = 0
            elif blockchoice == 3:
                game.add_widget(block3)
                Clock.schedule_interval(block3.fall,1/60)
                for i in allblocks:
                    if block3.collide_widget(i):
                        block3.position[1] = 0
            elif blockchoice == 4:
                game.add_widget(block4)
                Clock.schedule_interval(block4.fall,1/60)
                for i in allblocks:
                    if block4.collide_widget(i):
                        block4.position[1] = 0
            elif blockchoice == 5:
                game.add_widget(block5)
                Clock.schedule_interval(block5.fall,1/60)
                for i in allblocks:
                    if block5.collide_widget(i):
                        block5.position[1] = 0
            elif blockchoice == 6:
                game.add_widget(block6)
                Clock.schedule_interval(block6.fall,1/60)
                for i in allblocks:
                    if block6.collide_widget(i):
                        block6.position[1] = 0
            else:
                print('this is not possible')
        return game
To explain the Clock.schedule_interval function, we will have to define a fall function within each of our widget classes. The Clock.schedule_interval function keeps calling this function over a period of time.
#In this case it call the fall function of our widget once every 60 seconds
Clock.schedule_interval(block.fall, 1/60)
Making our blocks fall
We then make the blocks fall and stop when they reach zero position.
#Repeat this piece of code for every block widget
class Block6(Widget):
    vel_x = NumericProperty(0)
    vel_y = NumericProperty(-5)
    position = ReferenceListProperty(vel_x,vel_y)
    def fall(self, pos):
        self.pos =  Vector(self.position) + self.pos
        if self.pos[1]==0:
            self.position[1] = 0
If you followed you should see your blocks falling one after the other and lumping on each other when they reach the end
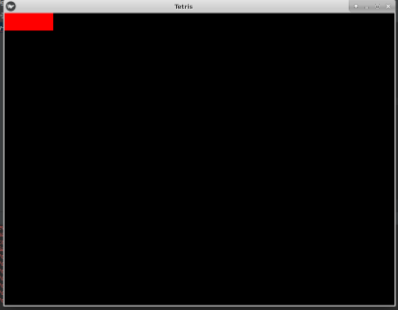.png)
This tutorial would continue in the next of its series
For my previous posts in the python tutorial series
-Click Here* Creating a simple calculator using python 3.8(cpython)
Creating an encryption key(Cryptography)
- Part 1
- Part 2
- Part 3
- Part 4
Developing an institutions data collection backend and frontend with python 3.6 series
Part 1 of this series
Part 2 of this series
Part 3 of this series
Part 4 of this series
Part 5 of this series
Part 6 of this series
Previous Series
Automating OnScreen Processes
Screen Mapping and Navigation
Packaging and Deploying
Proof of work done
Github
Thanks for your contribution.
We've been reviewing your contribution and suggest the following to improve on upcoming tutorials.
The code repeated is this:
Your contribution has been evaluated according to Utopian policies and guidelines, as well as a predefined set of questions pertaining to the category.
To view those questions and the relevant answers related to your post, click here.
Need help? Write a ticket on https://support.utopian.io/.
Chat with us on Discord.
[utopian-moderator]
Thank you for your review, @portugalcoin!
So far this week you've reviewed 16 contributions. Keep up the good work!
Thanks for the tip
Prior to this i thought my code was rather quite lenghty, but in the next of my tutorial series i would try to encapsulate more
Hey @yalzeee
Thanks for contributing on Utopian.
We’re already looking forward to your next contribution!
Want to chat? Join us on Discord https://discord.gg/h52nFrV.
Vote for Utopian Witness!
Hello! I find your post valuable for the wafrica community! Thanks for the great post! We encourage and support quality contents and projects from the West African region.
Do you have a suggestion, concern or want to appear as a guest author on WAfrica, join our discord server and discuss with a member of our curation team.
Don't forget to join us every Sunday by 20:30GMT for our Sunday WAFRO party on our discord channel. Thank you.