Learning React-native : Part VII
Official Github repo for this tutorial: https://github.com/facebook/react-native
What will I learn?
- Handling user input
- Implementing ‘redux-thunk’ in our application to handle asynchronous task
- Using Flat list to display the list of data
Requirements
- A laptop/PC with Mac OS/ Linux/ Windows
- Preinstalled node.js
- Preinstalled Code editor
Note: This tutorial is performed in Visual Studio Code in laptop with Windows 10 Home, 64 bit OS
Difficulty
Intermediate, you must have good knowledge of JavaScript to catch up this tutorial.
Tutorial Content
Handling user input:
React library doesn’t support its own validation, so we should add our own validation logic in our application. To add our own validation we should connect the input of our JSX to some object we can manage in the state.
By doing this we can set up two-way binding so that the we can save the user input in our state, check the validity and control the validity of each state and finally use this information to change the styling of the input field and disable the button if the information is not valid.
So, in the state of our ‘Signup.js’ we added a controls object which holds the four inputs in this page that is email, name, password and confirmPassword.
controls:{
        email,
        name,
        password,
        confirmPassword
}
But only these keys don’t help much so we will be adding the js object in our key so that we store current value as well as check the validity of the input.
Each js object in our key has attributes like value where we will be storing out user input, valid where we will add the flag whether the input in valid or not, validationRules for the corresponding input and finally touched flag which determines whether the input field has been touched or not.
Validation rule can be different according to the input for eg: the validation rule for email checks whether the typed input is an email or not whereas validation rule for password will be that it should be of minimum 6 character. Similarly, for confirmPassword the rule is that it matches to the password field and for username it is that it contains a combination of letter and number.
controls:{
            email: {
              value: "",
              valid: false,
              validationRules: {
                isEmail: true
              },
              touched: false
            },
            name:{
                value:"",
                valid:false,
                validationRules:{
                    containesLetterAndNumber:true

                },
                touched:false
            },
            password: {
              value: "",
              valid: false,
              validationRules: {
                minLength: 6
              },
              touched: false
            },
            confirmPassword: {
              value: "",
              valid: false,
              validationRules: {
                equalTo: "password"
              },
              touched: false
            }
          }
Now that we defined our state let us work in our input
Let us now start making the validation rules. Create a new file named validation.js
We will be receiving the value of the user input, rule for the corresponding text input and the connected value so that we can confirm our password matches the previous password input.
Here we have used switch case for every rules passed so that we can check the condition that is rule required to validate it.
emailValidator returns true if the user input matches email syntax. It is used to validated email.
minLengthValidatator returns true if the minimum password length is 6. It is used to validate password.
equalToValidator returns true if the received value from the user matches the previous connectedValue which is password in our case. It is used to validate confirmPassword
containsLetterandNoValidator returns true if the input contains at least one character and number. It is used to validate the username field.
const validate = (val, rules, connectedValue) => {
    let isValid = true;
    for (let rule in rules) {
        console.log("the rule is:"+rule)
      switch (rule) {
        case "isEmail":
          isValid = isValid && emailValidator(val);
          break;
        case "minLength":
          isValid = isValid && minLengthValidator(val, rules[rule]);
          break;
        case "equalTo":
          isValid = isValid && equalToValidator(val, connectedValue[rule]);
          break;
          case "containesLetterAndNumber":
          isValid=isValid && containsLetterAndNoValidator(val);
          break;
        default:
          isValid = true;
      }
    }

    return isValid;
  };
  const containsLetterAndNoValidator=(val)=>{
      console.log("inside contains letter and number validator");
      return /(?=.*\d)(?=.*[a-zA-Z])/.test(
        val
      );
  }

  const emailValidator = val => {
    return /[a-z0-9!#$%&'*+/=?^_`{|}~-]+(?:\.[a-z0-9!#$%&'*+/=?^_`{|}~-]+)*@(?:[a-z0-9](?:[a-z0-9-]*[a-z0-9])?\.)+[a-z0-9](?:[a-z0-9-]*[a-z0-9])?/.test(
      val
    );
  };

  const minLengthValidator = (val, minLength) => {
      return val.length >= minLength;
  };

  const equalToValidator = (val, checkValue) => {
      return val === checkValue;
  };

  export default validate;
Now that we have made validation.js Let us implement it in our Signup screen
Our DefaultInput in Signup.js for email text input will now look like this which fires up onChangeText when the text is changed in the input field, it then sets the user input to ‘this.state.controls.email.value’ of our state.
<DefaultInput
               placeholder='Email'
               style={styles.input}
               value={this.state.controls.email.value}
               onChangeText={(val)=>{this.updateInputState('email',val)}}
               valid={this.state.controls.email.valid}
               touched={this.state.controls.email.touched}/>
Similarly, we should add these attributes for username, password and confirmPassword too
<DefaultInput
               placeholder='Name'
               style={styles.input}
               value={this.state.controls.name.value}
               onChangeText={(val)=>{this.updateInputState('name',val)}}
               valid={this.state.controls.name.valid}
               touched={this.state.controls.name.touched}
               />
               <View style={this.state.viewMode==='potrait'
               ?styles.passwordContainerPotrait
               :styles.passwordContainerLandscape}>
               <View
                style={this.state.viewMode==='potrait'
                ?styles.passwordWrapperPotrait
                :styles.passwordWrapperLandscape}>

            <DefaultInput
                placeholder='Password'
                style={styles.input}
                secureTextEntry={true}
                value={this.state.controls.password.value}

                onChangeText={(val)=>{this.updateInputState('password',val)}}
                valid={this.state.controls.password.valid}
                touched={this.state.controls.password.touched}

              />
              </View>
              <View
               style={this.state.viewMode==='potrait'
               ?styles.passwordWrapperPotrait
               :styles.passwordWrapperLandscape}
               >
              <DefaultInput
                placeholder='Confirm Password'
                style={styles.input}
                secureTextEntry={true}
                value={this.state.controls.confirmPassword.value}
                onChangeText={(val)=>{this.updateInputState('confirmPassword',val)}}
                valid={this.state.controls.confirmPassword.valid}
                touched={this.state.controls.confirmPassword.touched}

              />
              </View>
              </View>
When the text is changed updateInputState is fired which contains the key for our corresponding Text input field and the value of the text input.
Now in our equalTo validation rule of ‘confirmPassword’ we have simply assigned it to ‘password’ string so, we first should check that whether we have equalTo validation rule or not and if we have equalTo validation rule then we should save some extra information.
equalControl gives us ‘password’ which is the identifier of the control password and equalValue gives us the value of the password and we have saved this value in our connected value js object so that we can dynamically set the value.
‘this.setState’ then calls the validation function which then check the validity of the input according to the validation rule. If the key is confirmPassword then we should continuously validate it with password and toggle the valid state accordingly and if the key is not confirmPassword then we simply update the state of the input to value according to the key we receive.
updateInputState = (key, value) => {
        let connectedValue = {};
        if (this.state.controls[key].validationRules.equalTo) {
          const equalControl = this.state.controls[key].validationRules.equalTo;
          const equalValue = this.state.controls[equalControl].value;
          connectedValue = {
            ...connectedValue,
            equalTo: equalValue
          };
        }
        if (key === "password") {
          connectedValue = {
            ...connectedValue,
            equalTo: value
          };
        }
        this.setState(prevState => {
          return {
            controls: {
              ...prevState.controls,
              confirmPassword: {
                ...prevState.controls.confirmPassword,
                valid:
                  key === "password"
                    ? validate(
                        prevState.controls.confirmPassword.value,
                        prevState.controls.confirmPassword.validationRules,
                        connectedValue
                      )
                    : prevState.controls.confirmPassword.valid
              },
              [key]: {
                ...prevState.controls[key],
                value: value,
                valid: validate(
                  value,
                  prevState.controls[key].validationRules,
                  connectedValue
                ),
                touched: true
              }
            }
          };
        });
      };
Now our DefaultInput.js looks like this:
const defaultInput=props=>(

    <TextInput
     underlineColorAndroid="transparent"
     {...props}
    style={[styles.validInput,props.style,!props.valid && props.touched ? styles.invalidInput : null]}
    />
);

const styles=StyleSheet.create({


      validInput:{
    width:"100%",
    borderWidth: 1,
    borderColor: "#eee",
    padding: 5,
    marginTop: 8,
    marginBottom: 8

      },

      invalidInput: {
        backgroundColor: '#f9c0c0',
        borderColor: "red"
      }
})
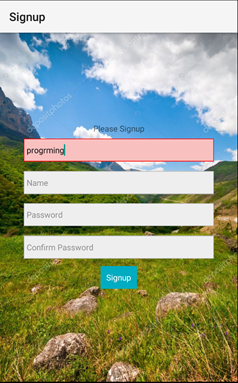
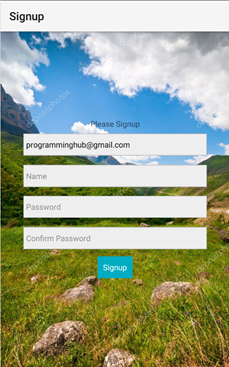
In our DefaultInput.js if the input is invalid in if the input field is touched then we have set our style to ‘invalidInput’ that is background appears red but if the input is valid then we set the style to valid style . Now if you run the application the output looks like this:
Initially, the style looks good ad the style is applied to validStyle

Now if you start adding input the background and border color change as the input is ‘invalid’ for the email field

Only if the user enter valid input then only the style is set to ‘validInput’

In this way we can validate our input in react native.
What is redux-thunk?
‘redux-thunk’ is one of the popular middleware to handle the asynchronous actions in redux. We will be using ‘redux-thunk’ to fetch some data from the API and display it in the list. There are many other libraries for handling the asynchronous action like ‘redux-saga’, ‘redux-observable’ etc but ‘redux-thuk’ is one of the most popular to use.
We will be fetching the API from the url:
https://api.steemjs.com/getTrendingTags?afterTag=funny&limit=10
This URL will return the output in json format like this:
[{"name":"funny","total_payouts":"1860858.456 SBD","net_votes":2172492,"top_posts":313290,"comments":196268,"trending":"1606343938"},{"name":"busy","total_payouts":"3244362.886 SBD","net_votes":2447760,"top_posts":229524,"comments":217534,"trending":"1415365210"}]
Now we should use ‘redux-thunk’ to fetch the data from this URL and display it in the list.
Let us add ‘redux-thunk’ in our project:
PS A:\hybrid\react-native\SteemitTutorial> npm install redux-thunk –save
Now, as we added redux-thunk in our project we should first import applyMiddleware from ‘redux’ and add appyMiddleware(thunk) in our createStore.
import {applyMiddleware} from 'redux';
import thunk from 'redux-thunk';


const configureStore = () => {
    return createStore(rootReducer, (applyMiddleware(thunk)));
  };
applyMiddleware from redux allows us to support asynchronous task without much boilerplate code and it allows us to dispatch function as well as action in our action creators. Now that we have added ‘thunk’ in our applyMiddleware and ‘thunk’ handles all the asynchronous task required.
Now, in our action creator we will be returning dispatch which will fetch the data from the url ‘https://api.steemjs.com/getTrendingTags?afterTag=funny&limit=10’ catch if there is some error then if the response is successful we get the response in json format and finally we create an empty array ‘feeds’ where we add the feeds fetched from the server using for loop. Finally when we have pushed all the items in the feeds array we call the function setFeeds() which returns the action of type SET_FEED and returns the feeds array full of feeds list.
We can return both function or action as per our requirement in ‘redux-thunk’ which make it very easy to use.
export const getFeeds=()=>{
    console.log("inside getting feeds");
    return dispatch=> {
            fetch("https://api.steemjs.com/getTrendingTags?afterTag=funny&limit=10")
            .catch((err)=>{
                alert("Something went wrong :/");
                console.log(err);
                console.log("inside error")
        })
            .then((res)=> res.json())

            .then(resp=>{
                //dispatch(setFeeds(feeds));
                console.log("inside second response")
                console.log(resp)
                const feeds=[];
                for(let key in resp){
                    console.log("inside for loop")
                    feeds.push({
                        ...resp[key],
                        name:resp[key].name,
                        totalPayout:resp[key].total_payouts,
                        commentsCount:resp[key].comments,
                        netVotes:resp[key].net_votes,
                        trending:resp[key].trending

                    });
                }
                dispatch(setFeeds(feeds));
             console.log("size is:"+feeds.length)
             console.log("elemenet is:"+feeds[0].name+", total payout is:"+feeds[0].total_payouts);

            });
    };

};

export const setFeeds=feeds=>{
    console.log("inside setting feeds");
    return{
        type:SET_FEEDS,
        feeds:feeds
    };
};
Now in our Home.js
As we will be displaying the item in the list we will be using FlatList component provide by react-native.
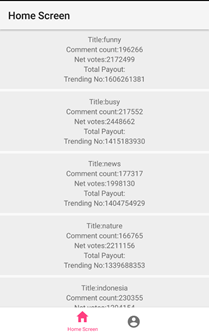
To create list of items we first have to create the view for the single item of the list and populate other items of the list similarly. So, let us now create a custom component called FeedItem.js which will set the view of the individual list item according to the prop it receives. Here we be displaying 5 texts in our single list item.
const listItem=props=>(
    <View style={styles.listItem}>
    <Text>Title:{props.feedTitle}</Text>
    <Text>Comment count:{props.commentsCount}</Text>
    <Text>Net votes:{props.netVotes}</Text>
    <Text>Total Payout:{props.totalPayouts}</Text>
    <Text>Trending No:{props.trending}</Text>
    </View>
);
As we have made single view for the list item we now have to create another component to populate all the items of the list. We will call it FeedList.js
const feedsList=props=>{
    return(
        <FlatList
        style={styles.listContainer}
        data={props.feeds}
        renderItem={(info)=>(
            <FeedItem
              feedTitle={info.item.name}
              commentsCount={info.item.commentsCount}
              netVotes={info.item.netVotes}
              totalPayouts={info.item.totalPayouts}
              trending={info.item.trending}
            />
        )}
        >
        </FlatList>
    );
};
FeedList.js will receive all the list of the data from the server. FlatList has an attribute called renderItem which renders the view for the individual item. So, in our render view we should pass the component holding the view for the single list item which in our case is FeedItem. We have passed the content to be displayed in FeedItem so that we can receive it via pops and display it in FeedItem.
Now, open Home.js
We will create state which will check whether the feed is loaded or not. Initially it is set to false.
state={
      feedLoaded:false,

    }
In our componontDidMount() function which is fired when a component is mounted (inserted into the tree). So in our componentDidMount we will be initially calling this.props.onLoadFeeds() which will dispatch the event getFeeds() and when the dispatch event is successful it returns us the list of feed so we will be calling this.loadFeed which sets the feedLoaded state to true as the feeds has been successfully loaded.
componentDidMount(){
     console.log("inside component mounted in Home screen")
     this.props.onLoadFeeds();
     this.loadFeed();
    }
loadFeed = () => {
      console.log("inside place search");
        this.setState({
          feedLoaded: true
        });

    };

const mapStateToProps = (state) => {
   console.log("inside map state to props");
    return {
      feeds:state.feeds.feeds,

    };

}

const mapDispatchToProps=dispatch=>{
  console.log("inside map dispatch to props")

  return{
    onLoadFeeds:()=>dispatch(getFeeds())
  };
};
Now in our render method initially, we set the content to empty View and if the state of the feedLoaded is true then we render the FeedList so that it shows the list of the feed.
render(){
         let content=(
        <View></View>
   );

          if(this.state.feedLoaded){
            content = (
              <FeedList
                 feeds={this.props.feeds}>
                </FeedList>
            );
          }

          return(
            <View>
              {content}
           </View>
        );
    }

}
Now if we run the application it will load the list of the items from the API

In this tutorial we learned to validate user in put and render list item from API using ‘redux-thunk’. We also learnt to use ‘FlatList’ to render the list item. We will be learning many more in the next tutorial.
All above codes can be downloaded from my GitHub link. Click here to download.
CURRICULUM
Thank you for your contribution.
While I liked the content of your contribution, I would still like to extend few advices for your upcoming contributions:
Looking forward to your upcoming tutorials.
Your contribution has been evaluated according to Utopian policies and guidelines, as well as a predefined set of questions pertaining to the category.
To view those questions and the relevant answers related to your post, click here.
Need help? Write a ticket on https://support.utopian.io/.
Chat with us on Discord.
[utopian-moderator]
espoem knows the value of NULL, and he can sort by it too.
Lol
Thank you for your valuable suggestions.
Hey @programminghub
Thanks for contributing on Utopian.
We’re already looking forward to your next contribution!
Contributing on Utopian
Learn how to contribute on our website or by watching this tutorial on Youtube.
Want to chat? Join us on Discord https://discord.gg/h52nFrV.
Vote for Utopian Witness!
Congratulations @programminghub! You have completed the following achievement on Steemit and have been rewarded with new badge(s) :
Click on the badge to view your Board of Honor.
If you no longer want to receive notifications, reply to this comment with the word
STOPDo not miss the last post from @steemitboard:
SteemitBoard World Cup Contest - The results, the winners and the prizes
Congratulations @programminghub! You have completed the following achievement on the Steem blockchain and have been rewarded with new badge(s) :
Click here to view your Board
If you no longer want to receive notifications, reply to this comment with the word
STOPDo not miss the last post from @steemitboard:
Congratulations @programminghub! You received a personal award!
Click here to view your Board
Congratulations @programminghub! You received a personal award!
You can view your badges on your Steem Board and compare to others on the Steem Ranking
Vote for @Steemitboard as a witness to get one more award and increased upvotes!