Learning React-native : Part V
Official Github repo for this tutorial: https://github.com/facebook/react-native
What will I learn?
- Adding third party libraries like: react-native-navigation and adding vector images
- About flexbox
- Integrating navigation and flexbox in our application
- Making custom ‘TextInput’ component
Requirements
- A laptop/PC with Mac OS/ Linux/ Windows
- Preinstalled node.js
- Preinstalled Code editor
Note: This tutorial is performed in Visual Studio Code in a laptop with Windows 10 Home, 64 bit OS
Difficulty
Intermediate, you must have good knowledge of JavaScript to catch up this tutorial.
Tutorial Content
In my previous session, I explained to you about Redux and its use in react native and showed you how to add redux in our application. In this tutorial, we will be integrating third party libraries in our application. We will also be learning about flexbox layout and focus on making our application UI look better. We will be implementing third party libraries like react-native navigation and react-native vector images so that we can add native navigation, and vector icons in both the platform android and ios. We will be implementing navigation with our redux too. It might seem a bit messy at first but at the end it will all be good.
Usually, two types of libraries are found one is pure java script and some libraries rely on native code, in this case, we should add some files to our native code too otherwise the application will throw some error. There are two ways of linking the library having native code in our application. They are:
Manual linking: In manual linking we should link the library on our own by following the steps provided in the documentation of the library. Typically, this involves opening the native projects and modifying it as per the documentation.
Automatic linking: We can automatically link our library by simply running the command react-native link
While automatic linking is easy to use there are cases where some libraries doesn’t support automatic linking and in this case we have to manually link our application with the library.
We will be manually linking both of our libraries.
For adding vector-icon we should enter the following command line:

Add the following in ‘settings.gradle’. Here we are adding the ‘react-native-vector-icons’ package in our native application and providing the path to the installed location of package.
include ':react-native-vector-icons'
project(':react-native-vector-icons').projectDir = new File(rootProject.projectDir, '../node_modules/react-native-vector-icons/android')
Update project dependency in android/app/build.gradle so that our application can know the dependency required to run the application.
compile project(':react-native-vector-icons')
To customize the files being copied we should add the following lines of code. I have choosen ‘Ionicons’ and you can choose any of the font available.
project.ext.vectoricons = [
    iconFontNames: ['Ionicons.ttf'] // Name of the font files you want to copy
]

apply from: "../../node_modules/react-native-vector-icons/fonts.gradle"
We successfully added vector icons in our application, but we will be using it later in the tutorial, now, it’s time to add ‘react-native-navigation’. To add navigation, we should enter the following command line. It will download the latest stable version.

Now that we have installed ‘react-native-navigation’ package let us add it in our project. To add in our project, add the following in ‘settings.gradle’. Here we are adding the ‘react-native-navigation’ package in our native application and providing the path to the installed location of package.
 include ':react-native-navigation'
 project(':react-native-navigation').projectDir = new File(rootProject.projectDir, '../node_modules/react-native-navigation/android/app/')
Update project dependency in android/app/build.gradle
compile project(':react-native-navigation')
Here we are adding ‘react-native-navigation’ dependency in our application
Now open your MainActivity.java and make it extend ‘SplashActivity’ instead of ReactActivity.
public class MainActivity extends SplashActivity {


}
Now open your MainApplication.java and make it extend NavigationApplication. In the getPackages() method we will be adding the additional package that we require in our application.
public class MainApplication extends NavigationApplication {

  @Override
  public boolean isDebug() {
      // Make sure you are using BuildConfig from your own application
      return BuildConfig.DEBUG;
  }

  protected List<ReactPackage> getPackages() {
      // Add additional packages you require here
      return Arrays.<ReactPackage>asList(
        new VectorIconsPackage()
      );
  }

  @Override
  public List<ReactPackage> createAdditionalReactPackages() {
      return getPackages();
  }
That’s it for setting up the navigation and vector icons in our application. Now if you run the application you will get an empty white screen as your output.
Till now we had two screens in our application ‘Login.js’ to let user login and ‘Home.js’ for welcoming user after the login is successful. So, now when the user logs in the user can navigate between screens that is Home Screen and Profile Screen. We already have Home screen so let us first create Profile screen which will simply show a message saying it is a profile screen.
import React,{Component} from 'react';
import {View,Text} from 'react-native';
class ProfileScreen extends Component{
    render(){
        return(
            <View><Text>Profile Screen</Text></View>
        );
    }
}
export default ProfileScreen;
As we successfully created our screens to display we should register these screens so that the navigation library knows about the screens we are going to use. We can do that simply by importing Navigation form ‘react-native-navigation’ and calling registerComponent() which has two parameters that is screenId and generator. Each screen must have a unique screenId so that the screen can be recognized. The generator simply gets the corresponding component of the screen we want to show.
import {Navigation} from 'react-native-navigation';
import Login from './src/components/screens/login/Login';


Navigation.registerComponent(
   "steemittutorial.LoginScreen",()=>Login);
As we have used redux in our application there are two extra parameters that we have to pass so that we can connect our screen to redux.
Navigation.registerComponent(
   "steemittutorial.LoginScreen",()=>Login,store,Provider);
We have passed our store and Provider from redux so that each screen can connect to the redux. If the screen doesn’t have to connect to redux then we can simply avoid adding store and provider.
Let us register our other screens too:
Navigation.registerComponent(
   "steemittutorial.HomeScreen",()=>Home,store,Provider);
 Navigation.registerComponent(
   "steemittutorial.ProfileScreen",()=>ProfileScreen);
Now that we have registered our screen and connected it to redux we can start our app by:
Navigation.startSingleScreenApp({
   screen:{
     screen:"steemittutorial.LoginScreen",
     title:"Login"
   }
 });
We used startSingleScreenApp in which we passed the screen we want to display "steemittutorial.LoginScreen"
We should use the exact same screenId we used to register the screen so that the screen is uniquely identified and is displayed accordingly.
The title displays the title of our application in the toolbar. Now that we have started our application from App.js we should also edit our index.js file. ‘react-native-navigation’ uses index.android.js to start the app in android and index.ios.js to start app in ios. So, we can simply remove index.js and add index.android.js and index.ios.js.
Both of the file will contain the same code.
import App from './App';
As we have already started our application from App.js we can simply import the App and the rest work will be done.
We already have registered our screens so let us implement tab-based navigation to toggle between this two screens. So, for that let us create MainTabs.js which will hold the function that allows us to start tab-based navigation.
Navigation.startTabBasedApp() is used to open the screen containing the tabs.
‘tabs’ is an array holding ‘n’ number of tabs. We can add as many number of as we want.
‘screen’ will hold the screenId we assigned to each screen in our App.js. If the screenId is wrong then the application will throw error in our application.
MainTabs.js
import { Navigation } from 'react-native-navigation';
import Icon from 'react-native-vector-icons/Ionicons';

const startTabs = () => {
        Navigation.startTabBasedApp({
            tabs: [
                {
                    screen: "steemittutorial.HomeScreen",
                    label: "Home Screen",
                    title: "Home Screen",
                },
                {
                    screen: "steemittutorial.SecondScreen",
                    label: "Profile Screen",
                    title: "Profile Screen",
                                    }
            ]
        });
};

export default startTabs;
Now function startTabs() will get called when the user presses the login button in our Login.js. So, on the userLogin function we have to call startTabs to open the screen containing tabs.
So open you Login.js and edit ‘userLogin’ as below:
userLogin(val){
       this.props.onLogin(this.state.username,this.state.password);
       MainTabs();
    }
Now let us run the application. If we pressed login button then it will throw us errors like this:
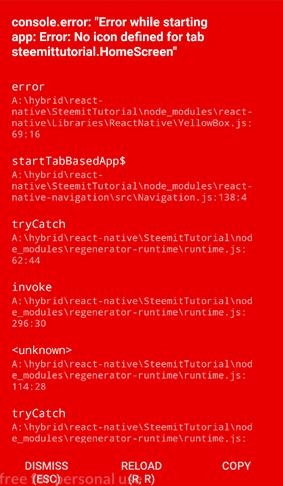
This is because it is compulsory in android to define icon for the tab. This is where we will be using our vector icons. We already have added vector icon in our application. We first should import it.
import Icon from 'react-native-vector-icons/Ionicons';
In order to add the vector icon in our tab we must first load it then only we should display it as an icon in the tab. If we displayed the icon before it has been loaded then the application will throw an error. So we use Promise which ensures us that if we get the icon successfully then only we will be loading our icon in our tab. Only after we successfully get our image source we load tabs and then add icon in it.
Promise.all([
        Icon.getImageSource("md-home", 30),
        Icon.getImageSource("md-user", 30)
    ]).then(sources => {
        Navigation.startTabBasedApp({
            tabs: [
                {
                    screen: "steemittutorial.HomeScreen",
                    label: "Home Screen",
                    title: "Home Screen",
                    icon: sources[0]
                },
                {
                    screen: "steemittutorial.ProfileScreen",
                    label: "Profile",
                    title: "Profile",
                    icon: sources[1]
                }
            ]
        });
    });
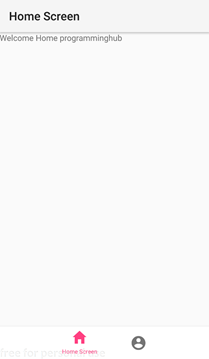
Now if we run the application we can get the following output.
Now let us learn something about flexbox layout in react native.
In mobile application the UI and views are quite different compared to that of web application. Mobile application usually uses list to display the item like recycler view in android and table view in ios. So, to render the parent and child view properly it is very important for us to catch the concept of flexbox. Flexbox manages the child component and it is also used for consistent view in different devices.
Let us illustrate the concept of flexbox by implementing it. So, let us open Login.js
return(
            <View style={styles.loginContainer}>

                <Text>Please Login</Text>
                <View style={styles.inputContainer}>
                 <TextInput
                   placeholder='Username'
                   keyboardType='email-address'
                   value={this.state.username}
                   onChangeText={(text)=>this.setState({username:text})}
                   />
                <TextInput
                    placeholder='Password'
                    secureTextEntry={true}
                    value={this.state.password}
                     onChangeText={(text)=>this.setState({password:text})}

                  />
                  </View>

                 <Button
                 onPress={(val)=>this.userLogin(val)}
                 title="Login"/>

            </View>
        );

//our stylesheet
const styles=StyleSheet.create({
    loginContainer: {
        flex:1,
  borderColor:"green",
        borderWidth:2,


      },
      inputContainer:{
          width:"80%"

      },

})
Here ‘loginContainer’ is the main parent view containing two child that is ‘inputContainer’ and a button. Here we have declared ‘inputContainer’ so that it can be easier for us to style the ‘TextInput’ component separately
        flex:1,
  borderColor:"green",
        borderWidth:2,
This means that the corresponding component is a flexbox container and will take upon the width and height of the entire parent. Here the ‘loginContainer’ takes the width and height of the entire parent.
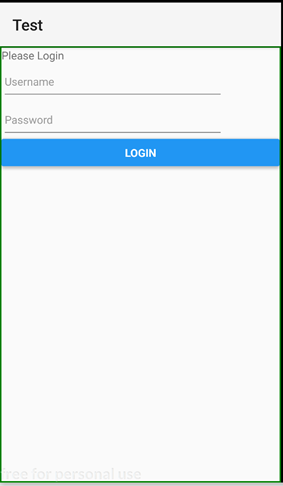
Here you can see the green borders that we have assigned to the ‘loginContainer’ and it matches the size of the whole parent.
Now you might wonder what will happen if I assign flex:1 to the child component that is ‘inputContainer’.
inputContainer:{

          flex:1,
          borderColor:"red",
          borderWidth:2,
          width:"80%"

      },
This will also take entire height and the width we have assigned.
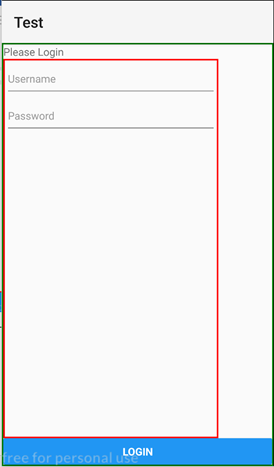
Here if we hadn’t assigned the width ‘80%’ then it would take the entire width. I think you got it.
Let us discuss about some of the important attributes of flexbox layout. They are:
flexDirection:'column',
flexDirection is used to determine whether the child components will be aligned vertically or horizontally. The default value of flex direction is ‘column’. If we set it to ‘row’ then the child will be aligned horizontally to each other.
justifyContent:"center",
justify content is used to determine the distribution of the child components within the parent component.
justifyContent have many available options like:
flex-start, center, flex-end, space-around, space-between and space-evenly.
Below are the example of how each option will look like:
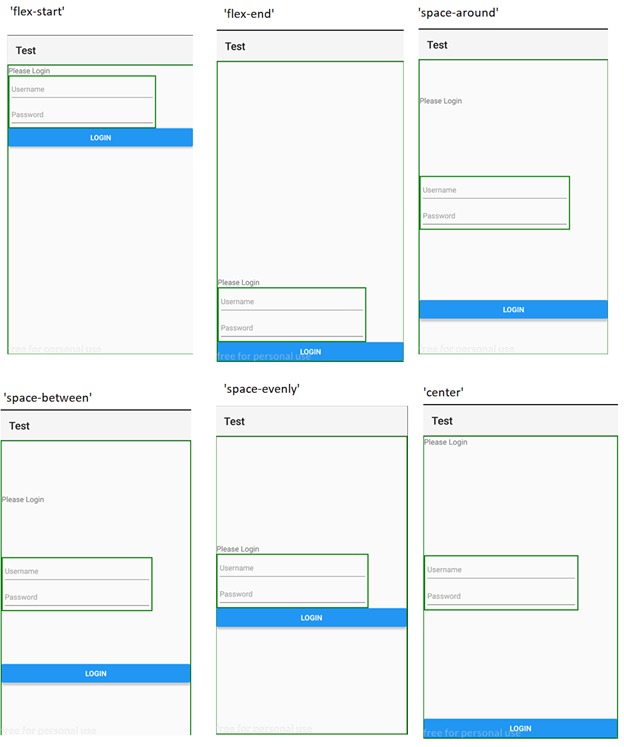
We will use ‘center’ attribute to make our child item appear in the center.
alignItems:"center"
alignItems handles the alignment of the clild component within the parent component. Below are the available option for alignItems along with the example:
flex-start, center, flex-end, and stretch.
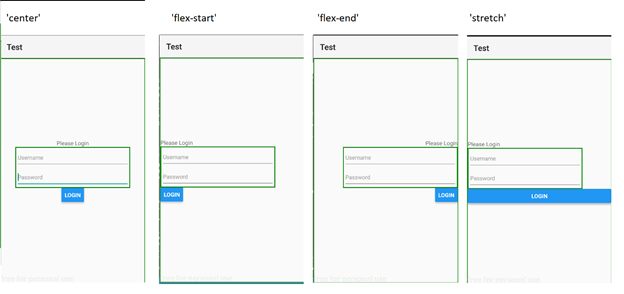
There might be many cases where we should use one component all over the application. For eg: TextInput can be used all over our application and what if we want to give same style to every TextInput in our application.
So in order to remove the boilerplate code and to reuse the same component we can make our own custom TextInput component and import it anywere we want to.
Let us make a custom component and name it DefaultInput. This custom component will be useful when we have to use same type of TextInput all over the application but what if we want our TextInput to be a password field and what if we want a different attribute in TextInput.
In order to resolve this problem we have used {…props} which let us distribute all the props we get.
import React from 'react';
import {TextInput,StyleSheet} from 'react-native';

const defaultInput=props=>(
    <TextInput
     style={styles.input}
     autoCapitalize='none'
     autoCorrect={false}
     autoFocus={true}
     underlineColorAndroid="transparent"

 {...props}
    />
);

const styles=StyleSheet.create({

      input:{
          width:"100%",
          borderWidth:1,
          borderColor:"#f2f2f2",
          padding:10,
          margin:10

      }
})

export default defaultInput;
 Now we can import it any where I our app like this:
<DefaultInput
                   placeholder='Username'
                   keyboardType='email-address'
                   value={this.state.username}
                   onChangeText={(text)=>this.setState({username:text})}
                   />
                <DefaultInput
                    placeholder='Password'
                    secureTextEntry={true}
                    value={this.state.password}
                     onChangeText={(text)=>this.setState({password:text})}

                  />
This will give us the following output
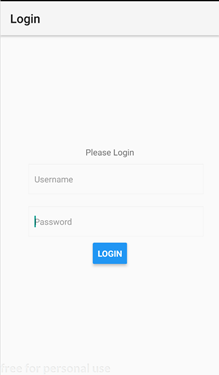
Our Login UI looks much better. Now if we press the login button then we will be navigated to the next screen

We succesfully added ‘react-native-navigation’,’react-native-vector-icon’ along with redux and created a custom TextInput component.
All above codes can be downloaded from my GitHub link. Click here to download.
CURRICULUM
Thank you for your contribution.
While I liked the content of your contribution, I would still like to extend few advices for your upcoming contributions:
Looking forward to your upcoming tutorials.
Your contribution has been evaluated according to Utopian rules and guidelines, as well as a predefined set of questions pertaining to the category.
To view those questions and the relevant answers related to your post,Click here
Need help? Write a ticket on https://support.utopian.io/.
Chat with us on Discord.
[utopian-moderator]
@portugalcoin I commit my code to my github repo, you can check commit history to see code changes for each part.
Hey @programminghub
Thanks for contributing on Utopian.
We’re already looking forward to your next contribution!
Contributing on Utopian
Learn how to contribute on our website or by watching this tutorial on Youtube.
Want to chat? Join us on Discord https://discord.gg/h52nFrV.
Vote for Utopian Witness!