How to use EJS - Displaying data from NodeJS in HTML
What Will I Learn?
- How to use EJS in NodeJS
- How to display Node variables in the frontend with EJS
- How to setup EJS with ExpressJS and Body Parser
Difficulty : Basic
Basic Node and Express setup
Before we start writing code, we will need to have all our required npm packages installed. We will need the following packages:
- express
- body-parser
- ejs
To install them just use the following command:
npm install express body-parser ejs mongodb --saveNow, let's write our basic Node and Express code that will display Hello World.
app.js
var app = require('express')();
app.get("/", (req, res) => { res.send("Hello World"); });
app.listen(8080, () => { console.log("Server online on http://localhost:8080"); });
Now, if we visit http://localhost:8080, we should see the following:

Configuring EJS with Express
Our basic express route is now working. Let's start working with EJS. The first thing we need to do is to create a index.ejs file that will hold our EJS code. In the same directory as the app.js, create another directory named views. Inside the views directory, create a new file called index.ejs (ejs stands for EJS).
Your file hierarcy should look like this:
|--app.js
|+--views
|          |--index.ejs
Inside index.ejs, let's write this simple HTML code:
<html>
<h1>This is an EJS page</h1>
</html>
Now we have our index.ejs, but Express will just render Hello World. How can we get Express to render our index.ejs file? We will use Express's view engine, so the code inside app.js will now look like this:
app.js
var app = require("express")();
var bodyParser = require("body-parser");

//Set view engine to ejs
app.set("view engine", "ejs");

//Tell Express where we keep our index.ejs
app.set("views", __dirname + "/views");

//Use body-parser
app.use(bodyParser.urlencoded({ extended: false }));

//Instead of sending Hello World, we render index.ejs
app.get("/", (req, res) => { res.render("index") });

app.listen(8080, () => { console.log("Server online on http://localhost:8080"); });
Now, when we visit http://localhost:8080, it should display this:

Rendering variables from the backend ( Node.JS )
For example, you have a variable user in Node that is equal to the current user's name:
var user = "Prodicode";We want to display the user variable in HTML so it will look like this:
Hello, Prodicode
To do so, we will need to pass the
user variable to the index.ejs file when we render it. So when we render index.ejs, we will use this line instead:
app.get("/", (req, res) => { res.render("index", { username: user }); });user variable into another username variable that now exists in the index.ejs file.
All that's left to do is to display the username variable inside index.ejs. So, let's write this inside index.ejs:
<html>
<h1>Hello, <%= username %></h1>
</html>
You will notice some strange HTML syntax: <%= username %>. Well, that is not HTML, it's EJS. The username variable already exists when we render index.ejs, and that is the EJS syntax for dumping a variable's value, a.k.a displaying it.
Navigating to http://localhost:8080, we will see:

Displaying an array
We now know how to display an variable, but what if we want to display a list of variables inside an array. Inside app.js, we will also have the following array:
var shopping_cart = ["shampoo", "snacks", "fruits"];
And we want to display them like so:
Hello, Prodicode
Shopping Cart:
- shampoo
- snacks
- fruits
Inside app.js, when we render index.ejs, instead of only sending the user variable, we will send both the user variable and the shopping_cart array. The code that renders the page will look like this:
app.get("/", (req, res) => { res.render("index", { username: user, cart: shopping_cart }); });index.ejs we will have 2 variables available that we can use the EJS syntax to render: username with the value of "Prodicode" and cart that is an array containing the following elements: "shampoo", "snacks" and "fruits". EJS does not only support displaying variables with <%= variable_name %>, it also supports javascript code. For example, this code will check if the variable loggedIn is true, and if it is, will display Welcome! :
<html>
<% if(loggedIn){ %>
<span>Welcome!</span>
<% } %>
</html>
Just take a second to analyze the code above.
To display the array, use the following code:
<html>
<h1>Hello, <%= username %></h1>
<br>
<h3>Shopping Cart: </h3>
<br>
<ul>
<% for(var item in cart) { %>
<li><%= item %></li>
<% } %>
</ul>
</html>
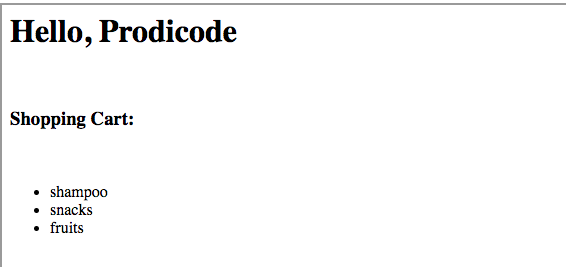
Now, navigating to http://localhost:8080 should render this:

Conclusion
EJS is a great alternative to plain HTML to use with Node and Express. The best part about it is its simplicity. The EJS syntax is very easy to integrate in HTML and it's not hard to understand. You can check out EJS's official website here where you can find more documentation and examples. If you have any other questions or are confused about certain aspects of EJS, drop them in the comments below and I will try to answer them as fast as possible!
Posted on Utopian.io - Rewarding Open Source Contributors
Thank you for the contribution. It has been approved.
You can contact us on Discord.
[utopian-moderator]
Thanks!
Hey @prodicode I am @utopian-io. I have just upvoted you!
Achievements
Suggestions
Get Noticed!
Community-Driven Witness!
I am the first and only Steem Community-Driven Witness. Participate on Discord. Lets GROW TOGETHER!
Up-vote this comment to grow my power and help Open Source contributions like this one. Want to chat? Join me on Discord https://discord.gg/Pc8HG9x