Java programming with Official Hord - Databases with Apache Derby
Repository
https://github.com/dmlloyd/openjdk
What Will I Learn?
- You will learn to Create in App Database with Apache Derby
- You will learn to Connect Apache Derby Databases to Application
- You will learn Data Manipulation with Apache Derby
Requirements
- Basic knowlege of Java
- NetBeans IDE 8.2
- Basic Knowlege of SQL Statements
Difficulty
- Intermediate
Tutorial Contents
Apache derby is a relational database management system developed by apache foundation that can be embedde in java programs and used online.
For this series we will be working with Apache derby database in our java program, and in this tutorial I'll guide you through creating and connecting to the Apache derby database.
Creating an Apache Derby Database
This is a walkthrough for creating thwe database with Netbeans IDE, follow the steps carefully to understand. I'll create a database with the name "Userdata".
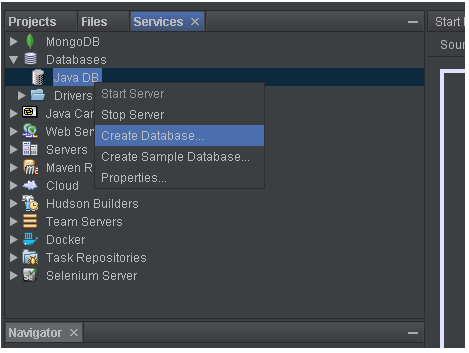
Step 1: Head to the Services pane on the right side of the window where you can view projects in your Netbeans program. Click on Databases, a list of databases will drop down, Right click Java Db and click connect.
This will start the inbuilt Apache server which would be used to create and access the database.
Step 2: Right click and select Create database.
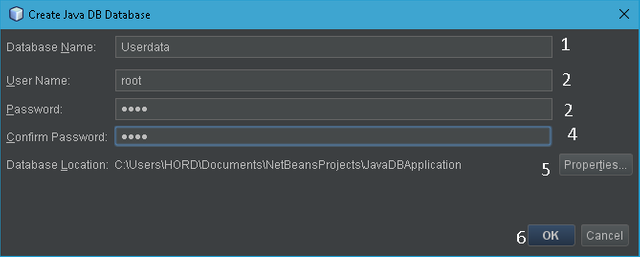
Step 3: Input your preferred name for the database, also set username and password for the database. For now I'll advise you use something you can remember easily for example; "root".
Step 4: We have to set the location of the database to the same as the application project file. Click the properties button beside the database location, set the location to the same filepath of the application project and click ok.
We have successfully created the database, furthermore we add tables to the database. In databases, the data is held in tables so your database should and must contain tables. Right click on the tables section and click add table as seen in the screen shot. Furthermore add columns and save, you can also add data to the table and also view data by right clicking the table and clicking view data.
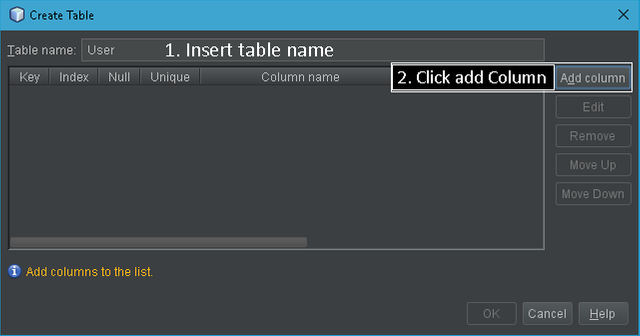
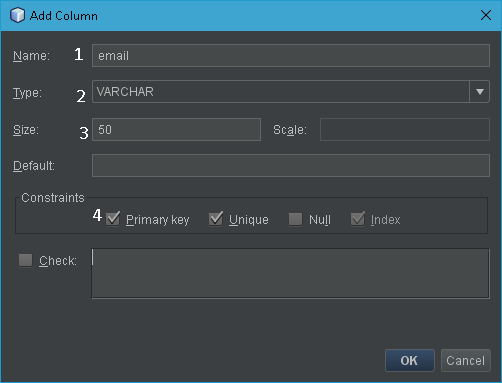
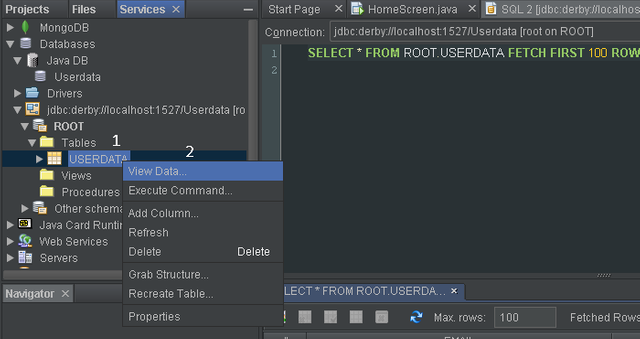
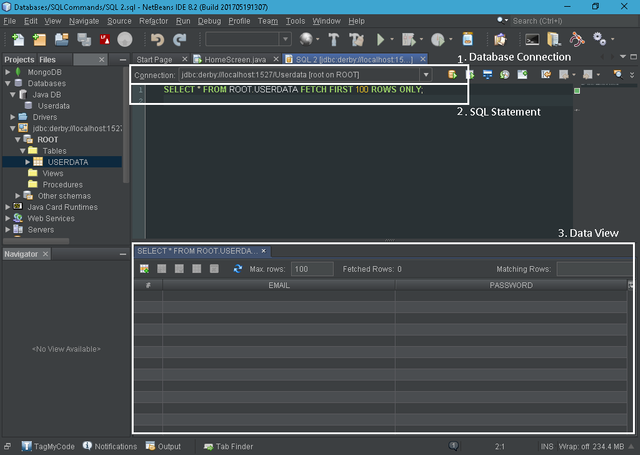
Kindly drop any questions concerning this section if there is any.
Connecting the Apache Derby Database to your application
After creating the database, next we connect the database tot the application in which it will be used. You can either create a method for this in your main file or create a different file for this purpose. In this case i have chosen the shorter way out by creating a connection method in the main program file, its the same process if you're doing either of the above, the only difference is creating a new file for the method.
First I'll create two strings to hold the username and password of the database, syntax simply String username = "username";, same for the password and remember to close your statement with the brace.
Next we create the connection method using public Connection getConnection() throws SQLException { your code }, public .... in this statement shows that the method is top level and makes the method accessible everywhere in the application, this means in other packages apart from the home package in which it is created, in two words public access.
... Connection ... This tells the system that a connection to an entity outside the code is initiated in the method and your program will require you to import the respective java library which is import java.sql.Connection;, without this import, the code will not work.
getConnection() Generally every method has a name which it is called with, this can be anything you chose but I'll advice you use something that has to do with connection to make it easier to remember. throws SQLEXception This one here tells the system that the method may bring up errors that have to do with database access.
This method would carry all the code required to connect to the database, before we begin entering the connection code, the method needs a return statement which we wouldn't need so what you do is return nothing since it is compulsory for the method to have a return statement, therefore we write return null; this way nothing is returned.
In our method, first we create a connection object Connection conn = null;, this creates a Connection but an empty one which basically does nothing for now . Next create a try and catch block, what this does is to carry out the code in the block, but if there is any errors in the block it will the stop the execution of the program.
The syntax for the try and catch block is;
try { your code}
catch(Exception){ what to do if error occurs}
Next we call the driver class for Apache Derby in our try block, Class.forName("org.apache.derby.jdbc.ClientDriver"); this specifies the class from which the driver for the connection will be selected, different libraries might have different class names and there are a few other drivers under Apache but for the sake of this tutorial we'll be using the ClientDriver.
Next create a properties holder object, this object will be used to hold the username and password for the database access from the program. Properties connectionproperties = new Properties();, in this case i have used connectionproperties as the name for the holder, after the property holder is created we then add the properties required, these are username and password which have been stored in strings before we created the connection method. To add data to the property holder, the syntax Properties.put("property", data); is used, this way each data is added to the property it is needed for. Adding the username to the property holder will be connectionproperties.put("user", this.username); the same way for the password.
Finally we get the connection to the database using the location, name and properties of the database, the connection is also to be stored in the connection object "conn" which we have created earlier in the program. we use a DriverManager to pull the connection using the .getConnection() method DriverManager.getConnection("jdbc:derby://localhost:1527/Userdata", connectionproperties);. If you noticed, I used jdbc:derby: this tells the Drivermanager that the database is derby. To get the database location, click on databases in the services pane and right click on your database, select properties and you'll see the path of the database, copy that and paste in the code.
System.out.println("Database Connection Available"); This statement here tells the system to display "Database Connection Available" in the output pane of the IDE once the connection is successful.
return conn; Whenever the method is called, if the connection is succesful, it returns a connection and If not, it prints the excepion as set by the catch block.
            ex.printStackTrace();

        }
If you followed all the steps carefully, your code would look like this:
String username = "root";
    String password = "root";

    public Connection getConnection() throws SQLException {

        Connection conn = null;
        try {

            Class.forName("org.apache.derby.jdbc.ClientDriver");
            Properties connectionproperties = new Properties();
            connectionproperties.put("user", this.username);
            connectionproperties.put("password", this.password);

            conn = DriverManager.getConnection("jdbc:derby://localhost:1527/Userdata", connectionproperties);
            System.out.println("Database Connection Available");
            return conn;
        } catch (Exception ex) {
            ex.printStackTrace();

        }return null;
}
If we run the code now, it will return a lot of errors this is because we have not added the library for Apache Derby. To do this, go to the project pane, in your application project, right click libraries, click add library, scroll down and find Java DB Driver, select that an click OK.
Testing connection
In order to know if our connection method worked or not, we will have to call it during the execution of the application. In this case I have created a JFrame interface with a button and also set up an action listener for the button in which the connection is called.
To call the connection method, simply create a try and catch block as previously in the connection class, but this time in the try block, simply input the name of the Connection class with a parenthesis in front of it and a semi colon.
Your code will look like this
 try {

            getConnection();
        } catch (Exception e) {
            e.printStackTrace();
        }
You can now run the program, if you have entered your codes correctly, the program will output "Database Connection Available" in the output pane of the IDE as seen in the screenshot below.

Curriculum
This is the first tutorial in this series
Proof of Work Done
Full Code used in this tutorial: GitHub Repository
You have a minor misspelling in the following sentence:
It should be successful instead of succesful.Thanks corrected.
Nice knowledge
Thanks man, Hope you got it all?
Thank you for your contribution.
While I liked the content of your contribution, I would still like to extend one advice for your upcoming contributions:
Your contribution has been evaluated according to Utopian policies and guidelines, as well as a predefined set of questions pertaining to the category.
To view those questions and the relevant answers related to your post, click here.
Need help? Write a ticket on https://support.utopian.io/.
Chat with us on Discord.
[utopian-moderator]
Thanks man, would input this is forthcoming tutorials.
Hey @official-hord
Thanks for contributing on Utopian.
We’re already looking forward to your next contribution!
Want to chat? Join us on Discord https://discord.gg/h52nFrV.
Vote for Utopian Witness!
Java programme can change life style and also earn many more money......
Lol, I'am happy you understand this... Thanks a lot, are you a programmer also?