JavaFX - Best Practice of Client-Server App with Connection to the Database (Part 2)
What Will I Learn?
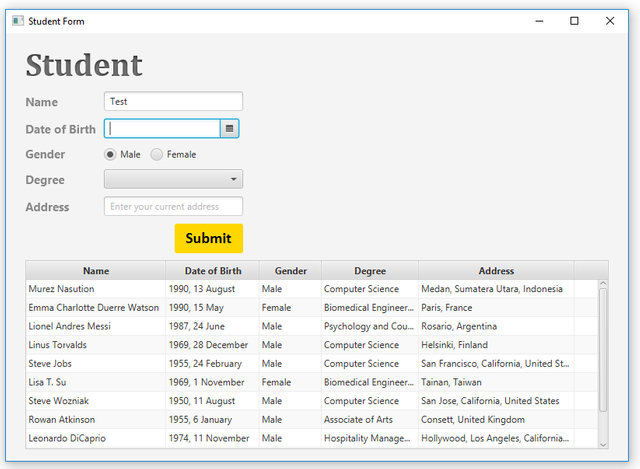
In this tutorial, I will continue the previous Student app development with connection to MySQL database. Previously, any successful saved records of Student will be lost each time the app has been closed. Instead, we want the data to stay alive and will always be reloaded every time the app reopens. Also, we want that all records of Student will no longer be saved temporarily in the table-view, but will be permanently saved in the database.
Here, I only deal to manage data flow from/to MySQL database using native Java™ SQL API. And I will show you how to solve this case.
- JavaFX UI Controls
- JavaFX Behaviour (Event Handler)
- Connection and Query to MySQL
- Fetching Records from MySQL Using java.sql.ResultSet
- Java™ Socket Connection
- Java™ JSON Object in the javax.json Package
- Java™ Concurrent Collections Using java.util.concurrent.BlockingQueue≺E≻
- Select Columns by Joinning Tables at MySQL
Requirements
- Any current JDK.
- IntelliJ IDEA Community.
- MySQL Community version 5.6 or later.

Source: https://spring.io/guides/gs/accessing-data-mysql/
GNU General Public Licence - Implementation of javax.json API.
We will use it for conversion from string to json object or vice versa over network.- If you have installed GlassFish, you can use the package in the installation folder:
<glassfish-xxx>\glassfish\modules\javax.json.jar. - Or, you can download directly here.
- If you have installed GlassFish, you can use the package in the installation folder:
- Your understanding of the previous tutorials.
You can link to the curriculums at the most bottom of this article.
Difficulty
- Advanced
Tutorial Contents
Overview
- Preparation of Dependencies
- Create Connector to MySQL
- Create
TaskProvideras Provider of Controllers - Set up Sample Database
- Create Functions to Handle Query and Deliver Results
- Modify Server from Previous Tutorial
- Test!
1) Preparation of Dependencies
- Set up Java MySQL Connector
Open your IntelliJ IDEA and right click Student project ⇢ Open Module Settings,
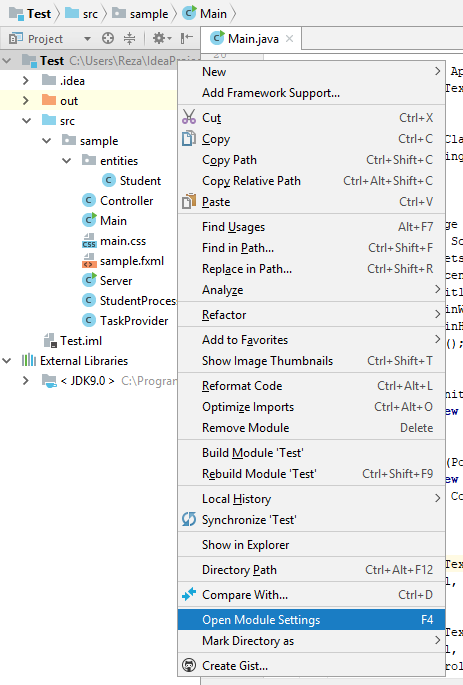
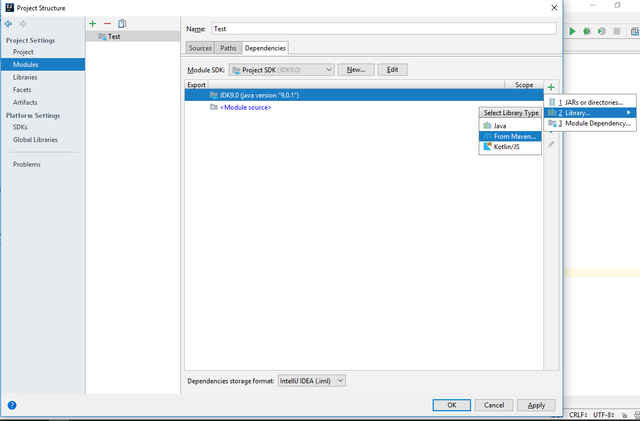
Next, will appear Project Structure dialog, then click+(plus sign) at the most right ⇢ Library... ⇢ From Maven...,
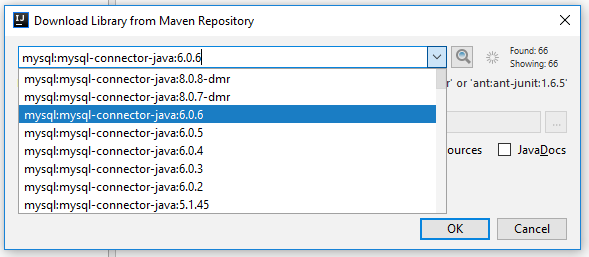
New popup dialog will appear again, here type:mysqlon the text-field and hit search. Wait for a moment, then select one as you wish, and finally click OK.
- Set up JAR of
javax.json
Do the same action as the previous one, but select JARS or directories..., instead of Library..., finally browse to JAR ofjavax.jsonas described on the Requirements before.

After all, here's the current state,
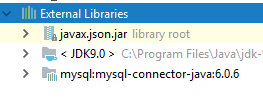
2) Create Connector to MySQL
Here, the Connector is responsible for providing connections to the target database. So when construction, the connector requires the name of the database to be accessed (target), username and password to login.
The Connector will implement java.lang.Runnable and java.lang.AutoCloseable interfaces. So when used, it can be run as a separate process and can be closed, because the currently actived Connector will grasp connection to the target database that in fact takes up a lot of resources.
Also, it will be a static inner class of TaskProvider. The goal is the mechanism of itself as a provider of connectors to the database. So, only TaskProvider can create the Connector and the constructor is private.
Create
TaskProviderclass,⇾ src ↳ sample ↳ . . . TaskProvider . . .Here are the methods that will be provided:
⋄void start(java.net.Socket, TaskProvider)
⋄void run()
⋄void close()
⋄boolean isActived(), and
⋄boolean isClosed()
The
Connectorpublic static class Connector implements Runnable, AutoCloseable { private final AtomicBoolean CLOSED = new AtomicBoolean(); private final Connection C; private TaskProvider holder; private Socket client; private boolean active; private Connector(String database, String username, String password) throws Throwable { C = java.sql.DriverManager.getConnection("jdbc:mysql://127.0.0.1/" + database, username, password); } public void start(Socket client, TaskProvider holder) { if(holder == null) throw new UnsupportedOperationException("Required the owner of this connector"); synchronized(C) { if(active) throw new UnsupportedOperationException("This connector has started"); if(client == null || client.isClosed()) throw new IllegalArgumentException("This client has expired"); this.client = client; this.holder = holder; C.notify(); active = !active; } } @Override public void run() { for(;;) { try { synchronized(C) { active = false; C.wait(); } } catch(Throwable e) { break; } System.out.println("New client: " + client.getRemoteSocketAddress()); JsonObject json; try { Function<Connection, JsonObject> f; json = Json.createReader(client.getInputStream()).readObject(); System.out.println("Request: " + json); if(!json.containsKey("reqCode") || (f = StudentProcessor.get(json.getString("reqCode"))) == null) throw new UnsupportedOperationException("Doesn't have a request code"); json = f.apply(C); } catch(Throwable e) { json = Json.createObjectBuilder() .add("code", 400) .add("text", "Bad Request") .add("reason", e.getMessage()).build(); } try { Json.createWriter(client.getOutputStream()).writeObject(json); client.close(); } catch(Throwable e) { e.printStackTrace(); } while(!holder.putBack(this)); if(CLOSED.get()) break; } } @Override public void close() { try { C.close(); } catch(Throwable e) { e.printStackTrace(); return; } CLOSED.set(true); } public final boolean isActived() { synchronized(C) { return active; } } public final boolean isClosed() { return CLOSED.get(); } }
3) Create TaskProvider as Provider of Controllers
TaskProvider will provide as many n Connectors to be saved into the queue. The queue to be used here is java.util.concurrent.BlockingQueue≺E≻, because it has a method that will wait for the time unit when the element is loaded from the queue or put back into the queue.
The scenario is when the Server receives a request from the client, then it picks up a Connector from TaskProvider. The connector will remain on hold until the process is complete and give the response back to the client. Finally, it is restored to TaskProvider and the server is waiting for another requests.
Here are the methods that will be provided:
⋄ Connector request(long)
⋄ boolean putBack(Connector)
⋄ void close()
public class TaskProvider implements java.io.Closeable {
    private final BlockingQueue<Connector> RUNNERS;

    public TaskProvider(int capacity, String database, String username, String password) {
        RUNNERS = new ArrayBlockingQueue<>(capacity);
        for(int i = -1; ++i < capacity; ) {
            String name = Connector.class.getSimpleName() + "-" + i;
            Connector connector;
            try {
                connector = new Connector(database, username, password);
            } catch(Throwable e) {
                System.out.format("Creation of connector %s has failed (%s)%n", name, e.getMessage());
                continue;
            }
            RUNNERS.add(connector);
            new Thread(connector).start();
        }
        if(RUNNERS.size() < 1)
            throw new UnsupportedOperationException("No Connector available at all");
    }
    /**
     * @param timeout Time runs out in seconds.
     * @return Instance of Connector or {@code null} if none is available.
     */
    public Connector request(long timeout) {
        try { return RUNNERS.poll(timeout, TimeUnit.SECONDS); }
        catch(Throwable e) {
            return null;
        }
    }

    private boolean putBack(Connector c) {
        //Putting the Connector back to the queue is always close to success (always true).
        //Because it can't be created carelessly (the constructor is private).
        boolean b = true;
        try { RUNNERS.add(c); }
        catch(Throwable e) {
            b = false;
        }
        return b;
    }

    @Override
    public void close() {
        for(Connector c : RUNNERS)
            c.close();
    }
}
4) Set up Sample Database
- Create Table of Student
CREATE TABLE Student( ID INT UNSIGNED PRIMARY KEY AUTO_INCREMENT ,Name VARCHAR(250) NOT NULL ,Birth DATE NOT NULL ,Gender TINYINT(1) DEFAULT 1 ,Degree INT UNSIGNED NOT NULL ,Address VARCHAR(450) ) - Insert the Initial Records to Student
INSERT INTO Student(Name, Birth, Gender, Degree, Address) VALUES ('Murez Nasution','1990-08-13',1,1,'Medan, Sumatera Utara, Indonesia') ,('Emma Charlotte Duerre Watson','1990-05-15',0,3,'Paris, France') ,('Lionel Andres Messi','1987-06-24',1,5,'Rosario, Argentina') - Create Table of Degree
CREATE TABLE Degree( ID INT UNSIGNED PRIMARY KEY AUTO_INCREMENT ,Name VARCHAR(150) NOT NULL ) - Insert the Initial Records to Degree
INSERT INTO Degree(Name) VALUES
 ("Computer Science")
,("Mathematics")
,("Biomedical Engineering")
,("Nursing")
,("Psychology and Counseling")
,("Associate of Arts")
,("Hospitality Management")
5) Create Functions to Handle Query and Deliver Results
Create StudentProcessor class that only has members (field and metohds) as static and will provide three functions as described below, and in which Parameter≺JsonObject≻ as the type of the input and JsonObject as the type of the result of the this function.
- Get List of the Degrees
FUNCTIONS.put("getDegrees", arg -> { JsonArrayBuilder builder = Json.createArrayBuilder(); String query = "SELECT * FROM Degree"; try(ResultSet result = arg.C.createStatement().executeQuery(query)) { if(result.first()) do { builder.add( Json.createObjectBuilder() .add("ID", result.getLong(1)) .add("val", result.getString(2)) ); } while(result.next()); } catch(Throwable e) { e.printStackTrace(); } return Json.createObjectBuilder().add("data", builder).build(); }); - Get All of Students
FUNCTIONS.put("getStudents", arg -> { JsonArrayBuilder builder = Json.createArrayBuilder(); String query = "SELECT" + " s.ID" + ",s.Name" + ",DATE_FORMAT(s.Birth,'%m/%d/%Y')" + ",s.Gender" + ",s.Degree,d.Name `Degree`" + ",s.Address" + " FROM Student s, Degree d" + " WHERE s.Degree = d.ID"; try(ResultSet result = arg.C.createStatement().executeQuery(query)) { if(result.first()) do { builder.add( Json.createObjectBuilder() .add("ID", result.getLong(1)) .add(Student.NAME, result.getString(2)) .add(Student.BIRTH_DATE, result.getString(3)) .add(Student.GENDER, result.getInt(4)) .add(Student.DEGREE, Json.createObjectBuilder() .add("ID", result.getInt(5)) .add("val", result.getString(6)) ) .add(Student.ADDRESS, result.getString(7)) ); } while(result.next()); } catch(Throwable e) { e.printStackTrace(); } return Json.createObjectBuilder().add("data", builder).build(); }); - Put a Student
FUNCTIONS.put("addStudent", arg -> { String query = "INSERT INTO Student(Name, Birth, Gender, Degree, Address) VALUES(?,STR_TO_DATE(?,'%m/%d/%Y'),?,?,?)"; String text = ""; int code = 500; try(PreparedStatement pS = arg.C.prepareStatement(query)) { pS.setString(1, arg.T.getString(Student.NAME)); pS.setString(2, arg.T.getString(Student.BIRTH_DATE)); pS.setInt(3, arg.T.getInt(Student.GENDER)); pS.setInt(4, arg.T.getInt(Student.DEGREE)); pS.setString(5, arg.T.getString(Student.ADDRESS)); System.out.println(">> " + pS); if(pS.executeUpdate() > 0) { code = 200; text = "OK"; } } catch(Throwable e) { e.printStackTrace(); text = "Internal Server Error"; } return Json.createObjectBuilder() .add("code", code) .add("text", text) .build(); }); - Class of
Parameter≺JsonObject≻public static final class Parameter<T> { public final Connection C; public final T T; public Parameter(Connection c, T t) { C = c; T = t; } }
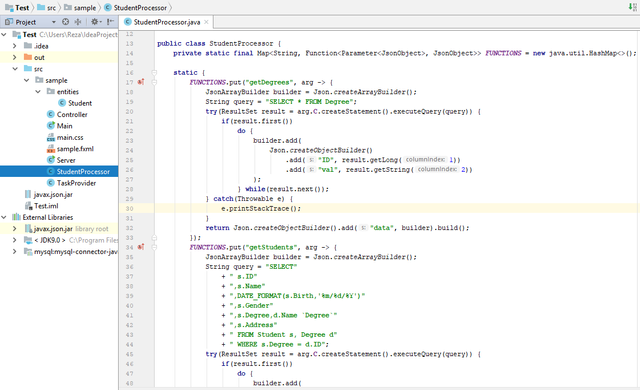
6) Modify Server from Previous Tutorial
We just add constant of the target database properties and modify run() method in the Runner, as follows:
private static final String DATABASE = "sample";
private static final String USERNAME = "Tester";
private static final String PASSWORD = "myPass123";
public static final long TIMEOUT = 1;//A minute.
private static final byte[] RESPONSE_TIMEOUT = "{\"code\":429,\"text\":\"Too Many Requests\"".getBytes();

public void run() {
   TaskProvider.Connector c;
   for(;;) {
       try {
           Socket client = S.accept();
           if((c = PROVIDER.request(TIMEOUT)) == null) {
               try(OutputStream out = client.getOutputStream()) {
                   out.write(RESPONSE_TIMEOUT);
                   out.flush();
               }
               continue;
           }
           c.start(client, PROVIDER);
       }
       catch(Throwable e) { break; }
       synchronized(PROVIDER) {
           if(!up) break;
       }
   }
}
7) Test!
Run the Server
Right click on theServerdocument ⇢ Run 'Server.main()' and log will appear as the information of server state.
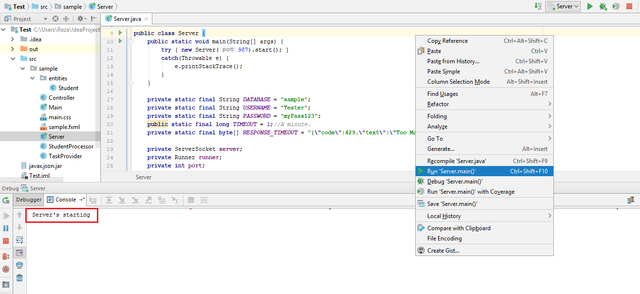
Run the Main as the Front-End
Same as the previous one, but it's on theMaindocument. When it's running, you'll see the window like this,
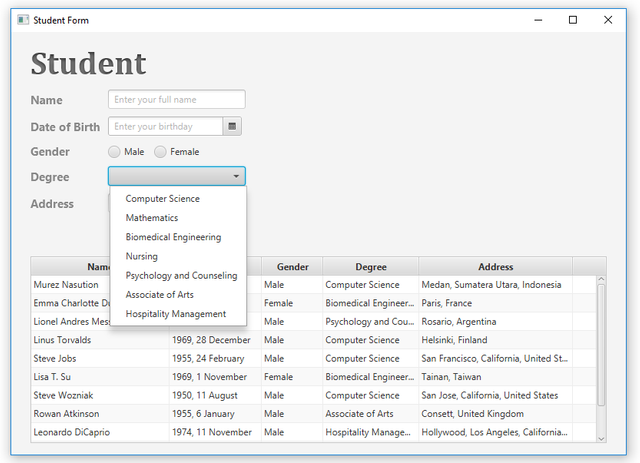
Here are the last records of the
Sampledatabase, it appears that the number of records in the database corresponds to the data in the table-view and the list of degrees.
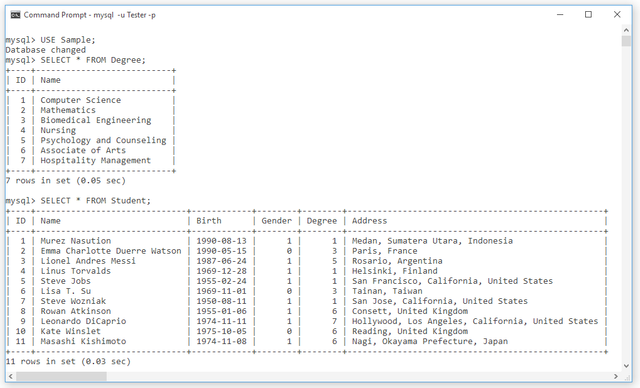
And, here's the log in the client side.

Insert New Student
Here's the new data of Student,
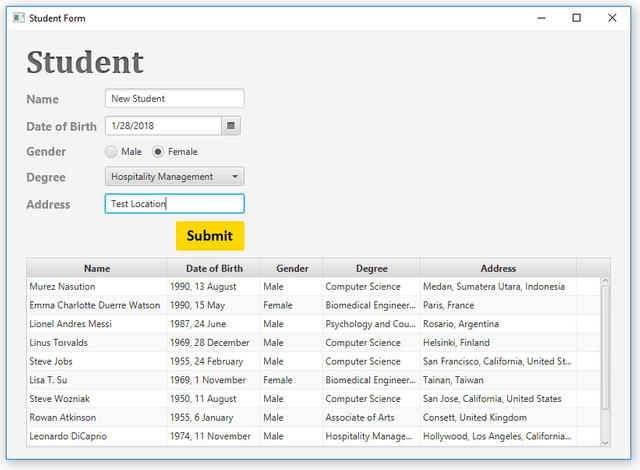
When submit a new record will appear on the database and the table-view.
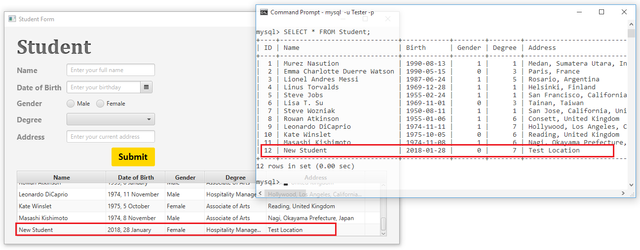
Congratulations! We have successfully connected the Student app to/from the MySQL database.
Thank you!
Share with Heart.
Curriculum
- Java - How to Create a Simple Server Using Java Socket
- Java (Spring Framework) - First App with Connection to MySQL Database
Appendix
Posted on Utopian.io - Rewarding Open Source Contributors
Thank you for the contribution. It has been approved.
You can contact us on Discord.
[utopian-moderator]
Hey @murez-nst I am @utopian-io. I have just upvoted you!
Achievements
Suggestions
Get Noticed!
Community-Driven Witness!
I am the first and only Steem Community-Driven Witness. Participate on Discord. Lets GROW TOGETHER!
Up-vote this comment to grow my power and help Open Source contributions like this one. Want to chat? Join me on Discord https://discord.gg/Pc8HG9x