Data Source Controls and Data-Bound Controls (asp.net tutorial Part 2)
Lesson Objectives
A. Working with Data Source Controls
B. Working with Data-Bound Controls
C. The Object DataSource Controls
Needs are;
A.Asp.NET
B. Visual Studio
C. C#
The difficulty level of commands we use is middle.
The Object DataSource Controls
The Object DataSource Controls provides a mechanism for connecting to a class which provides access to data. The ObjectDataSource is an example of The Object DataSource Controls. More coding has to be written while using the Object DataSource Controls. It provides the advantage of separating the business logic and the data access logic. The ObjectDataSource can be bound to controls such as DropDownList, GridView, DetailsView and FormView. The various operations such as Select, Insert, Update and Delete can be performed using the ObjectDataSource control.
Demonstration: Creating a DropDownList Control to display Country information from a business object using the ObjectDataSource Control.
Steps to create the Web Page.
1 ) Create a new web form named ObjectDataSourceDemo.aspx in the WebSiteNavigation Project.
2 ) Drag a Label and set its Text as “ObjectDataSource Demo”
3 ) Drag a Label and set its Text as “Select a Country”
4 ) Drag an ObjectDataSource Control from the Data Tab of the Toolbox into the Web Form.
5 ) Drag a DropDownList Control from the Standard Tab of the Toolbox into the Web Form.
6 ) The Design of the form should look as below :
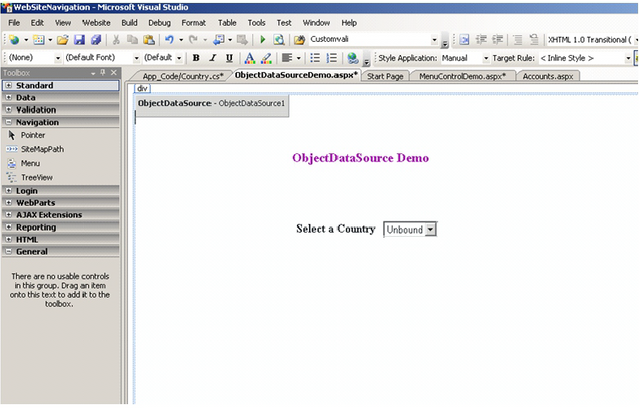
7 ) Right-click the Project and select Add ASP.NET Folder > App_Code to add the App_Code folder.
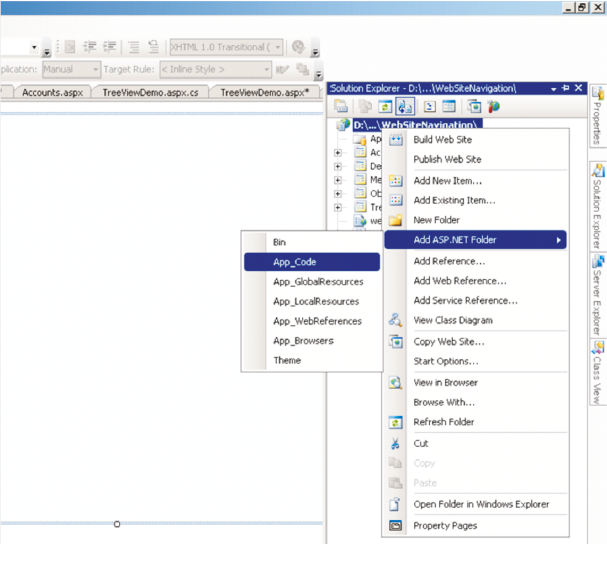
8 ) Right-click the App_Code folder > Select Add New Item > Select Class and type Country.cs as the Name and click the Add Button.
9 ) Write the code below in the Country.cs file.
using System;
using System.Collections.Generic;
using System.Linq;
using System.Web;
using System.Collections;
public class Country
{
public List< string > GetCountries()
{
List< string > countryList = new List< string >();
countryList.Add("India");
countryList.Add("Japan");
countryList.Add("China");
countryList.Add("Australia");
countryList.Add("Singapore");
countryList.Add("Malaysia");
return countryList;
}
}
10 ) Switch to the source view and edit the tag for the ObjectDataSource as below:
< asp:ObjectDataSource
ID="ObjectDataSource1"
runat="server"
TypeName="Country"
SelectMethod = "GetCountries" >
< /asp:ObjectDataSource >
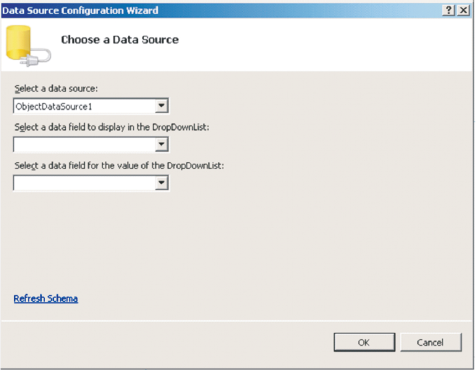
11 ) Click the smart tag of the DropDownList and click Choose Data Source. Select ObjectDataSource1 in the Data Source Configuration Wizard as below:
12 ) Right-Click the ObjectDataSourceDemo.aspx file and select “Set As Start Page” and execute the project.
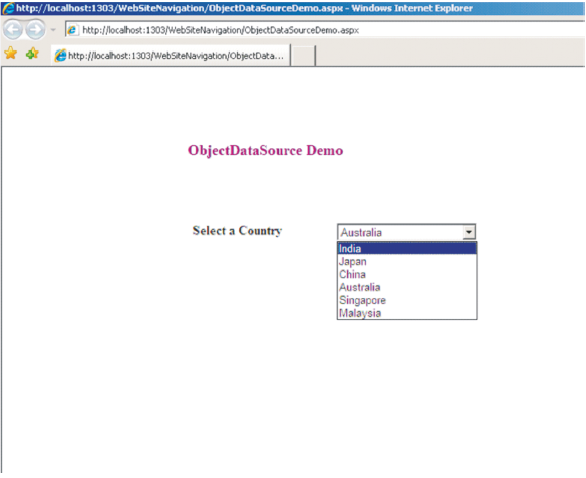
13 ) View the Output below :
The XML DataSource Controls
The XmlDataSource Controls can be used to access data stored data in XML files. The XMLDataSource is an example of XML DataSource Controls. The XMLDataSource control
allows the selection, insertion, updation and deletions of data in XML files. These operations can be done quickly and easily.
The Relational DataSource Controls
The Relational DataSource Controls connect to a Relational Databases. The SqlDataSource Control and AccessDataSource Controls are examples of Relational DataSource Controls.The SQLDataSource Control can connect to the data sources which work with the ADO.NET data provider. You can connect to various databases such as SQL Server and Oracle. The SQL DataSource can also be used with Open Database Connectivity and OLEDB. The AccessDataSource provides connectivity with Microsoft Access Database. Coding is reduced when using Relational DataSource controls.
The GridView Control
The GridView control displays data to the user in the form of a table with rows and columns.The GridView allows sorting of data based on a particular column. When the data to be displayed in the GridView is of multiple pages, paging can be used in the GridView. Styles can be applied to the Header and Footer sections of a GridView. New rows can be inserted into the GridView and existing rows can be modified. Deletion of rows can also be done with the help of a GridView.
The DetailsView Control
The DetailsView Control is a data-bound control which displays a single record at a time.Paging can be enabled, when there are multiple records available in the Data Source. New records can be created and existing records can be updated using the DetailsView control.Deletion of records is also possible using the DetailsView. The Layout of the DetailsView can be set by using the various Layout properties such as AllowEdit, AllowInsert, AllowPaging,HeaderText and FooterText etc. The Style of the DetailsView can be set by using the various style properties such as HeaderStyle, FooterStyle, ItemStyle and
Demonstration: Creating a DetailsView Control to display the detailed information from the Employee table in the SQL Server Database using the SQLDataSource Control.
Solution :
The Employee table with data below is used in the demo.

Steps to create the Web Page.
1 ) Create a new web form named DetailsView_SQLDataSourceDemo.aspx in the WebSiteNavigation Project.
2 ) Drag a Label and set its Text as “DetailsView using SQLDataSource Demo”
3 ) Drag a SQLDataSource Control from the Data Tab of the Toolbox into the Web Form.
4 ) Drag a DetailsView Control from the Data Tab of the Toolbox into the Web Form.
5 ) The Design of the form should look as below :
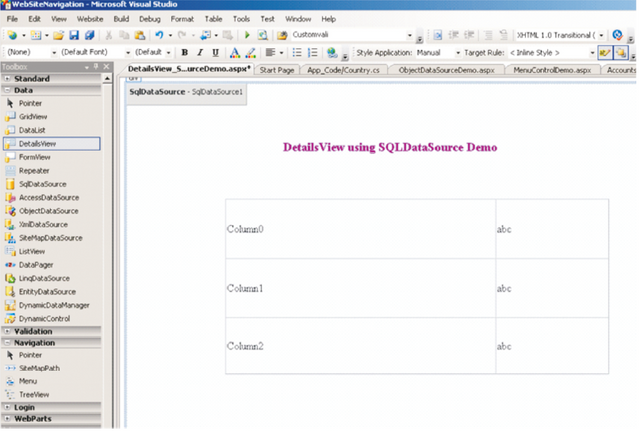
6 ) Click the smart tag of the SQLDataSource Control and click “Configure Data Source” to display the wizard below:
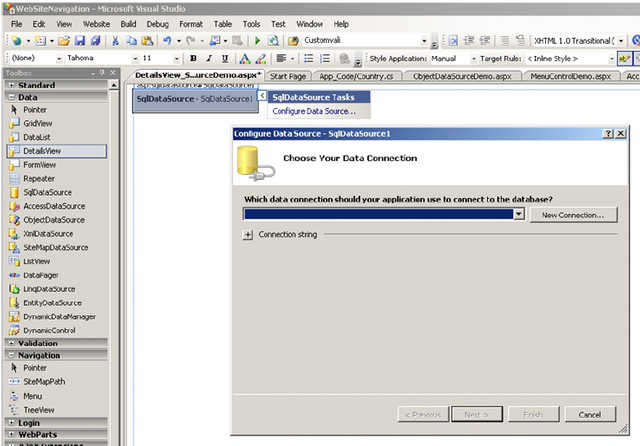
7 ) Click the “New Connection: button in the “Choose Your Data Connection” Window to display the “Add Connection” Dialog as shown below:
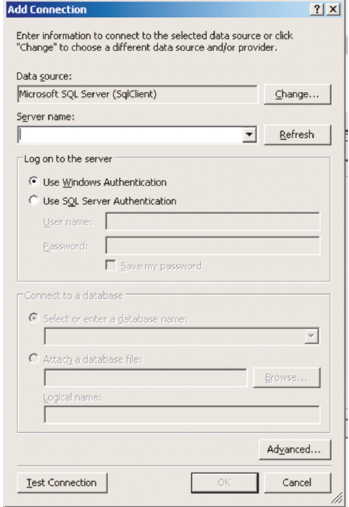
8 ) Select the Microsoft SQL Server instance name in the “Server Name” DropDown. Enter the UserName and Passsord. Select the database from the “Select or enter a database name” drop down as shown below.
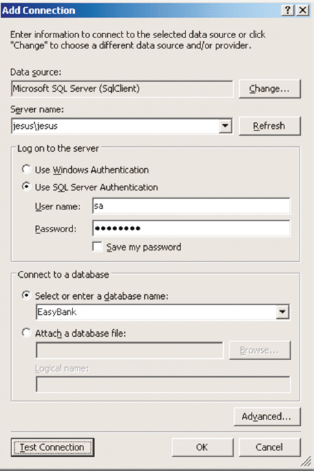
9 ) Click the “Test Connection” Button in the “Add Connection” window. The message “Test connection succeeded” is displayed as shown below.
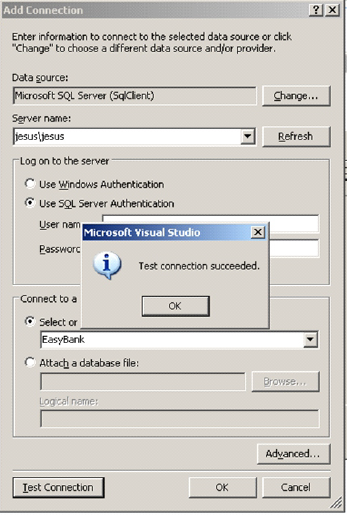
10 ) Click “OK” button to close the message. Click “OK” button in the Add Connection Dialog box. The data connection is created and displayed as shown in the dialog below.
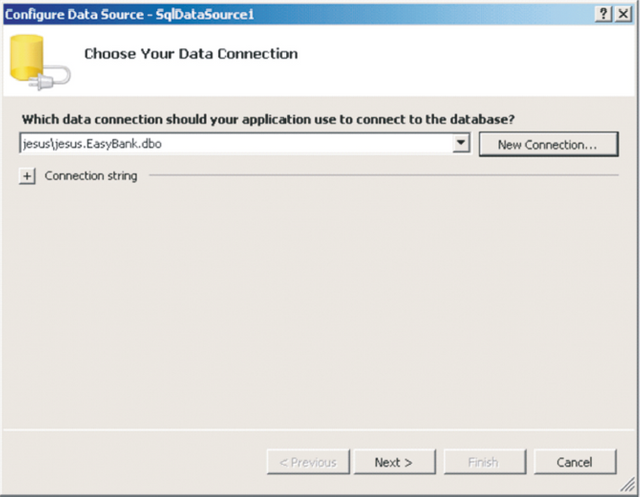
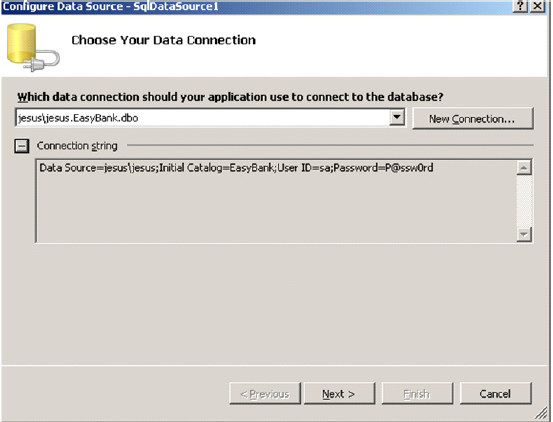
11 ) Expand the connection String to see the connection details such as SQL Server Name, Initial Catalog, User ID and Password as shown below and click the “Next” button.
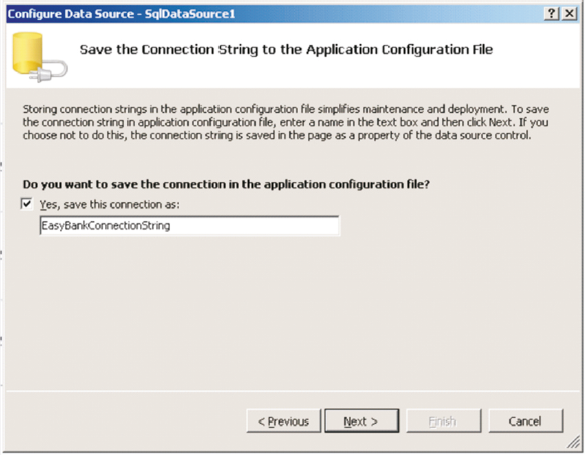
12 ) Select the check box to save the connection information to the application configuration file as shown below and click the “Next” button.
13 ) Select the “Specify columns for table or view” in the “Configure the Select Statement” window. Select the required table from the “Name:” dropdown list. Select the “*” checkbox to select all the columns in the table as shown below and click the “Next” button.
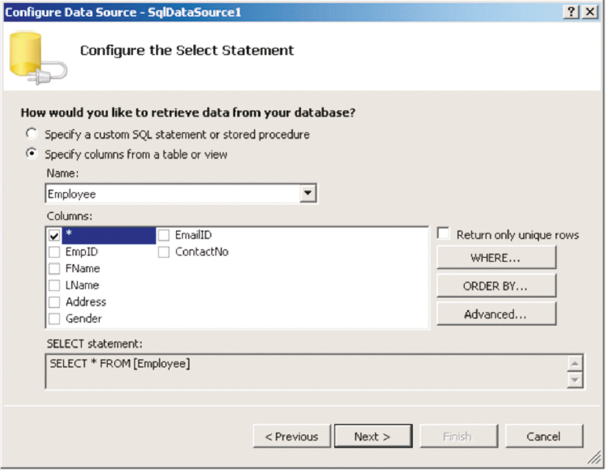
14 ) Click the “Test Query” button to execute the query and to preview the results as shown below.
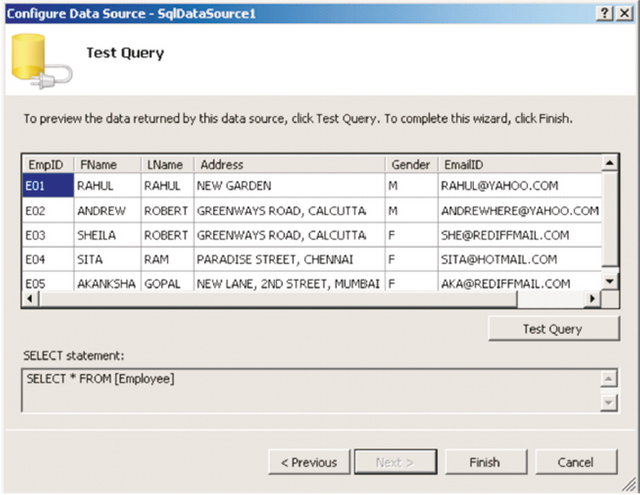
15 ) Click the “Finish” button to complete the configuration of the SQL Data Source.
16 ) Click on the Smart Tag of the DetailsView1 control and select “SQLDataSource1” from the “Choose Data Source” dropdown as shown below.
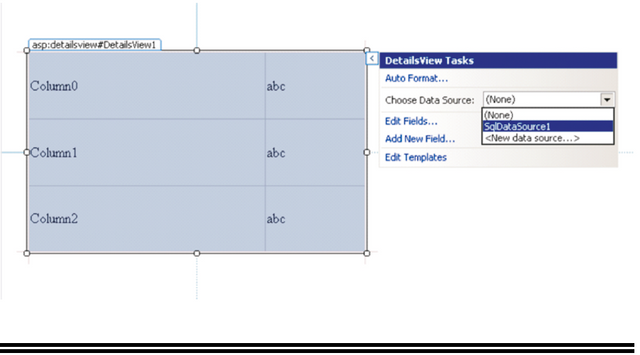
17 ) Click on the “Auto Format” option from the “Details View Tasks” as shown below.
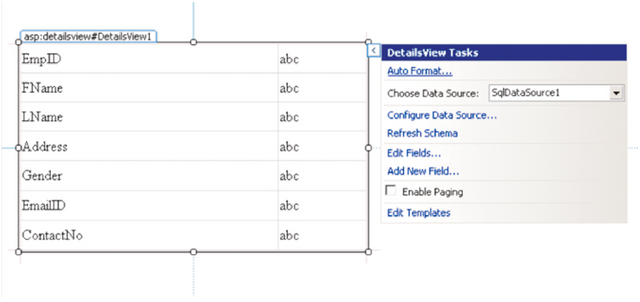
18 ) Select the required format form the “Autoformat” window as shown below.
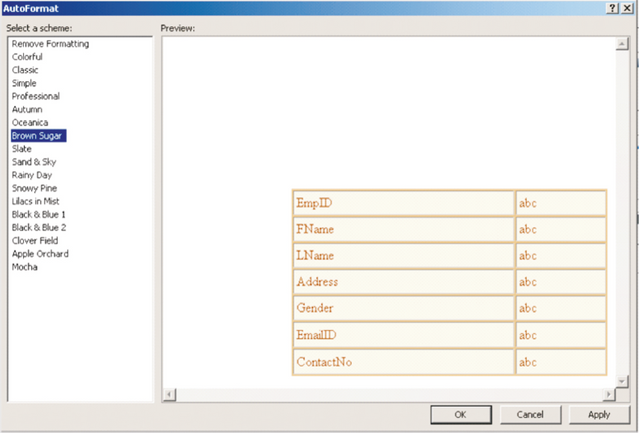
19 ) Select the “Enable Paging” checkbox to display the page numbers for navigating the records as shown below.

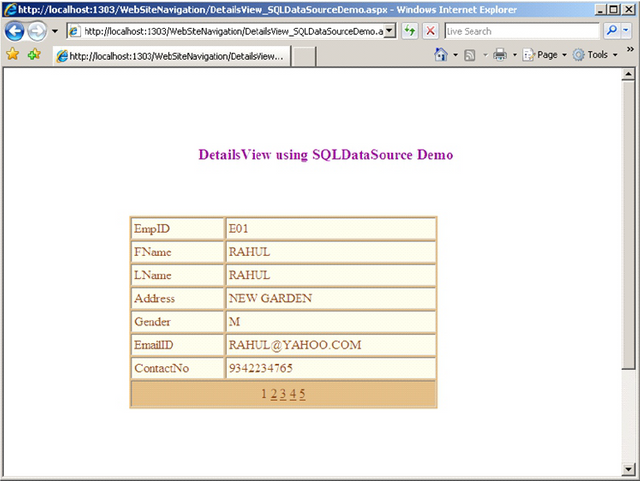
20 ) Right-Click the DetailsView_SQLDataSourceDemo.aspx file and select “Set As Start Page” and execute the project.
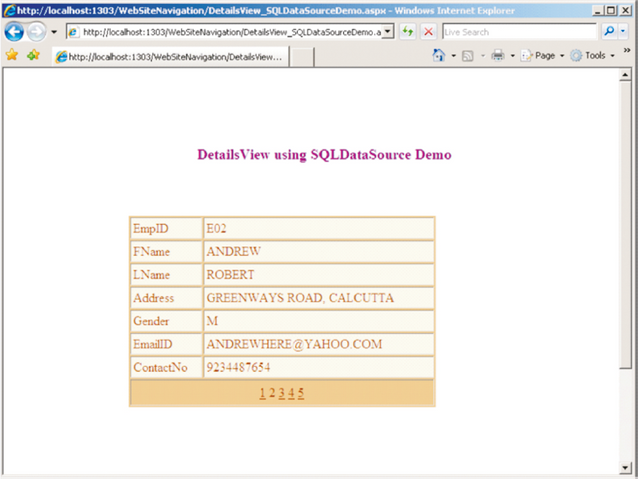
21 ) View the Output 1 below.
note:
Posted on Utopian.io - Rewarding Open Source Contributors
Thus the post has been rejected.
you can contact us in Discord