How to create a Load More on the WordPress Post with Ajax
Step by step instructions to Create A Load More On The WordPress Post With Ajax
Setup
Make an envelope with the name ajax-stacked more. At that point inside those organizers please make 2 envelopes again with the name of the css and js Folder is utilized to store the css documents and javascript modules. Make a record stack in the js organizer posts. js record, and style. css in the css organizer.
Finally make a php document with the name ajax-stacked more.
Open the document stack more ajax, input the code underneath.
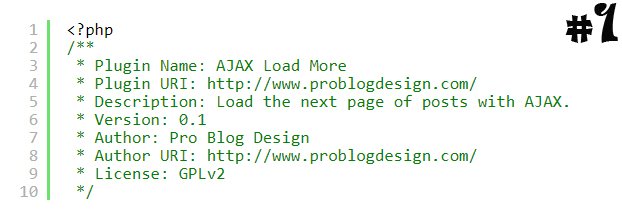
The above code is helpful for mendefenisikan module you made so it can be perused by wordpress. It would be ideal if you change yourself to your enjoying.
Stacking a document and Pass the estimation of the
Above all else we require the javascript and css code made at the right page, duplicate the accompanying code.
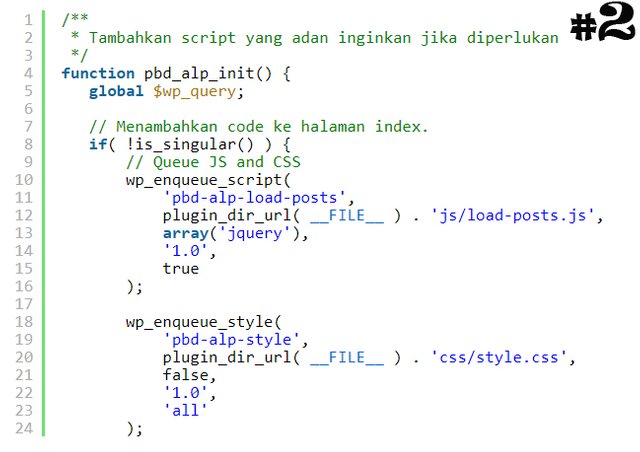
The above code we use to make another capacity that we give the name pbd_alp_init (). Also you can take a gander at the worldwide code $wp _ inquiry which we will use for the following stage.
The most imperative thing is on line 8, which merupukan a conditionals ' articulations which can't chip away at singular pages as in the single post, page or post of wordpress.
This is a broad area to ensure our code running on the landing page, seek pages, label pages and so forth. You can modify it with more specifics.
At that point we likewise utilize wp_enqueue_script () and wp_enqueue_style () for wordpress memberutahukan on the off chance that we utilize the 2 documents i.e., css and jquery.
Here we will utilize the wp_localize_script () capacity to compute esteems in PHP and afterward print it out into site pages with the goal that the content we make would then be able to get to it.
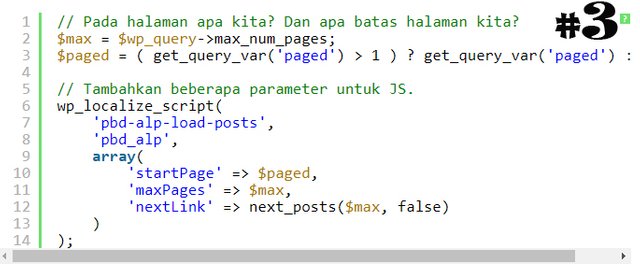
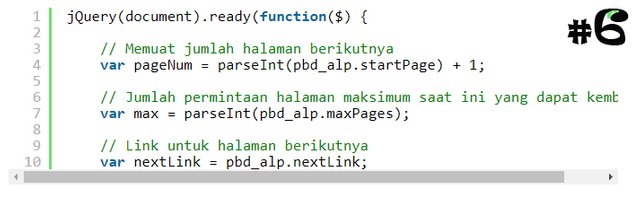
We began taking a shot at the initial 2 lines. $max is the most extreme number of pages in the present demand page that can be rehashed (for instance, if each page demonstrates 5 post and there is no 12 post on the class right now, at that point the greatest sum will progress toward becoming 3).
The $paged variable will store the page we are as of now on (The general purpose of our module is to guarantee individuals never stack a moment page, yet it doesn't hurt to ensure). At that point in the variable $paged capacity to spare our present page (the center of this module is to influence the individual to won't stack the second page or another page).
On the off chance that we bounce to line 12, there will take a gander at where we have been working out of the third line work (this is a connection to the following page). next_posts () is a worked in WordPress work that will restore the URL that we require.
wp_localize_script () work is the best since this makes it simple to pass the qualities (values) from PHP to javascript. The main esteem, pbd-snow capped mountain stack posts must match the qualities that are conjured on the wp_enqueue_script ().
The estimation of the second, we will make a pbd_alp variable will be the name that we use on our javascript next.
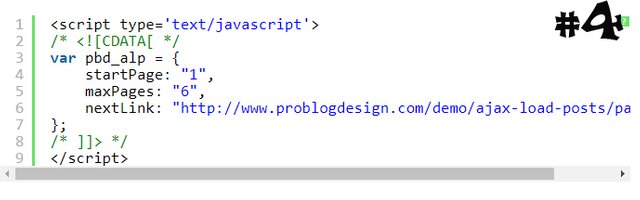
Finally, we send over a variety of information. In the event that you show HTML source later in the page website page, you will see a code like underneath before the javascript document is stacked:
Presently, we have to close the if explanation i.e. pbd_alp_init () work, and associating every last bit of it into put.

Here we are utilizing the template_redirect snare in light of the fact that with the init snare, variable $wp _ question won't be settled ahead of time.
jQuery – the core of this Plugin
Presently we stack the content and through qualities that we require. This is your opportunity to get the substance of this instructional exercise.
Open the document stack posts .js. The principal topics we do is influence 3 to get to variable that we proceed with the php work we as of now make.
Step by step instructions to get to those qualities is to utilize the arrangement valueName pbd_alp.: (pbd_alp the second is an esteem which we contribution to the wp_localize_script (), ideally regardless you recollect).
The most imperative thing to recollect is that the quantity of pages we have sent as a string, so we utilize javascript parseInt () capacity to change over it back to a past page number.
With the pageNum, we add one to the number as this will keep the number on the following page to stack (not the present page).
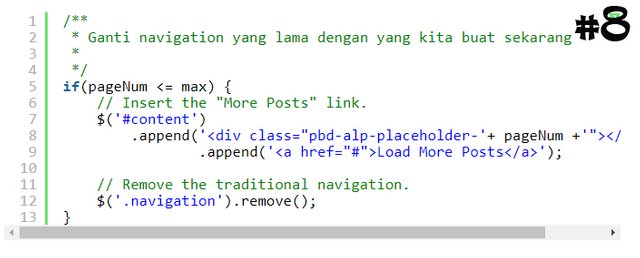
Most as of now have a WP topic route to move keantar page, as Older Posts/NewerPost interface. Presently we will mengantinya with ajax catch we make, so first we will evacuate all naigation keys we embed joins and.
Remember that it is the number of the next page pageNum, so if it is larger than the max, no page that will be loaded again. In this case, we will not be adding the button.
If there is new content to be loaded, then we look for the #content div, and add two things that ended it. The first is an empty div, which later will we use to incorporate into our posts.
The second is the button itself (A normal HTML link), wrapped in a paragraph.
Lastly, we find div. navigation and delete it. If the theme you're using a different class to the navigation key, you will have to change (the default theme is that navigation is commonly used). The same goes for div #content too.
The result of the code above is the key we've placed, although it cannot yet be used to doing nothing.
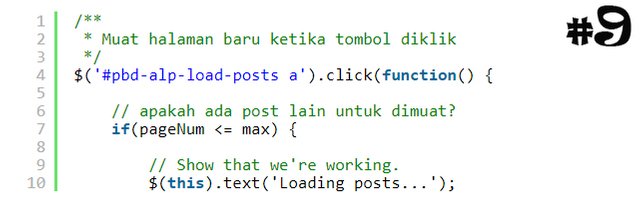
Now, let's make a code that can be used by the user clicking the button.
The first line of code is the jQuery event handler, which runs when the user clicks the button.
in line 7, we run the same checks as before. This is important because this script will load in the message error 404 if no other post.
Line 10 is the update of the text on the button to read "Loading posts ..." This is a good practice because the user will get an instant reaction when they click the button.
The next step is to make AJAX calls. Quite a lot going on here, so just copy and paste the following script,
The first line is paramount. We use the jQuery selector to select the placeholder div. reason we add pageNum number to end the class name if the user click on the button again. We will be adding a new post for the new placeholder (no overwrite the old one).
. load () function to load the url we have we skip (remember that nextlink are URLs to move to next page), and because we've added. post to the end, it will only copy the div. post found only, not for the entire the page.
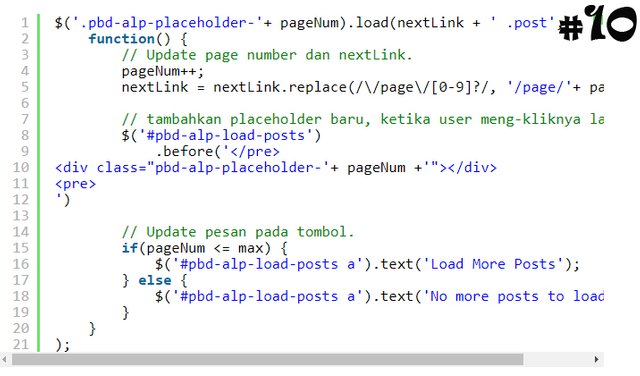
In line 2, we start with a new function that will be called when AJAX completed runs.The first thing to do is to update the values for the next time when the button is clicked.
pageNum increased by one (to point to the next page), and nextLink updated using regular expression. This is used to search for the URL/page/2/(or other number), and replace the part number of the next page with a new one.
at line 8, we are adding a new div placeholder. This will be used when the button is clicked.
Finally, at line 12, we update the text on the button again. If any other post that are loaded, we will return to the original text. If not, then we will be updating with a message saying that there is no post that can load again.
Now, we just need to complete a few things:
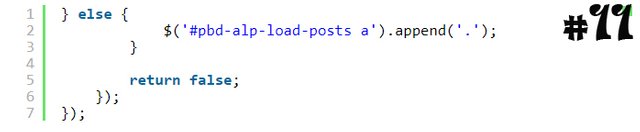
This code starts by covering the first f-statement (If there are more pages to load (load)?). If not, he added '. ' key messages into it. This is solely to provide some sort of visual response for users when the button is clicked (take a look at the screenshots below to see what happened).
And last of all, we use return false; to prevent a link from the button load himself.
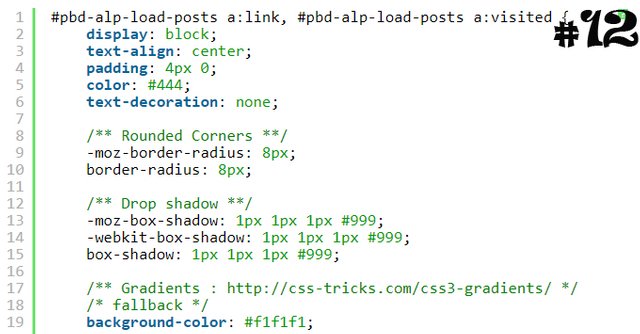
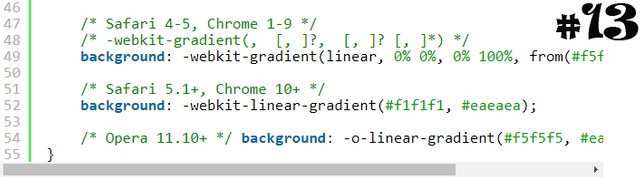
Style
The button you are now fully working! The only thing left is to make the button style.
Open the file style. css in the css folder, and then add the following script:
Save all you already do, and activate the plugin. If there is a problem, try the clay back what you've been using theme #content. navigation if you don't add or replace the id and class before.
So tutorial from me! hopefully useful, I am the first time to join the spark plug here Thank you very much to utopian-io has been providing contributing open source money to steemians and thanks to the moderator who reviewed my tutorial.
I @miftahul23, Thank you for Support
good luck.
Posted on Utopian.io - Rewarding Open Source Contributors
Your contribution cannot be approved because it does not follow the Utopian Rules.
Machine translations are not welcome in Utopian.
You can contact us on Discord.
[utopian-moderator]