Programming in Clojure. Part 3: Syntax and REPL
What Will I Learn?
In this part of the tutorial you will learn:
- What are the benefits Clojure's LISP-like syntax
- How to use REPL to run and debug your code
- How to develop your own REPL for Clojure
Requirements
To follow this part of the tutorial it might be beneficial to have:
- Experience in any other programming languages, especially in those designed for functional programming. Ideally Lisp dialects.
- Experience with functional programming.
- Experience working in command line.
Difficulty
- Intermediate
Tutorial Contents
This part of a tutorial will demonstrate a simple model for thinking about evaluation of Clojure programs. It will also describe how to take advantage from powerful Clojure REPL. Practical task of this tutorial will consist of developing our own REPL, which is surprisingly simple thanks to Clojure's syntax.
Curriculum
- Part 1: Why Clojure?
- Part 2: Functional Programming
- Part 3: Syntax and REPL
- Part 4: Data structures
- Part 5: Advanced data structures
- And maybe more...
Abstract Syntax Tree
Being a LISP dialect, Syntax of Clojure is famous for being quite exotic compared to most modern lanugages. Latter opt-in to use expression and statements which look similar to mathematic notation: 1 + 2 * y is immidiately understandable even for middle schoolers. Identical expression in any LISP would look like (+ 1 (* 2 y)), which many people find confusing, especially when they just start learning programming. However, there are compelling evidence to use latter, which you will know by the end of this article.
Almost all programming languages are executed in sequence of following phases:
- Preprocessing: manipulating the source code of the program in one way or another. LISPs has macros for this, C has preprocessor, other languages might have different techniques.
- Lexical analysis: breaking down source code into it's constutuent elements. In a sense, that's when compiler/interpreted "understands" the meaning of the smallest pieces of source code.
- Syntax analysis: organizing tokens received from Lexical analysis stage into an abstract syntax tree, according to syntactic rules of a language.
- Semantic analysis: handling type checking, declaring variables and binding them to values, and ensuring semantic correctness of a program.
- Analysis and optimization: advanced techniques for manipulating program structure in such a way as to make it run faster. One particular example might be elimination of "dead code" (code which will never run, like
if (false) { <dead code> }. - Code generation: creating a machine code (or code in some other language in case of transpiling).
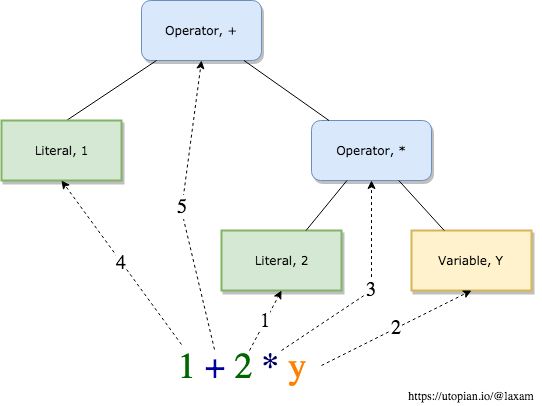
Let's take previously mentioned expression 1 + 2 * y as an example, and see what compiler or interpreter needs to do on Lexical and Semantic analysis phases to process it:
- Lexical analysis: will output tokens similar to the following: <Literal, 1>, <Operator, +>, <Literal 2>, <Operator, *>, (of course it's not persice, since exact format of changes from language to language and even between compiler/interpreter versions).
- Semantic analysis: will need to form an abstract syntax tree from those tokens. It needs to scan the whole thing to find an operation with highest preference, which is <Operator, *> in our case, then it needs to find tokens to which this operator is applied, which are <Literal, 2> and <Variable, y>. Now it needs to figure out that resulting value must be appled on <Operator, +> together with <Literal, 2>. As you can see, there are many back-an-forth lookups performed, even in this simple example:
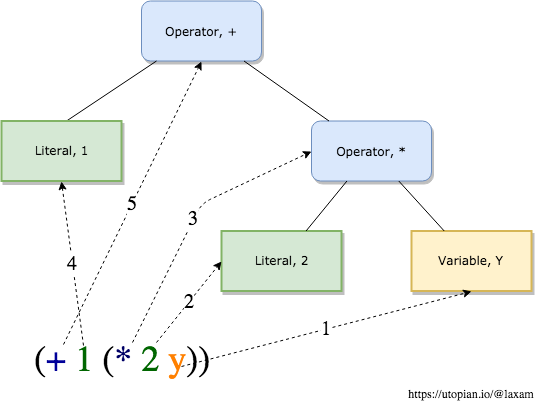
However, the process is much more strightforward with LISP syntax, because LISP expression is already a tree. Each LISP expression represents a list, where first element is a function to apply, and the rest are it's arguments. In fact, with LISP Lexical and Semantic analysis can be performed at the same time. Again, let's follow steps performed by compiler or interpreter, but now given the LISP expression (+ 1 (* 2 y)) as an input:
- First element of a top level list expression is
+, so create<Function, +>token. - Second element of a top level list expression is
1, so create<Literal, 1>token as an argument toFunction, +. - Third element of a top level list expression is
(* 2 y), so take the first element of it<Function, *>and put it as an argument to<Function, +>. - Second element of second level list is
<Literal, 2>, so put it as an argument to<Function, +>. - Third element of second level list is
<Variable, y>, so put it as a second argument to<Function, +>.
As a result, we get exactly the same tree, built in one pass, which exactly mirrors the initial syntax.
In effect, this means that LISP source code already represents abstract syntax tree, and it describes internal structure on a program much better than traditional syntax. This gives developer power to modify abstract syntax tree by simply modifying the source code programmaticaly, instead of using complicated introspection tools. Since source code is basically a structure consisting of nested lists, it is relatively easy to work with. With traditional syntax, source code is just an array of strings, with evaluation rules way too complicated to allow for efficient preprocessing without compiler support.
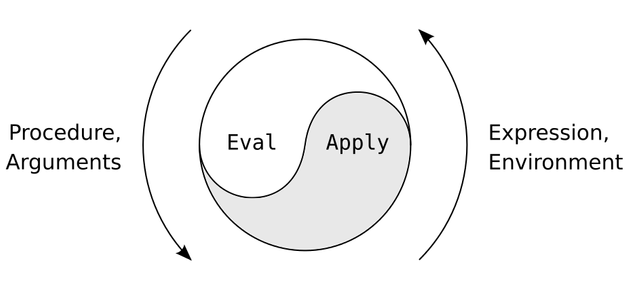
Another benefit of LISP-based syntax is that basic evaluation rules can be modelled as two stage process of recursively reducing the program to it's simpler version:
Given a list, it's evaluation can be performed in following way:
- Evaluate the tail of the list.
- Apply the head of the list to the tail of the list.
If we try to apply this process to our initial expression, this is how it will be evaluated:
(+ 1 (* 2 y))- initial list. For this example, let's say that value ofyis5in current namespace.- Evaluate it's tail:
- Evaluate
1. Literals, obviously, evaluate to their own value, so the result of this step is1. - Evaluate
(* 2 y).- Evaluate it's tail:
- Evaluate
2. Returns2. - Evaluate
y. Returns it's value5. - Apply
*to2and5. Returns10.
- Apply
+to1and10, Returns11
1. (+ 1 (* 2 y))
2. (+ 1 (* 2 5))
3. (+ 1 10)
4. 11
Keep in mind that while this model gives a convenient way of thinking about the source code evaluation, it does not always match what really happens in a real application. In many situation Clojure needs to alter the argument evaluation rules for one reason or another. Still, we need to understand eval/apply execution model to use as a base for understanding those exceptional cases.
Read Eval Print Loop
Many modern languages, especially interpreted ones, have a built-in read-eval-print-loop, or REPL: : Python, Ruby, Scala, JavaScript to name a few. In many cases having access to REPL is very convinient, since it allows working with code in more interactive manner. Developer can try out different features of a language and receive immidiate feedback from the language. It might also be used as a very powerfull debugging tool.
LISP was one of the first languages to implement REPL. Event the name itself has it roots in following LISP expression (not valid in Clojure due to differences in syntax):
(loop (print (eval (read))))
Thanks to the newly-obtained knowledge of the LISP evaluation model, we can see why that expression seems to be written backwards (arguments are always evaluated first). Here's how this simples REPL works:
readan input as a stringevalan input as a Clojure source codeprintthe result to standart outputloopto repeat the process from the start
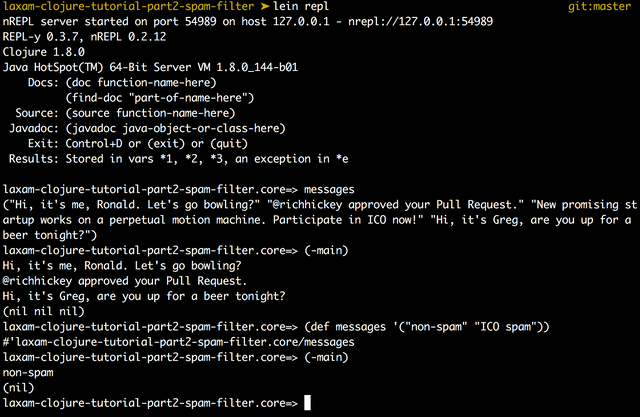
You can start Clojure's REPL with Leiningen by running lein repl. If you run this command from the project directory, you will have an access to project's namespace and all variables there. Here's how we can use REPL to change the list of messages for the program we've developed in the previous part of the tutorial:
Writing REPL
We can create similar kind of REPL on our own with without too much effort. All we need to modify initial (loop (print (eval (read)))) construct to match closure's syntax, and add some niceties like idicator of waiting for the user's input.
Create new Leiningen project, as usual with lein new app laxam-clojure-tutorial-part3-repl. Open file ./src/laxam_clojure_tutorial_part3_repl/core.clj in your favourite editor and let's get to work.
First, we need to change loop expression. In Clojure, loop is very similar to recursion. It accepts a vector of bindings (just like a function with it's arguments), and requires user to trigger next loop iteration by calling recur. Values of recur's arguments will be used for bindings. So, the first draft of our -main function looks like this:
(defn -main
  [& args]
  (loop [_ nil]
    (recur
     (println
      (eval
       (read))))))
Now, let's extend this small program with user interaction promit. I will use >>> symbol as an indicator that REPL is ready to accept user's input:
(defn -main
  [& args]
  (loop [_ nil]
    (recur
     (println
      (do (print ">>>") (flush)
          (eval (read)))))))
This works almost perfectly. It evaluates expressions correctly and even looks up varaibles in current namespace:
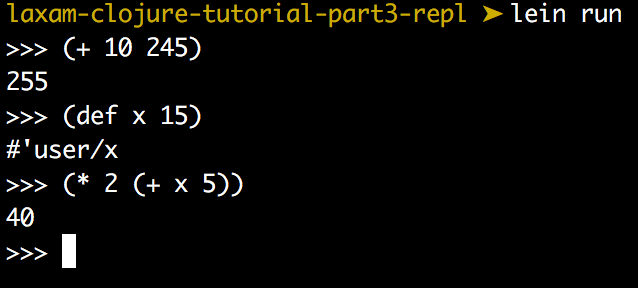
There's just one problem with this code so far. Once we encounter an error, exception will bubble up all the way to the top, closing our REPL process. That's not what we expect from REPL, so let's catch that exception, print the error message and stop the process from exiting:
(defn -main
  [& args]
  (loop [_ nil]
    (recur
     (println
      (do (print ">>> ") (flush)
          (try
            (eval (read))
            (catch Exception e (println "Exception: " (.getMessage e)))))))))
That's much better. We used Clojure's version of try-catch expression, which works quite similar to ideantical expression in Java. .getMessage is an example of interoperability between Java and clojure: it is actually a method bound to exception object, and not a Clojure function. If "function name" starts with ., Clojure will try to look up corresponding method in a second element of a list expression (first function argument).
One last problem with this code is that when we want to exit REPL with CTRL+D, JVM generates runtime exception "End of file while reading", which will be caught in try-catch block and ignored. Next (read) will still contain EOF symbol, so our repl will get into endless loop. To handle it, we need to handle EOF manually. Fortunately, read expression in Clojure can be instructed to return special symbol when encountering EOF, instead of throwing an error. We will use it to safely exit the process when user sends EOF combination to standard input channel:
(defn -main
  [& args]
  (loop [_ nil]
    (recur
     (println
      (do (print ">>> ") (flush)
          (try
            (eval
             (let [expr (read *in* false :end)]
               (if (= expr :end) (System/exit 0) expr)))
            (catch Exception e (println "Exception: " (.getMessage e)))))))))
As you can see, read was modified by instructing it to not throw an exception (false flag) and to replace it with :end value instead. We store incomming expression into expr variable and, if it equals :end, we call System/exit 0 to stop the process cleanly. Finally, our REPL application is complete, and works correctly even when exceptions occur:
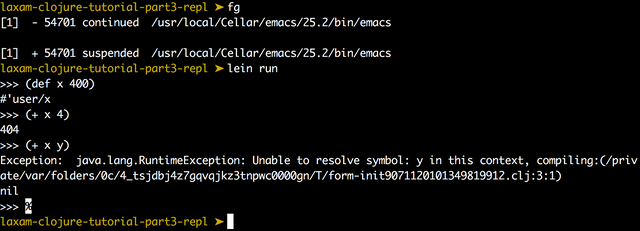
The complete source code for this project can be found, as usual, in a GitHub repostory.
Summary
Clojure's exotic syntax has many benefits which are not visible from the first glance. It is very easy to reason about the program execution with simple set of rules in mind. We developed a REPL application, which despite a simple source code is complete and functional.
I hope you have enjoyed this tutorial.
Posted on Utopian.io - Rewarding Open Source Contributors
Thank you for the contribution. It has been reviewed.
Need help? Write a ticket on https://support.utopian.io.
Chat with us on Discord.
[utopian-moderator]
Hey @laxam I am @utopian-io. I have just upvoted you!
Achievements
Utopian Witness!
Participate on Discord. Lets GROW TOGETHER!
Up-vote this comment to grow my power and help Open Source contributions like this one. Want to chat? Join me on Discord https://discord.gg/Pc8HG9x