REAL TIME GPS TRACKER ON YOUR PHONE
Introduction
This tutorial is a open source project, the purpose is following your car. Car thieves will now be captured very easily with this project. With Arduino and GPS GPRS, we can instantly see where our car is located on the map from our phone using the module. You can use it for anything you want, not just a car.
What Will I Learn?
- You will learn the signal from GPS satellites
- You will learn what communication type is used between arduino and modules
- You will learn how to easily communicate your Arduino with your smartphone
- You will learn how to use the Blynk application
Requirements
- Arduino Uno R3 board
- SIM800L
- NE06GPS
- Breadboard
- Jumper wires
- PC
Difficulty
- Basic
Tutorial Contents
PART 1 How this Modules works
NE06GPS
This is a gps module. Communicates with the GPS satellites in the space and generates a code containing your location information. What kind of code is this? I wondered, and I read the output from Arduino and the following codes appeared.
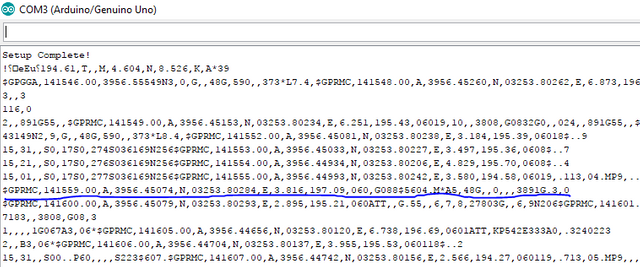
The NE0-6M-GPS module outputs an output like this when we read only the incoming data without using any library. As an example, let's examine a code.
$GPRMC,141559.00,A,3956.45074,N,03253.80284,E,3.816,197.09,060118,
"$GPRMC" tells us how to handle the incoming GPS code.
"141559.00" is the time information. This time information is UTC.
"A" This letter indicates that the GPS is connected to the satellite and this satellite is called the hot satellite. Unsatisfied GPS satellites in this section "V" letter is published and these satellites are called cold satellites.
The third line is "3956.45074" latitude. Formats are degrees and minutes. After this data is processed, the correct format will be as follows; 39 degrees 56.45074 minutes.
In the fourth line, "N" is north. This data gives us the data of what pole of the world it is. If you were to the south you would write "S".
The fifth line is "03253.80284" longitude. Formats are degrees and minutes. . After this data is processed, the correct format will be as follows; 32 degrees 53.80284 minutes.
The sixth line is "E" east. This data gives us the data that we are in the east or west of the world. If you were in the West, "W" would write to the West .
Our seventh and eighth data "3.816,197.09" gives us speed.
The ninth received date has "060118" date. The edited version is 06: 01: 18.
- SIM800L
This is a sim card module. It communicates with telecommunication antennas in your area and provides make calls, messaging and internet connectivity. How does this module communicate with arduino? I wondered and read the output of Arduino and the following codes appeared.
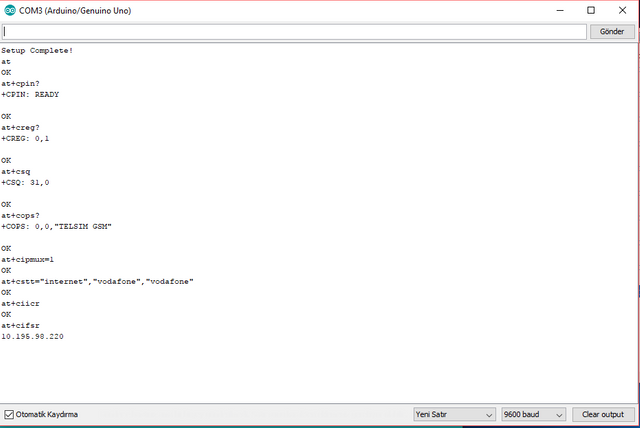
Our first command "AT" SIM800L tells us that the answer is "OK" when the SIM800L is ready.
Our second command is "AT + CPIN?" When we send it to SIM800L, the answer is "+ CPIN: READY" and it says that the pin code is entered in sim card. Since our sim card did not have a pin code, it opened directly. If there was a pin code, we would open the pin code by entering the code "AT + CPIN =" XXXX "".
Our third command is "AT + CREG?" When we send this to SIM800L the answer is "+ CREG: 0,1" This command checks whether our sim card is connected to the network.
"+ CREG: 0.0" says you are not connected to a network and can not connect.
"+ CREG: 0,1" means that you are connected to a network.
"+ CREG: 0,2" says you are not connected to a network and you are trying to connect.
Our fourth command is "AT + CSQ" When we send this to SIM800L, the answer is "+ CSQ: 31,0" this command tells us how much our sim card has taken.
0 -115 dBm
1 -111 dBm
2...30 -110 dBm ... -54 dBm
31 -52 dBm or it has a better quality.
Our fifth command is "AT + COPS?" When we send this to SIM800L, the answer is "+ COPS: 0,0," TELSIM GSM "" this tells us which network our sim card is registered to.
Our sixth command is "AT + CIPMUX = 1" when we sends this to SIM800L reply "OK" this command configures SIM800L for single or multiple IP connection.
Our seventh command is “AT+CSTT="internet","vodafone","vodafone"” when we send this to SIM800L reply "OK" with this command we are making APN settings for the internet.
Our eighth command "AT + CIICR" SIM800L When we send this reply "OK" this command will start our internet connection.
When our ninth command "AT + CIFSR" SIM800L when wesends this, the reply "10.195.90.220" gives us the local ip address of our link with this command.
PART 2 How this Modules connection
SIM800L................ARDUINO
GND.......................GND
VCC........................5V
TX...........................PIN2
RX...........................PIN3
- NE06GPS................ARDUINO
- GND........................GND
- VCC.........................3.3V
- TX...........................PIN5
- RX...........................PIN4
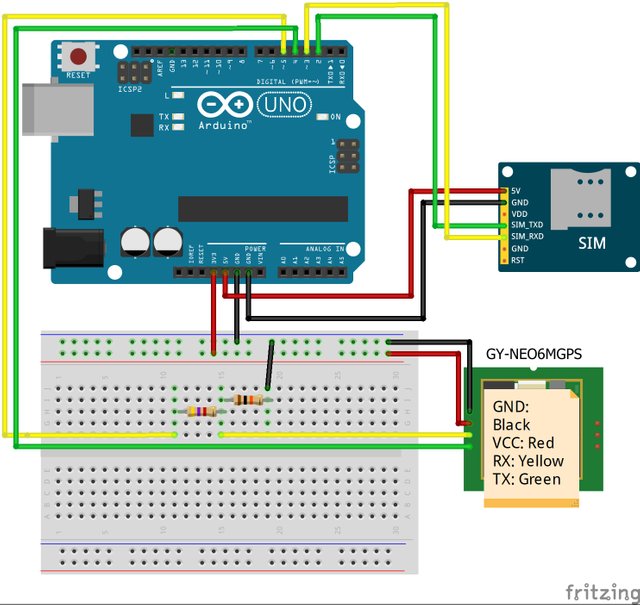
The GPS module is the voltage divider for the RX pin of the GPS module because the GPS module is the RX pin receiver and it works with 3.3 volts. The Arduino has a 5 volt output. I drop it so that it does not damage the GPS module.
I communicate these modules with Arduino using a communication protocol UART. You can go here to learn more about the UART.
The GPS baud rate is 9600 bits per second. This means that at the moment 9600 data is sent from GPS to Arduino. You can go here to learn more about the GPS module. The SIM800L baud rate is 38400 bits per second. This means that at the moment 38400 data is sent from GPS to Arduino. You can go here to learn more about the SIM800L. But Arduino can communicate with one module at a time. Arduino has only one UART system. When data arrives at the same time in two modules, it is confusing and our system is not working. To solve this, we will use commands in our code to start and stop communicating with the modules.
- PART 3 How to use Blynk app
Blynk is a smartphone application. Using Blynk and Arduino you can easily create your own IOT project. You can go here to learn more about the Blynk. You can download Blynk app from for android, for ios
- Now let's go to the Blynk application.
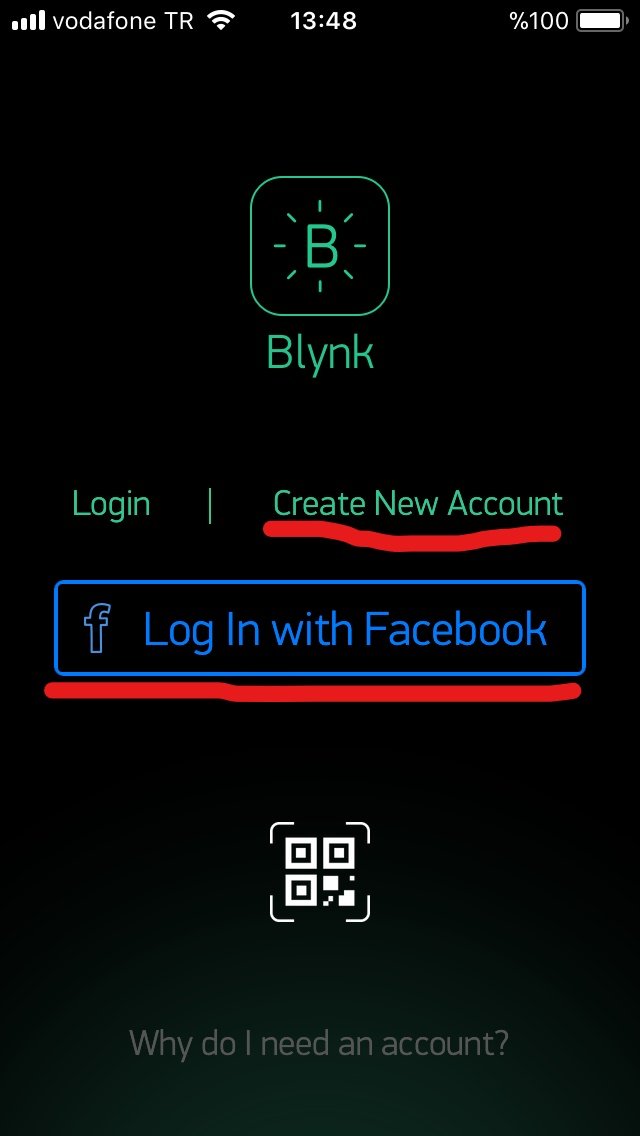
Create a new account and sign in to the app.

Create a new project for gps tracking.
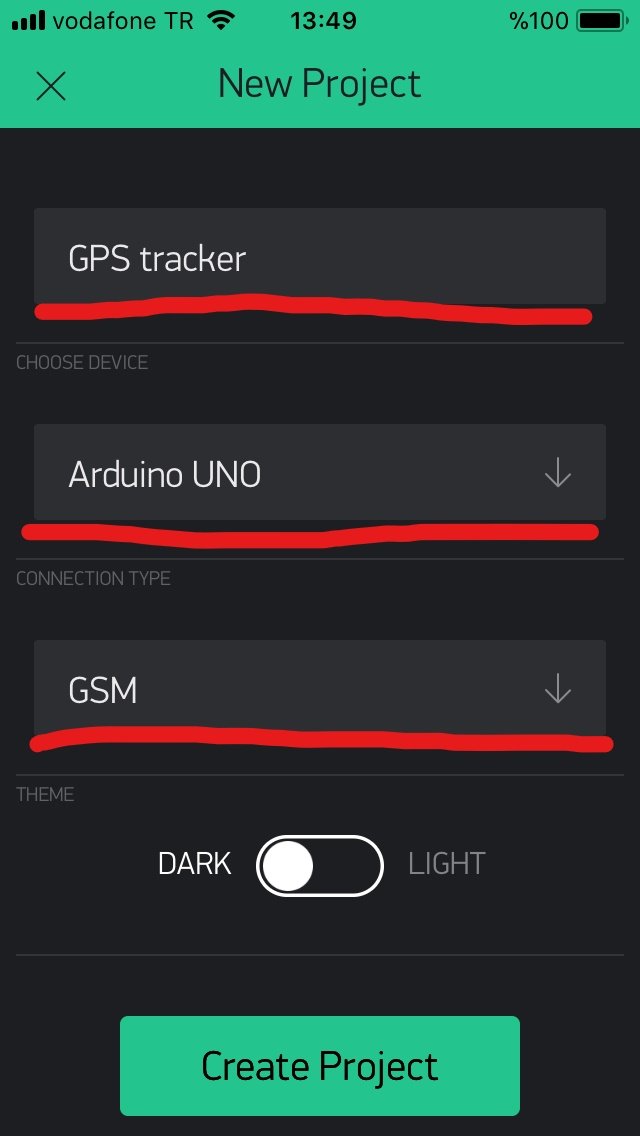
Apply your project settings as shown in the picture.
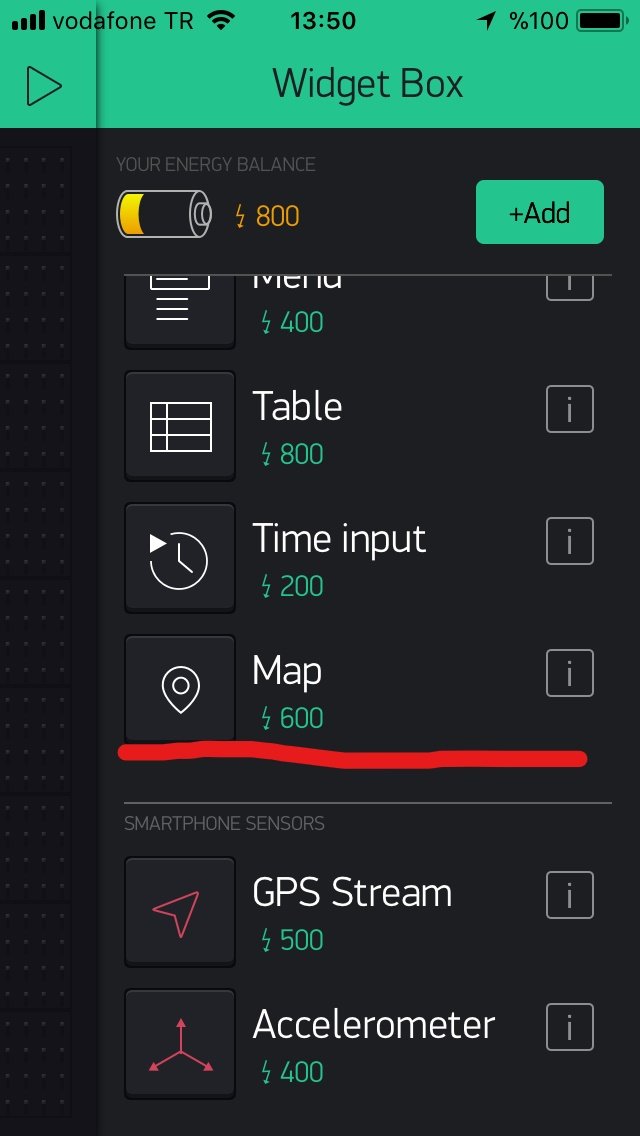
Go to the widget box and click on map.
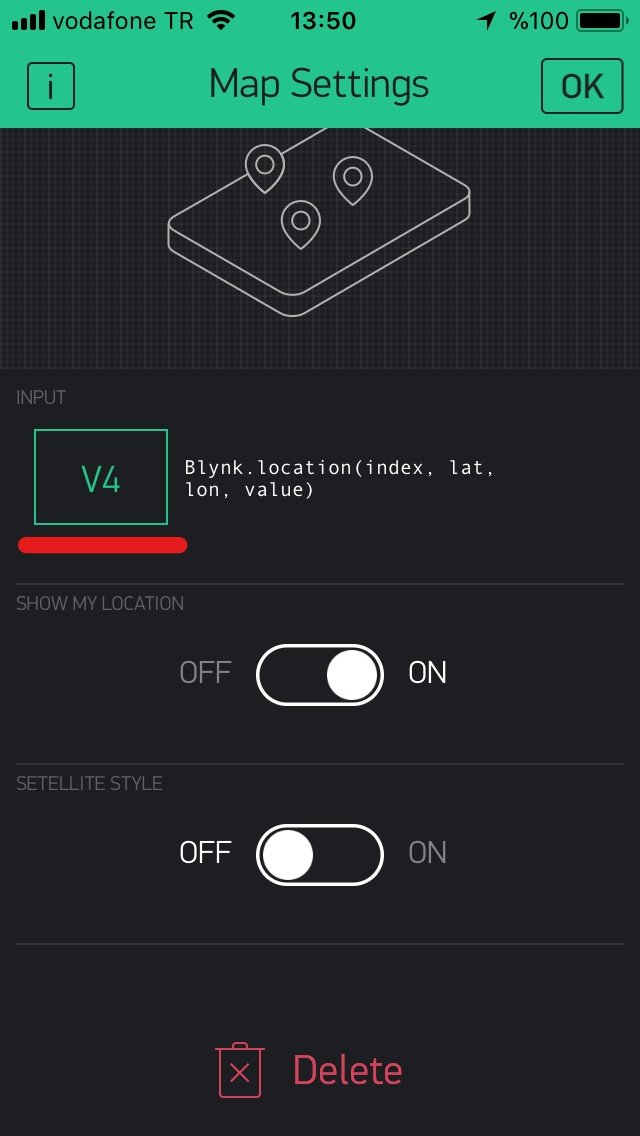
Apply your map settings as shown in the picture.

You can add extra widgets like me. Now go to project settings.
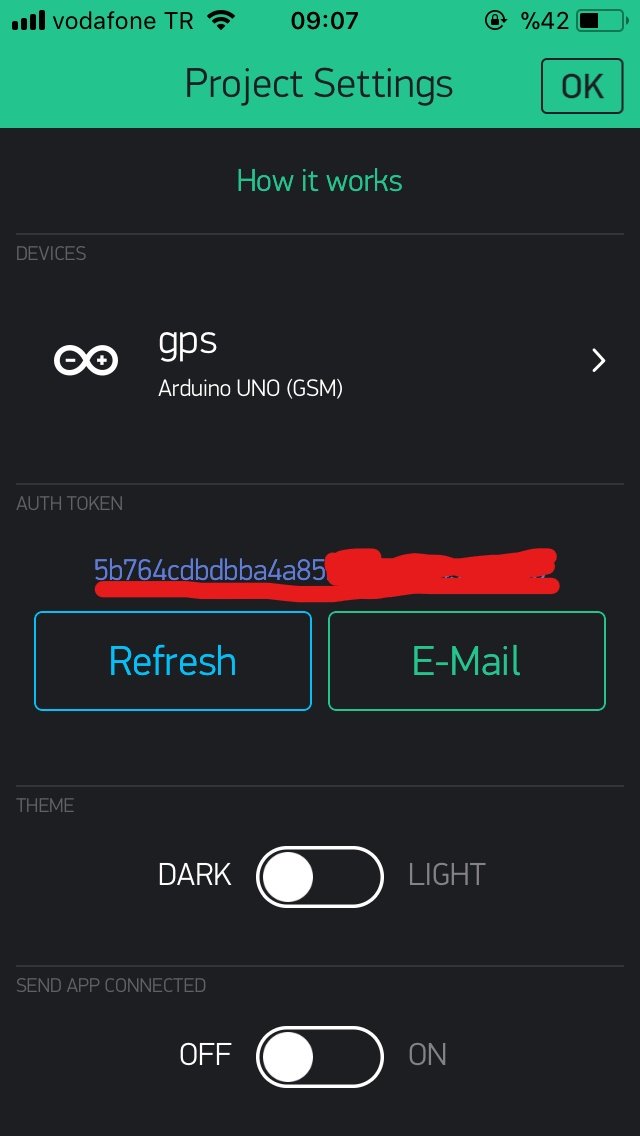
And keep this auth token in mind. We will use it in our code.
PART 4 Download the Libraries
Download the Aruino software from here.
Download the Blynk library from here.
Download the Tinygps library from here.
Download the Tinygsm library from here.
Download the Softwareserial from here.
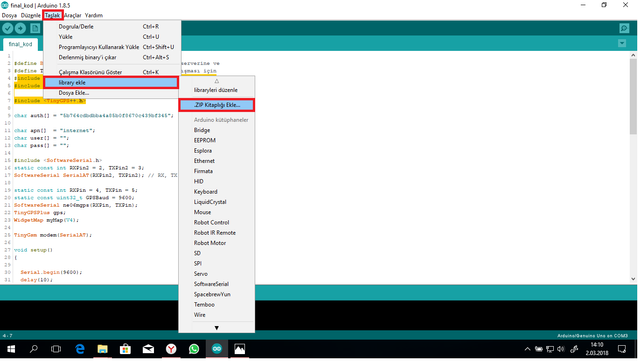
You can add the libraries you downloaded as shown in the picture.
- PART 5 Programing
#define BLYNK_PRINT Serial       // Bu kısım BLYNK serverine ve
#define TINY_GSM_MODEM_SIM800    // SIM800L'nin çalışması için
#include <TinyGsmClient.h>       // gerekli olan kütüphaneler.
#include <BlynkSimpleSIM800.h>

#include <TinyGPS++.h>

char auth[] = "YOUR AUTH TOKEN";

char apn[]  = "YOUR APN SETTING";
char user[] = "";
char pass[] = "";

#include <SoftwareSerial.h>
static const int RXPin2 = 2, TXPin2 = 3;
SoftwareSerial SerialAT(RXPin2, TXPin2); // RX, TX

static const int RXPin = 4, TXPin = 5;
static const uint32_t GPSBaud = 9600;
SoftwareSerial ne06mgps(RXPin, TXPin);
TinyGPSPlus gps;
WidgetMap myMap(V4);

TinyGsm modem(SerialAT);

void setup()
{

  Serial.begin(9600);
  delay(10);
  ne06mgps.begin(9600);
  delay(10);
  SerialAT.begin(38400);
  delay(10);

  SerialAT.listen();
  delay(100);
  Serial.println("SERVERA BAGLANILIYOR");
  Blynk.begin(auth, modem, apn, user, pass);
  Blynk.virtualWrite(V3,"SISTEM BAGLANILIYOR");
  SerialAT.end();
  delay(3000);
}

void loop()
{    ne06mgps.listen();
     while (ne06mgps.available() > 0)
     if (gps.encode(ne06mgps.read()))
     konumgonder();
     Serial.println("gpsencode okundu");
     delay(10);
}
void konumgonder()
{
    if (gps.location.isValid())
    {
    float enlem = (gps.location.lat());
    float boylam = (gps.location.lng());

    Serial.print("ENLEM:  ");
    Serial.println(enlem, 6);
    Serial.print("BOYLAM: ");
    Serial.println(boylam, 6);

    ne06mgps.end();
    SerialAT.listen();

    Blynk.virtualWrite(V3,"KONUM BULUNDU");
    Blynk.virtualWrite(V1, gps.location.lat() ,6);
    Blynk.virtualWrite(V2, gps.location.lng(), 6);
    myMap.location(1, gps.location.lat(), gps.location.lng(), "KONUM");
    Blynk.virtualWrite(V5, gps.speed.kmph());
    SerialAT.end();
    }else{

    ne06mgps.end();
    SerialAT.listen();
    Serial.println("baglanamadi");
    Blynk.virtualWrite(V3,"KONUM ARANIYOR");
    delay(1000);
    Blynk.virtualWrite(V3,"BEKLEYİNİZ");
    delay(1000);
    SerialAT.end();}
}
- Now, you can see the location on Blynk app.
I hope this tutorial will help you. thank you.
Posted on Utopian.io - Rewarding Open Source Contributors
Your contribution cannot be approved because it does not refer to or relate to an open-source repository. See here for a definition of "open-source."
You can contact us on Discord.
[utopian-moderator]