The user guide for a newbie on how to build a private Steem blockchain for corporate projects

Repository
https://github.com/steemit/steem
What Will I Learn?
- How to customize and install the steem software
- How to configure a witness node, a seed node, and an RPC node
- How to create and configure more witnesses for the same chain
- How to perform basic operations with CLI wallet
- How to configure the firewall
Requirements
2 Servers with:
- 1 CPU
- 4 GB RAM
- 500 MB of Hard Disk
- Ubuntu 16.04 installed
These are the minimum requirements for each machine, but they can grow as the blockchain grows.
Difficulty
- Intermediate
Tutorial Contents
This guide is a response to the Blockchain Competence Centre of the European Commission, who have requested a complete documentation on how to build a Private Steem Blockchain.
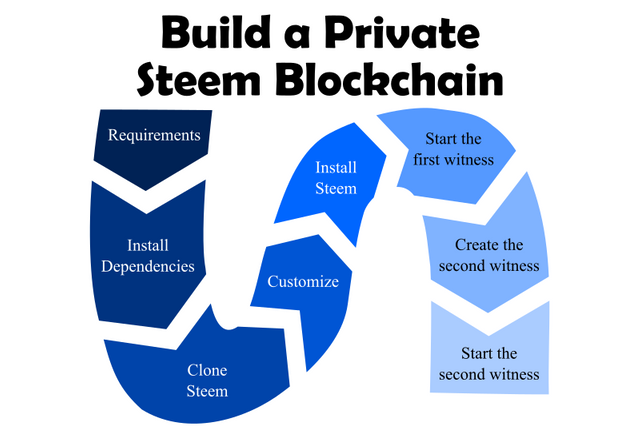
Below is a summary of all the steps:
- Install dependencies
- Clone Steem
- Customize
- Install Steem
- Start the first witness
- Create the second witness
- Start the second witness
- Extras
Install Dependencies
Open the terminal and run:
sudo apt-get install -y \
    autoconf \
    automake \
    cmake \
    g++ \
    git \
    libbz2-dev \
    libsnappy-dev \
    libssl-dev \
    libtool \
    make \
    pkg-config \
    python3 \
    python3-jinja2
These commands will download and install the required packages.
Next, install the boost packages (an important dependency for steem)
sudo apt-get install -y \
    libboost-chrono-dev \
    libboost-context-dev \
    libboost-coroutine-dev \
    libboost-date-time-dev \
    libboost-filesystem-dev \
    libboost-iostreams-dev \
    libboost-locale-dev \
    libboost-program-options-dev \
    libboost-serialization-dev \
    libboost-signals-dev \
    libboost-system-dev \
    libboost-test-dev \
    libboost-thread-dev
Clone Steem
Now, we can download the source code of Steem:
git clone https://github.com/steemit/steem.git
cd steem
git checkout stable
git submodule update --init --recursive
Here we take the code from the github repository, enter to the folder, select the most recent stable code, and download more dependencies (the submodules). Regarding the checkout command we can define a specific version, for instance, git checkout v0.19.5 to modify all files to the version 0.19.5.
Customize
The config.hpp file has a lot of features to customize, like the name of the token and the distribution of new tokens issued. They are declared with #define directive as constants and some are separated into two groups: Those who are between #ifdef IS_TEST_NET and #else are used for the Testnet, and those who are between #else and #endif are used for the Mainnet. We will focus on the mainnet section.
Open config.hpp (located at steem/libraries/protocol/include/steemit/protocol) and search:
#define STEEM_SYMBOL
...
#define VESTS_SYMBOL (uint64_t('V')        | (uint64_t('E') << 8) |
                     (uint64_t('S') << 16) | (uint64_t('T') << 24)|
                     (uint64_t('S') << 32))
#define STEEM_SYMBOL (uint64_t('S')        | (uint64_t('T') << 8) |
                     (uint64_t('E') << 16) | (uint64_t('E') << 24)|
                     (uint64_t('M') << 32))
#define SBD_SYMBOL   (uint64_t('S') |
                     (uint64_t('B') << 8)  | (uint64_t('D') << 16))
...
These constants define the names of the tokens VESTS, STEEM, and SBD. As you can see the words are build letter by letter.
Let's change the names to VESTS, EFTG, and EUR:
...
#define VESTS_SYMBOL (uint64_t('V')        | (uint64_t('E') << 8) |
                     (uint64_t('S') << 16) | (uint64_t('T') << 24)|
                     (uint64_t('S') << 32))
#define STEEM_SYMBOL (uint64_t('E')        | (uint64_t('F') << 8) |
                     (uint64_t('T') << 16) | (uint64_t('G') << 24)
#define SBD_SYMBOL   (uint64_t('E') |
                     (uint64_t('U') << 8)  | (uint64_t('R') << 16))
...
Now we have defined the names of our tokens!
From version 0.20 onwards the names of the tokens are defined in
asset_symbol.hpp.
#define STEEMIT_ADDRESS_PREFIX
Steem blockchain uses 4 key-pairs for each user (owner, active, posting, memo). The public key of all of them always starts with "STM". The purpose of this prefix is to explicitly differentiate a key pair from different Steem-like blockchains. STEEMIT_ADDRESS_PREFIX allows us to define this prefix, which should be fixed to 3 characters. Let's change it to EUR.
#define STEEMIT_ADDRESS_PREFIX "EUR"
#define STEEMIT_CHAIN_ID
The chain id is a unique identifier for the blockchain. It is useful to prevent replay transactions between different chains. To configure it we apply the hash function to some text. For instance, the hash of europe:
#define STEEMIT_CHAIN_ID (fc::sha256::hash("europe"))
#define STEEMIT_INIT_PUBLIC_KEY_STR
This is the public key of the first user in the blockchain, initminer. In this order, we need a pair of keys. How to generate one? there are many alternatives, like this generator or the CLI wallet (more details about this CLI in the following sections). For instance, using the CLI wallet we can use the command: get_private_key_from_password initminer owner luxembourg, where the last word (luxembourg) is the password. The response is this:
[
  "STM8PsyH8FSX7VPKg3ecKLD4khpkrUTYLJeWYcN8h2fJyhVnd1iHf",
  "5JKVA1RMufcDpprpWmRsNVrkJtb3m3E8VbRUHdsVxC9CRxii2Z4"
]
The first string is the public key, and the second one the private key.
Important! Change the prefix STM in the public key to the prefix used in our chain, in this case EUR (this change does not affect the private key).
#define STEEMIT_INIT_PUBLIC_KEY_STR "EUR8PsyH8FSX7VPKg3ecKLD4khpkrUTYLJeWYcN8h2fJyhVnd1iHf"
#define STEEMIT_HARDFORK_REQUIRED_WITNESSES
As the name indicates it represents the number of witnesses required to make a hard fork, which by default is 17. If you have a few servers for testing purposes change it to 1.
#define STEEMIT_HARDFORK_REQUIRED_WITNESSES 1
#define STEEMIT_MAX_WITNESSES
This value defines the maximum number of witnesses per round, which by default is 21. On steem, new blocks are created every 3 seconds, this means that one round takes 63 seconds. A block is considered irreversible after 2/3 of the witnesses in the round have confirmed. The more witnesses there are, the more decentralized the network will be. However, it takes more time synchronizing and will have slower irreversible time. Then this number of witnesses represents an intermediate point between performance and security.
#define STEEMIT_MAX_WITNESSES 21
#define STEEMIT_INFLATION
The inflation in the steem blockchain is defined through 3 constants:
| Value | Description |
|---|---|
STEEMIT_INFLATION_RATE_START_PERCENT | Inflation rate at the first block. By default (978) meaning 9.78% |
STEEMIT_INFLATION_NARROWING_PERIOD | Number of blocks to reduce the inflation rate by 0.01%. 250000 by default |
STEEMIT_INFLATION_RATE_STOP_PERCENT | Floor for the inflation rate. By default (95) meaning 0.95% |
#define STEEMIT_CONTENT_REWARD_PERCENT
The distribution of the new tokens is defined through 2 constants:
| Value | Description |
|---|---|
STEEMIT_CONTENT_REWARD_PERCENT | Percentage to authors and curators. By default 75% |
STEEMIT_VESTING_FUND_PERCENT | Percentage to holders of Steem Power (internally VESTS). By default 15%. |
| Witnesses | Remaining percentage goes to witnesses, that is, 10%. |
From version 0.20 onwards the names of the constants start with STEEM instead of STEEMIT.
Take a look at config.hpp file to see more constants to define. Now we are prepared to compile the code.
Install Steem
Go to the principal steem folder and run:
mkdir build_eftg
cd build_eftg
cmake -DCMAKE_BUILD_TYPE=Release -DLOW_MEMORY_NODE=OFF ..
make -j$(nproc) steemd
make -j$(nproc) cli_wallet
This could take some time. Here we are installing two things: steemd which is the software that creates the blockchain, and cli_wallet the command line interface to sign and broadcast transactions.
When
LOW_MEMORY_NODEoption is OFFsteemdis built in such way that data and fields not needed for consensus are not stored in the object database. This is the simplest form of a consensus node.
config.ini file
The config.ini file is used to configure the parameters of steemd. Run this commands to create and open the file:
cd programs/steemd
mkdir eftg
vim eftg/config.ini
press INS to enable writing and paste this:
rpc-endpoint = 127.0.0.1:9876
p2p-endpoint = 0.0.0.0:3333
shared-file-size = 1G
enable-stale-production = true
witness = "initminer"
private-key = 5JKVA1RMufcDpprpWmRsNVrkJtb3m3E8VbRUHdsVxC9CRxii2Z4
press ESC and type :x to exit. The meaning of these lines is detailed below.
rpc-endpointallows RPC calls for blockchain operations from clients, we have used here the port 9876 but we could put a different one.p2p-endpointopens the port to listen connections p2p. Through this port, the machine connects with other witnesses and seed nodes in order to synchronize blocks. Here we set it to 3333 but we could put a different one.shared-file-sizeis the disk space reserved for the blockchain. It can set low at the beginning but it should be increased as the blockchain grows.enable-stale-productionactivates the witness for block production.witnessis the witness we are configuring, in this case it is initminer, the first in the blockchain.private-keyis the private key of initminer, which was generated above and match with theSTEEMIT_INIT_PUBLIC_KEY_STR
Start the first witness
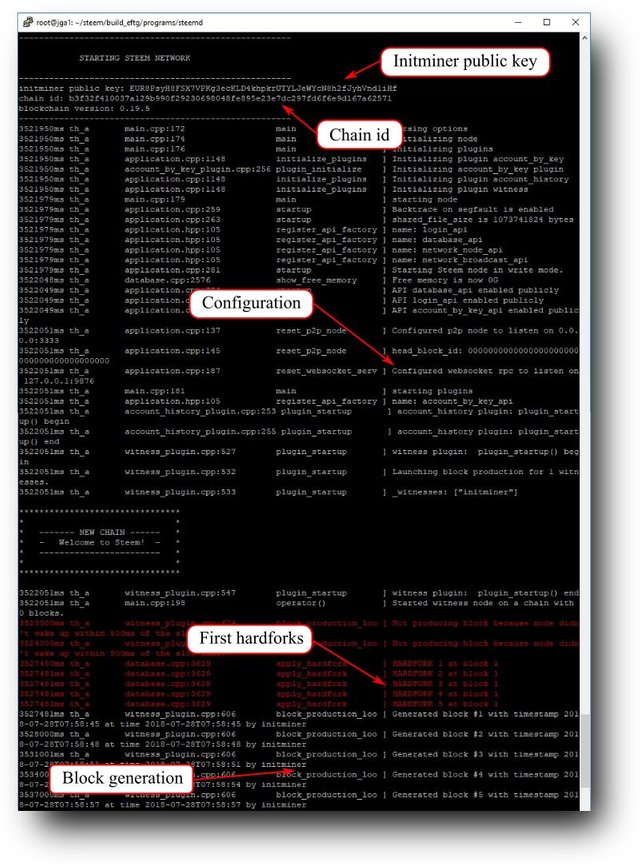
At this point we can start the generation of blocks with initminer as unique witness. Being in the steemd folder run
./steemd -d eftg
First, it displays the initminer public key, the chain id, and the node configuration. And finally it starts producing blocks.
Hardforks: Although the code version is v0.19, the genesis of the blockchain starts in the version 0.0.0. This means that it has to apply hardforks one by one in order to achieve the last version. The hardfork 19 is applied around the block 294.

Congratulations! now you are producing blocks!
Create the second witness
In this section, we will access to the blockchain using the CLI wallet to create a new user, @alice. Next, she will be configured to be a witness.
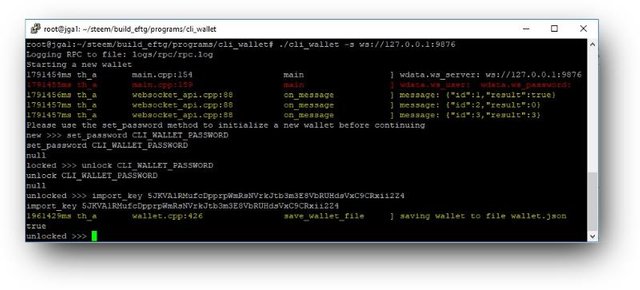
While steemd is running open other terminal and start the CLI wallet with the RPC port:
cd programs/cli_wallet
./cli_wallet -s ws://127.0.0.1:9876
Note: If you can't open another terminal, run steemd in background:
./steemd -d eftg > /dev/null 2>&1 &
The CLI wallet ask us to set a password:
>>> set_password SUPER_SAFE_PASSWORD
Next, unlock the wallet:
>>> unlock SUPER_SAFE_PASSWORD
And import the initminer's private key in order to make transactions:
>>> import_key 5JKVA1RMufcDpprpWmRsNVrkJtb3m3E8VbRUHdsVxC9CRxii2Z4

Now, we will create @alice's account. First suggest some password:
>>> suggest_brain_key
{
  "brain_priv_key": "KERNEL SCABBLE COOREE ASTEISM NONCOM OBOLE MOSAIC MESTIZO DOLCAN BATLAN AVOWANT AUGERER GETTING PLOUKY DIS ESSED",
  "wif_priv_key": "5KBaNCy9KWiwAT49ugTGg7L1BwXDYokPC7mKPexjLHHAfnDuQ5D",
  "pub_key": "EUR8T9kSuX4h2bW6JoZ3AdVWxZJLCCAAeZqfk8vZoXS1kCvzBsXeB"
}
Next, calculate the different key-pairs using the wif_priv_key:
>>> get_private_key_from_password alice owner 5KBaNCy9KWiwAT49ugTGg7L1BwXDYokPC7mKPexjLHHAfnDuQ5D
[
  "EUR8GyPg9Ha6wUwuMAUFdrQvbSVv2Be9FckBYVmM8YJ3gsWkq9mYr",
  "5JtParFnBNYMwQnLqmiozNzk5vh4vY7eykg21uM1VPCB4GNN3g4"
]

>>> get_private_key_from_password alice active 5KBaNCy9KWiwAT49ugTGg7L1BwXDYokPC7mKPexjLHHAfnDuQ5D
[
  "EUR8Eh7YVFmgDwc47VhnVHRUmRWjoNvmgBRzMe6CrLRCrF3UgrEWu",
  "5JDtMRaCv5HZgyFYSTVRisvgyWXHqf6ukMA22tvPnewNo2uyFEi"
]

>>> get_private_key_from_password alice posting 5KBaNCy9KWiwAT49ugTGg7L1BwXDYokPC7mKPexjLHHAfnDuQ5D
[
  "EUR5zrHYFXytHC9pBDgr1EuggJJgn4U4g2BmnS3FK1ciobHNV4KQf",
  "5JhK3HCeyTbUaeXB6zawo1ZRefmigsbrVXnjipHQMYRYUL5vXJC"
]

>>> get_private_key_from_password alice memo 5KBaNCy9KWiwAT49ugTGg7L1BwXDYokPC7mKPexjLHHAfnDuQ5D
[
  "EUR71xbxmG8ijSaiFWGXW2LqJF6cTsfLpjvbTSB7JnUzNYEDpUtsD",
  "5JTXYvSQ8Tzpmq3MdKepVHmS9ZsQhrn8UDrPFbKYvzczugwS6u1"
]
Save these key-pairs in a safe place. Next, initminer uses these public keys to create the alice's account and delegate some tokens:
create_account_with_keys_delegated initminer
"5.000 EFTG" "50000.000000 VESTS" alice "{}"
EUR8GyPg9Ha6wUwuMAUFdrQvbSVv2Be9FckBYVmM8YJ3gsWkq9mYr
EUR8Eh7YVFmgDwc47VhnVHRUmRWjoNvmgBRzMe6CrLRCrF3UgrEWu
EUR5zrHYFXytHC9pBDgr1EuggJJgn4U4g2BmnS3FK1ciobHNV4KQf
EUR71xbxmG8ijSaiFWGXW2LqJF6cTsfLpjvbTSB7JnUzNYEDpUtsD true
Note: This function only works after the hardfork 17. To see the actual hardfork use
get_witness initminerand look forhardfork_version_vote.
Now Alice can interact with the blockchain, let's import her active key:
>>> import_key 5JDtMRaCv5HZgyFYSTVRisvgyWXHqf6ukMA22tvPnewNo2uyFEi
Publish that she wants to be a witness. We can use another key-pair to sign transactions, let's use the suggested brain public key:
>>> update_witness alice "https://steemit.com/@alice"
EUR8T9kSuX4h2bW6JoZ3AdVWxZJLCCAAeZqfk8vZoXS1kCvzBsXeB
{"account_creation_fee":"0.100 EFTG",
"maximum_block_size":131072,"sbd_interest_rate":0} true
Now the blockchain should has 2 witnesses, check it:
>>> list_witnesses 30 30
[
  "initminer",
  "alice"
]
(Optional) initminer gives a vote to alice:
>>> vote_for_witness initminer alice true true
(Optional) initminer and alice publish the feed price:
>>> publish_feed initminer {"base":"5.000 EUR","quote":"1.000 EFTG"} true
>>> publish_feed alice     {"base":"4.700 EUR","quote":"1.000 EFTG"} true
Good! Now Alice can start producing blocks!
Start the second witness
In the second node repeat the same process of cloning, customizing, and installing steem. Do not change STEEMIT_INIT_PUBLIC_KEY_STR, use the same as initminer.
In the config.ini file change the witness to alice and set her private key. Additionally, set the seed-node of initminer in order to connect the 2 witnesses (ip address and port 3333):
rpc-endpoint = 127.0.0.1:9876
p2p-endpoint = 0.0.0.0:3333
seed-node = 178.128.78.111:3333
shared-file-size = 1G
enable-stale-production = true
witness = "alice"
private-key = 5KBaNCy9KWiwAT49ugTGg7L1BwXDYokPC7mKPexjLHHAfnDuQ5D
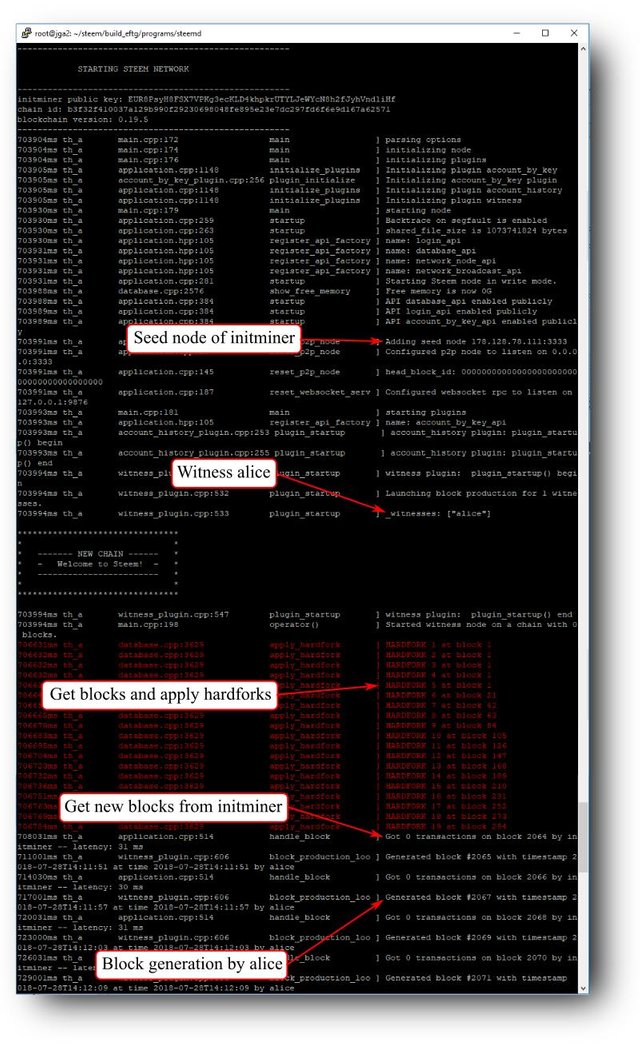
Now, start steemd on the alice's machine:
./steemd -d eftg
If everything works correctly Alice will synchronize the blockchain with initminer, and both witnesses will be producing blocks.

Congratulations! you have created a private steem blockchain with 2 witnesses!
Extras
Seed nodes
The seed nodes help to broadcast transactions and mainly to support all the demand of transactions required by the network.
The configuration of a seed node is the same as the witnesses with the difference that the config.ini file does not has witness nor private key. Regarding the system requirements, a seed node uses the same resources than a witness node.
Additionally it's important to mention that you can define several seed-nodes in the configuration file. For instance:
seed-node = 212.117.213.186:2016
seed-node = 185.82.203.92:2001
seed-node = 52.74.152.79:2001
seed-node = 52.63.172.229:2001
seed-node = 104.236.82.250:2001
seed-node = 104.199.157.70:2001
seed-node = steem.kushed.com:2001
seed-node = steemd.pharesim.me:2001
seed-node = seed.steemnodes.com:2001
RPC nodes
When a user uses the CLI wallet he is communicating with an RPC node. In this order, these nodes help to create and broadcast transactions and also to query them. The config.ini file contains a series of API plugins to enable. For instance, this is a full node (all options enabled):
plugin = webserver p2p json_rpc witness account_by_key tags follow market_history account_history
plugin = database_api account_by_key_api network_broadcast_api tags_api follow_api
plugin = market_history_api witness_api condenser_api block_api account_history_api
...
As you can see, the plugins can be split into different lines.
They RPC nodes need more resource requirements than a witness or seed node. Take the requirements section of this post as a reference to start, but the node will need more resources as the network grows. This post has more details about requirements and recommends to run the plugin account_history in a separate node.
CLI Wallet commands
In this section, we will see the basic CLI Wallet commands. A complete and detailed set of functions can be found here.
get_account
Used to get the current state of an account (public keys, balance, rewards, etc). Needs the account name as parameter. Example:>>> get_account aliceget_witness
Get info of a specific witness. Needs the witness name as parameter. Example:>>> get_witness initminerpost_comment
Function to publish a post or comment. It uses 8 parameters:author,permlink,parent_author(empty if it is a post),parent_permlink(category name if it is a post),title,body,json_metadata, andbroadcast(False to only sign). Example:>>> post_comment "alice" "my-first-post" "" "introduceyourself" "My First Post" "Hi, I'm alice. This is my first post" "{\"tags\":[\"eftg\",\"introduceyourself\"]}" truevote
Function to vote for a post or comment. It uses 5 parameters:voterauthor,permlink,weight, andbroadcast. For intance, to vote the previous post at 100%:>>> vote initminer alice "my-first-post" 100 trueget_state
Get global variables and state of a specific post. It needs the url. For instance, to get the previous post:>>> get_state "introduceyourself/@alice/my-first-post"get_block
Get the transactions of a specific block. Example:>>> get_block 36936vote_for_witness
Vote for a witness. It uses 4 parameters:voter,witness,approve, andbroadcast. For instance, if initminer want to vote for alice:>>> vote_for_witness initminer alice true trueupdate_witness
Used to register a witness or update. It uses 5 parameters:witness,url,block_signing_key,chain_properties, andbroadcast. Although this function was introduced above, the chain properties were not deepened. There are some chain properties that are defined by witnesses. Each one set his point of view, and the network takes the median of all of them.account_creation_fee: This is the minimum amount of steem needed to create a new account. This amount isn't burned at creation but transferred to the new account. A low fee allows the entry of a lot of new users but at the same time of spam accounts, while a high fee reduces spam but restricts the entry of new users. The witnesses define this intermediate point.maximum_block_size: Every 3 seconds the chain creates a new block. This value is a limit on the size of the block (measured in bytes), and it is very linked to the transactions per second that the blockchain will support. It is measured in Bytes. For instance, the current block size in the main chain is 65536 bytes (that is, 12.5 MB every 10 minutes, more than 1 MB of bitcoin).sbd_interest_rate: All holders of SBD receive an annual interest rate defined by this value. This is measured in hundredths of one percent, for instance set 710 for 7.10%.
These properties are written in JSON format. Example:
>>> update_witness alice "https://steemit.com/@alice"
EUR8T9kSuX4h2bW6JoZ3AdVWxZJLCCAAeZqfk8vZoXS1kCvzBsXeB
{"account_creation_fee":"0.100 EFTG",
"maximum_block_size":131072,"sbd_interest_rate":710} true
publish_feed
Used to set the SBD exchange rate. Again, the network takes the median of all witnesses. It uses 3 parameters:witness,exchange_rate, andbroadcast. Example:>>> publish_feed initminer {"base":"5.000 EUR","quote":"1.000 EFTG"} trueIn this example 5 EUR is the price of 1 EFTG.
Firewall
Install UFW (Uncomplicated Firewall) to set the firewall and have more security in the nodes.
sudo apt-get install ufw
Depending of what you want configure use these instructions:
sudo ufw defaultallow outgoing` Allow outgoing connectionssudo ufw default deny incomingDeny incoming connectionssudo ufw allow 9876Allow connections through 9876 portsudo ufw allow 9876Deny connections through 9876 portsudo ufw enableEnable Uncomplicated Firewallsudo ufw disableDisable Uncomplicated Firewall
This is the end of this basic tutorial. I hope it can be useful for those groups that want to take advantage of the Steem Blockchain and create powerful private chains.
Proof of Work Done
https://github.com/joticajulian/steem/tree/tutorial1
References
- 2018 Beginner's guide to setting up a steem witness and seed node (by @brandonfrye).
- The complete noob guide to steem witness setup (by @klye).
- Exploring Steem Scalability (by @steemitblog).
- Steem pressure 3 - Steem node 101 (by @gtg).
- How to start a test network (by @dantheman).
- Steem command line guide Part 1 - A learner's guide to using cli_wallet (by @pfunk).
Congrats, Juliàn! We'll test next week.
Excellent! I remain attentive to any doubt or clarification.
Your tutorial is very interesting, please edit the tutorial and put the utopian template.
Don't forget to put proof of your work in github.
After editing your tutorial let me know.
Thank you @jga
Need help? Write a ticket on https://support.utopian.io/.
Chat with us on Discord.
[utopian-moderator]
Hi @portugalcoin, thanks for your response. I have made new changes and added the work in github.
Thank you for your contribution.
Your contribution has been evaluated according to Utopian policies and guidelines, as well as a predefined set of questions pertaining to the category.
To view those questions and the relevant answers related to your post, click here.
Need help? Write a ticket on https://support.utopian.io/.
Chat with us on Discord.
[utopian-moderator]
Hey @jga
Thanks for contributing on Utopian.
Congratulations! Your contribution was Staff Picked to receive a maximum vote for the tutorials category on Utopian for being of significant value to the project and the open source community.
We’re already looking forward to your next contribution!
Want to chat? Join us on Discord https://discord.gg/h52nFrV.
Vote for Utopian Witness!
Wonderful! Thank you very much
Hi,
Thank you for this wonderful tutorial! I am trying to run a small private Steem Network, and followed your tutorial. The latest GitHub code is different than your guide, and so had to follow the "asset_symbol.hpp" for the symbol declaration. However, the symbols are all suffixed with "_U64". That was an easy fix. My custom values were:
VESTS_SYMBOL_U64 (uint64_t('V') | (uint64_t('E') << 8) | (uint64_t('S') << 16) | (uint64_t('T') << 24) | (uint64_t('S') << 32))
STEEM_SYMBOL_U64 (uint64_t('M') | (uint64_t('E') << 8) | (uint64_t('T') << 16) | (uint64_t('K') << 24) | (uint64_t('N') << 32))
SBD_SYMBOL_U64 (uint64_t('M') | (uint64_t('T') << 8) | (uint64_t('K') << 16))
Then, I edited only the "mainnet" section following in "config.hpp"
STEEM_INIT_PUBLIC_KEY_STR "MTK8PsyH8FSX7VPKg3ecKLD4khpkrUTYLJeWYcN8h2fJyhVnd1iHf"
STEEM_CHAIN_ID (fc::sha256::hash("europe"))
STEEM_ADDRESS_PREFIX "MTK"
I kept all others unchanged. I used the example public/private key combination in this tutorial, as I didn't have a way to generate my own.
The compile went well, and the steemd is running on my local server on port 9876. I can see it is also generating blocks, as expected.
However, I'm stumped at the cli_wallet section. When I do a "import_key xxxx" for my initminer, doing a "get_account initminer" shows the following output:

Not only is it showing no balance, it is also not showing my custom name. It still shows "STEEM" and "SBD"
What could I be doing wrong? Any help?
You have to change the assets in the function
asset_num_to_stringin this file.This is an issue in the actual code. This part is very hidden, hehe.
I have a problem with "INSTALL STEEM" . I don't understand why the steem installation stopped to 26 percent. Someone can help me?
Congratulations @jga! You have completed the following achievement on Steemit and have been rewarded with new badge(s) :
Click on the badge to view your Board of Honor.
If you no longer want to receive notifications, reply to this comment with the word
STOPVery.. very interesting tutorial! It's really cool to see how everything started, and can be replicated. Appreciate the detailed tutorial and also you referencing my witness setup. Would be cool to see somebody test this out :)
is really a breeze </satire off>
Cool
Information