Coding the Functional Android App in Kotlin: Get started
What Will I Learn?
- Installing Kotlin Plugin on Android Studio
- Configure Your Project to Use Kotlin
- Convert Java Files to Kotlin
- Understanding Kotlin Syntax
- Creating Extra Kotlin Files
Requirements
- App Android Studio
- Must have an understanding of the kotlin
Difficulty
- Basic
Tutorial Contents
Installing Kotlin Plugin on Android Studio
The first thing you need to do is to add Kotlin support to your Android Studio installation.
Before you begin, make sure you're running the latest version of Android Studio, stable, as you're more likely to encounter bugs with Kotlin plugins in the experimental version of Android Studio. It's also worth opening the SDK Manager and checking whether updates are available for all packages you have installed.
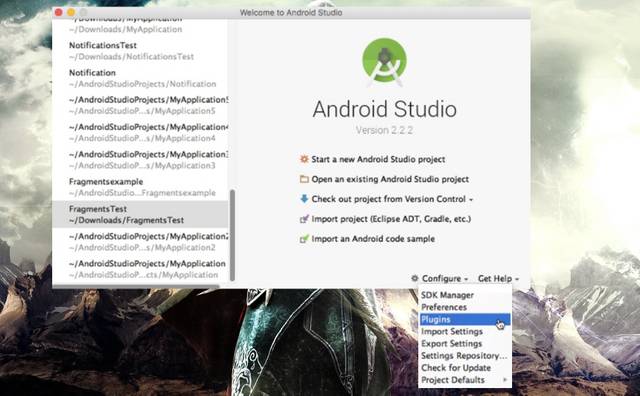
Once you are sure that your development environment is up to date, you are ready to install the Kotlin plugin. Launch Android Studio and you'll see a Welcome window in Android Studio - if this window does not appear, close Android Studio completely and relaunch.
Give the Configure icon a click, then select Plugins from the next dropdown menu.
Click the Install JetBrains plugin ... button.
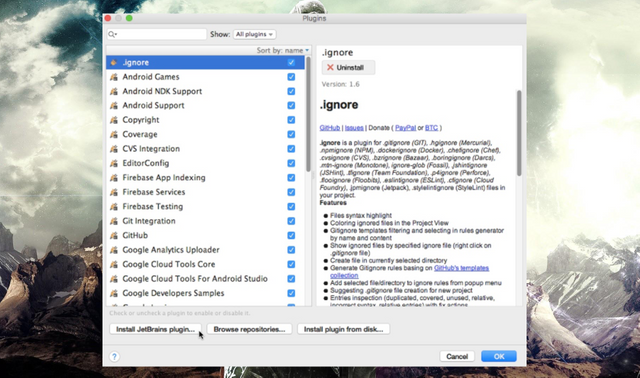
Select Kotlin from the menu, then click the green Install button. You must restart your IDE before the Kotlin plugin becomes active, so click the Restart Android Studio button that appears or restart your IDE manually.
Configure Your Project to Use Kotlin
At this point, your IDE can understand and run the Kotlin code, but you still need to configure Kotlin every time you use it on a new project. Let's create a new project and configure the project to use Kotlin now. Create a new project with your preferred settings, but for simplicity's sake, choose Empty Activity when prompted.
Thanks to the Kotlin plugin, configuring the project to use Kotlin could not be simpler: just select Tools from the Android Studio toolbar, followed by Kotlin and Configure Kotlin in Project.
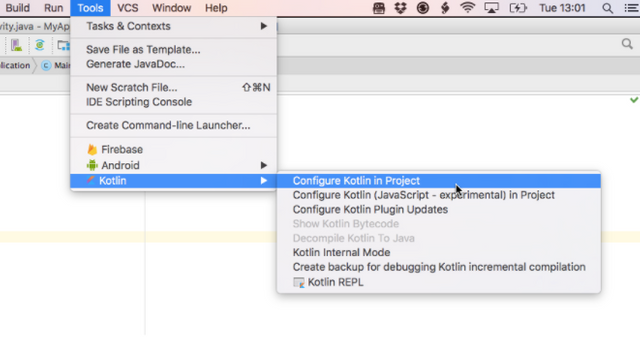
This will open a popup where you can choose to configure Kotlin to:
- all modules
- all modules containing Kotlin files
- or a named module
Since I will only use Kotlin code in my project, I choose All modules. You can also choose which version of Kotlin you want to use-usually, this will be the latest version.
Or, you can configure Kotlin by selecting Help from the Android Studio menu bar, followed by Find Action ... In the Find Action bar, start typing Kotlin Configuration in Project, then select this option when it appears.
The Configuration Kotlin in Project selection makes a number of tweaks to your project's build.gradle file, so let's take a closer look at how these files have changed. Open your project-level build.gradle file - it should look like this:
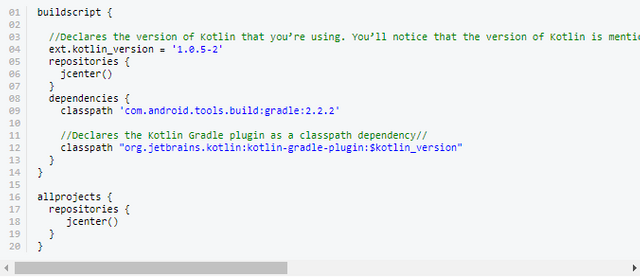
Now, let's look at your module-level build.gradle file:
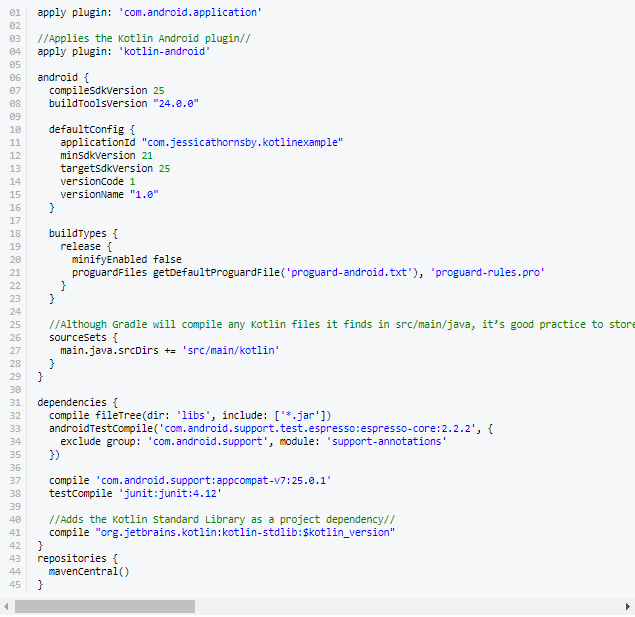
Finally, sync your changes by clicking Sync Now from the popup that appears or by clicking the Sync Project with Gradle Files icon on the Android Studio toolbar.
Convert Java Files to Kotlin
One Kotlin plugin feature that is particularly useful for Kotlin's newcomers is its ability to convert Java source files to Kotlin, while maintaining full runtime compatibility.
Being able to see exactly how each Java file will be translated into Kotlin is ideal to help you learn the language, but it can also come in handy throughout your Kotlin trip- if you ever struggle to figure out how to write something in Kotlin, you can always write it in Java and then use this feature to convert that code into Kotlin.
Let's convert our MainActivity project file into Kotlin source file. There are two ways to introduce Kotlin's Convert Java File plugin to Kotlin action file, so:
- Select your MainActivity file and select Code from the Android Studio menu bar, followed by Convert Java File to Kotlin File.
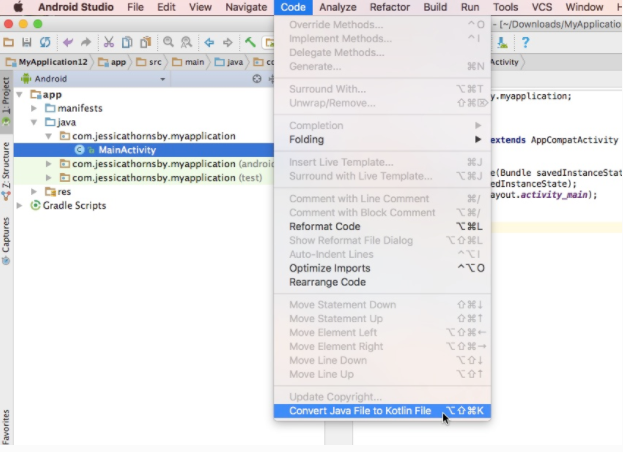
- Or choose Help from the Android Studio menu bar, followed by Find Action. In the next popup, start typing Convert Java file to Kotlin file and then select this option when it appears. Note that you can also launch Find Action popups with keyboard shortcuts: if you're using a Mac, press the Command-Shift-A key, and if you're using Windows or Linux, press Control-Shift-A.
Know that, depending on the complexity of your code, conversions may not always be 100% accurate, so you should always check the conversion code for errors.
Your newly converted MainActivity will look like this:

You'll also notice that the file extension has changed, changing from MainActivity.java to MainActivity.kt.
It may be simple Activity, but some of these lines illustrate some of the key characteristics of Kotlin syntax. Since this is our first look at some of the actual Kotlin codes, let's select this class separately line by line.
Understanding Kotlin Syntax
In Kotlin, you declare the class by using the keyword class, just like in Java. However, in Kotlin, classes (and methods) are public and final by default, so you can create a class just by writing the Class MainActivity.
When it comes to expanding the class, you replace Java extends with a colon, and then attach the parent class name. So, in the first line of our MainActivity.kt file, we create a public end class called MainActivity that extends: AppCompatActivity

Java equivalents are:

If you want to replace a class or method, then you must explicitly declare it as open or abstract.
In Kotlin, functions are defined using keywords 
, followed by function names and parameters in brackets. In Kotlin, the name of the function exists before its kind:

This is the opposite of Java, where type comes before the name:

Note that we do not specify that this method is final, as in Kotlin all methods are final by default.
The rest of this activity looks very similar to Java. However, some of these lines illustrate other key characteristics of Kotlin:

In Kotlin you do not need to finish your sentence with a semicolon, then there is no colon in the above snippet. You can add a colon if you really want to, but your code will be cleaner and easier to read without them.
Now that we've parsed our MainActivity.kt file, let's move it to the proper home. Since Kotlin plugin has trouble adding the src / main / kotlin declaration to our build.gradle file, let's actually create this directory. This step is not mandatory, but retaining your Kotlin file in a special directory will make the project cleaner.
In Android Studio Project Explorer, Control-click your Project's main directory and select New from the menu that appears, followed by Directory. Name this directory kotlin then click OK.
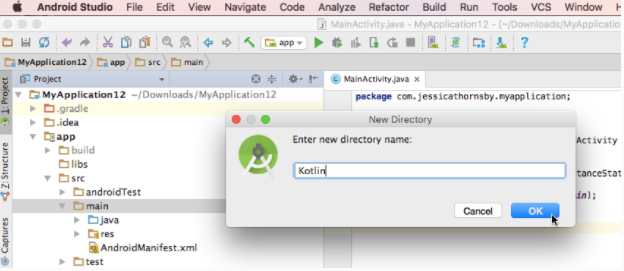
If you are struggling to see the main directory of your project, open a small dropdown at the top left of Project Explorer and select Project. You should have no problems viewing the elusive src / main directory.
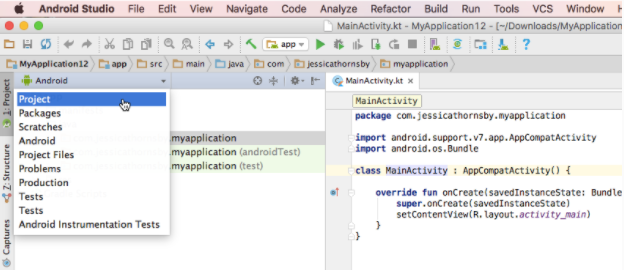
After you create a special Kotlin directory, drag your MainActivity.kt file into it. Be sure to retain the name of your existing MainActivity.kt package to keep your project running.
Also, if you're just going to use Kotlin in this project, you might want to remove the Java directory, rather than messing up your project with empty and unnecessary directories.
Because Kotlin compiles for bytecode, the app written in Kotlin feels exactly the same as the app written in Java, so try installing this app on your compatible Android device or AVD - it should feel as if nothing has changed.
Creating Extra Kotlin Files
If you continue to work with Kotlin in your project, then sooner or later you will need to start creating a new Kotlin file instead of changing the one in Java.
To create a Kotlin file, Control-click your / src / main / Kotlin application directory and choose New> Kotlin Activity.
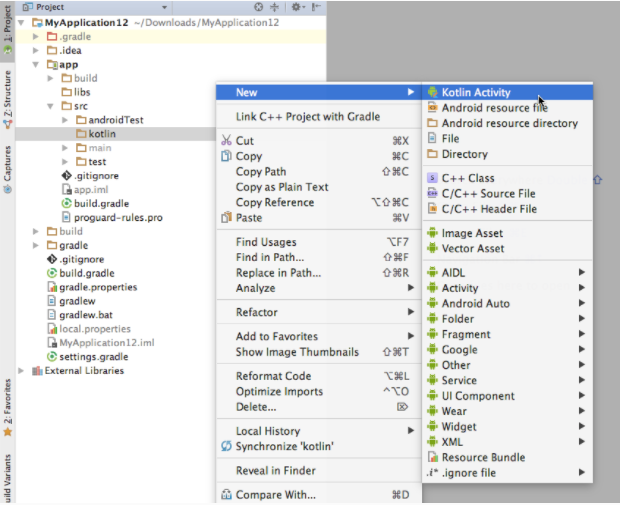
Give your class a name and select a class from the drop-down menu. Your new class will look like this:

At this point, your activity is empty. To get to the point where you can start adding some real functionality, you need to complete a few steps. First, add  statement you want to use. The only difference between the import statements in Kotlin and the import statements in Java is that you do not need to complete each row with a semicolon. As an example:

You then have to specify the class that you extend, using the same format as we see in our MainActivity.kt file:

Next, you need to change the Activity method 

Now you can add any functionality you want to this Activity (and in the next section, I'll show you how to use Kotlin extensions to manipulate UI widgets, so this might be a good place to start), but one final set up you need to finish is declare Your Kotlin Activity in your Manifest. It follows exactly the same formula by declaring a new Java Activity, for example:

Kotlin Android Extension: Welcome to Wave 
Now that we've mastered the basics, let's take a closer look at what Kotlin really can do-start with features that can really reduce the amount of boilerplate code you need to write.
On Android, every time you want to work with anything  in an Activity you need to use
  method to get a reference to that View. This makes
  one of the most important, but also one of the most frustrating bits of code that you will find yourself writing over and over, and more so in your Android project. The
  method is a huge source of potential bugs, and if you work with some UI elements in the same Activity, then everyone
  s can really mess up your code, making it difficult to read.
Although there are a number of libraries, such as Butter Knife, which aims to remove the need for  s, this library still asks you to note on the fields for each Display, which can cause errors and still feel like a lot of effort will be done. better invested in other areas of your project.
Kotlin Kotlin Android plugin (which has just been incorporated into the standard Kotlin plugin) promises to make  something of the past, offers the benefits of the above libraries without lack of having to write additional code or send an extra runtime.
You can use Kotlin extension to import  eference to your source file. At this point, the Kotlin plugin will create a set of "synthetic properties" that let you work with this view as if they are part of your activity-most importantly, it means you no longer have to use it
  to find each one
 before you can work with me t.
To use the extension, you must enable Kotlin Android Extensions plugins in each module, so go to your module build.gradle level file and add the following:

Sync these changes by clicking on Sync Now.
You can then import a reference to one  , using the following format:

For example, if your activity_main.xml file contains an ID, then you will import a reference to this view by adding the following to:

You can then access  this activity by using its own ID-and without
 vision!
Let's look at the extension in action, by adding 
to our activity_main.xml file, import it into our MainActivity.kt file, and use the extension to programmatically set program text.
Start by getting you :
:
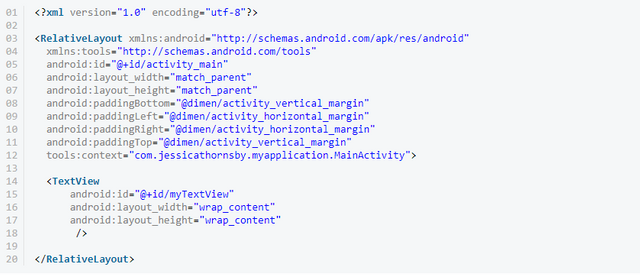
You can then import it  to MainActivity.ktyou say, and specify text only with ID:

Note, if you want to work with multiple widgets from the same layout file, you can import the entire contents of the layout files in one motion, using the following formula:

For example, if you want to import all the widgets from your activity_main.xml file then you will add the following to your Activity:

Curriculum
This is my first contribution
Posted on Utopian.io - Rewarding Open Source Contributors
Your contribution cannot be approved because it does not follow the Utopian Rules, and is considered as plagiarism. Plagiarism is not allowed on Utopian, and posts that engage in plagiarism will be flagged and hidden forever.
You can contact us on Discord.
[utopian-moderator]
Congratulations @irmapijanist! You received a personal award!
Click here to view your Board
Congratulations @irmapijanist! You received a personal award!
You can view your badges on your Steem Board and compare to others on the Steem Ranking
Vote for @Steemitboard as a witness to get one more award and increased upvotes!