Travel-it iOS App now gives users ability to see trending and hot travel posts with all content and all pictures, users can also check their current voting power in app and big update is the app is ready to go live on Apple App Store!
Repository
https://github.com/iamank1t/travel-it-iOS
What is Travel-it iOS App
Travel-It is an open source iOS made for Steemit travel bloggers. It shows trending posts from travel category. This app is created to help minnows who used travel niche on Steemit. Using this app users can learn writing tactics from trending travel posts and hot travel posts. Users can also use all useful Steem tools to check various details of their Steemit account. Currently app had one Steem tool which help users in checking their or others account voting power recharge time. New tools and more features will be coming soon.
New features added in app
The new feature added in the app are following with commit history :
- post body fix with all images and content in trending post section
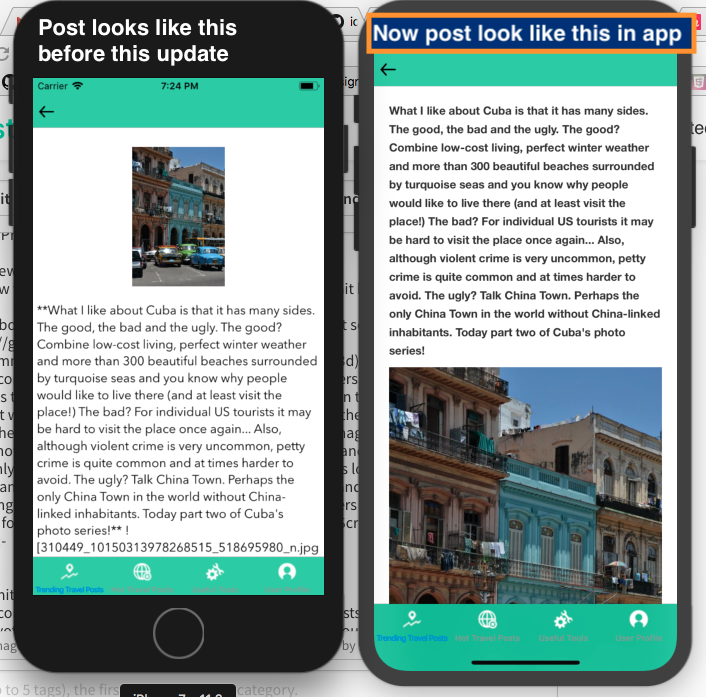
in this commit i will fix the every post body screen, now users can see every post content same as they can see on web. Before applying this feature in the app, the every post content was shown as a string because the API returns me the post body as markdown text. When i convert markdown text in string, the links of images and other other links were shown as links. When user open any post in trending and hot section, he gets a view with only one image and the content of post with links. This looks very bad in term of UX. So to handle this situation now i added a markdown view and load the markdown text receiving from steemit api on the markdown view. Now users can see every post in a proper format with all images and proper text formatting. Screenshot of this feature is below :-

Why this feature is valuable
Add all content in post body is a valuable feature for app because as the app is to help new travel bloggers by guiding them. Now new bloggers can see how the successful bloggers write their post, what points they write first, what type of pictures they add in their post and how they format their post.
post body fix, now all images and post content comes properly in hot section posts
in this commit i fix the posts of hot post section. Now users can see the hot post section posts same like trending posts.current voting power checker tool added in useful tools section
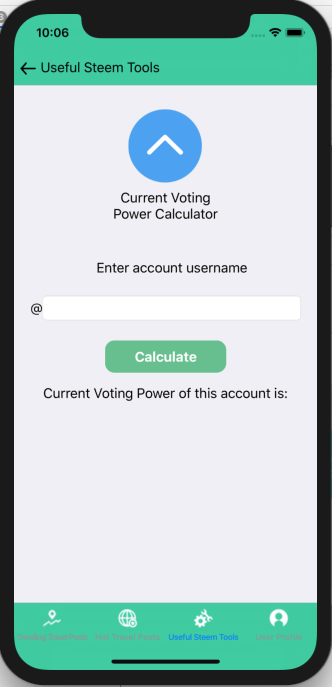
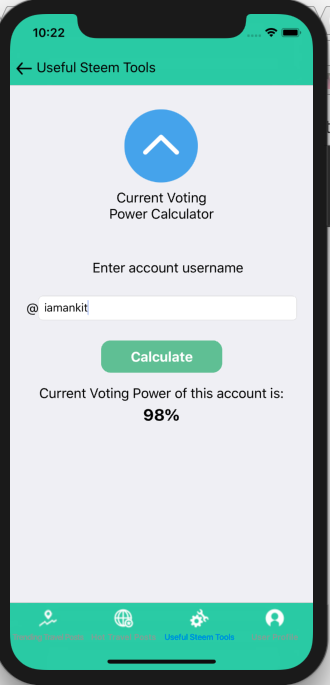
in this commit i will add a new tool in app useful tools section. Using this tool users can check current voting power of their account or other accounts. This tool helps users to check voting bots voting power. Some screen shots of the tool are below


How the post body feature and current voting power checker tool works
For post body, i used this library. So to render markdown text of post body on a webview, i used this library view, add my string on the view and add that view as a subview to main view like this :-
 let postBody = postData["body"]! as! String
        guard let downView = try? DownView(frame: self.view.bounds, markdownString: postBody, didLoadSuccessfully: {
            self.stopLoadingIndicator()
            print("Markdown was rendered.")
        }) else {
            self.stopLoadingIndicator()
            return }
        view.addSubview(downView)
and for current voting power tool, i get username from the username textfield, then i make a request to steemit api to get information of that user account. After storing user account information in json, i fetch his voting power from that json. After getting voting power, i show that on a label. I also implement some checks like check on wrong account name, check on blank account name. If you try tool with wrong account name, app inform you with a nice prompt. The code of how current voting power tools works is below :-
import UIKit
import NVActivityIndicatorView

class CurrentVotingPowerCalculatorVC: UIViewController {
    @IBOutlet var votingPowerLabel: UILabel!
    private var activityView: NVActivityIndicatorView!
    @IBOutlet var accountNameTextfield: UITextField!
    var votingPower: String?
    override func viewDidLoad() {
        super.viewDidLoad()
        // Do any additional setup after loading the view.
    }

    @IBAction func calculateButtonClicked(_ sender: Any) {
        if (self.accountNameTextfield.text?.isEmpty)! {
            let alert = UIAlertController(title: "Alert", message: "Please enter account username", preferredStyle: UIAlertControllerStyle.alert)
            // add an action (button)
            alert.addAction(UIAlertAction(title: "OK", style: UIAlertActionStyle.default, handler: nil))
            // show the alert
            self.present(alert, animated: true, completion: nil)
        }
        else {
        self.showLoadingIndicator()
        let url = URL(string: "https://steemit.com/@" + accountNameTextfield.text! + ".json")!
        URLSession.shared.dataTask(with: url, completionHandler: {
            (data, response, error) in
            if(error != nil){
                print("error")
            }else{
                do{
                    var json = try JSONSerialization.jsonObject(with: data!, options: []) as! [String: AnyObject]
                    if let votingPower = json["user"]!["voting_power"] as? Int {
                    self.votingPower = "\(votingPower)"
                    DispatchQueue.main.async(execute: {
                        self.stopLoadingIndicator()
                        self.votingPowerLabel.text = String((self.votingPower?.dropLast(2))!) + "%"
                    })
                    } else {
                        DispatchQueue.main.async(execute: {
                        self.stopLoadingIndicator()
                        let alert = UIAlertController(title: "Alert", message: "Please enter valid account username", preferredStyle: UIAlertControllerStyle.alert)
                        // add an action (button)
                        alert.addAction(UIAlertAction(title: "OK", style: UIAlertActionStyle.default, handler: nil))
                        // show the alert
                        self.present(alert, animated: true, completion: nil)
                        })
                    }
                }catch let error as NSError{
                    print(error)
                }
            }
        }).resume()
        }
    }

    func showLoadingIndicator(){
        if activityView == nil{
            activityView = NVActivityIndicatorView(frame: CGRect(x: 0, y: 0, width: 50.0, height: 50.0), type: NVActivityIndicatorType.ballClipRotatePulse, color: UIColor.loaderColor, padding: 0.0)
            activityView.backgroundColor = UIColor.white
            // add subview
            view.addSubview(activityView)
            // autoresizing mask
            activityView.translatesAutoresizingMaskIntoConstraints = false
            // constraints
            view.addConstraint(NSLayoutConstraint(item: activityView, attribute: NSLayoutAttribute.centerX, relatedBy: NSLayoutRelation.equal, toItem: view, attribute: NSLayoutAttribute.centerX, multiplier: 1, constant: 0))
            view.addConstraint(NSLayoutConstraint(item: activityView, attribute: NSLayoutAttribute.centerY, relatedBy: NSLayoutRelation.equal, toItem: view, attribute: NSLayoutAttribute.centerY, multiplier: 1, constant: 0))
        }

        activityView.startAnimating()
    }

    func stopLoadingIndicator(){
        activityView.stopAnimating()
    }

}
RoadMap of SteemTools
- Add more steemit tools to Useful Tools Section
- Add users details to User Profile Section
- Steemconnect Login for users.
- Users can upvote, comment their favourite posts directly from app.
- Users can see authors Steemit profile in app.
- Users can see their Steemit profile in app.
- Get some help to make app live on app store.
- And much more!
How to run app
The app is currently not available on app store but still you can install it on your iPhone. For this you need to have following things :-
- Mac
- Xcode
- Apple developer account
- If you had all of this, then download the updated repository to your system, open xcworkspace file in Xcode.
- Now go to project directory from your terminal and run pod install to install all the dependencies for app.
- That's it now connect your device to system, go to Xcode and build the app on your device and enjoy the app.
Technology Stack
- Swift 4 Programming Language
How to contribute?
Github: https://github.com/iamank1t/travel-it-iOS
- Fork it!
- Create your feature branch: git checkout -b my-new-feature
- Commit your changes: git commit -am 'Add some feature'
- Push to the branch: git push origin my-new-feature
- Submit a pull request.
great work :)
I am looking forward for the next one
thank you so much @amn.
Thank you for your contribution, it has been approved.
Need help? Write a ticket on https://support.utopian.io.
Chat with us on Discord.
[utopian-moderator]
Thank you sir, but how to check score on the contribution.
Hey @iamankit
We're already looking forward to your next contribution!
Contributing on Utopian
Learn how to contribute on our website or by watching this tutorial on Youtube.
Utopian Witness!
Vote for Utopian Witness! We are made of developers, system administrators, entrepreneurs, artists, content creators, thinkers. We embrace every nationality, mindset and belief.
Want to chat? Join us on Discord https://discord.gg/h52nFrV