Swift Programming Language Tutorials - Intro (1)
What Will I Learn?
- You will learn about the purpose and history of Swift Programming Language.
- You will learn about environment setup for Swift Programming Language.
- You will learn the fundamentals of Swift Programming Language.
Requirements
- You should have a basic understanding of Computer Programming terminologies.
- Playground platform.
- X code Software to start with Playground platform.
- Spirit to learn this modern language.
Difficulty
- Basic
- Intermediate
Swift Programming Language Tutorials - Intro (1)
This is my first tutorial regarding to "Swift Programming Language", it will become a book gradually when i will cover all related topics one after one about Swift Programming Language. This series tutorials for anybody who has basic knowledge of Computer Programming terminologies and have spirit to learn about modern languages. This series of tutorials is for both beginners and experts because this latest language and only some people are know about this. Now the world of Information technology is transforming towards latest technologies so, it is very necessary to learn about latest languages like swift to survive in the field of IT.
Available Versions
- Swift 1.0
- Swift 1.1
- Swift 1.2
- Swift 2.0
- Swift 3.0
- Swift 4.0
- Swift 4.1
We will learn about Swift 4.0 in this series of tutorials.
Why Swift Programming Language?
- Swift is for Mac & iOS Apps.
- Swift is great for rapid development.
- Swift is Fast.
- More Secure.
- Free and Open Source.
- Swift is growing and in high demand.
- Swift is apple's future.
Environment Setup
Swift 4 provides a playground platform for learning purpose and we are going to setup the same. To start Swift 4 coding in playground platform, we need to install xCode software. Once you feel comfortable with Swift 4, you can use xCode IDE for iSO/OS x application development.
To start with, i consider that you have already have an account on Apple Developer website. Once you are logged in, go to this Link and download xCode 6.2.
You can see list of software:
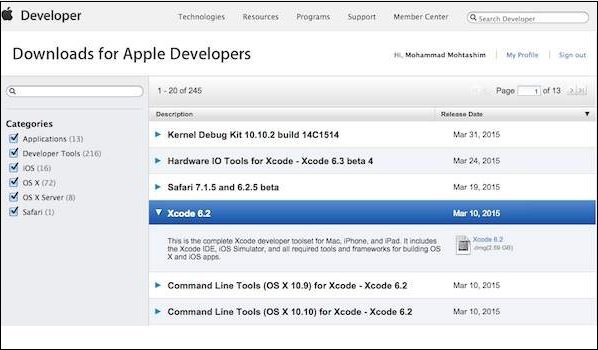
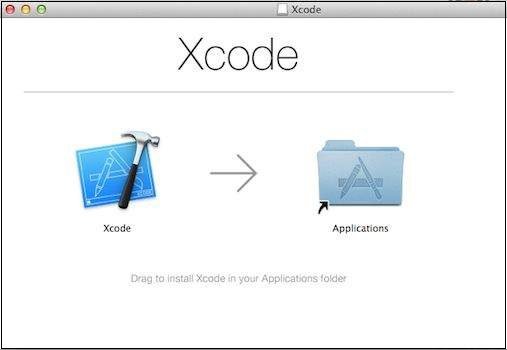
Simply click on the given link near to disc image. After downloading the dmg file, you can install it by double clicking on it and following the given instructions. Finally, drop xCode icon in application folder:
Now you have installed xCode on your machine. Now open the application folder and accept all terms and conditions. If everything is fine then you can see following screen:
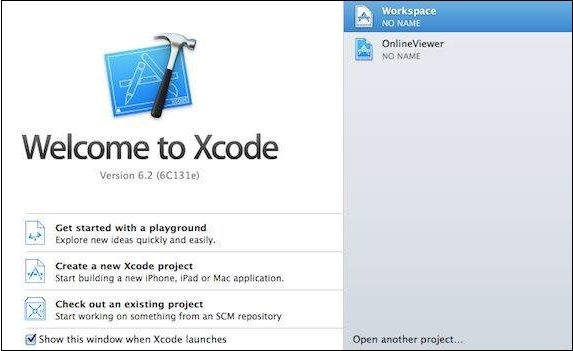
Select Get Started with the Playground and enter name for playground and select iOS as platform as follows and click on Next button.
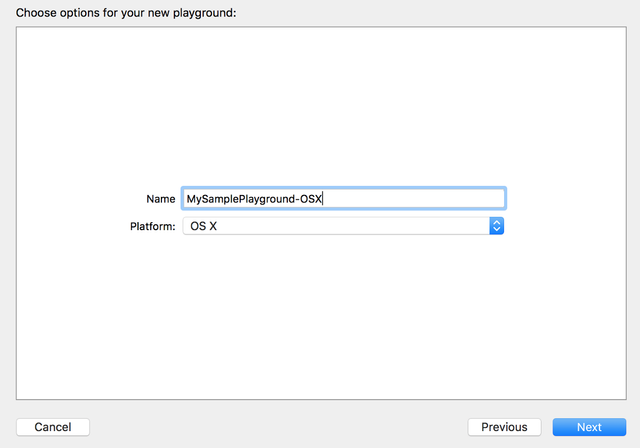
Finally, you will get a playground window as follows:

Following is the code taking from the default Swift 4 Playground window.
import UIKit
var str = "Hello, playground"
If you will create same program for X OS program then code will look like:
import Cocoa
var str = "Hello, playground"
When you run the above code, you will get output look like this:
Hello, playground
Data Types
Some built-in data types are following:
- INT
- FLOAT
- DOUBLE
- BOOL
- STRING
- CHARACTER
- OPTIONAL
- TUPLES
I will discussed these data types with code examples in coming tutorials.
Basic Syntax
Let's start once again with the following Hello, World! program created for OS X playground, which includes import Cocoa as shown below:
/* My first program in Swift 4 */
var myString = "Hello, World!"

print(myString)
If you create the same program for iOS playground, then it will include import UIKit and the program will look as follows:
import UIKit
var myString = "Hello, World!"
print(myString)
we will get the following result:
Hello, World!
Import in Swift 4
You can use the import statement to import any Objective-C framework (or C library) directly into your Swift 4 program. For example, the above import cocoa statement makes all Cocoa libraries, APIs, and runtimes that form the development layer for all of OS X, available in Swift 4.
Cocoa is implemented in Objective-C, which is a superset of C, so it is easy to mix C and even C++ into your Swift 4 applications.
Tokens in Swift 4
A Swift 4 program consists of various tokens and a token is either a keyword, an identifier, a constant, a string literal, or a symbol. For example, the following Swift 4 statement consists of three tokens:
print("test!")
The individual tokens are:
print("test!")
Comments
Comments are like helping texts in your Swift 4 program. They are ignored by the compiler. Multi-line comments start with /* and terminate with the characters */ as shown below:
/* My first program in Swift 4 */
Multi-line comments can be nested in Swift 4. Following is a valid comment in Swift 4:
/* My first program in Swift 4 is Hello, World!
/* Where as second program is Hello, Swift 4! */ */
Single-line comments are written using // at the beginning of the comment.
// My first program in Swift 4
Semicolons
Swift 4 does not expect you to type a semicolon (;) after every statement in your code, however it's discretionary; and in the event that you utilize a semicolon, at that point the compiler does not gripe about it.
However, if you are writing multiple statements in same line then it requires semicolon as delimiter. Shown below:
/* My first program in Swift 4 */
var myString = "Hello, World!"; print(myString)
Printing in Swift
o print anything in swift we have ‘ print ‘ keyword.
Print has three different properties.
Items – Items to be printed
Separator – separator between items
Terminator – the value with which line should end, let’s see a example and syntax of same.
print("Items to print", separator: "Value " , Terminator: "Value")
// E.g. of print statement.

print("Value one")
// prints "Value one \n" Adds, \n as terminator and " " as separator by
default.

print("Value one","Value two", separator: " Next Value" , terminator: " End")
//prints "Value one Next Value Value two End"
In the above code first print statement adds \n , newline Feed as terminator by default, where as in second print statement we’ve given " End " as terminator, hence it’ll print "End " instead of \n.
We can give our custom separator and terminators according to our requirement.
Variables
Swift 4 supports the following basic types of variables:
- INT
- FLOAT
- DOUBLE
- BOOL
- STRING
- CHARACTER
Swift 4 also allows to define various other types of variables, which we will cover in subsequent tutorials, such as Optional, Array, Dictionaries, Structures, and Classes.
Variable Declaration
A variable declaration tells the compiler where and how much to create the storage for the variable. Before you use variables, you must declare them using var keyword as follows:
var variable_Name = <initial value>
The following example shows that how variable is declared in Swift 4
var varZ = 42
print(varZ)
we get the following result :
42
Optionals
Swift 4 also introduces Optionals type, which handles the absence of a value. Optionals say either "there is a value, and it equals x" or "there isn't a value at all".
An Optional is a type on its own, actually one of Swift 4’s new super-powered enums. It has two possible values, None and Some(T), where T is an associated value of the correct data type available in Swift 4.
Here’s an optional Integer declaration:
var perhapsInt: Int?
Here’s an optional String declaration:
var perhapsStr: String?
The above declaration is equivalent to explicitly initializing it to nil which means no value:
var perhapsStr: String? = nil
Let's take the following example to understand how optionals work in Swift 4 :
var myString:String? = nil

if myString != nil {
   print(myString)
} else {
   print("myString has nil value")
}
We get following result:
myString has nil value
Optionals are similar to using nil with pointers in Objective-C, but they work for any type, not just classes.
Forced Unwrapping
If you defined a variable as optional, then to get the value from this variable, you will have to unwrap it. This just means putting an exclamation mark at the end of the variable.
Let's take a simple example:
var myString:String?

myString = "Hello, Swift 4!"

if myString != nil {
   print(myString)
} else {
   print("myString has nil value")
}
We will get following output:
Optional("Hello, Swift 4!")
Now let's apply unwrapping to get the correct value of the variable:
var myString:String?

myString = "Hello, Swift 4!"

if myString != nil {
   print( myString! )
} else {
   print("myString has nil value")
}
We will get output:
Hello, Swift 4!
Automatic Unwrapping
You can declare optional variables using exclamation mark instead of a question mark. Such optional variables will unwrap automatically and you do not need to use any further exclamation mark at the end of the variable to get the assigned value. Let's take a simple example:
var myString:String!
myString = "Hello, Swift 4!"

if myString != nil {
   print(myString)
} else {
   print("myString has nil value")
}
We will get output:
Hello, Swift 4!
Optional Binding
Use optional binding to find out whether an optional contains a value, and if so, to make that value available as a temporary constant or variable.
An optional binding for the if statement is as follows:
if let constantName = someOptional {
   statements
}
Let's take a simple example to understand the usage of optional binding:
var myString:String?
myString = "Hello, Swift 4!"

if let yourString = myString {
   print("Your string has - \(yourString)")
} else {
   print("Your string does not have a value")
}
When we run the above program using playground, we get the following result:
Your string has - Hello, Swift 4!
Tuples
Swift 4 also introduces Tuples type, which are used to group multiple values in a single compound Value.
The values in a tuple can be of any type, and do not need to be of same type.
For example, ("Tutorials Point", 123) is a tuple with two values, one of string Type, and other is integer type. It is a legal command.
let ImplementationError = (501, "Not implemented") is an error when something on the server is not implemented, It returns two values. Error Code, and Description.
You can create tuples from as many values as you want and from any number of different data types.
Here’s the syntax of Tuple declaration:
var TupleName = (Value1, value2,… any number of values)
You can access the values of tuple using the index numbers that start from 0.
Here’s an example of accessing tuple Values:
print(“The code is\(error501.0)”)
print(“The definition of error is\(error501.1)”)
You can name the variables of a tuple while declaring , and you can call them using their names:
var error501 = (errorCode: 501, description: “Not Implemented”)
print(error501.errorCode)   // prints 501.
Tuples are helpful in returning multiple values from a function. Like, a web application might return a tuple of type ("String", Int) to show whether the loading was successful or failed.
By returning different values in a tuple we can make decisions depending on different tuple types.
Note − Tuples are useful for temporary values and are not suited for complex data.
What Will You Learn In Next Tutorials Of This Series (Swift Programming Language Tutorials)
I have just discussed about introduction of Swift Programming Language in first tutorial. Believe me it was just an introduction. You will get a lot of knowledge through this series of tutorials about Swift Programming Language. I will discuss every topic related to Swift 4. You will be able to design apps using Swift 4 at the end of this series of tutorials. I will tell you everything topic by topic. There are many things like Operators, Dictionaries, Functions, Classes, Structures, Coursers, Properties, Inheritance, Error Handling, Type Casting, protocols and many other topics. We will also design some sample apps at the end of this series of tutorials.
Thank you for your valuable time, I hope to see you in next tutorials of this series.
Posted on Utopian.io - Rewarding Open Source Contributors
Your contribution cannot be approved because it does not follow the Utopian Rules, and is considered as plagiarism. Plagiarism is not allowed on Utopian, and posts that engage in plagiarism will be flagged and hidden forever.
You can contact us on Discord.
[utopian-moderator]