Tutorial - embeding scipy + matplotlib with tkinter to work on images in a GUI framework
Repository
https://github.com/scipy/scipy/
What Will I Learn?
- How to make a gui using tkinter libraries
- Display images using matplotlib on a tkinter frame
- Image manipulation and processing using Numpy and Scipy
Requirements
- Windows OS (for this tutorial I'm using windows)
- Python 3.6 distribution
- Scipy, matplotlib, numpy (You can Install by using Anaconda or pip or any other way you think might work better for you)
- Basic understanding of python programming language
Difficulty
- Intermediate
Tutorial Contents
Python has huge number of GUI frameworks you can find here. tkinter is traditionally bundled with python and here we're going to use it as the gui framework.
Make an empty frame with a button
First we make a simple gui to understand the basic definitions of tkinter gui class and methods. in the code below, made a simple frame which is a gui container with a single button inside which has no method binds to it yet.
# from tkinter import *  will import everything from tkinter.
# we can also use import tkinter as tk
# but that way for every attribute we must type tk.attrib-name
from tkinter import *

# this is the main class, ImageProc, inherited from Frame
class ImageProc(Frame):

    # Defines settings upon initialization.
    def __init__(self, master=None):

        # parameters we want to send through Frame class
        Frame.__init__(self, master)

        #reference to the master widget, which is the tk window
        self.master = master

        #initialization of imageProc frame
        self.init_imageProc()

     # here we create the initialization frame
    def init_imageProc(self):

        # set the title of master widget
        self.master.title("Image Processing")

        # allowing the widget to take the full space of the root window
        self.pack(fill=BOTH, expand=1)
        self.create_widgets()
        # creating a menu instance

    def create_widgets(self):
            self.browse = Button(self)
            self.browse["text"] = "Browse Image"
            self.browse["command"] = ""
            self.browse.grid(row=0, column=0)

# root window created. Here, that would be the only window, but
# you can later have windows within windows.
root = Tk()

root.geometry("1024x600")

# creation of an instance
app = ImageProc(root)

# mainloop
root.mainloop()
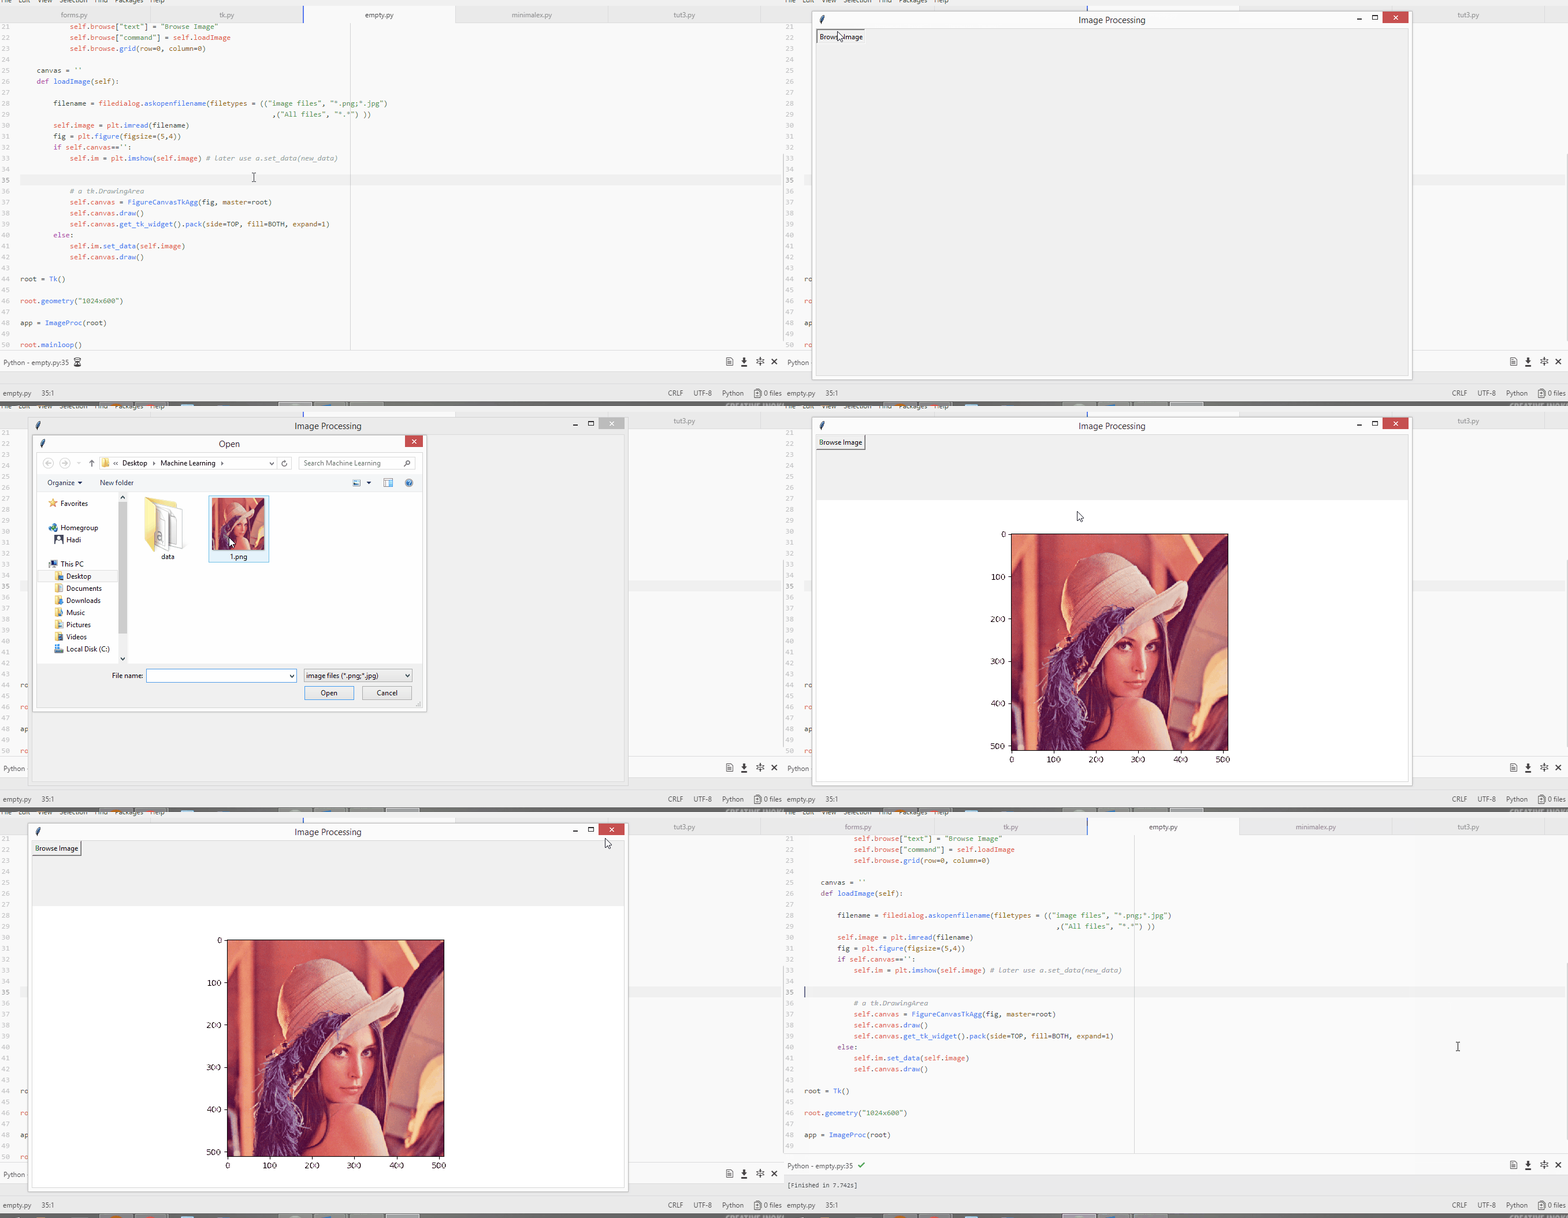
When you run the code you should see the result like the picture below:

Open Image File
Now that the GUI is ready we need a method to bind with the browse button to select an image to display, we call the method loadImage, there are multiple ways to load an image but since we want to browse and select an image, we're going to use filedialog.askopenfilename, which in this case from tkinter import filedialog is needed, so the first line gives the selected image file address to filename variable and by importing import matplotlib.pyplot as plt we can use plotting tools from matplotlib libraries, plt.imread(filename) will take the image and give it as an <numpy.ndarray> which is an array object representing a multidimensional, homogeneous array of fixed-size items, and is a good container for image data, we can also use misc.imread(filename) by first importing from scipy import misc this will also give us the image as a numpy.ndarray.
Now the reason I'm using global variables like self.image is because we need this variables in other methods that we're going to define next. in python global variables doesn't need to be predefined and we don't need setter/getter methods.
Next we define a figure and using plt.imshow(self.image) we can show the image on that figure but we want to show the figure inside our GUI frame, so matplotlib has a specified library to use plotting tools with tkinter GUI and it's called tkagg, to use this feature first import from matplotlib.backends.backend_tkagg import FigureCanvasTkAgg and then using FigureCanvasTkAgg(fig, master=root) we will give the figure to our root frame in GUI. The next 2 line of code will draw the figure and gives it the location and size on the frame. I defined self.im and self.canvas as global because we need them in other methods.
from tkinter import filedialog
import matplotlib.pyplot as plt
from matplotlib.backends.backend_tkagg import FigureCanvasTkAgg

    def loadImage(self):

        filename = filedialog.askopenfilename(filetypes = (("image files", "*.png;*.jpg")
                                                             ,("All files", "*.*") ))
        self.image = plt.imread(filename)
        fig = plt.figure(figsize=(5,5))
        self.im = plt.imshow(self.image) # for later use self.im.set_data(new_data)

        # DrawingArea
        self.canvas = FigureCanvasTkAgg(fig, master=root)
        self.canvas.draw()
        self.canvas.get_tk_widget().pack(side=TOP, fill=BOTH, expand=1)
After adding this method we should bind it with browse button simply by adding this line: self.browse["command"] = "self.loadImage"
like the code below:
    def create_widgets(self):
            self.browse = Button(self)
            self.browse["text"] = "Browse Image"
            self.browse["command"] = "self.loadImage"
            self.browse.grid(row=0, column=0)
If you run the code it should be like below:

It's working good but there is a problem, if you want to load another image it will make another canvas area without clearing the current figure:

To prevent this problem I made some changes on the code above, also if you want to remove the number labels on axes just perform these changes:
    canvas = ''
    def loadImage(self):
        filename = filedialog.askopenfilename(filetypes = (("image files", "*.png;*.jpg")
                                                             ,("All files", "*.*") ))
        self.image = plt.imread(filename)
        fig = plt.figure(figsize=(5,4))
        if self.canvas=='':
            self.im = plt.imshow(self.image) # later use a.set_data(new_data)
            axs = plt.gca()
            axs.set_xticklabels([])
            axs.set_yticklabels([])

            # a tk.DrawingArea
            self.canvas = FigureCanvasTkAgg(fig, master=root)
            self.canvas.draw()
            self.canvas.get_tk_widget().pack(side=TOP, fill=BOTH, expand=1)
        else:
            self.im.set_data(self.image)
            self.canvas.draw()
axs = plt.gca() this will get the current axes and gives it to axs variable then using empty brackets [] inside axs.set_xticklabels([]) will remove number labels.
And to check if the canvas is not empty I defined global variable canvas, you can find another and maybe better way to do this.
Adding extra features
Our GUI is ready and we can load image into canvas, now let's add some extra methods to perform actions on the image and display it, Here I want to show rotation, uniform_filter, gaussian_filter, minimum value and variance.
Rotation methods
To make image rotation by 90 degrees I'm going to use scipy libraries so first lets import from scipy import ndimage, Because I need to maintain theta value, I defined it as global (you can do it your own way).
ndimage.rotate(self.image, self.theta) will rotate the image by theta degree and the next 2 line of codes will reset the image data and draw it again.
    theta = 0
    def rotate_left(self):
        self.theta += 90
        rotated = ndimage.rotate(self.image, self.theta)
        self.im.set_data(rotated)
        self.canvas.draw()

    def rotate_right(self):
            self.theta -= 90
            rotated = ndimage.rotate(self.image, self.theta)
            self.im.set_data(rotated)
            self.canvas.draw()
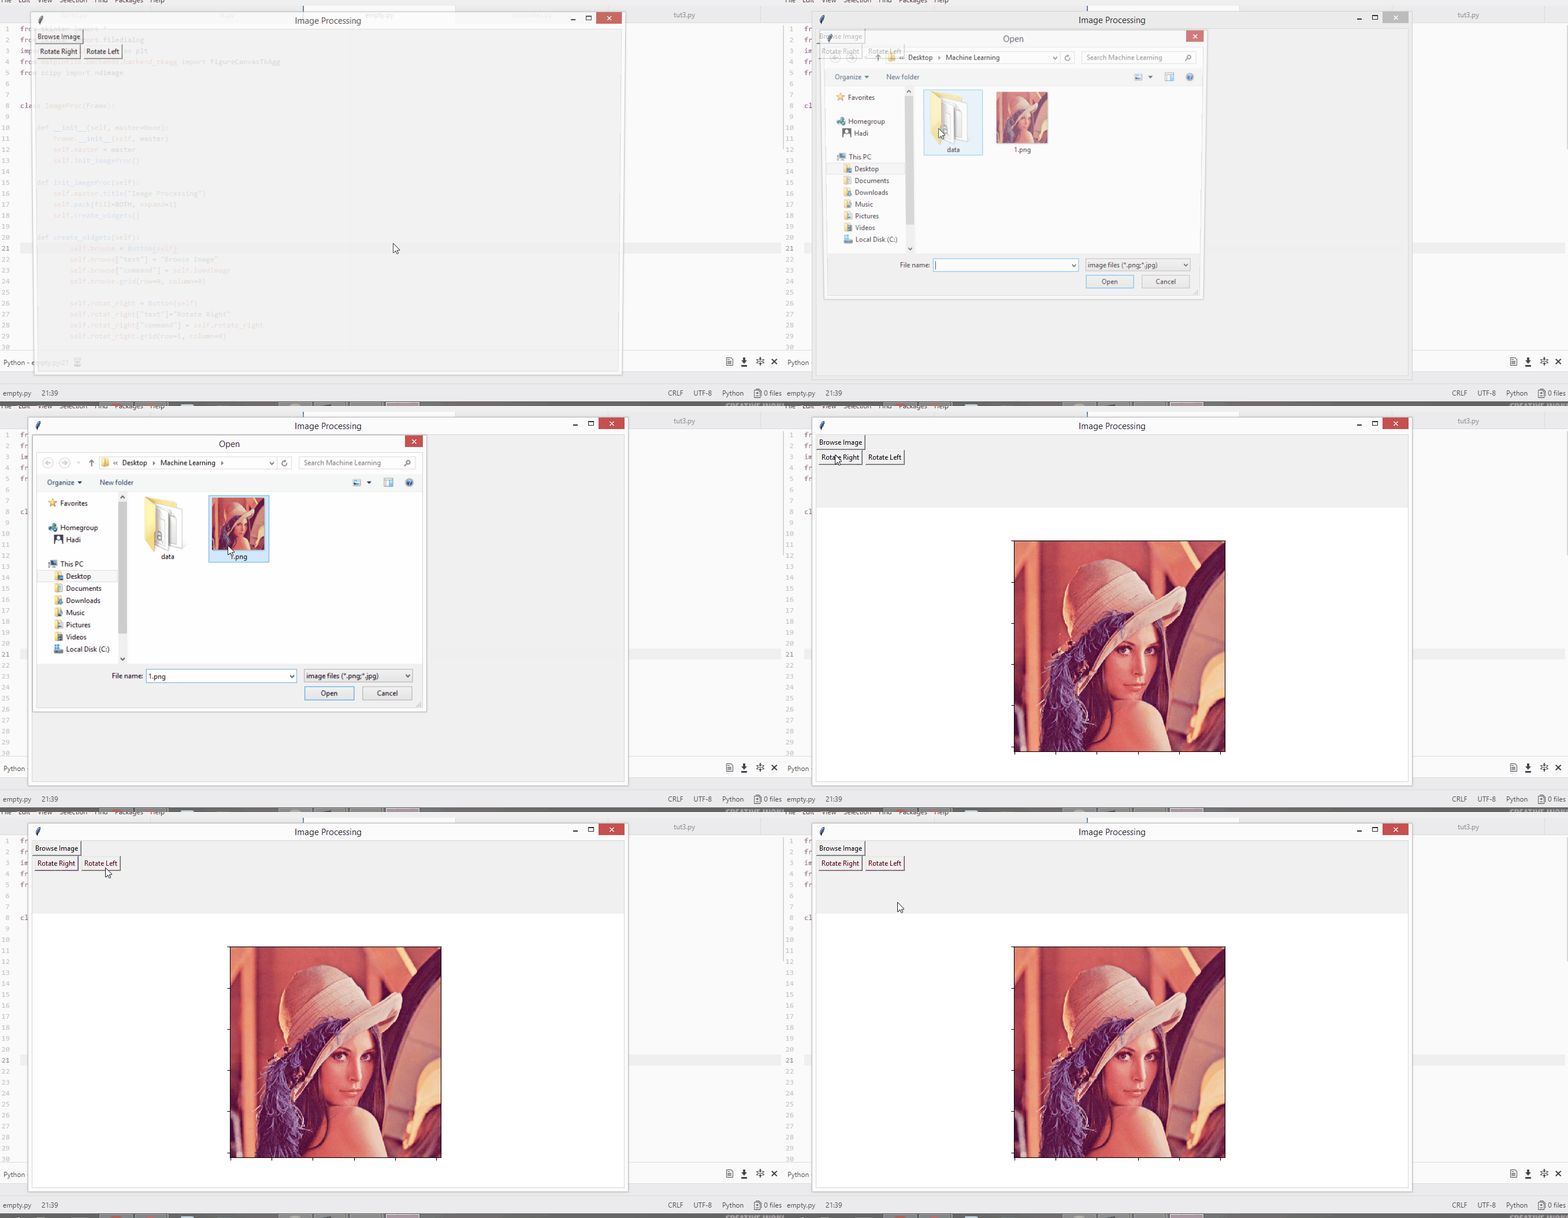
For these two methods we also need two buttons, which we should define them in create_widgets methods like this:
(by setting row=1 they will be placed under browse button)
    def create_widgets(self):
            self.browse = Button(self)
            self.browse["text"] = "Browse Image"
            self.browse["command"] = self.loadImage
            self.browse.grid(row=0, column=0)

            self.rotat_right = Button(self)
            self.rotat_right["text"]="Rotate Right"
            self.rotat_right["command"] = self.rotate_right
            self.rotat_right.grid(row=1, column=0)

            self.rotat_left = Button(self)
            self.rotat_left["text"]="Rotate Left"
            self.rotat_left["command"] = self.rotate_left
            self.rotat_left.grid(row=1, column=1)
And here is the result:

Adding image filters
In ndimage library we have some methods which we can use to perform filters on images, I chose gaussian and unifrom filters for this tutorial:
    def unifilter(self):
        self.image = ndimage.uniform_filter(self.image, size=30)
        self.im.set_data(self.image)
        self.canvas.draw()

    def gaufilter(self):
        self.image = ndimage.gaussian_filter(self.image, sigma=5)
        self.im.set_data(self.image)
        self.canvas.draw()
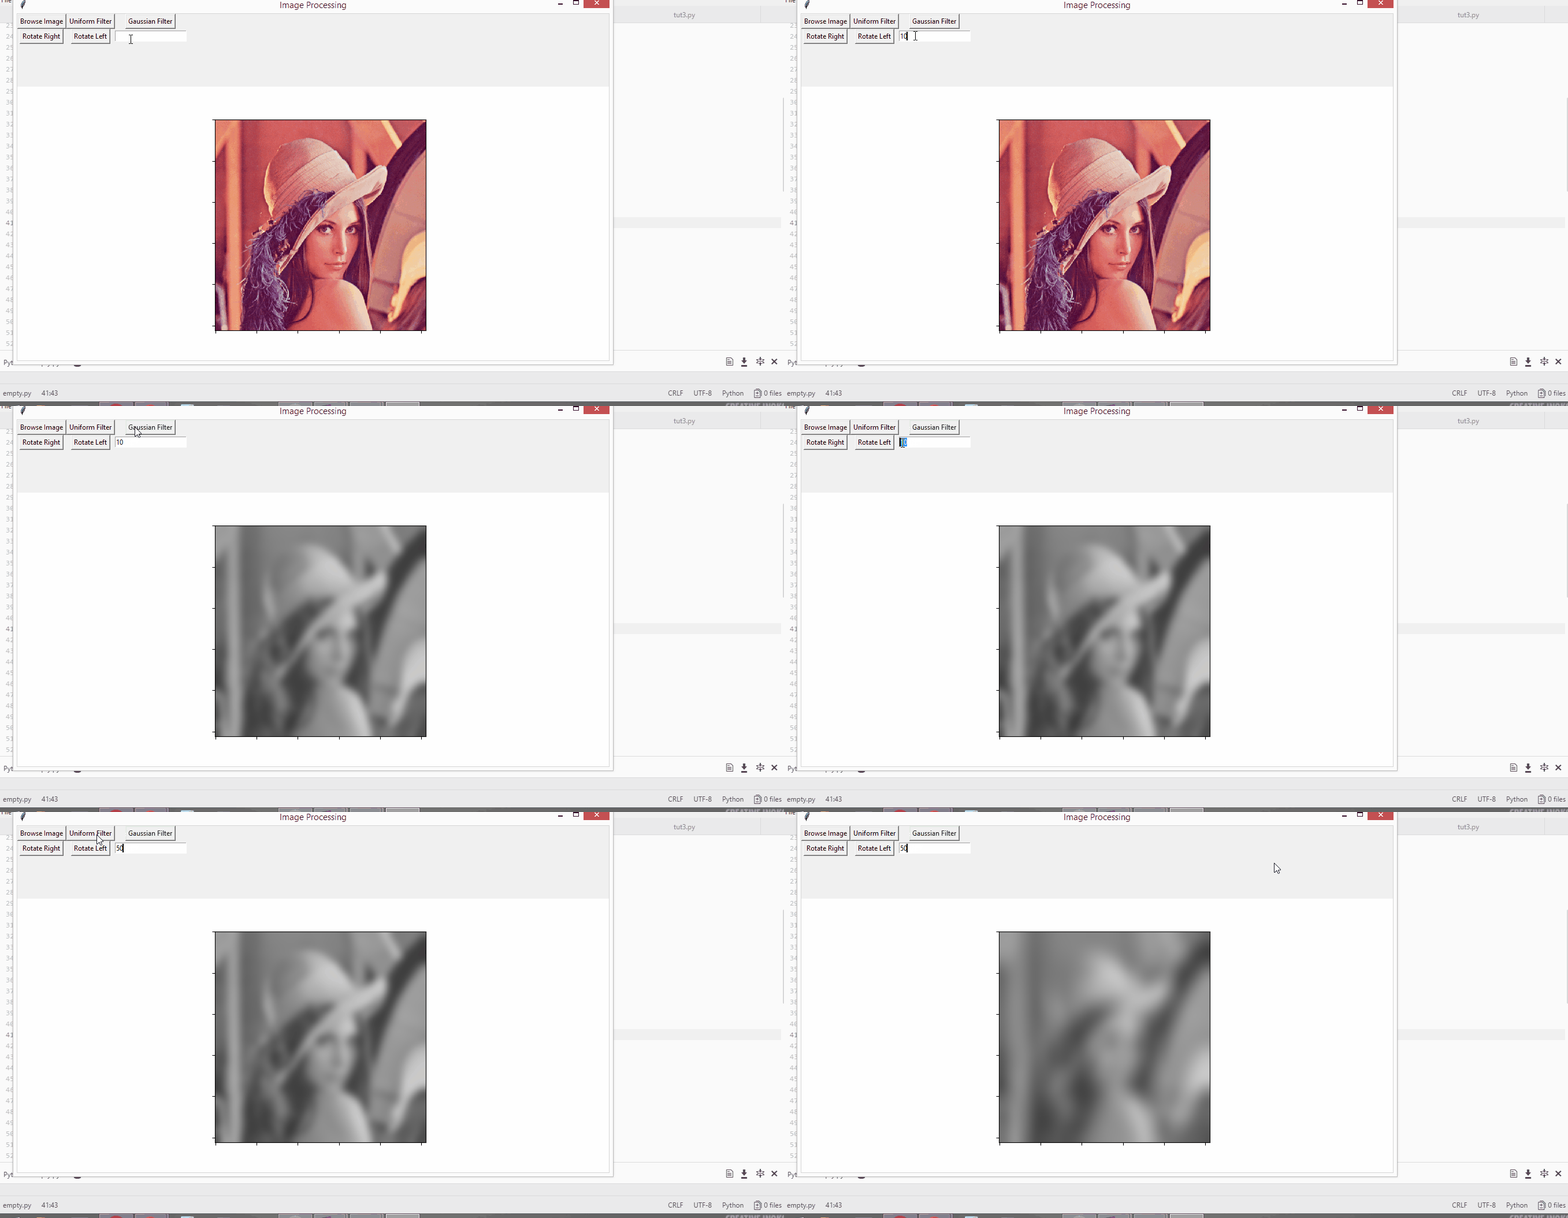
For uniform_filter's size and gaussian_filter's sigma values, you can give them directly in code, but I want to enter the value from keyboard so let's change the code, and create a textbox and two buttons for the our methods in create_widgets method like this:
    def create_widgets(self):
            self.browse = Button(self)
            self.browse["text"] = "Browse Image"
            self.browse["command"] = self.loadImage
            self.browse.grid(row=0, column=0)

            self.rotat_right = Button(self)
            self.rotat_right["text"]="Rotate Right"
            self.rotat_right["command"] = self.rotate_right
            self.rotat_right.grid(row=1, column=0)

            self.rotat_left = Button(self)
            self.rotat_left["text"]="Rotate Left"
            self.rotat_left["command"] = self.rotate_left
            self.rotat_left.grid(row=1, column=1)

            self.uni_filter = Button(self)
            self.uni_filter["text"] = "Uniform Filter"
            self.uni_filter["command"] = self.unifilter
            self.uni_filter.grid(row=0, column=1)

            self.gau_filter = Button(self)
            self.gau_filter["text"]="Gaussian Filter"
            self.gau_filter["command"] = self.gaufilter
            self.gau_filter.grid(row=0, column=3)

            self.text1=Entry(self)
            self.text1.grid()
            self.text1.grid(row=1, column=3)
            self.text1.focus()
And change the size and sigma values to int(self.text1.get()) since self.text1.get() is a str value we need to change it to int using int():
    def unifilter(self):
        self.image = ndimage.uniform_filter(self.image, size=int(self.text1.get()))
        self.im.set_data(self.image)
        self.canvas.draw()

    def gaufilter(self):
        self.image = ndimage.gaussian_filter(self.image, sigma=int(self.text1.get()))
        self.im.set_data(self.image)
        self.canvas.draw()
It should be working like this:

Adding minimum and variance values
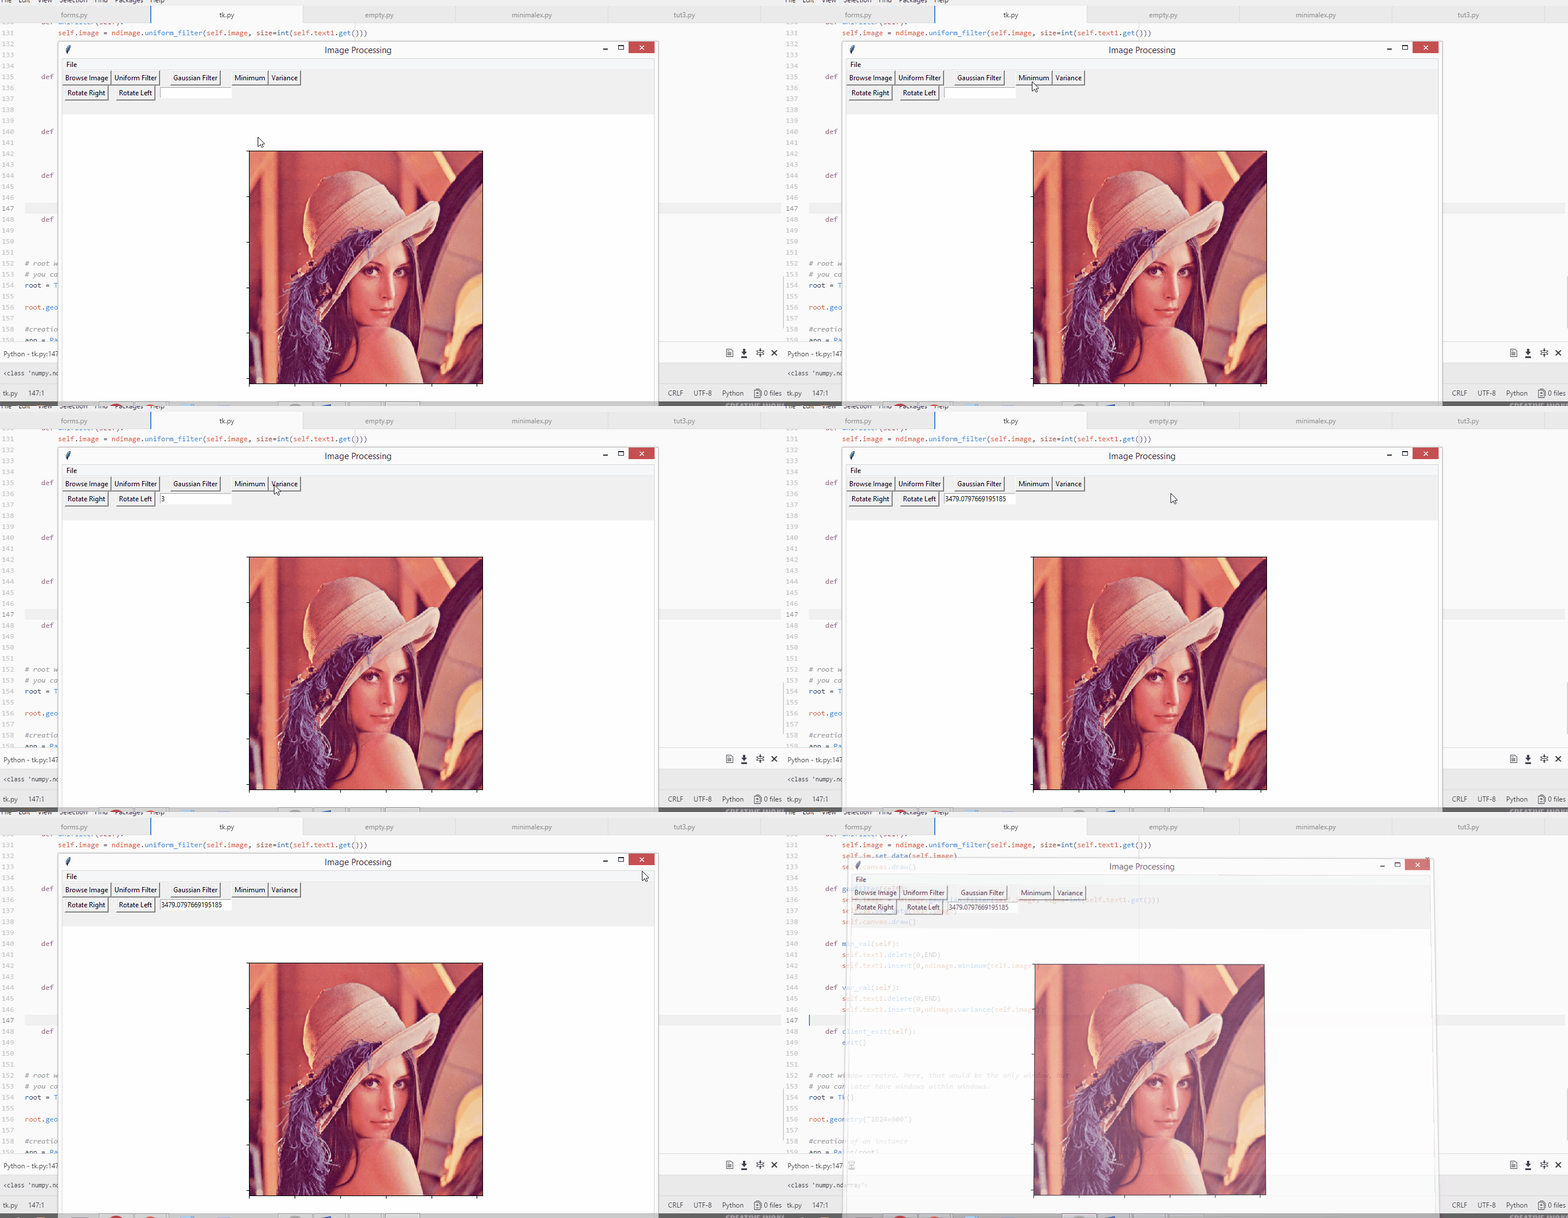
Now let's calculate minimum and variance values of the image and display it in the textbox, like before first we need to add two buttons in create_widgets method:
            self.minm = Button(self)
            self.minm["text"]="Minimum"
            self.minm["command"] = self.min_val
            self.minm.grid(row=0, column=4)

            self.varianc = Button(self)
            self.varianc["text"]="Variance"
            self.varianc["command"] = self.var_val
            self.varianc.grid(row=0, column=5)
And add new methods to ImageProc class:
    def min_val(self):
        self.text1.delete(0,END)
        self.text1.insert(0,ndimage.minimum(self.image))

    def var_val(self):
        self.text1.delete(0,END)
        self.text1.insert(0,ndimage.variance(self.image))
This self.text1.delete(0,END) will clear textbox and this line self.text1.insert(0,ndimage.minimum(self.image)) will insert new value:

Conclusion
Many programmers which are working with python scientific libraries usually coming from mathematical world and are not much familiar with programming concepts and using GUIs, so this tutorial may be useful to start and get things done using a user interface, also for practice you can use other ndimage methods here.
Thanks for your time and special thanks to utopian moderators.
Curriculum
This is my first contribution about image processing using python scientific libraries.
great job bro
Thank you for your contribution.
Overall I liked your work. I would advise you though to:
Looking forward to your upcoming tutorials.
Need help? Write a ticket on https://support.utopian.io/.
Chat with us on Discord.
[utopian-moderator]
Thanks for your advise, I will correct these problems.
Hey @hadif66
Thanks for contributing via Utopian.
We're already looking forward to your next contribution!
Contributing on Utopian
Learn how to contribute on our website or by watching this tutorial on Youtube.
Want to chat? Join us on Discord https://discord.gg/h52nFrV.
Vote for Utopian Witness!
Congratulations @hadif66! You have received a personal award!
Click on the badge to view your Board of Honor.
Do not miss the last post from @steemitboard!
Participate in the SteemitBoard World Cup Contest!
Collect World Cup badges and win free SBD
Support the Gold Sponsors of the contest: @lukestokes
Congratulations @hadif66! You have completed the following achievement on the Steem blockchain and have been rewarded with new badge(s) :
Click on the badge to view your Board of Honor.
If you no longer want to receive notifications, reply to this comment with the word
STOPDo not miss the last post from @steemitboard:
Congratulations @hadif66! You received a personal award!
You can view your badges on your Steem Board and compare to others on the Steem Ranking
Vote for @Steemitboard as a witness to get one more award and increased upvotes!