Learn Python Digital Imaging with OpenCV [Resize - Part 1]
What Will I Learn?
- You will learn Python
- You will learn OpenCV
- You will learn PYCharm
Requirements
- PYCharm
- OpenCV Package
- NumPY Package
Difficulty
- Intermediate
Tutorial Contents
What is Digital Imaging?
From wikipedia, Digital imaging or digital image acquisition is the creation of photographic images, such as of a physical scene or of the interior structure of an object. The term is often assumed to imply or include the processing, compression, storage, printing, and display of such images.
What is OpenCV?
From wikipedia, OpenCV (Open Source Computer Vision) is a library of programming functions mainly aimed at real-time computer vision.[1] Originally developed by Intel, it was later supported by Willow Garage then Itseez (which was later acquired by Intel[2]). The library is cross-platform and free for use under the open-source BSD license.
What is Resize?
Resize is the process of resizing the size of an image, whether enlarged or scaled to help that purpose, OpenCV provides resize functionality. This function has several arguments as follows:
- src1 : the first image file to be resized
- width : setting the width of the new image.
- height : setting the height of the new image.
- interpolation : the type of interpolation used. There are two options that can be used, namely INTER_AREA commonly used to shrink the image or INTER_CUBIC & INTER_LINEAR to enlarge the image. If not set, then by default INTER_LINEAR will be used.
Resize Example Program.
Zoom
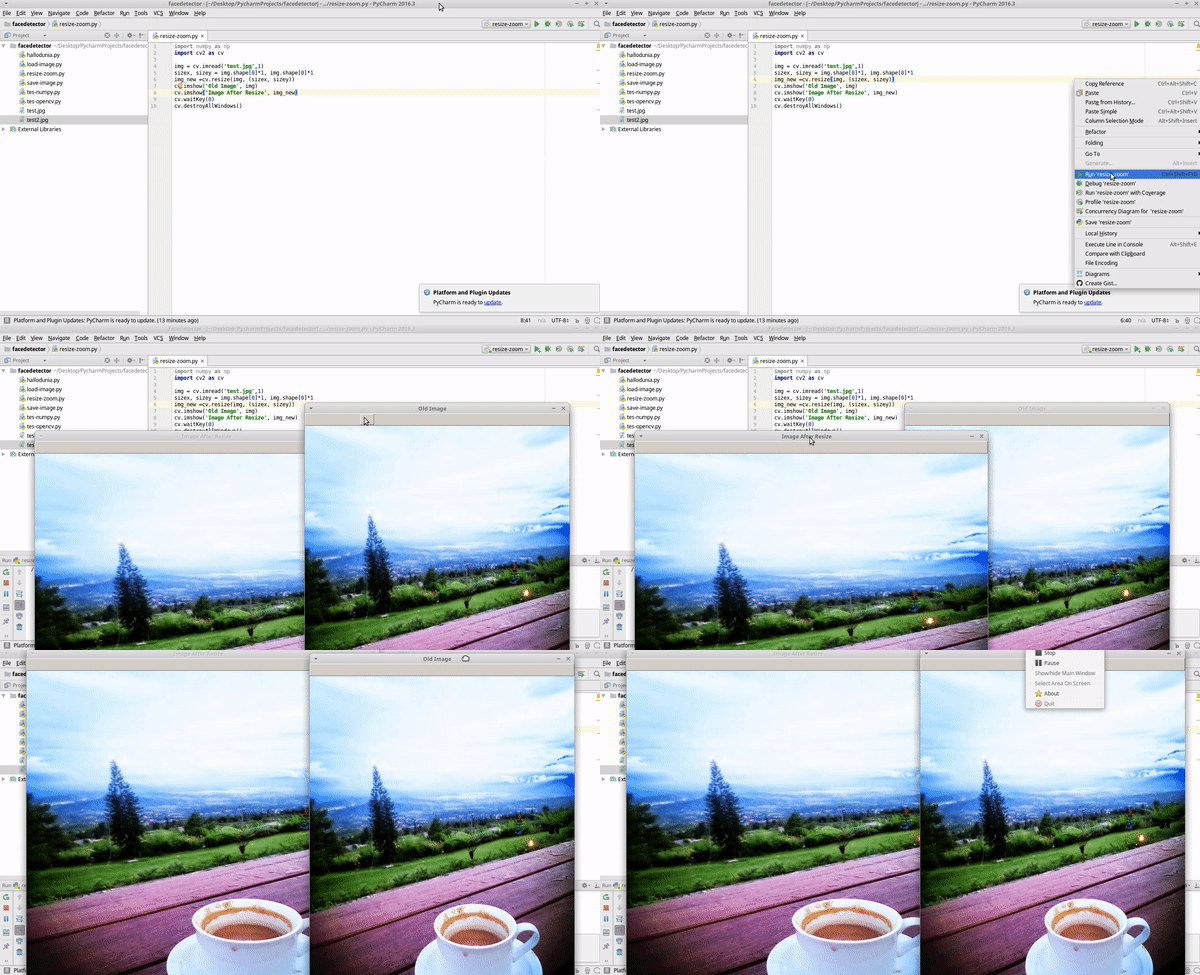
1 . Create new Python file on your PYCharm with name resize-zoom.
2 . Copy an image to folder project.
3 . Write the source code below.
import numpy as np
import cv2 as cv

img = cv.imread('test.jpg',1)
sizex, sizey = img.shape[0]*1, img.shape[0]*1
img_new =cv.resize(img, (sizex, sizey))
cv.imshow('Old Image', img)
cv.imshow('Image After Resize', img_new)
cv.waitKey(0)
cv.destroyAllWindows()
4 . Run it, and see output.

Explaination Code:
sizex, sizey = img.shape[0]*1, img.shape[0]*1
img_new =cv.resize(img, (sizex, sizey))
To know the dimensions or the physical size of the image and the number of channels in it you can use the shape, this code img.shape img.shape[0]1, img.shape[0]1 width and height will multiply 1. And then, resize() function for change size image.
Shrink
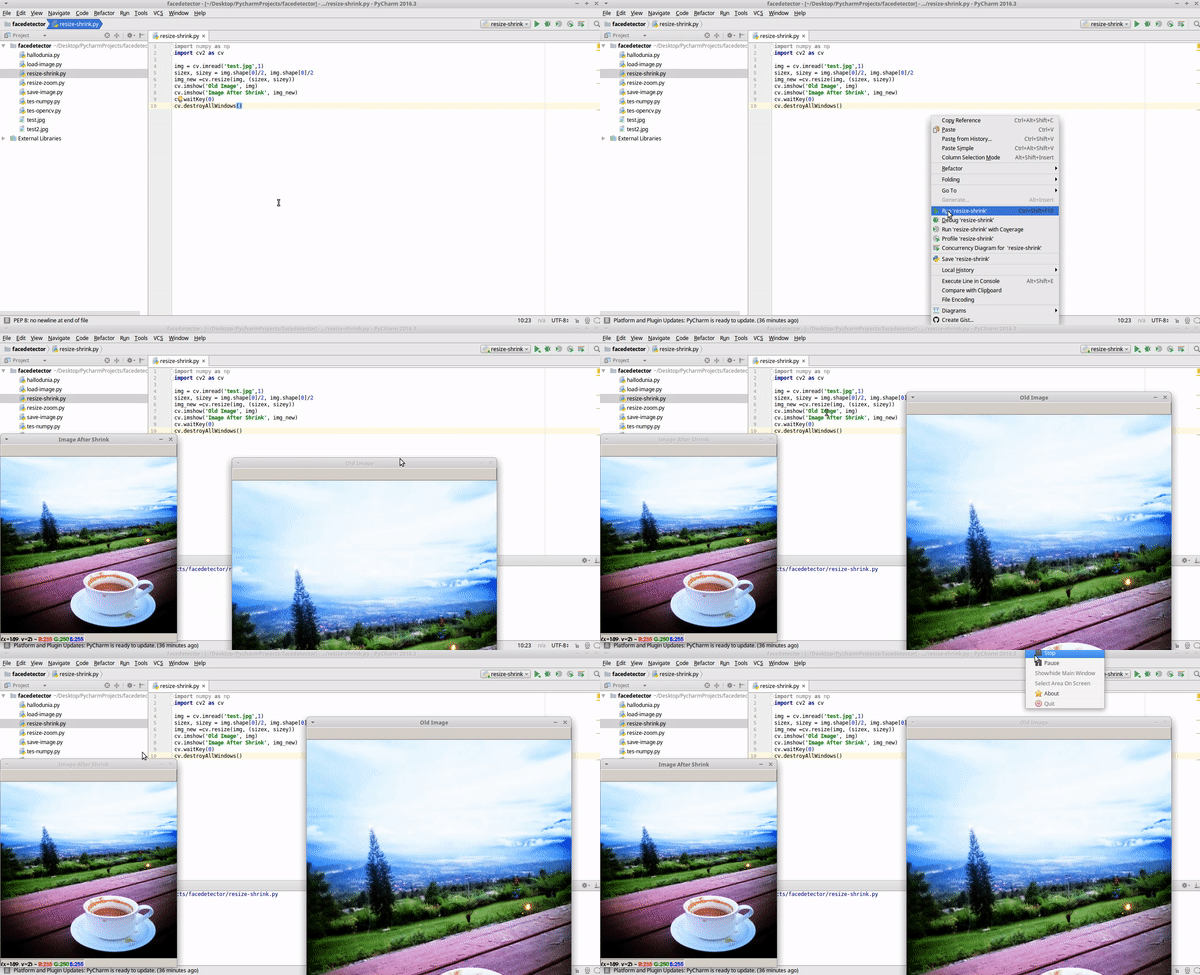
1 . Create new Python file on your PYCharm with name resize-shrink.
2 . Copy an image to folder project.
3 . Write the source code below.
import numpy as np
import cv2 as cv

img = cv.imread('test.jpg',1)
sizex, sizey = img.shape[0]/2, img.shape[0]/2
img_new =cv.resize(img, (sizex, sizey))
cv.imshow('Old Image', img)
cv.imshow('Image After Shrink', img_new)
cv.waitKey(0)
cv.destroyAllWindows()
4 . Run it, and see output.

Explanation Code:
img = cv.imread('test.jpg',1)
This code to call image file.
sizex, sizey = img.shape[0]/2, img.shape[0]/2
img_new =cv.resize(img, (sizex, sizey))
To know the dimensions or the physical size of the image and the number of channels in it you can use the shape, this code img.shape img.shape[0]/2, img.shape[0]/2 width and height will divided 2. And then, resize() function for change size image.
Transformation Image
OpenCV has several functions to help image transformations such as Rotate, shift (translation), create perspectives, etc. These functions are warpAffine and warpPerspective. The difference lies in the use of matrix when transforming where warpAffile uses 2x3 matrix, while warpPerspective uses 3x3 matrix.
Tranformation Example Program.
Rotate and Flip
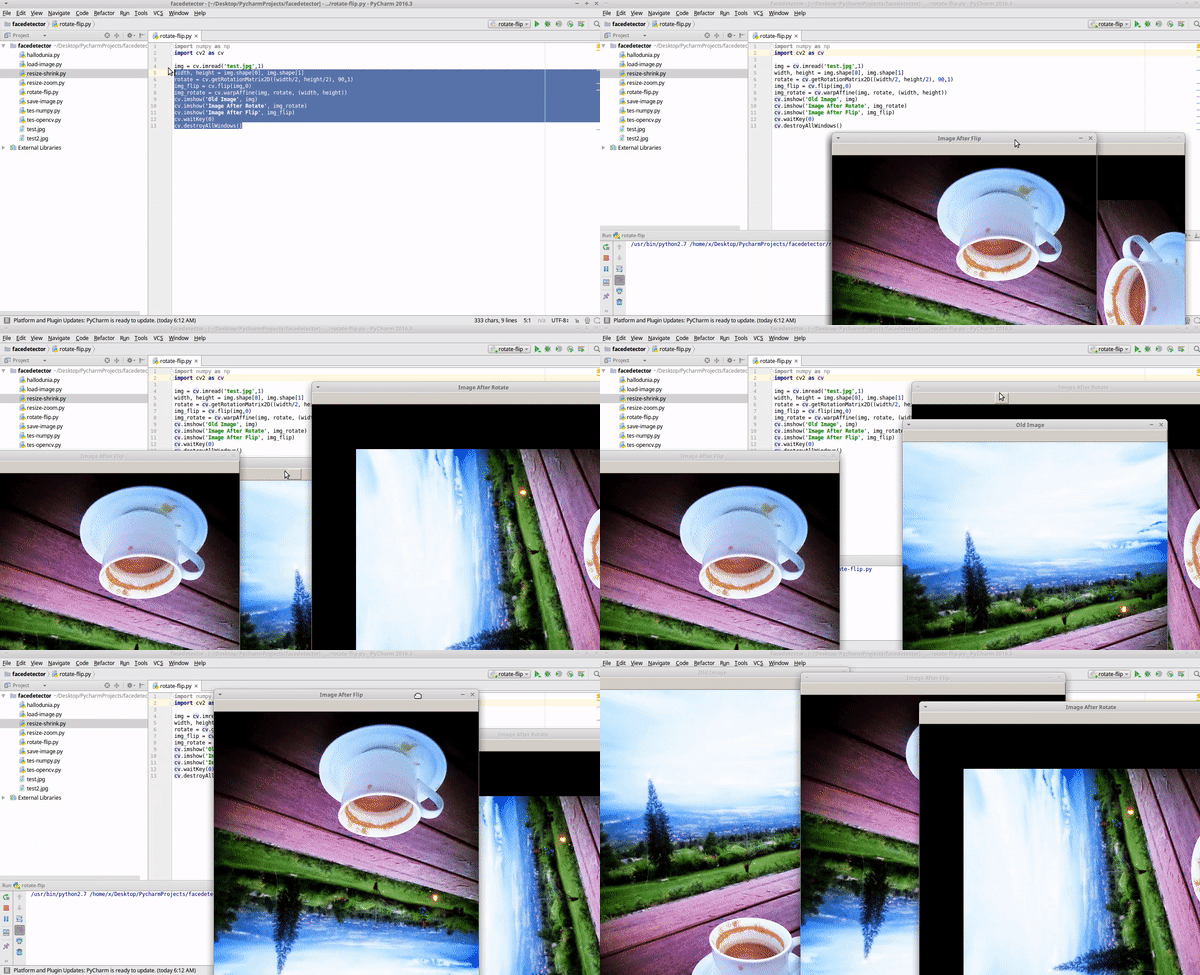
1 . Create new Python file on your PYCharm with name rotate-flip.
2 . Copy an image to folder project.
3 . Write the source code below.
import numpy as np
import cv2 as cv

img = cv.imread('test.jpg',1)
width, height = img.shape[0], img.shape[1]
rotate = cv.getRotationMatrix2D((width/2, height/2), 90,1)
img_flip = cv.flip(img,0)
img_rotate = cv.warpAffine(img, rotate, (width, height))
cv.imshow('Old Image', img)
cv.imshow('Image After Rotate', img_rotate)
cv.imshow('Image After Flip', img_flip)
cv.waitKey(0)
cv.destroyAllWindows()
4 . Run it, and see the output.

Explanation Code:
rotate = cv.getRotationMatrix2D((width/2, height/2), 90,1)
To rotate image you can using this function **getRotationMatrix2D **, argument width / 2, height / 2 means we want the rotation axis image is in the middle of the image, while 90 indicates the desired rotation degree.
img_rotate = cv.warpAffine(img, rotate, (width, height))
the image rotation process is performed using the warpAffine function according to the value received by the rotate variable. Then the rotated image (in img_rotate variable) is displayed using imshow
img_flip = cv.flip(img,0)
Of the code above 0 is the flip value.
1 = if you want to flip horizontally.
0 = if you want to flip vertically.
-1 = if you want to flip horizontally and vertically.
Translation
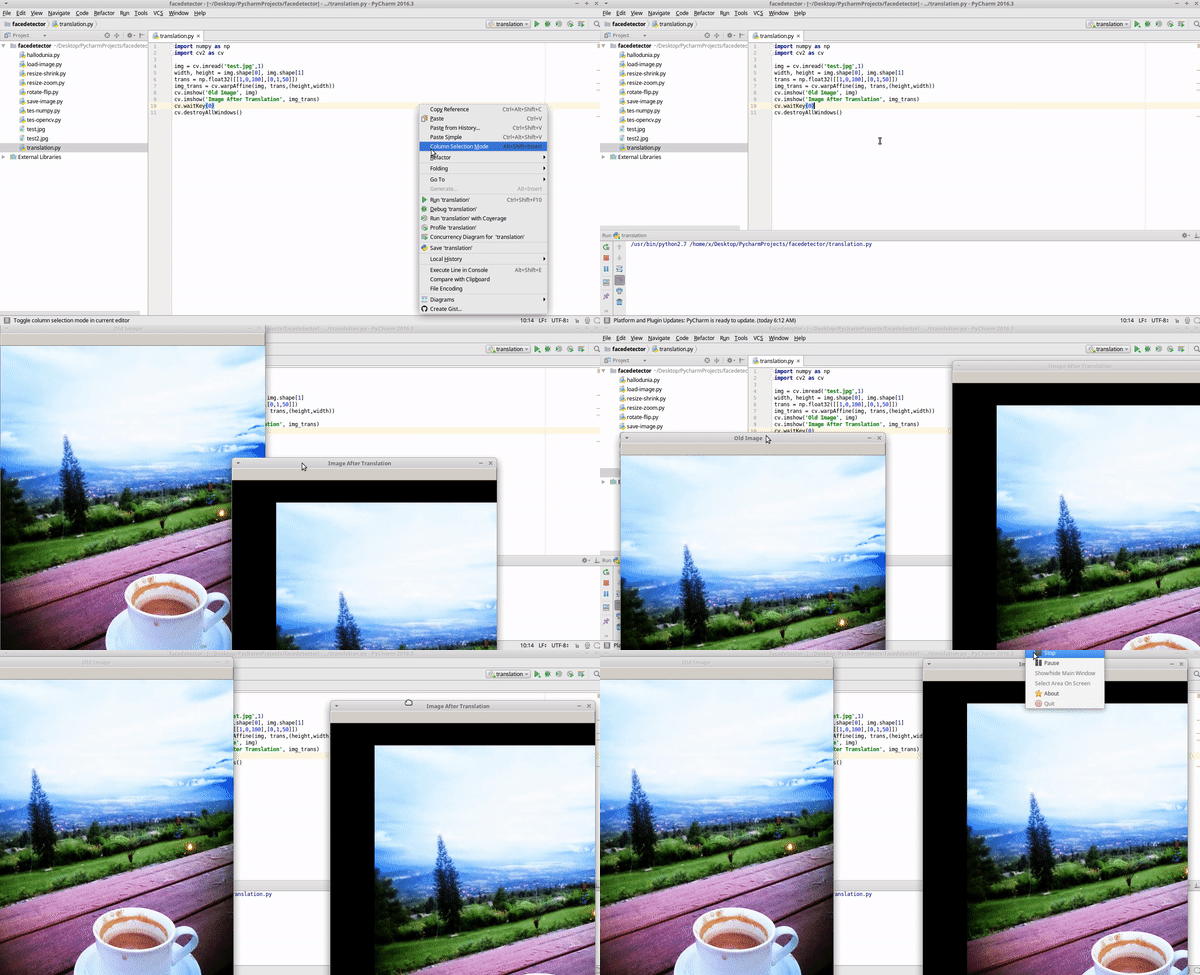
1 . Create new Python file on your PYCharm with name translation.
2 . Copy an image to folder project.
3 . Write the source code below.
import numpy as np
import cv2 as cv

img = cv.imread('test.jpg',1)
width, height = img.shape[0], img.shape[1]
trans = np.float32([[1,0,100],[0,1,50]])
img_trans = cv.warpAffine(img, trans,(height,width))
cv.imshow('Old Image', img)
cv.imshow('Image After Translation', img_trans)
cv.waitKey(0)
cv.destroyAllWindows()
4 . Run it, and see the output.

Explanation Code:
trans = np.float32([[1,0,100],[0,1,50]])
img_trans = cv.warpAffine(img, trans,(height,width))
To get the new x and y positions on the image so that it seems to shift, we can take advantage of float32 function from NumPY. Basically, this function is a simplification of the matrix to get a new position that will be used to shift the image. The position you want to get is the axis x = 100 and y = 50.
The value will then be used for the warpAffine function to perform translation (shift), while (height, width) determines the size of the window obtained from the image property itself.
will continue [Resize- Part 2]
Curriculum
Posted on Utopian.io - Rewarding Open Source Contributors
Your contribution cannot be approved because it does not follow the Utopian Rules.
You can contact us on Discord.
[utopian-moderator]
if you said that, means the contribution of existing tutorial categories in utopian can be deleted because there is already google