Creating Responsive Web Apps Using ReactJS, NodeJS and ReactiveX Part 7
Repository
https://github.com/facebook/react
Welcome to the Tutorial of Creating Responsive Web Apps Using ReactJS, NodeJS and ReactiveX Part 7
What Will I Learn?
- You will learn how to handle the server disconnection in our Application.
- You will learn how to do synchronization of messages and events in App.
- You will learn how to publish Real time events using Socket.IO.
- You will learn how to reconnect to the server in our application.
- You will learn how to test the final result after queuing live data.
- You will develop the Complete Robust Responsive Sketching Application
Requirements
System Requirements:
- Node.js 8.11.1
- Yarn
- RethinkDB
- Visual Studio Code or any similar editor for code editing
- A computer with basic functionalities and Web browsers
OS Support:
- Windows 7/8/10
- macOS
- Linux
Difficulty
- Intermediate
Resources
Required Understanding
- You need a good knowledge of HTML, CSS and JavaScript
- A fair understanding of Node.js and React.js
- A thirst for learning and developing something new
- Prior tutorials that are Part 1,Part 2,Part 3,Part 4,Part 5 and Part 6
Tutorial Contents
Description
You have studied and learned how the connecting to different ports occurs in our Sketching Application. Also, we have seen what happens when the connection to different servers interrupted and how to reconnect with them in the Sixth Part of the tutorial, if you don't check the sixth tutorial then check the sixth part.
In this Tutorial, you'll learn how the reconnection happens when one of the users disconnected and keeps on sketching. We will see how the queuing works for us in this situation. So, when the client gets back and reconnected it will be queued up with the work that has been done before.
Server Disconnection
The next scenario you'll be tackling is when the user is disconnected, but keeps on sketching. What you'll want to happen is for the events to queue up on the client.
When the client manages to connect again, it sends up all the events that it queued up while being disconnected. The good news is you won't need to do all the RxJS work for this to work. We are using a particular library for syncing
Remember, you want to run one service on port
8000 and the other on port 8001. So you'll have three services running, the React app and the server on both ports.
Synchronizing Events:
Most of the work to do this is done in the api.js file. Import the npm package that for synchronization onto the variable called createSync.
Now just above the publishLine function, go ahead and create a const called sync. Sync that to the result of calling createSync and this takes some options. Set a maxRetries value to 10. It'll try syncing events that many times before it gives up. Specify delayBetweenRetries of 1000. This is in milliseconds, so it'll wait 1 second between each failed retry. Specify syncAction.
const sync = createSync({
  maxRetries: 10,
  delayBetweenRetries: 1000,
  syncAction: line => new Promise((resolve, reject) => {
}),
})
This is a function that the library will use to execute the logic that you want to happen, and this function should return a promise because that's what the library expects. Now the library will pass whatever you fit into it for each item into this function, so make it deal with a line. Inside of this function, set a variable called sent to false.
let sent = false;
let sent = false;
Now try to send the line to the socket server by calling socket.emit publishLine and passing it the line just as you did before,
socket.emit('publishLine', line,)
socket.emit('publishLine', line,)
But now there's a twist. Pass on an extra function. This function will be called when the server confirms receipt of the message. In this function, set the sent variable to true and resolve the promise.
socket.emit('publishLine', line, () => {
      sent = true;
      resolve();
    });
Now we want to hear back from the server when it doesn't confirm the message. So below this code set a timeout, and let's give it about 2 seconds, and if by this time the success code did not execute this code up here, which you can see by the sent variable as still being false, then reject the promise.
setTimeout(() => {
      if (!sent) {
        reject();
      }
    }, 2000);
So we're basically saying that each item being passed to this sync will be synced up with a promise. If we get a success callback, then we resolve the promise. If we don't receive one after 2 seconds, we reject the promise, and the library knows that it needs to retry. Cool! Now in the publishLine function, just call a method called queue on the sync, and pass it the event that you want to be published.
sync.queue({ sketchingId, ...line });
sync.queue({ sketchingId, ...line });
As an aside, this sync object actually exposes two observables that you can use to check to see what's going on.
sync.failedItems.subscribe(x => console.error('failed line sync: ', x));
sync.syncedItems.subscribe(x => console.log('successful line sync: ', x));
Use the failedItems observable, and subscribe on it, and log out an error message when it gets a value. And use the syncedItems, subscribe to that, and log out a success message.
Publishing Real-Time Events:
This could even be used to show a sort of status to the user in the app to show how the data is being synced to the server. You also need to adapt the server so that it knows that it needs to call back to the client to confirm the messages. In the server index file where you handle the publishLine event, add a callback variable after the line.
function handleLinePublish({ connection, line, callback })
function handleLinePublish({ connection, line, callback })
In this handleLinePublish function, add a then onto the query, and in here just pass in the callback.
.then(callback);
.then(callback);
This way Socket.IO will ensure that the client gets notified when it's done.

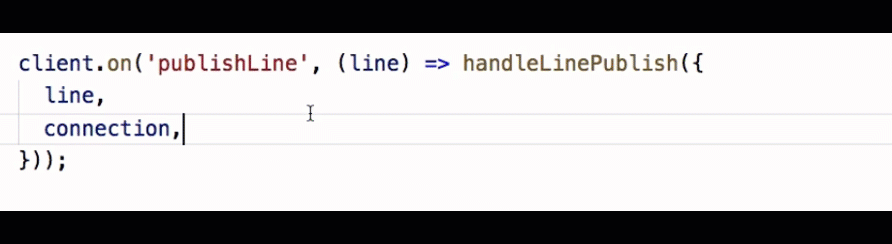
Where you handle the publishLine event, add a callback variable after the line, and pass this value on the handleLinePublish function.
client.on('publishLine', (line, callback) => handleLinePublish({
      line,
      connection,
      callback,
    }));
After going with this update index.js file of the server will look like this
//index.js//
const r = require('rethinkdb');
const io = require('socket.io')();

function createSketching({ connection, name }) {
  return r.table('sketchings')
  .insert({
    name,
    timestamp: new Date(),
  })
  .run(connection)
  .then(() => console.log('created a new sketching with name ', name));
}

function subscribeToSketchings({ client, connection }) {
  r.table('sketchings')
  .changes({ include_initial: true })
  .run(connection)
  .then((cursor) => {
    cursor.each((err, sketchingRow) => client.emit('sketching', sketchingRow.new_val));
  });
}

function handleLinePublish({ connection, line, callback }) {
  console.log('saving line to the db')
  r.table('lines')
  .insert(Object.assign(line, { timestamp: new Date() }))
  .run(connection)
  .then(callback);
}

function subscribeToSketchingLines({ client, connection, sketchingId, from }) {
  let query = r.row('sketchingId').eq(sketchingId);

  if (from) {
    query = query.and(r.row('timestamp').ge(new Date(from)))
  }

  return r.table('lines')
  .filter(query)
  .changes({ include_initial: true, include_types: true })
  .run(connection)
  .then((cursor) => {
    cursor.each((err, lineRow) => client.emit(`sketchingLine:${sketchingId}`, lineRow.new_val));
  });
}

r.connect({
  host: 'localhost',
  port: 28015,
  db: 'awesome_whiteboard'
}).then((connection) => {
  io.on('connection', (client) => {
    client.on('createSketching', ({ name }) => {
      createSketching({ connection, name });
    });

    client.on('subscribeToSketchings', () => subscribeToSketchings({
      client,
      connection,
    }));

    client.on('publishLine', (line, callback) => handleLinePublish({
      line,
      connection,
      callback,
    }));

    client.on('subscribeToSketchingLines', ({ sketchingId, from }) => {
      subscribeToSketchingLines({
        client,
        connection,
        sketchingId,
        from,
      });
    });
  });
});


const port = parseInt(process.argv[2], 10) || 8000;
io.listen(port);
console.log('listening on port ', port);
Testing the Final Results:
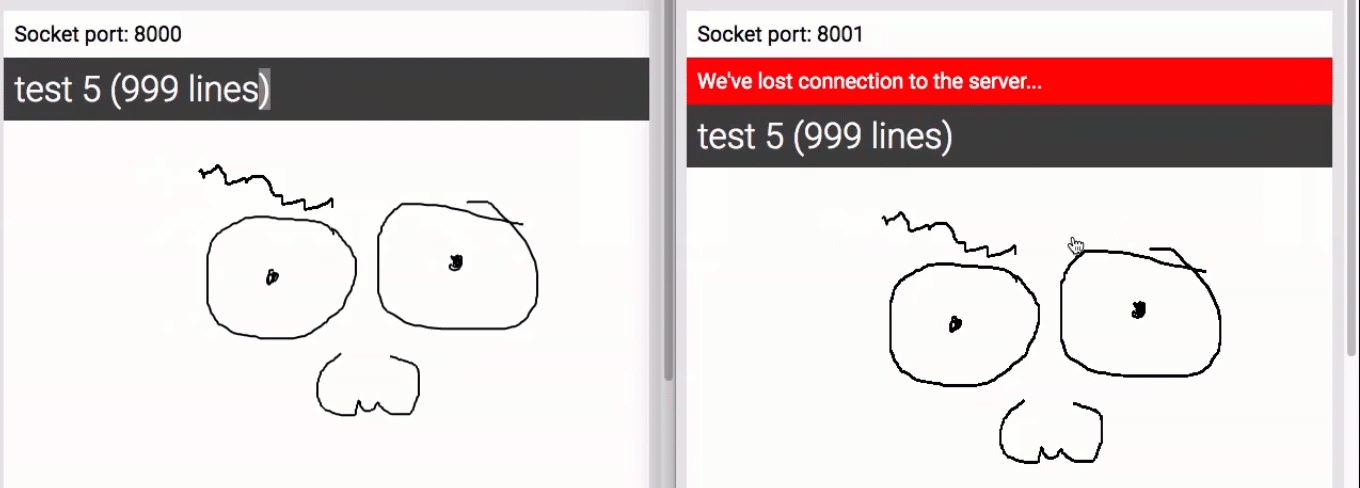
Now go and test that. Open up the same sketching in both the browser instances. Remember one should be connected to port 8000 and the other to port 8001. Draw on either browser instance. Now go and stop the service running on 8001.

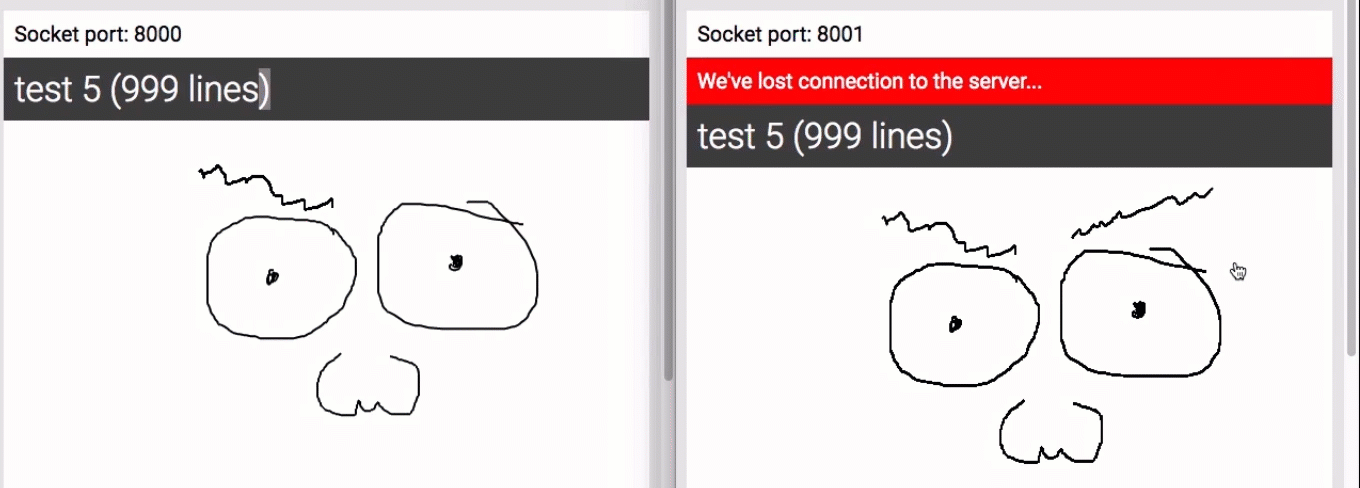
In the 8001 browser window, add to the sketching. Obviously the other browser window doesn't receive it because the one you're sketching on can't send the values up to the server. It's not connected.

Go back to the console, and start up the service for 8001. Now when you go back to the browser, as soon as it reconnects, the lines come through on the other window.

So you can even handle the scenario of the user sketching while the user doesn't have a connection to the server.
Summary:
Wow! That tutorial was a bit advanced. I tried to keep it simple and lean, but I don't blame you if you feel a bit overwhelmed with everything that went on in this last tutorial of the series, especially if you don't have any RxJS experience. If you do feel that way, I'd recommend that you read up on RxJS because that was what brought all the magic to this tutorial. It helps your components to stay simple and for your complicated reconnect batching and so forth to be handled away from components in a place better suited to it.

Now just a reminder, this course was made to be about patterns. Even though I think
RethinkDB is cool, you can use any kind of stack to build your real-time feature. My guess is you'll stumble onto very similar issues found in this course on most stacks, and my hope is that this course puts you in a better position to solve and overcome those issues. In the next courses there are a lot of interesting things coming soon. Thanks a lot for following along in this series!.
Curriculum
- Creating Responsive Web Apps Using ReactJS, NodeJS and ReactiveX part 1
- Creating Responsive Web Apps Using ReactJS, NodeJS and ReactiveX Part 2
- Creating Responsive Web Apps Using ReactJS, NodeJS and ReactiveX Part 3
- Creating Responsive Web Apps Using ReactJS, NodeJS and ReactiveX Part 4
- Creating Responsive Web Apps Using ReactJS, NodeJS and ReactiveX Part 5
- Creating Responsive Web Apps Using ReactJS, NodeJS and ReactiveX Part 6
Project Repository
- Complete Source Code of Sketching-App Part 7
Comment removed
Thank you for your contribution.
While I liked the content of your contribution, I would still like to extend one advice for your upcoming contributions:
Looking forward to your upcoming tutorials. Good Job!
Your contribution has been evaluated according to Utopian rules and guidelines, as well as a predefined set of questions pertaining to the category.
To view those questions and the relevant answers related to your post,Click here
Need help? Write a ticket on https://support.utopian.io/.
Chat with us on Discord.
[utopian-moderator]
Your tutorial appears to be plagiarized from elsewhere on the web. Many pointers are indicating that, especially some weak sentences at the start of the tutorial, in contrast to the excellent English within, as well as the general layout and approach.
To give you a change to clarify this, i will request the following from you to be done in the next 24 hours, otherwise your account will be banned:
Need help? Write a ticket on https://support.utopian.io/.
Chat with us on Discord.
[utopian-moderator]
Screenshots:
Explanation:
In the summary of my tutorial I have discussed about the patterns and implementations in RxJs. This particular tutorial is concerned with the pattern that I have used named Observer pattern. There is a subject and an observer. Observers constantly waiting for the signals coming from the Subject. So whenever Subject sends data to observers they will update their state. In this way, there will be data queuing done as also in our example of sketching. So, this is the pattern I have discussed earlier. As far as the implementation part is concerned RxJs follows the above subject and observers pattern for implementation for streams.
okay, it's clear you did not do the work:
You unfortunately will be banned now.
Need help? Write a ticket on https://support.utopian.io/.
Chat with us on Discord.
[utopian-moderator]
Congratulations @engr-muneeb! You have completed some achievement on Steemit and have been rewarded with new badge(s) :
Click on any badge to view your Board of Honor.
For more information about SteemitBoard, click here
If you no longer want to receive notifications, reply to this comment with the word
STOPDo not miss the last announcement from @steemitboard!
Congratulations @engr-muneeb! You received a personal award!
Click here to view your Board
Congratulations @engr-muneeb! You received a personal award!
You can view your badges on your Steem Board and compare to others on the Steem Ranking
Vote for @Steemitboard as a witness to get one more award and increased upvotes!