Creating Responsive Web Apps Using ReactJS, NodeJS and ReactiveX Part 3
Repository
https://github.com/facebook/react
Welcome to the Tutorial of Creating Responsive Web Apps Using ReactJS, NodeJS and ReactiveX Part 3
What Will I Learn?
- You will learn how to update server part to store sketches.
- You will learn how the serving and piping of sketches done through client.
- You will learn how to setting up the socket logic from client.
- You will learn how to manage the client code to save sketches.
- You will learn how to list all sketches using client in our application.
- You will learn about the testing of real time results using local host.
Requirements
System Requirements:
- Node.js 8.11.1
- Yarn
- RethinkDB
- Visual Studio Code or any similar editor for code editing
- A computer with basic functionalities and Web browsers
OS Support:
- Windows 7/8/10
- macOS
- Linux
Difficulty
- Intermediate
Resources
Required Understanding
- You need a good knowledge of HTML, CSS and JavaScript
- A fair understanding of Node.js and React.js
- A thirst for learning and developing something new
Tutorial Contents
Description
Since you know how to install and run RethinkDB, as well as the way to execute and subscribe to changes in Rethinkdb Database. You have also studied how to develop database schema and test the results in the Second Part of the tutorial, if you don't check the second tutorial check the second part, Now you will learn how to update the server side code to store as well to serve the list of sketches. We will also see what will be the possible changes in the client side code so that it would be able to save new sketches and also to list the set of sketches.
Updating Server to Store Sketches:
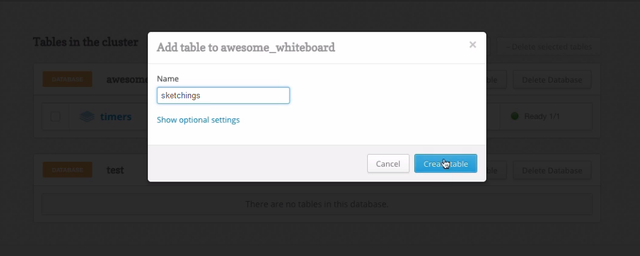
Now you're going to use the same basic pattern that you used for the timer to maintain a list of sketchings in the DB. You'll code up some functionality to store a new sketching to a table, as well as some logic to pipe existing and new sketchings over interested sockets. First thing you need to get out of the way is to create a new table that will store the sketchings. Go into the RethinkDB console and add a new table to the awesome_whiteboard database called sketchings.
You're going to follow along with the basic same pattern that you did for the timer, except you're also going to take a sketching that comes in from the socket and store it to the database.
function createSketching({ connection, name })
function createSketching({ connection, name })
In the server index file, create a new function called createSketching, and make it take a connection and a name you can use for the sketching.
r.table('sketchings')
r.table('sketchings') Now call r.table, and specify sketchings for that. Chain on an insert statement, and add a new object with a name property and a timestamp that you set to the current date.
.insert({
    name,
    timestamp: new Date(),
  })
Chain on a run statement and pass it the connection. This returns a promise, so chain a then on here and just write out a success message to the console. The success message doesn't matter as long as it makes sense.
  .run(connection)
  .then(() => console.log('created a new sketching with name ', name));
This is going to come from the client, so in our code at the bottom of this file, get rid of the timer stuff you added earlier.
Subscribe to an event coming from the socket called
createSketching. Pass that a handler function. Make this take an object that has a name property. In here, just call the createSketching function, passing on the connection that you have available here and the name for the sketching.
  client.on('createSketching', ({ name }) => {
      createSketching({ connection, name });
    });
So now it's possible for the client to emit this event and should end up with a sketching being saved to the RethinkDB
Serving Sketches Using Rethinkdb:
Below where you have the createSketching function, add a new function called subscribeToSketchings and make it take a client, which is the client side of the socket and the connection, which is the RethinkDB connection.
function subscribeToSketchings({ client, connection }) {

}
Open a query to the sketchings table and specify that you're interested in changes. This time, pass an object to this changes method call and specify that you want include_initial to be true.
r.table('sketchings')
  .changes({ include_initial: true })
This option just tells RethinkDB that when you execute the query, you want it to call back to us for each row that is already present that matches your query. Now run the query, passing it the connection, and this returns a promise, so add a then on it, providing a callback function that gets the resulting cursor.
.then((cursor) => {
  });
On the cursor, call each and provide it with a callback function that takes an error and a sketchingRow, the row containing the new sketching.
cursor.each((err, sketchingRow) => client.emit('sketching', sketchingRow.new_val));
cursor.each((err, sketchingRow) => client.emit('sketching', sketchingRow.new_val)); In this function, you emit to the client with an event name of sketching and pass the new_val object that you got from the row as the event payload.
Our Socket Logic:
So very much the same as you did with the timer, just with a bit more structure, and you specified that you wanted to get the initial values on the cursor. Now in our socket logic, you subscribe to an event from the client by calling on and specifying an event of subscribeToSketchings. Give it a function to execute when the client emits this event, and call subscribeToSketchings
client.on('subscribeToSketchings', () => subscribeToSketchings({ }));
client.on('subscribeToSketchings', () => subscribeToSketchings({ }));Now passing it the client and the connection. So when the client emits this event,
client.on('subscribeToSketchings', () => subscribeToSketchings({
      client,
      connection,
    }));
your code will pipe the existing sketchings through to it, as well as any new sketchings that make it into the table.
Changing Client Code to Save New Sketch:
Let's go use this functionality now on the client side. Open up the api.js file in the src folder in the client folder. Change this function name to be subscribeToSketchings, and subscribe to sketching instead of the timer event, and pass the sketching onto the callback.
unction subscribeToSketchings(cb) {
  socket.on('sketching', sketching => cb(sketching));
  socket.emit('subscribeToSketchings');
}
Also, emit subscribeToSketchings instead of what you have at the moment. Now add a new function called createSketching.
function createSketching(name) {
  socket.emit('createSketching', { name });
}
It should have one parameter called name’. Here, justemitan event calledcreateSketching, which you wired up earlier on the server side, and pass it an object containing thename` for the sketching.
You can go call these functions from your React components. You’ll need to go and create those components first. In the src folder in your client folder, create a new file SketchingForm.js. This will contain the form component for creating a new sketching.
import React, { Component } from 'react';
import React, { Component } from 'react'; In this file, import React and Component from the React npm package. You'll also want to import the createSketching function from the `api file’.
import {createSketching} from './api';
import {createSketching} from './api'; Create a new React component called SketchingForm that extends from Component. Add some initial state with a sketchingName value that equals an empty string.
class SketchingForm extends Component {
  state = {
    sketchingName: '',
  }
Add the render method, return a div with a class name of form. The starter code contains all the starting in the App.css file. Inside of this div, add a form.
Inside the form, add an input component, which I'll use to take the name of the sketching. It's of type text. Its value should reflect the sketchingName on state, and you should add an onChange value. And in here, just state the sketchingName value on state to the event's target value. Add a placeholder of Sketching name, a className of Form-sketchingInput, and make the field required.
render() {
    return (
      <div className="Form">
        <form onSubmit={this.handleSubmit}>
          <input
            type="text"
            value={this.state.sketchingName}
            onChange={(evt) => this.setState({ sketchingName: evt.target.value })}
            placeholder="Sketching name"
            className="Form-sketchingInput"
            required
  />
    );
  }
Put a button below the input with type of submit and className of form button. The button text should be Create. Add a class method called handleSubmit onto the class that takes an event. Inside, call the preventDefault method on the event to ensure that it doesn't bubble up. Now call the createSketching function that you imported from api, and pass on the sketchingName from state.
handleSubmit = (event) => {
    event.preventDefault();
    createSketching(this.state.sketchingName);
  }
Afterwards, just set the sketchingName to an empty string on state. And now that we've got the handleSubmit function defined,
this.setState({
      sketchingName: '',
    });
We can use it on the form. Now open the App.js file. In here, first clean it up by getting rid of the constructor. And after you've done that, also get rid of the default state. Clean out the message in render too. Now import the SketchingForm component at the top of this file.
import SketchingForm from './SketchingForm';
import SketchingForm from './SketchingForm'; Just go and add the SketchingForm in the render method below where you have your header code, this out in the browser. You'll see that you should be able to specify a Sketching name and click the button, and the text box gets cleared out.
But did anything happen?
Go take a look. Open up your Rethink console, go to the Data Explorer, and run the following query:
r.db(‘awesome_whiteboard’).table(‘sketchings’)
r.db(‘awesome_whiteboard’).table(‘sketchings’) You should see your sketching being returned.
Listing of Sketches Using Client:
So you have the ability to add a new row to the sketchings table. Next, you'll create a component that shows the items in a list by subscribing to the values over the WebSocket. In the src folder in your client code, add a new file and call it SketchingList. You can copy the work you did from the SketchingForm component to get the basic React component structure in place. Just copy everything from the SketchingForm file, and paste it into the SketchingList file. Change the class name from SketchingForm to SketchingList, and also remember to export at the end of the file using the new name.
export default SketchingList;
export default SketchingList;Clear out the render function for now. You'll code up the logic there soon enough. Under the false state, remove the SketchingName state prop, and state a prop called sketchings to an empty array.
At the top of the file, import the subscribeToSketchings function from the api module instead of the createSketching function.
import {subscribeToSketchings,} from './api';
import {subscribeToSketchings,} from './api';Now add a constructor to your SketchingList component, and remember to make it take a props parameter. Call super, passing on the props.
constructor(props) {
    super(props);
  }
Now call the subscribeToSketchings function, which, as you might recall, expects a callback that it can call for every sketching that will come back on the socket. In this callback function, just call setState using the function syntax, which takes a function that will be called with the previous state.
subscribeToSketchings((sketching) => {
      this.setState(prevState => ({
        sketchings: prevState.sketchings.concat([sketching]),
      }));
    });
From this, just return the state with a new sketching added on to the end of the array. So when our component gets constructed, it will subscribe to sketchings from the server. In render function, you can see that we also need to remove the handleSubmit function over here. We don't need it anymore so remove it.
const sketchings = this.state.sketchings.map(sketching => ());
const sketchings = this.state.sketchings.map(sketching => ());Moving onto the render function, define a new const called sketchings and set that to the result of mapping over the sketchings array on state. Map takes a function that should return the desired result for each item in the array, so add that.
  <li
        className="SketchingList-item"
        key={sketching.id}
      >
From this return an li with a className of SketchingList-item, and you also need to specify you need key because you'll have multiple of these items in the list. Set that to the sketching.id. For the inner text of the li, just use the sketching.name.
  return (
      <ul
        className="SketchingList"
      >
        {sketchings}
      </ul>
    );
Below the map code, you return a ul, and you use the sketchings you just calculated as its children. Specify a class name of SketchingList for the ul. So now you have a component that subscribes to sketchings from the server over the socket when it gets constructed and then adds them to an array on state as it gets in. This component renders all the items in the array as a list item in an unordered list, pretty simple.
Checking the Results:
Go plug in your SketchingList component by heading over to the App.js file and duplicating this SketchingForm input.
import SketchingList from './SketchingList';
import SketchingList from './SketchingList';
Rename it to import the SketchingList component instead. Great! So now if you open up the browser, you should see the sketchings, you've added previously using the form being displayed in there.
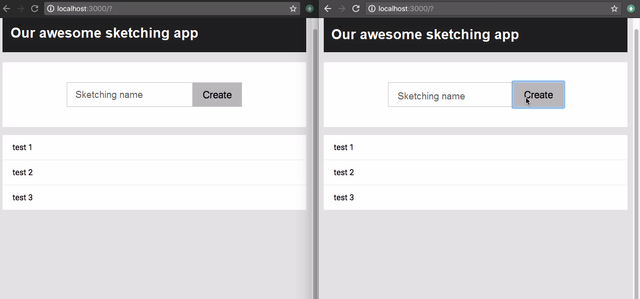
Open up another browser instance and keep it side by side with the one you've got open currently. Navigate to
localhost:3000 so that you've got the app open in both browser windows. In the one, add a new sketching. You should see the other one updating in real time, and that was the whole point.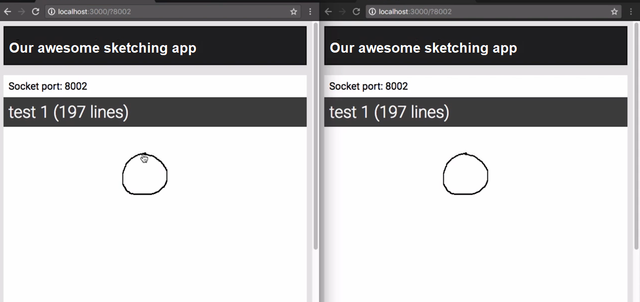
Summary:
In this tutorial, we learned how to update server to make it happen to store the sketches as well as serve them. We have also studied about the management of client side code to save a new sketch and display all the list of sketches in our application. In the end, we have seen our results by connecting our application to local host server. In the next tutorial we will have look at developing components of our sketching application. Including subscribing using react and improve the rendering time of sketching component.
Source Code:
//index.js//

const r = require('rethinkdb');
const io = require('socket.io')();

function createSketching({ connection, name }) {
  return r.table('sketchings')
  .insert({
    name,
    timestamp: new Date(),
  })
  .run(connection)
  .then(() => console.log('created a new sketching with name ', name));
}

function subscribeToSketchings({ client, connection }) {
  r.table('sketchings')
  .changes({ include_initial: true })
  .run(connection)
  .then((cursor) => {
    cursor.each((err, sketchingRow) => client.emit('sketching', sketchingRow.new_val));
  });
}


r.connect({
  host: 'localhost',
  port: 28015,
  db: 'awesome_whiteboard'
}).then((connection) => {
  io.on('connection', (client) => {
    client.on('createSketching', ({ name }) => {
      createSketching({ connection, name });
    });

    client.on('subscribeToSketchings', () => subscribeToSketchings({
      client,
      connection,
    }));
  });
});


const port = 8000;
io.listen(port);
console.log('listening on port ', port);
//App.js//

import React, { Component } from 'react';
import './App.css';
import SketchingForm from './SketchingForm';
import SketchingList from './SketchingList';

class App extends Component {
  render() {
    return (
      <div className="App">
        <div className="App-header">
          <h2>Our awesome sketching app</h2>
        </div>

        <SketchingForm />

        <SketchingList />
      </div>
    );
  }
}

export default App;
//api.js//

import openSocket from 'socket.io-client';
const socket = openSocket('http://localhost:8000');

function subscribeToSketchings(cb) {
  socket.on('sketching', sketching => cb(sketching));
  socket.emit('subscribeToSketchings');
}

function createSketching(name) {
  socket.emit('createSketching', { name });
}

export {
  createSketching,
  subscribeToSketchings,
};
//SketchingForm.js//
import React, { Component } from 'react';
import {
  createSketching,
} from './api';

class SketchingForm extends Component {
  state = {
    sketchingName: '',
  }

  handleSubmit = (event) => {
    event.preventDefault();
    createSketching(this.state.sketchingName);
    this.setState({
      sketchingName: '',
    });
  }

  render() {
    return (
      <div className="Form">
        <form onSubmit={this.handleSubmit}>
          <input
            type="text"
            value={this.state.sketchingName}
            onChange={(evt) => this.setState({ sketchingName: evt.target.value })}
            placeholder="Sketching name"
            className="Form-sketchingInput"
            required
          />
          <button
            type="submit"
            className="Form-button"
          >Create</button>
        </form>
      </div>
    );
  }
}
export default SketchingForm;
//SketchingList.js//
import React, { Component } from 'react';
import {
  subscribeToSketchings,
} from './api';


class SketchingList extends Component {
  constructor(props) {
    super(props);

    subscribeToSketchings((sketching) => {
      this.setState(prevState => ({
        sketchings: prevState.sketchings.concat([sketching]),
      }));
    });
  }

  state = {
    sketchings: [],
  };

  render() {
    const sketchings = this.state.sketchings.map(sketching => (
      <li
        className="SketchingList-item"
        key={sketching.id}
      >
        {sketching.name}
      </li>
    ));

    return (
      <ul
        className="SketchingList"
      >
        {sketchings}
      </ul>
    );
  }
}

export default SketchingList;
Curriculum
- Creating Responsive Web Apps Using ReactJS, NodeJS and ReactiveX Part 1
- Creating Responsive Web Apps Using ReactJS, NodeJS and ReactiveX Part 2
Project Repository
- Complete Source Code of Sketching-App Part 3
Thank you for your contribution.
While I liked the content of your contribution, I would still like to extend one advice for your upcoming contributions:
Looking forward to your upcoming tutorials.
Your contribution has been evaluated according to Utopian rules and guidelines, as well as a predefined set of questions pertaining to the category.
To view those questions and the relevant answers related to your post,Click here
Need help? Write a ticket on https://support.utopian.io/.
Chat with us on Discord.
[utopian-moderator]
Hey @engr-muneeb
Thanks for contributing on Utopian.
We’re already looking forward to your next contribution!
Contributing on Utopian
Learn how to contribute on our website or by watching this tutorial on Youtube.
Want to chat? Join us on Discord https://discord.gg/h52nFrV.
Vote for Utopian Witness!