Creating Responsive Web Apps Using ReactJS, NodeJS and ReactiveX Part 2
Repository
https://github.com/facebook/react
Welcome to the Tutorial of Creating Responsive Web Apps Using ReactJS, NodeJS and ReactiveX Part 2
What Will I Learn?
- You will learn how to install and setting up the RethinkDB.
- You will learn how to manage the list of sketches in our App.
- You will learn how to subscribe to changes on Live Queries on Rethinkdb.
- You will learn how to execute queries using Rethinkdb.
- You will learn how to maintain database schema.
- You will learn about the testing of results using Database.
Requirements
System Requirements:
- Node.js 8.11.1
- Yarn
- RethinkDB
- Visual Studio Code or any similar editor for code editing
- A computer with basic functionalities and Web browsers
OS Support:
- Windows 7/8/10
- macOS
- Linux
Difficulty
- Intermediate
Resources
Required Understanding
- You need a good knowledge of HTML, CSS and JavaScript
- A fair understanding of Node.js and React.js
- A thirst for learning and developing something new
Tutorial Contents
Description
Since you know how to send and also receive events of a WebSocket utilizing Socket.IO and how to bind to an updating value in the First Part of the tutorial, if you don't check the first tutorial check the first part, Now you will learn to use RethinkDB in order to persevere your data and provide a publish/subscribe broker to your WebSocket stack, letting it scale. Publish/subscribe is a very typical pattern which allows producers of events to become decoupled from the logic that happens using the events downstream. It's a method to keep a system loosely coupled and add several concerns onto events. In our app, an event will be something like a user adding a new sketch or a user sketching a line onto a previous made sketch.
Within this part, you will set up RethinkDB and learn how to use its live query functionality with regard to publish/subscribe event brokering. This will allow you to develop a scalable WebSocket tier, due to the fact as long as your RethinkDB class is available, you can include and remove WebSocket service on top of it
Live Queries In RethinkDB
WebSockets are persistent connections. So if you want to ensure that you can support a substantial number of simultaneous users, you'll want to scale out across multiple servers, but let's say that you have a user doing something that another user is interested in, but they're connected to two different WebSocket servers. They can always write and query to a database. In fact, you'd probably want to persist your data regardless.
But if you use any plain old DB, how would a server get notified when an event occurs on another server? It would probably have to pull the database for changes that its connected users are interested in. This will cost a lot in terms of complexity and resources.
That's where RethinkDB enters the picture. It supports live queries, so a server could open up queries to the data that's its connected users are interested in, and RethinkDB will pipe any new data matching the queries through to a server as soon as it becomes available. So essentially, you have a mixture between publish/subscribe and data persistence. You don't need to use RethinkDB. You can use any technology or combination of technology like Redis and Kafka.
Setting up the Environment:
Before you can follow along with the rest of this module, you'll need to install RethinkDB on your machine. Luckily, this is usually very straightforward. Head on over to RethinkDB's website.Look for the Install RethinkDB button, taking into account that the website might have changed. When you click this button, it should take you to the installation options. Choose your operating system here in order to download the correct version for your OS. Just follow the instructions that you see here to get installed on your machine. It's really as simple as just downloading an installer and running it.
After installing it, you should either have the rethinkdb command available on your path or at least know where it's installed. Drop in to your command line and run the rethinkdb command. Remember, depending on the way that you've installed it, it might not be on your path, meaning it might not work if you just open up the command line at any location and running the rethinkdb command. You might need to either add it to your path manually or just navigate to where it was installed and run it from there. Once it's up and running, you should see something like this. The ports we are most interested in are 28015 and 8080;

28015 is the port that you'll connect to RethinkDB from code, and 8080 is what you'll use in your browser to connect to the administrative console. In fact, you can open it up in your browser now. Just point your browser to localhost:8080, and you should see something similar to this.
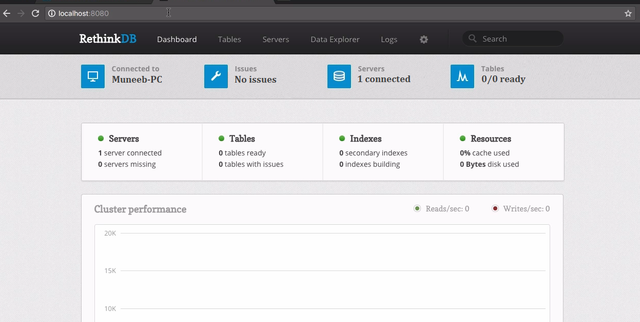
You'll be using this console to manage your RethinkDB tables and to insert some data later in this module. Okay, so you've got it installed, and now you can use it to follow along with the rest of this tutorial.
Continue Our Project:
Before implementing the feature to maintain a list of sketches in the RethinkDB, you're going to change the existing code that you did in the previous tutorial to get the time and value from RethinkDB instead of generating it on the server in a set timeout. That way you should see how you can use live queries to subscribe to data coming into RethinkDB and making it available on WebSockets to interested clients in the browser.
Open up your command line, navigate to where you checked out the code last time. cd into the client folder and type;
run
yarnornpm ito install the required packages.Once it's installed, run
yarn startornpm run startto run the client code.
Open up another tab, or instance, and navigate to the server folder. Again,run yarn or npm i to install the required packages. Once the packages are installed,
run yarn startornpm run startto get the server up and running.
Once everything is up and running,you should see the timer example working with an updated timer coming through in the app in the browser.
Subscribing to Changes on Rethinkdb Live Query:
You’re going to do now is change the server side of the code to get the timer value from RethinkDB with a live query instead of generating it with a set timeout. Open the code folder in your editor, and head on over to the index.js file in the server folder. In the top of this file, declare a const called r and set it to the result of requiring the rethinkdb module.
const r = require('rethinkdb');
Before you can open a query to RethinkDB, you'll need to connect to it. This you do by calling the connect method on it. To this you need to pass some options.
r.connect({


})
You need to tell it what host to use. For that you specify localhost, what port to use, 28015, which is the default, and also what db. Specify awesome_whiteboard here, which you'll need to go and create in a bit.
r.connect({
  host: 'localhost',
  port: 28015,
  db: 'awesome_whiteboard'
})
Calling connect returns a promise, so you can chain a then onto the result. In here add the structure for an arrow function. This function should have one parameter, the connection that was open to RethinkDB.
.then((connection) => {
  });
You're going to change your sockets in such a way that they're dependent on the RethinkDB connection being there, so move all the io code, except where you tell it to listen on the port, into this arrow function where you have access to the connection.
.then((connection) => {
io.on('connection', (client) => {
      client.on('subscribeToTimer', (interval) => {
        console.log('client is subscribing to timer with interval ', interval);
        setInterval(() => {
          client.emit('timer', new Date());
        }, interval);
      });
    });
 });
When a client subscribes to a timer value over the socket, you want to use the RethinkDB live query to get an updated timer value as it gets written to RethinkDB instead of using a set timeout. RethinkDB has a query language called R-E-Q-L, or ReQL for short. So you use the r variable you got when importing RethinkDB and call the table method on it. Pass in this a string value called timers. With that, you're basically saying get me the values in the timers table.
r.table('timers')
ReQL has a fluent API, also known as chainable. This means you can just add a next method call onto what you have here, and what you want to do is tell RethinkDB that you're interested in being notified when any changes come through on this query, and for that you use the changes method.
.changes()
//setInterval(() => {
// client.emit('timer', new Date());
// }, interval);
Executing the Live Queries Using Rethinkdb:
After this, you execute the query by adding the run method on here and passing in the connection it should run on. This also returns a promise, so add a then on here, and then pass in an arrow function.
.run(connection)
      .then((cursor) => {
  });
The arrow function should take one parameter, the cursor, that you can use to get the results of the query. On this cursor, you call the each method. Basically, you're giving the RethinkDB code a function to call every time a row comes through that matches the query. This function should take an error as its first parameter and a row as its second parameter.
cursor.each((err, timerRow) => {
          client.emit('timer', timerRow.new_val.timestamp);
        });
Now that you've got access to a new row that matches your query, you can call the client emit method to send a value through on the socket. This event is a timer as it used to be when we were using set timeout, and you get the timer value from the row by using the new_val property on it and then getting the timestamp property from that.
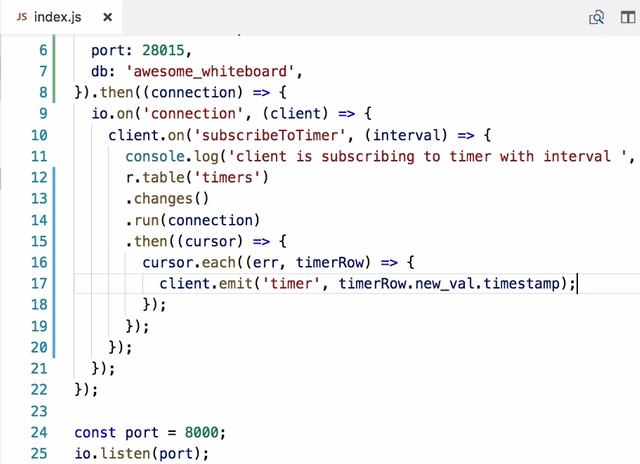
Let's do a recap of what this code does. First thing you did is change the code structure so that it opens up a RethinkDB connection, which you do using a promise. You only accept new socket clients once you have a connection because clients will be dependent on their RethinkDB connection being there; otherwise, you won't be able to get timer values from the DB, which is the whole point. Once a client emits the subscribeToTimer event, you open up a new query to RethinkDB by calling the table method on Rethink. You specify that you're interested in changes when they happen by using the changes method. You then run this query, passing it the connection that you got by calling connect in the first place. This returns a promise, and when the promise gets resolved, it provides you with a cursor. You tell the cursor to let you know every time it receives an updated value by calling each on it and passing it a callback function. For your callback function, you should take two parameters. The first is an error, which you're going to ignore, and the second is the row that matched your query. This row value will have the latest value of the row on a property called new_val from where you expect to get a timestamp.
Now after update index.js file looks like this;
//index.js//

const r = require('rethinkdb');
const io = require('socket.io')();


r.connect({
  host: 'localhost',
  port: 28015,
  db: 'awesome_whiteboard'
}).then((connection) => {
  io.on('connection', (client) => {
    client.on('subscribeToTimer', (interval) => {
      return r.table('timers')
      .changes()
      .run(connection)
      .then((cursor) => {
        cursor.each((err, timerRow) => {
          client.emit('timer', timerRow.new_val.timestamp);
        });
      });
    });

  });
});


const port = 8000;
io.listen(port);
console.log('listening on port ', port);
Setting the Database Schema and Testing of Results:
So you've changed your code to feed a timer from a live query against RethinkDB. Now you're going to set up the DB to make this code work and write some values into RethinkDB to test out the functionality. Open up the RethinkDB console at localhost port 8080 as you did earlier after installing RethinkDB. First thing you need to do is create the DB that your query wants to query against. On the top of the console, click on the Tables menu. Click the Add Database button over here and specify a name of awesome_whiteboard. This database is available on screen, so you can click the Add Table button right next to it. In here, specify the timers because that's the table that you queried from your RethinkDB query.
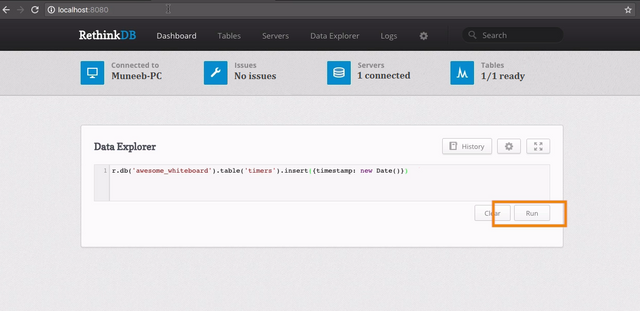
Now you've got the basic structure in place, you can go write a value into the table. Click on the Data Explorer menu item in the console. In here, run the following query, r.db and pass that the db name, awesome_whiteboard .table and pass that the table name, timers, and then on that .insert and add an object in here, timestamp, and set that to a new Date. This looks very similar to when you queried the timers table, instead you're inserting a new object. You also don't need to call run because that implicitly happens when you're using the console. Click the Run button, and open up your app in the browser at localhost:3000.
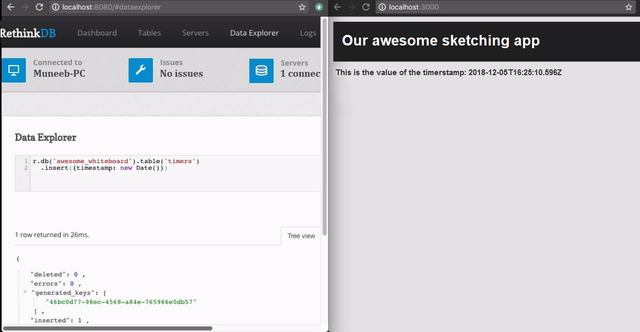
You should see a timer in here. In fact, open it up side by side. And if you run this query gain, you should see the value updating in real time in the browser. So you have a WebSocket that pipes data to the browser and to the React component as soon as it gets written into the DB.
Summary:
In this tutorial, we learned how to install and use RethinkDB so that your publisher logic can just write data to RethinkDB and let your subscriber logic get notified through live queries that it keeps open against RethinkDB. We studied how to manage real time listing of sketches, we have also seen that how to subscribe and execute live queries using Rethindb. We have learned about how to create database scheme and test the results. In the next tutorial we will see how can we store and serve the sketches. We will also see that what will be the client code to save a new sketch.
Source Code:
//index.js//

const r = require('rethinkdb');
const io = require('socket.io')();


r.connect({
  host: 'localhost',
  port: 28015,
  db: 'awesome_whiteboard'
}).then((connection) => {
  io.on('connection', (client) => {
    client.on('subscribeToTimer', (interval) => {
      return r.table('timers')
      .changes()
      .run(connection)
      .then((cursor) => {
        cursor.each((err, timerRow) => {
          client.emit('timer', timerRow.new_val.timestamp);
        });
      });
    });

  });
});


const port = 8000;
io.listen(port);
console.log('listening on port ', port);
//App.js//

import React, { Component } from 'react';
import './App.css';
import { subscribeToTimer } from './api';


class App extends Component {
  constructor(props) {
    super(props);

    subscribeToTimer((timestamp) => {
      this.setState({
        timestamp
      });
    });
  }

  state = {
    timestamp: 'no timestamp yet'
  };

  render() {
    return (
      <div className="App">
        <div className="App-header">
          <h2>Our awesome sketching app</h2>
        </div>
        This is the value of the timer timestamp: {this.state.timestamp}
      </div>
    );
  }
}

export default App;
//api.js//

import openSocket from 'socket.io-client';
const socket = openSocket('http://localhost:8000');

function subscribeToTimer(cb) {
  socket.on('timer', cb);
  socket.emit('subscribeToTimer', 1000);
}

export {
  subscribeToTimer,
};
Curriculum
Project Repository
- Complete Source Code of Sketching-App Part 2
Thank you for your contribution.
While I liked the content of your contribution, I would still like to extend one advice for your upcoming contributions:
Looking forward to your upcoming tutorials.
Your contribution has been evaluated according to Utopian rules and guidelines, as well as a predefined set of questions pertaining to the category.
To view those questions and the relevant answers related to your post,Click here
Need help? Write a ticket on https://support.utopian.io/.
Chat with us on Discord.
[utopian-moderator]
Hey @engr-muneeb
Thanks for contributing on Utopian.
We’re already looking forward to your next contribution!
Contributing on Utopian
Learn how to contribute on our website or by watching this tutorial on Youtube.
Want to chat? Join us on Discord https://discord.gg/h52nFrV.
Vote for Utopian Witness!