How To Create A Home Object In 2-Dimensional Form Using C++ Programming
What Will I Learn?
- You will learn about 2 dimensional object
- You will learn about C++ programming syntax
- You will learn about how to build a 2 dimensional object using C++
Requirements
- You need a basic knowledge about C++ programming syntax
- You need a basic concept about 2 dimensional object
- You need to know how to build a 2D object even though it is still base level
Difficulty
- Intermediate
Tutorial Contents
This time, I will explain the tutorial on how to make a home object in 2 dimensional form using C ++ programming language.To generate a 2 dimensional object, you must know about the coordinate point of the object to be created. 2D has 2 point coordinates are often called horizontal and vertical dots. The coordinate format is (x, y). Where point x is the horizontal point, and point y is the vertical point. A line is formed from the relationship between the coordinates, while the object is formed from a collection of lines. So, that's the 2D concept.
To make this tutorial, I use Visual Studio Code application. And this application is open source, so you can download it here. And to create a 2d home object, you can note the syntax below. Not only syntax, I also include an explanation of the syntax.
#include <stdio.h>
The above command is to declare the header used C ++. It is a function for input and output operations.
#include <stdlib.h>
The above command is a functions used for mathematical operations.
#include <GL/glut.h>
That command serves to call the interface function and graphics purposes.
typedef struct{
float x,y;
} point2D_t;
Serves as a declaration for 2D objects.
void userdraw(void);
It is to call the userdraw function
void drawDot(point2D_t p)
{
glBegin(GL_POINTS);

glVertex2f(p.x,p.y);

glEnd();
}
The above command has a function to draw a points.
void drawLine(float x1,float y1,float x2,float y2)
{
glBegin(GL_LINES);

glVertex2f(x1,y1);

glVertex2f(x2,y2);

glEnd();
}
The above function is useful for drawing lines.
void drawLine(point2D_t p1,point2D_t p2)
{
drawLine(p1.x,p1.y,p2.x,p2.y);
}
The above command serves to connect the dots to form a line.
void drawPolyline(point2D_t pnt[],int n)
{
int i;

glBegin(GL_LINE_STRIP);

for(i=0;i<n;i++)
{

    glVertex2f(pnt[i].x,pnt[i].y);

}

glEnd();
}
The above command serves to form a polyline or open curve.
void drawPolygon(point2D_t pnt[],int n)
{
int i;

glBegin(GL_LINE_LOOP);

for(i=0;i<n;i++)

{

    glVertex2f(pnt[i].x,pnt[i].y);

}

glEnd();
}
The above command serves to form a polygon or closed curve.
void setColor(float red,float green,float blue)
{
glColor3f(red,green,blue);
}
The above command serves to declare the RGB (Red, Green, Blue) color.
void userdraw(void)
{
point2D_t rumah[5]={{40.,40.},{110.,40.},{110.,90.},{75.,120},{40.,90.}};

point2D_t pintu[4]={{50.,40.},{50.,70.},{70.,70.},{70.,40}};

point2D_t jendela[4]={{80.,65.},{80.,80.},{95.,80.},{95.,65.}};

point2D_t cerobong[4]={{50.,100.},{50.,120.},{60.,120.},{60.,108}};


setColor(0.,0.,1.);

drawPolygon(rumah,5);

setColor(1.,0.,0.);

drawPolygon(pintu,4);

setColor(1.,0.,1.);

drawPolygon(jendela,4);

setColor(0.,0.,1.);

drawPolyline(cerobong,4);
}
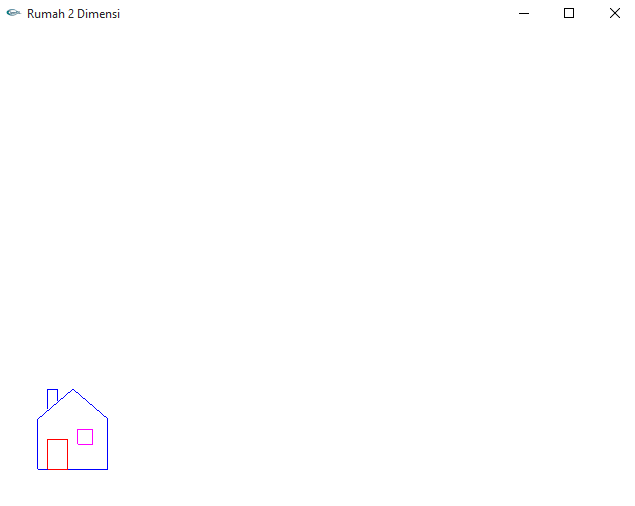
Are the syntaxs to draw a house-shaped object. For simplicity, I use 4 pieces of arrays, where each array will produce one form of polygon. Like a array rumah[5] will produce the shape of the house. Array pintu[4] will produce the shape of a door. Jendela[4] will produce a window shape. And cerobong[4] will produce a chimney shape.
Each form generated from the array is based on the coordinate points within the array. For example like a rumah[5] has 5 pieces of coordinates, which means it will form 5 dots. Then the 5 points will be connected to form a house shape. So did the other arrays.
Color selection is also done on this userdraw function, line staining is done based on each array. Like rumah[5] the color is blue, pintu[4] is red, jendela[4] is violet(mixing of red and blue color), and cerobong[4] is blue.
void display(void)
{
glClear(GL_COLOR_BUFFER_BIT);

userdraw();

glFlush();
}
Are the syntaxs to display the result of the userdraw function.
void main (int argc,char **argv)
{
glutInit(&argc, argv);

glutInitDisplayMode(GLUT_SINGLE | GLUT_RGB);

glutInitWindowSize(640,480);

glutInitWindowPosition(100, 150);

glutCreateWindow("Rumah 2 Dimensi");

glClearColor(1.0, 1.0, 1.0, 0.0);

gluOrtho2D(0., 640., 0.0, 480.0);

glutDisplayFunc(display);

glutMainLoop();
}
It is a main function, this command serves to set the display mode, window size, windows position, title, display color, and display function calling.
So the result will look like the picture below.

The full syntax can be downloaded here
Posted on Utopian.io - Rewarding Open Source Contributors
@elfida, Approve is not my ability, but I can upvote you.
Thanks @steemitstats
Hi @elfida, having some experience with C++/OpenGL myself, I have some suggestions to improve this tutorial.
<iostream>in C++ code.Keep up with posting tutorials!
thank you sir
Excuse me, I still dont understand with second point, about CMakeLists.txt,
Tell me please @nafestw
My point is, that you should provide instructions on how to build your sample code. You can either provide a Visual Studio Solution or a Makefile. CMake is a meta build system for C and C++. So if you provide rules to build your project in a CMakeLists.txt, the reader can generate a project for its favorite IDE or a Makefile from it. I recommend Daniel Pfeiffer's talk on "Effective CMake" on YouTube
Thanks a lot sir
Your contribution cannot be approved because it does not follow the Utopian Rules.
Hi, @nafestw already did a good job explaining of explaining some reasons why your tutorial could be rejected. I would like to add some other reasons why it was rejected
You can contact us on Discord.
[utopian-moderator]
What if I link it with repository https://github.com/Dgame/Dgame
Can I ?@amosbastian
That also doesn't have anything to do with your tutorial, nor has it been updated (except the README) in more than a year, so it wouldn't be a valid repository anyway. Your tutorial also already got rejected, changing the repository after the fact won't change this.
Thanks sir.
But I dont understand with providing a CMakeLists.txt with my source code,
Can you tell me a litle bit
You should ask @nafestw since he was the one who suggested it.
https://github.com/MessineseGianluca/cpp-structures
Can I use this repository to post 2D c++ programming ?
or this?
https://github.com/gammaseeker/Learning-C-and-Cpp