MFRC522 RFID Reader Arduino Library Setup and Functions Usage Shown With an Example Project - Tutorial
Introduction
This is a tutorial of an open source Arduino library, which lets you turn your Arduino to a “RFID Reader”, with a MFRC522 RFID reader module which reads and saves RFID cards information. I will show you how to install the library to Arduino IDE and make an example project with the library, throughout this tutorial while giving information RFID technology and Its working principle.
What Will I Learn?
In this tutorial you will learn:
- General knowledge about RFID technology.
- How to install “MFRC522 RFID” library to Arduino IDE.
- How to use ”MFRC522 RFID” library and how to use Its functions.
- How to apply RFID reader project using the library functions.
Requirements
This tutorials requirements are:
- Arduino UNO or equivalent microprocessor.
- Arduino IDE (Download here)
- MFRC522 RFID Arduino library (Download here)
- RDM630 RFID reader module, antenna (generally comes with the RFID reader), Breadboard, Jumper cables.
Difficulty
This tutorials difficulty is:
- Intermediate
Tutorial Contents
What is the RFID Technology and How It Works
RFID (short for radio-frequency identification) is a technology that digital data is encoded to “RFID tags” or smart labels can be read by an RFID reader, using electromagnetic fields. RFID tags contain data (information) that could be collected by RFID readers using radio waves. RFID technology is similar to the barcode in that way except the fact that RFID tags could be read from much more distant line of sight.
RFID tag reading procedure has four steps. Data (information) stored in the RFID tag (which is a passive element) waits a electromagnetic signal. RFID tags antenna receives electromagnetic energy emitted from RFID readers antenna. Then using the power from readers electromagnetic field, sends the data as radio signals to the reader. RFID reader receives the radio signals and turns them into usable data.

Modern day passports use RFID chips for storing information. Image Source (CC 2.0)
RFID tags are used in many areas and industries such as assembly lines, markets and stores, electronic toll collection systems, inventory management systems, counterfeit prevention systems, asset and personnel tracking systems , even it is used for tracking pets and livestock. There are RFID chips for implanting humans which some technology enthusiast implanted themselves, raising controversies.
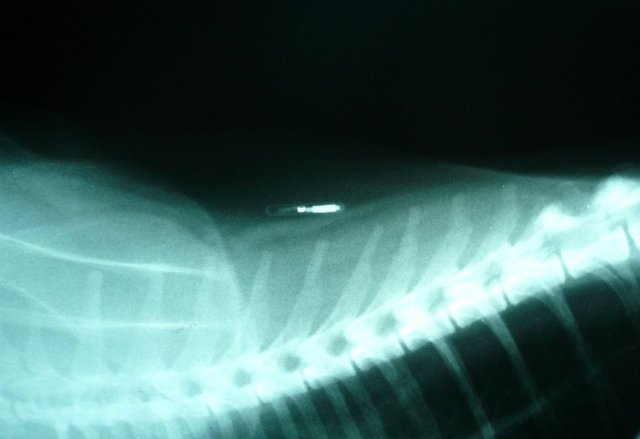
Radiograph of a RFID tag implanted to a cat. Image Source (CC 3.0)
How to Install MFRC522 RFID Library to Arduino IDE
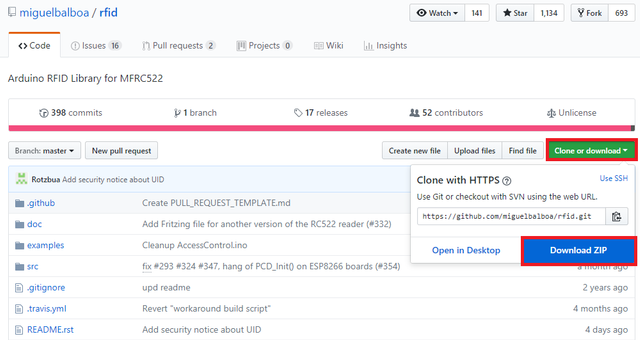
1. Download the library from https://github.com/miguelbalboa/rfid.
2. Open Arduino IDE. Then go to and select Sketch->Include Library->Add .ZIP Library.
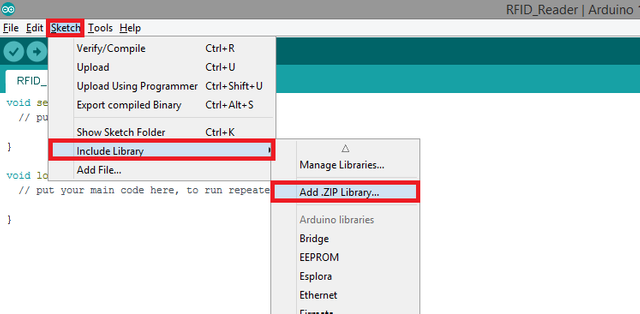
3. Choose rfid-master.zip file and click to Open.
An Example Project Using MFRC522 RFID Arduino Library
I'll show you step by step how to use the MFRC522 RFID reader module Arduino library with a simple example. In this example project, we will make a RFID card reader that will read, save and print the RFID cards UID (Unique Identifier). In order to make this project, first we’ll need to initiate the modules connection between the Arduino and the computer. Next we’ll have to initiate the reading and saving process using EEPROM. After reading and saving the RFID cards UID, we’ll print the UID to the serial monitor. See the steps for how to do these actions. Connections for MFRC522 RFID reader module to Arduino is shown below.
If you use this library in your other projects please tell in the comments.
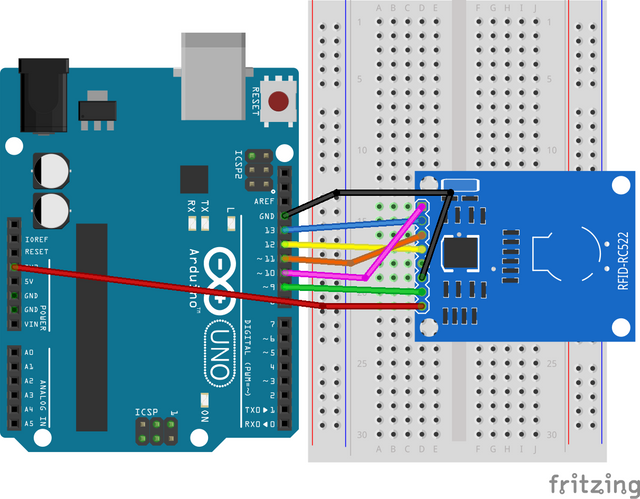
Connection diagram for MFRC522 RFID reader module to Arduino. Made with Fritzing.
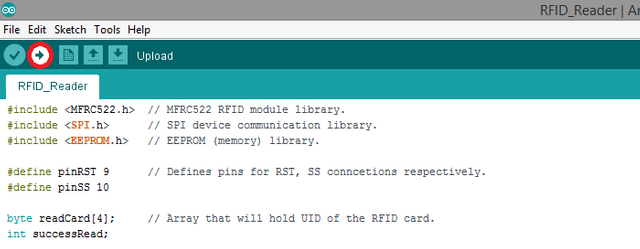
1. Open a new sketch and save it as "RFID_Reader”.
2. To add our MFRC522 RFID module, SPI device communication, EEPROM memory libraries to our sketch, type #include <MFRC522.h>, #include <SPI.h>, #include <EEPROM.h> respectively at the beginning of the code.

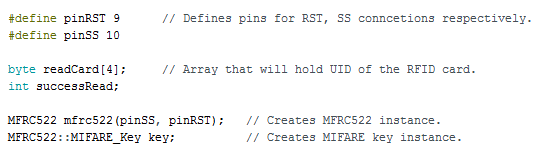
3. After adding the libraries, define the pins for MFRC522 RFID modules RST and SS pins. Then create an byte array that will hold UID of the RFID card. Define an integer for determining the reading process is done. Then create the MFRC522 instance including the pins variables. Create the MIFARE key instance.
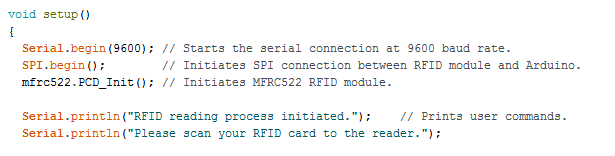
4. In the void setup() function, start the serial connection at 9600 baud rate. Then initiate the SPI connection between RFID module and MFRC522 RFID module between Arduino respectively. Then add two print command that will print user commands to the serial monitor.
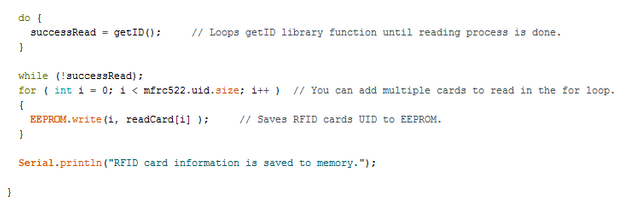
5. Add a “do” command that will loop “getID” function (that we’ll create later) until reading process is done. Then add a while loop that will work when the reading is successful. Create a for loop to be able to add more cards to read, save and print if you desire. Add the EEPROM library function to the for loop that saves RFID cards UID to EEPROM. Then add a print function to inform that the saving process is done to the user.
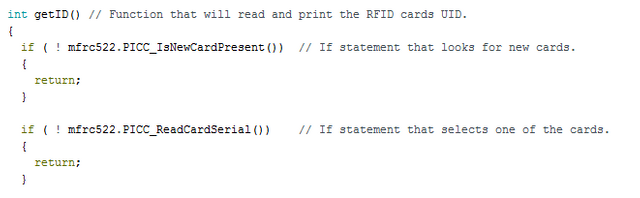
6.Create an integer function named “getID” that will read and print the RFID cards UID. Add two if statements that looks for new cards and selects one of the RFID cards respectively.
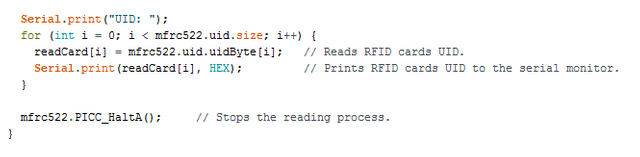
7. Create a for loop. In the for loop, add the library function that reads RFID cards UID. Then add the print command to print RFID cards UID in byte form to the serial monitor. Type the library function that will stop the reading process.
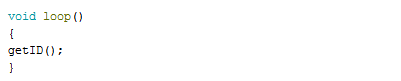
8. In the void loop() function add the “getID” function that we created to print the RFID cards UID to the serial monitor.
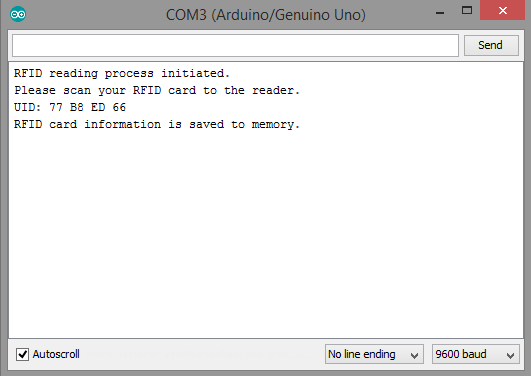
9. Click “Verify” and then “Upload” in order to compile and execute your codes. You should see a readings screen like this. Make sure your COM port and board setting is set right. Please double check the ground connections and all your wirings before running the code.
Conclusion
In this tutorial I’ve shown how to install “MFRC522 RFID” Arduino library, written by GitHub user “miguelbalboa” to Arduino IDE, showing how to use the library functions with an example, while giving information about RFID technology.
I hope that you enjoyed this tutorial and the information that I’ve given. Thank you for reading.
If you want more information about the library and the source use the link below.
Github: https://github.com/miguelbalboa/rfid
Code
#include <MFRC522.h>  // MFRC522 RFID module library.
#include <SPI.h>      // SPI device communication library.
#include <EEPROM.h>   // EEPROM (memory) library.

#define pinRST 9      // Defines pins for RST, SS conncetions respectively.
#define pinSS 10

byte readCard[4];     // Array that will hold UID of the RFID card.
int successRead;

MFRC522 mfrc522(pinSS, pinRST);   // Creates MFRC522 instance.
MFRC522::MIFARE_Key key;          // Creates MIFARE key instance.

void setup()
{
  Serial.begin(9600); // Starts the serial connection at 9600 baud rate.
  SPI.begin();        // Initiates SPI connection between RFID module and Arduino.
  mfrc522.PCD_Init(); // Initiates MFRC522 RFID module.

  Serial.println("RFID reading process initiated.");    // Prints user commands.
  Serial.println("Please scan your RFID card to the reader.");

  do {
    successRead = getID();     // Loops getID library function until reading process is done.
  }

  while (!successRead);
  for ( int i = 0; i < mfrc522.uid.size; i++ )  // You can add multiple cards to read in the for loop.
  {
    EEPROM.write(i, readCard[i] );     // Saves RFID cards UID to EEPROM.
  }

  Serial.println("RFID card information is saved to memory.");

}

void loop()
{
getID();
}


int getID() // Function that will read and print the RFID cards UID.
{
  if ( ! mfrc522.PICC_IsNewCardPresent())  // If statement that looks for new cards.
  {
    return;
  }

  if ( ! mfrc522.PICC_ReadCardSerial())    // If statement that selects one of the cards.
  {
    return;
  }

  Serial.print("UID: ");
  for (int i = 0; i < mfrc522.uid.size; i++) {
    readCard[i] = mfrc522.uid.uidByte[i];   // Reads RFID cards UID.
    Serial.print(readCard[i], HEX);         // Prints RFID cards UID to the serial monitor.
  }

  mfrc522.PICC_HaltA();     // Stops the reading process.
}
Previous Tutorials
- MPU6050 3 Axis Gyroscope & Accelerometer Module Setup, Arduino Library Use Shown With an Example Project
- Adafruit PCA9685 PWM Servo Driver Setup, Arduino Library Use Shown With an Example Project
- Making a Telegram Chat Bot With the TelegramBot Arduino Library and ESP8266 Wifi Module
- DS3232 Real Time Clock Module Setup, Arduino Library Use Shown With an Example Project
Posted on Utopian.io - Rewarding Open Source Contributors
Your contribution cannot be approved because it does not follow the Utopian Rules.
-Wrong repository.
-If you wanted to explain adding a library to Arduino, this is really simple and easy to do.
-If you wanted to create a new project by using RFID module, you should use Arduino repository.
You can contact us on Discord.
[utopian-moderator]-