Making a Weight Scale With the HX711 Module, HX711 Arduino Library and a Load Cell - Tutorial
Introduction
This is a tutorial of an Arduino project, which lets you turn your Arduino to a “Weight Scale”, with a 10 kg load cell and a HX711 load cell amplifier breakout circuit, that measures the weight of an object. I will show you how to wire load cell and HX711 load cell amplifier to Arduino microcontroller, how to use HX711 library with Its functions and make an example project with the load cell, throughout this tutorial while giving information load cells and their working principle.
What Will I Learn?
In this tutorial you will learn:
- General knowledge about load cells.
- How to wire load cell and HX711 load cell amplifier to Arduino.
- How to use HX711 library and how to use It’s functions.
- How to apply weight scale project using the library functions.
Requirements
This tutorials requirements are:
- Arduino UNO or equivalent microprocessor.
- Arduino IDE (Download here)
- HX711 Arduino library (Download here)
- 10 kg load cell, HX711 load cell amplifier breakout circuit, Breadboard (optional), 8 jumper wires.
Difficulty
This tutorials difficulty is:
- Intermediate
Tutorial Contents
What is a Load Cell and How It Works
A load cell is a transducer that converts a physical force to a electric signal. There are various types of load cells, hydraulic load cells, pneumatic load cells, magnetostrictive load cells, Piezoresistive load cells and strain gauge load cells, which we’ll use for our project. Strain gauge load cells are usually set up in Z shape forms so that the applied torque can be measured by the bending of the gauges. Applied weight (or torque you can say) changes the electrical resistance of the gauges proportional to the force. Load cells are used everywhere where scaling is needed: mechanical balancing applications, processing plants, industrial and platform scales, tank dispensing systems precision laboratory balances.
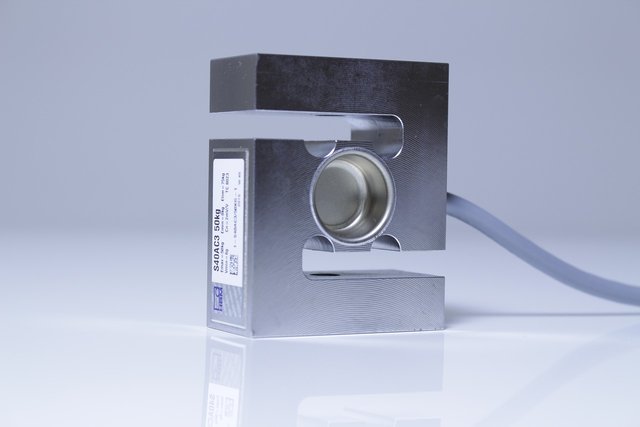
S type strain gauge load cell. Image Source (Royalty free)
How to Install HX711 Library to Arduino IDE
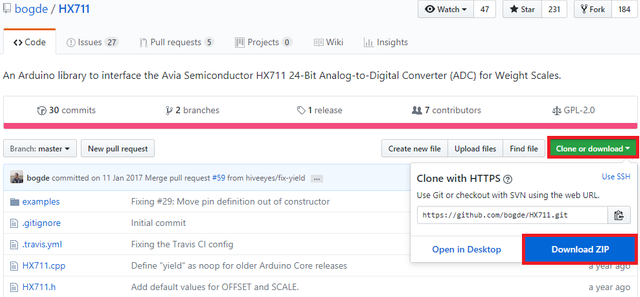
1. Download the library from https://github.com/bogde/HX711.
2. Open Arduino IDE. Then go to and select Sketch->Include Library->Add .ZIP Library.
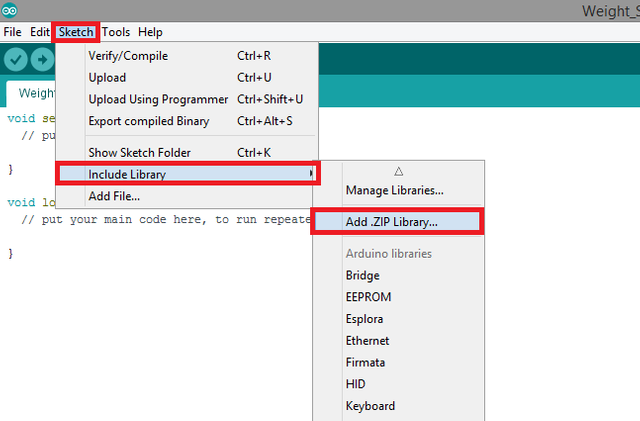
3. Choose HX711-master.zip file and click to Open.
An Example Project Using a Load Cell and HX711 Arduino Library
I'll show you step by step how to make a weight scale project with a 10 kg load cell and a HX711 load cell amplifier breakout circuit, using the HX711 Arduino library. In this example project, we want our load cell to sense the weight, send the data to amplifier. Then our HX711 amplifier should amplify the data sent from load cell, in order to make Arduino use the data. After that amplified data should be sent to Arduino in order to be processed. Then we will make Arduino print the weight in “kg” unit. See the steps for how to do these actions. Connections for 10 kg load cell and HX711 load cell amplifier breakout circuit to Arduino is shown below.
If you use this library in your other projects please tell in the comments.
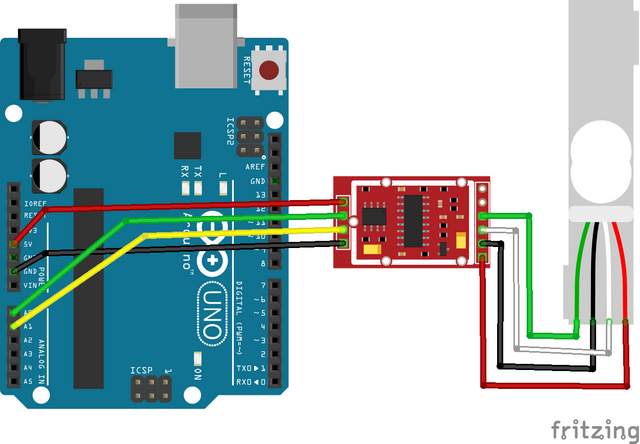
Connection diagram for 10 kg load cell and HX711 load cell amplifier breakout circuit to Arduino. Made with Fritzing.
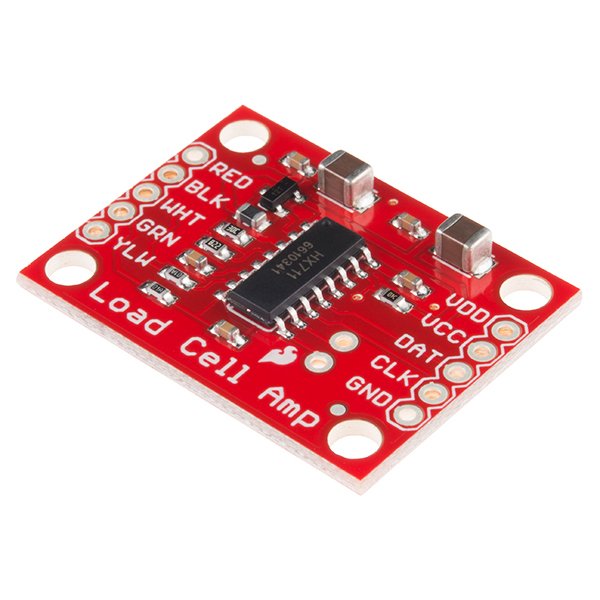
HX711 Load Cell Amplifier Breakout Circuit. Image Source (CC 2.0)
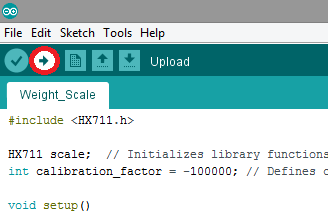
1. Open a new sketch and save it as "Weight_Scale”.
2. To add our library to our sketch, type #include <HX711.h> at the beginning of the code.
3. After adding the library, add the code that initializes library functions. Then define a integer value that will hold the calibration factor we'll use for calibrating. Value it somewhere between -90000 and -110000 (Check your load cell amplifiers datasheet to be precise).

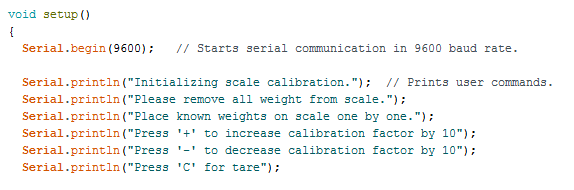
4. In the void setup() function, start the serial connection at 9600 baud rate. Then add the print function that will print the commands to the user.
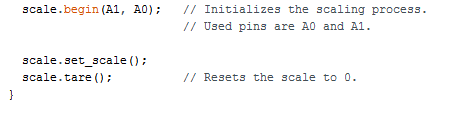
5. Add the library function that will initialize the scaling process. Note that the pins Analog 0 and Analog 1 are used for this project. You can change the pins as you wish, just make sure your pins are analog. After you started the scaling process, add the library function that resets the scale to zero.
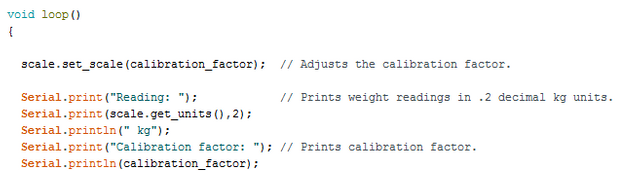
6. In the void loop() function, type the library function that adjusts the calibration factor. Then add the print command that will print weight readings in x.xx format in kg units to serial monitor. Then add the print command that will print the calibration factor to the serial monitor.
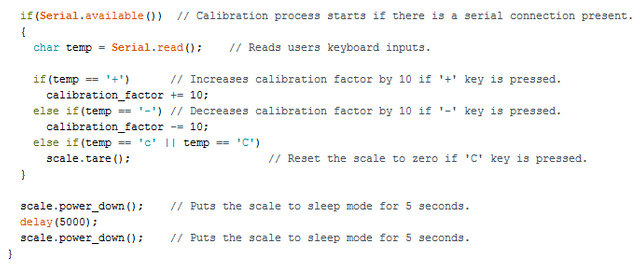
7. Add an If condition that will trigger if there is a serial connection present. Make the if condition start the calibration process when triggered. Define a character named “temp”, to store the readings from the user and make it read the users key input. After that add three if statements that will increase calibration factor by 10 if '+' key is pressed, that will decrease calibration factor by 10 if '-' key is pressed and that will reset the scale to zero if 'C' key is pressed respectively. Then add a power down and a power up library functions in order to put the scale to sleep mode for 5 seconds (add a delay in between the library functions).
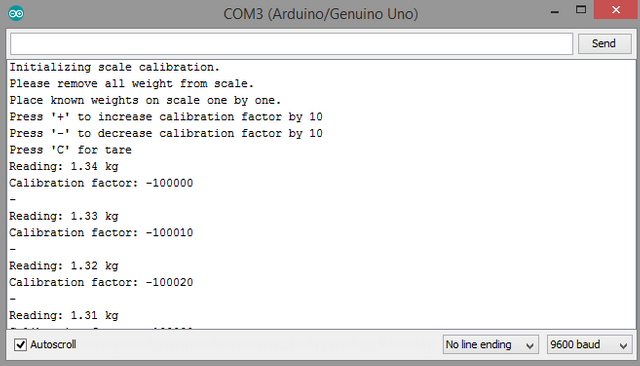
8. Click “Verify” and then “Upload” in order to compile and execute your codes. You should see a readings screen like this. Make sure your COM port and board setting is set right. Please double check the ground connections and all your wirings before running the code.
Conclusion
In this tutorial I’ve shown, how to use load cells with a HX711 load cell amplifier circuit, how to install “HX711” Arduino library, written by GitHub user “bogde” to Arduino IDE, showing how to use the library functions with an example, while giving information about load cells.
I hope that you enjoyed this tutorial and the information that I’ve given. Thank you for reading.
If you want more information about the library and the source use the link below.
Github: https://github.com/arduino/Arduino
Code
#include <HX711.h>

HX711 scale;  // Initializes library functions.
int calibration_factor = -100000; // Defines calibration factor we'll use for calibrating.

void setup()
{
  Serial.begin(9600);   // Starts serial communication in 9600 baud rate.

  Serial.println("Initializing scale calibration.");  // Prints user commands.
  Serial.println("Please remove all weight from scale.");
  Serial.println("Place known weights on scale one by one.");
  Serial.println("Press '+' to increase calibration factor by 10");
  Serial.println("Press '-' to decrease calibration factor by 10");
  Serial.println("Press 'C' for tare");

  scale.begin(A1, A0);   // Initializes the scaling process.
                         // Used pins are A0 and A1.

  scale.set_scale();
  scale.tare();          // Resets the scale to 0.
}


void loop()
{


  scale.set_scale(calibration_factor);  // Adjusts the calibration factor.

  Serial.print("Reading: ");            // Prints weight readings in .2 decimal kg units.
  Serial.print(scale.get_units(),2);
  Serial.println(" kg");
  Serial.print("Calibration factor: "); // Prints calibration factor.
  Serial.println(calibration_factor);

  if(Serial.available())  // Calibration process starts if there is a serial connection present.
  {
    char temp = Serial.read();    // Reads users keyboard inputs.

    if(temp == '+')      // Increases calibration factor by 10 if '+' key is pressed.
      calibration_factor += 10;
    else if(temp == '-') // Decreases calibration factor by 10 if '-' key is pressed.
      calibration_factor -= 10;
    else if(temp == 'c' || temp == 'C')
      scale.tare();                     // Reset the scale to zero if 'C' key is pressed.
  }

  scale.power_down();    // Puts the scale to sleep mode for 5 seconds.
  delay(5000);
  scale.power_up();
}
Previous Tutorials
- MPU6050 3 Axis Gyroscope & Accelerometer Module Setup, Arduino Library Use Shown With an Example Project
- Adafruit PCA9685 PWM Servo Driver Setup, Arduino Library Use Shown With an Example Project
- Making a Telegram Chat Bot With the TelegramBot Arduino Library and ESP8266 Wifi Module
- DS3232 Real Time Clock Module Setup, Arduino Library Use Shown With an Example Project
Posted on Utopian.io - Rewarding Open Source Contributors
Your contribution cannot be approved because it does not follow the Utopian Rules.
Design or video editing related tutorials, gameplay, simple on-screen instructions, ubiquitous functions (Save, Open, Print, etc.) or basic programming concepts (variables, operators, loops, etc.) will not be accepted.
A tutorial mustn't just be informative and explanatory, but also teach specific concept. In this case, this teaches nothing more than "How to use x module", which can be applied to all modules. There are similar tutorials which show "How to use Arduino modules.", so I reject this.
You can contact us on Discord.
[utopian-moderator]
Hey @yokunjon, I just gave you a tip for your hard work on moderation. Upvote this comment to support the utopian moderators and increase your future rewards!
@drencolha, Upvote for supporting you.