Java EclipseLink Essentials
What Will I Learn?
- Basic JPA Configurations
- Create tables from Java classes
- Write CRUD methods
Requirements
- Basic Java Knowledge
- Basic Database Knowledge
Difficulty
- Intermediate
Tools
- Eclipse Neon
- Oracle XE
Tutorial Contents
This tutorial focuses on introduction of EclipseLink. We are going to add libraries, configure persistence.xml, create data access object for a sample entity and do CRUD operations.
Essential Terminology
JPA (Java Persistence API) : As the name suggests, it's an API provided by Oracle to do database operations. Before JPA, every ORM tool (such as EclipseLink, TopLink, Hibernate) has its own rules. Now JPA supplies all ORM tools an API.
ORM (Object - Relational Mapping): As you know databases which we generally use has relational model and Java has object-oriented model. What ORM does is to bridge these two architectures. For instance when you create an object in Java, it is mapped as table in database. (We will use EclipseLink in this tutorial.)
JDBC Driver: JDBC Drivers create new database connections and operate them through commands. (We will use OJDBC since we use Oracle Database)
1. Create a New Workspace
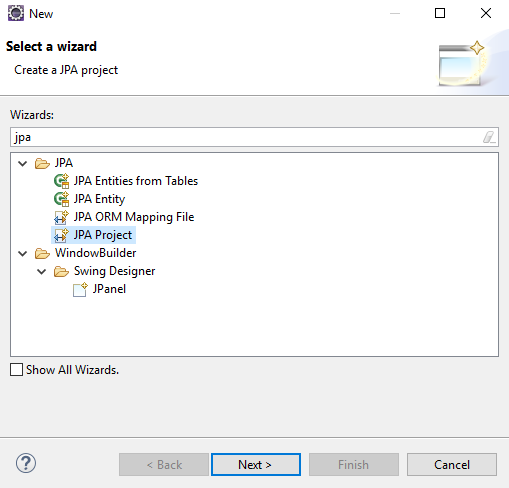
2.New Project From Eclipse
First, create a new Project as usual but choose JPA Project this time.
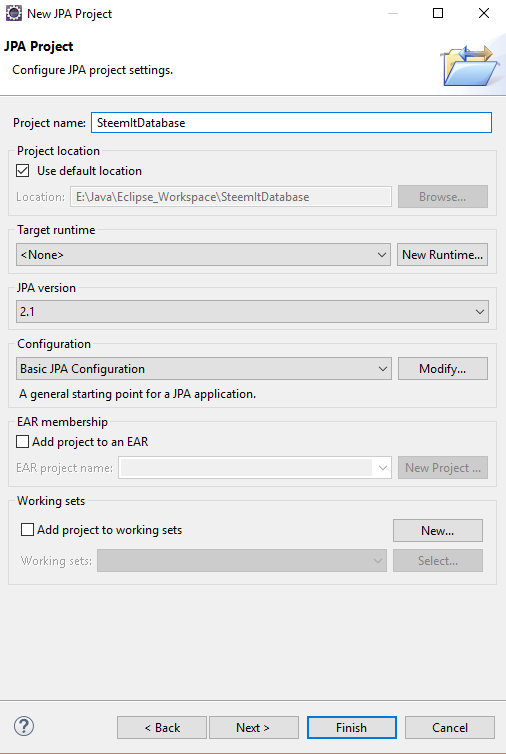
Then write project name and don't change anything else.
In this part we need two things in Build Path. EclipseLink and OJDBC Driver. Choose Eclipse Link from the combo box above and click Download Library.
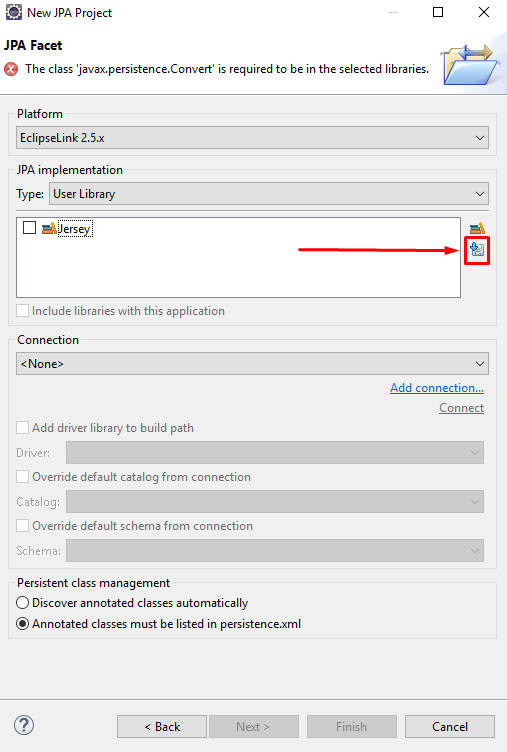
Choose EclipseLink's newest version and finish downloading. After downloading EclipseLink, download OJDBC jar from this link. Copy *.jar file to a stable path and click Manage Libraries now.
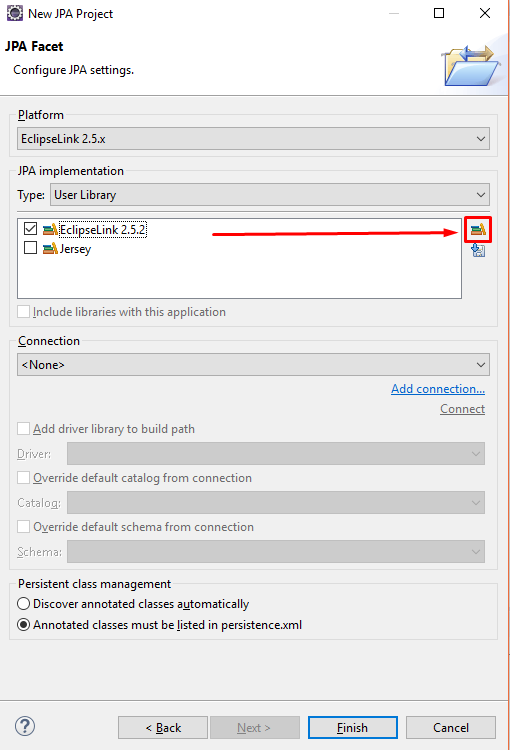
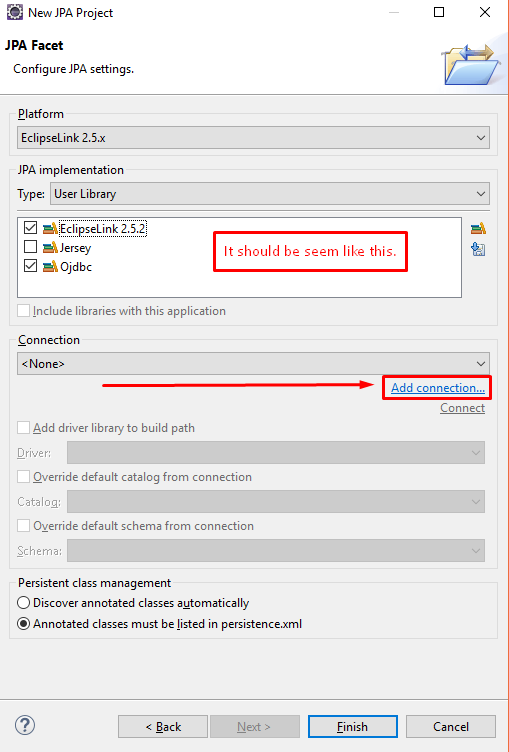
In the User Libraries page create a new library (I named "Ojdbc") and click "Add External JARs". Choose driver jar and finish.
Then click Add Connection. Choose Oracle, give a name to your connection and click New Driver Definition. Choose Oracle Thin Driver 11 and in the JAR List tab remove existing jar and add ojdbc jar.
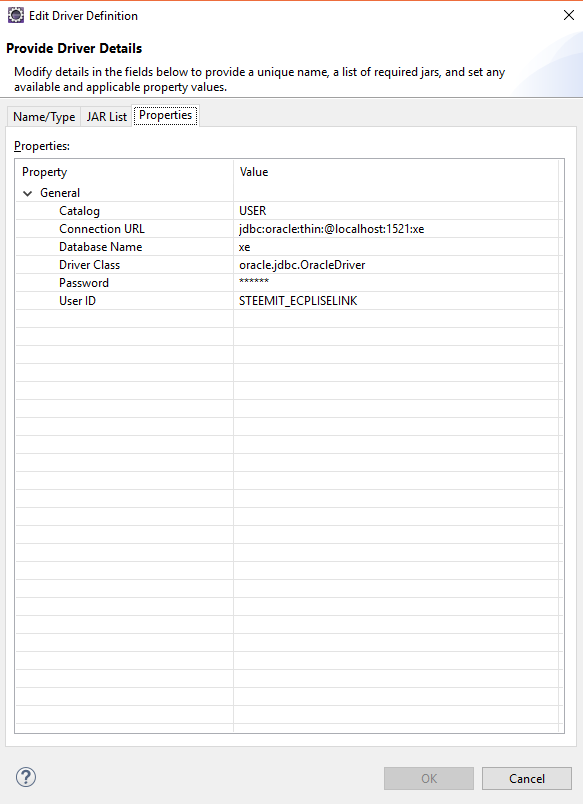
In the properties tab, make this changes. (xe stands for my database name Oracle Express) After you fill textfields test your connection. If you got success message finish it. This connection will be listed in Eclipse Connections.
3. persistence.xml Configuration
In the Connection tab choose transaction type as Resource Local and click Populate from connection and choose your connection from the list.
In the Schema Generation choose Database Action as Drop and Create.
4. Create YourFirst Entity
Up to now we added our libraries, created a workspace and started project. Now we will create an entity that will be mapped as table in database. Right click on your project and create a JPA Entity.
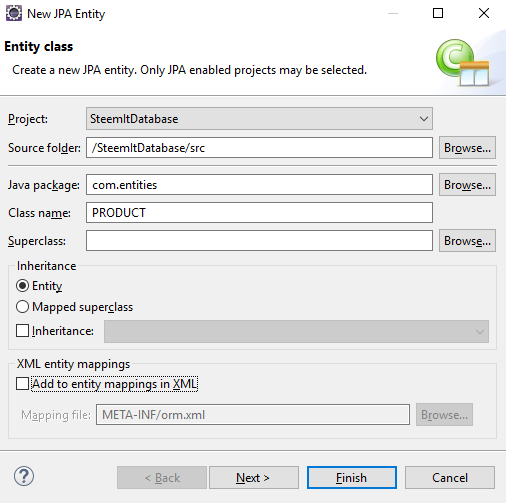
Add these three fields to your entity and select ID as Key.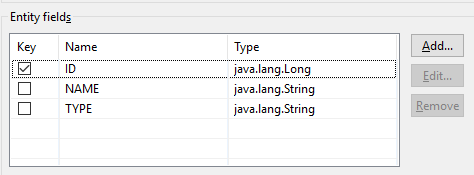
When you finish your Entity class wil be created. Let me explain this. This JPA Entity is basically a Java Class. The only essential difference is that it has Entity annotation. It makes this class JPA entity, in other words mappable by database. That's all. Let's go on.
Another annotation in this class is Id. It makes sure Key field is unique. But ID need some configuration. Add these to lines to create sequence generator.
@Id
@SequenceGenerator(name="SEQ_GEN", allocationSize=1, initialValue=1)
@GeneratedValue(generator="SEQ_GEN", strategy=GenerationType.SEQUENCE)
5. Create Your DAO
At first, create an Interface names "ICrud" with T as generic under "com.daos" package. This interface will have our essential method signs. Write these in interface.
    public Boolean create(T entity);

    public T read(Long id);

    public Boolean update(T entity);

    public Boolean delete(Long id);
Now create a class named "ProductDao" and implement ICrud interface with PRODUCT entity name instead of T. Before filling method bodies write these codes in your class.
    EntityManagerFactory emf = null;
    EntityManager em = null;

    public ProductDao() {
        emf = Persistence.createEntityManagerFactory("SteemItDatabase");
        em = emf.createEntityManager();
    }
Finally, it's time to fill methods.
    @Override
    public Boolean create(PRODUCT entity) {
        try {
            em.getTransaction().begin();
            em.persist(entity);
            em.getTransaction().commit();
            return true;
        } catch (Exception e) {
            e.printStackTrace();
        }
        return false;
    }

    @Override
    public PRODUCT read(Long id) {
        try {
            PRODUCT product = em.find(PRODUCT.class, id);
            return product;
        } catch (Exception e) {
            e.printStackTrace();
        }

        return null;
    }

    @Override
    public Boolean update(PRODUCT entity) {
        try {
            em.getTransaction().begin();
            em.merge(entity);
            em.getTransaction().commit();
            return true;
        } catch (Exception e) {
            e.printStackTrace();
        }
        return false;
    }

    @Override
    public Boolean delete(Long id) {

        try {
            PRODUCT product = read(id);
            em.getTransaction().begin();
            em.remove(product);
            em.getTransaction().commit();
            return true;
        } catch (Exception e) {
            e.printStackTrace();
        }
        return false;
    }
5. Create - Read - Update - Delete
Create a test class.
Create
PRODUCT product = new PRODUCT();
product.setNAME("iPhone 7 Plus");
product.setTYPE("Smartphone");
new ProductDao().create(product);
When you run this code it will create a row.

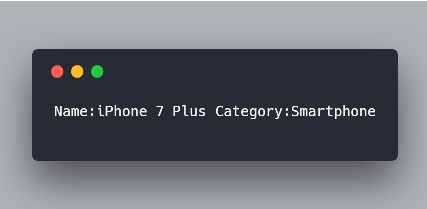
Read
PRODUCT product = new ProductDao().read(1L);
System.out.println("Name:" + product.getNAME() + " Category:" + product.getTYPE());
When you run this code, it will give following output.
Update
PRODUCT product = new ProductDao().read(1L);
        product.setNAME("iPhone 8");
        new ProductDao().update(product);
When you run this code, it will update Name field.

Delete
new ProductDao().delete(1L);
When you run this code, it will delete the row you want.
Posted on Utopian.io - Rewarding Open Source Contributors
Thank you for the contribution. It has been approved.
Be very careful to choose the correct Github repo for your submission. I had to change your repo to https://github.com/dmlloyd/openjdk
You can contact us on Discord.
[utopian-moderator]
Hey @buckydurddle, I just gave you a tip for your hard work on moderation. Upvote this comment to support the utopian moderators and increase your future rewards!
Hey @daxene I am @utopian-io. I have just upvoted you!
Achievements
Community-Driven Witness!
I am the first and only Steem Community-Driven Witness. Participate on Discord. Lets GROW TOGETHER!
Up-vote this comment to grow my power and help Open Source contributions like this one. Want to chat? Join me on Discord https://discord.gg/Pc8HG9x
Thank you for your submission
Congratulations @daxene, you have decided to take the next big step with your first post! The Steem Network Team wishes you a great time among this awesome community.
The proven road to boost your personal success in this amazing Steem Network
Do you already know that awesome content will get great profits by following these simple steps that have been worked out by experts?