Building an iOS Audio Editor with Swift(#3)-Referencing the Audio File for Playback
Repository
https://github.com/apple/swift
What Will I Learn?
- You will learn how to connect a segue between two View Controllers programmatically
- You will learn how to create a ViewController class and attach it to a view controller in the storyboard
- You will learn about
Protocolsin swift - You will learn about Delegation in swift
- You will learn about the
AVAudioRecorderDelegateprotocol - You will learn how to send objects across view controllers
Requirements
- Basic knowledge of the Swift Programming Language
- MAC OSx High Sierra version 10.13 and above
- Xcode version 9.3 Editor
- Previous Tutorial
Difficulty
- Intermediate
Tutorial Contents
In the Previous Tutorial, we added a new view controller, learnt about navigation through controllers with segues and added the audio recording functionality.
Please read the Previous Tutorial as we will be building on some concepts introduced there.
As earlier stated, in the previous tutorial, we were able to achieve audio recording and storing the recorded file at a location in our emulator document directory. However, there are major issues associated with the way we handled this functionality.
- We have to send the recorded audio file to the second view controller for playback
- We have to handle error cases whereby saving a large recording file is interrupted before it is complete.
Lets dive in and see how to solve these issues.
Setup Segue Programmatically
To solve the issues, we first have to programmatically set up our segue via code and not just from the stopRecordingButton. To get started, we first have to delete the segue we earlier created by clicking on it and pressing the delete key.
Then in our document navigator, we click on the SoundsRecordingController and holding the ctrl key, we drag the mouse to the SoundsPlayingController. A popup menu appears and we select show as the type of segue we want to create. This creates a segue that connects our two controllers.
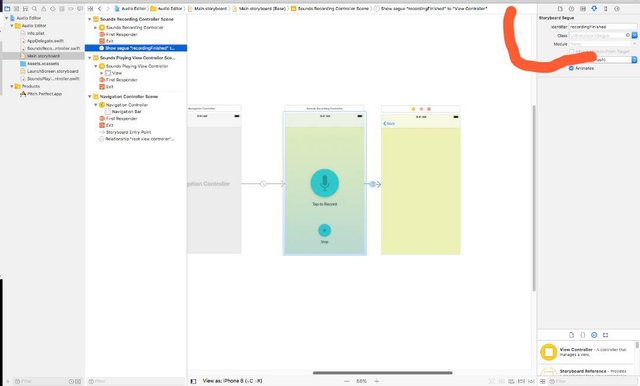
Next up, we click on the newly created segue and under the attributes inspector, we see a field called Identifier. This field holds a string that uniquely identifies the segue within the view controller classes and is case sensitive, extra care must be taken therefore to ensure that it is not mixed up. I have uniquely identified my segue as recordingFinished.

Image showing selected segue, with identifier filled in the red marked area
With this unique identifier, our segue can be referenced via code or programmatically. Lets create a class called SoundsPlayingController that will be used to reference our second view controller scene.
Creating a Controller class
- Right Click on the project folder and select New file
- Ensure iOS is selected and click on Cocoa Touch Class
- Name the class SoundsPlayingController and subclass it from
UIViewController - Save it in the project folder as prompted
The class has been created and now we have to attach it to the view controller in our story board. Click on the Main.storyboard and select the second view controller. Under the identity inspector, click the dropdown for class and select the class that the view controller should be linked to, in our case the SoundsPlayingController class. This creates the connection between the class and the view controller scene.
Next up, we have to actually know when recording is completed, like have some sort of callback that is called in code at the completion of recording. In comes Protocols
Protocol
A protocol in swift is like a contract that has attributes that must be implemented in code if the protocol is used. It defines a blueprint of properties, methods and other attributes for a required functionality. The protocol can then be implemented by a class, enumeration or structure to use those functionalities, in other words the contract that the protocol defines is implemented. Protocols in swift can be likened to interfaces in other languages such as java and c#.
To define a protocol in swift we simply create a file and use the protocol keyword, see code below,
protocol MyProtocol  {
//define methods and properties that must be implemented here

func myFunction(_ num:Int , label name:String )->Double

}
The code snippet above shows definition of a protocol called MyProtocol having a single function (multiple functions can be added) called myFunction which takes in two paramaters of type integer and string and returns a double.
To use this protocol, it is then extended when a class, structure or enumeration is declared and the method it provides is implemented within the class, see code below,
class MyClass : MyProtocol   {
func myFunction(_ num:Int , label name:String )->Double{
//implementation code goes in here
}

}
With this knowledge, lets see how a protocol helps us in our iOS application.
The AVAudioRecorderDelegate
Delegation in swift is a pattern that allows a structure or class to delegate some of its tasks to an instance of another type. The functionalities to be delegated are placed in a protocol and when this protocol is extended by a delegate(class, structure or enumeration), these functionalities must either be compulsorily implemented or optionally implemented if it has been marked with the optional keyword when it was defined in the protocol.
The AVAudioRecorderDelegate is therefore a protocol that allows a delegate to respond to audio recording completion, audio interruption and decoding errors. It is therefore what must be used to notify our controller class of when recording is completed. All methods in this protocol are optional and the delegate can choose whether to implement them or not.
Amongst the methods in the protocol is one called the audioRecorderDidFinishRecording() method which takes in anAVAudioRecorder instance and a boolean flag. This callback method is called in the delegate when recording is finished or complete. This is the method that can be used to indicate completion of recording.
Let us use this delegate for our application,
First of all, we extend the AVAudioRecorderDelegate protocol in our SoundsRecordingController class and implement the audioRecorderDidFinishRecording() method,
class SoundsRecordingController: UIViewController, AVAudioRecorderDelegate {


func audioRecorderDidFinishRecording(_ recorder: AVAudioRecorder, successfully flag: Bool) {
//method called when recording is complete

}
}
We can then call our segue from code in this implemented method to ensure that the segue shows the SoundsPlayingController when the recording is complete after clicking the stopRecordingButton.
To do this, we use the following code snippet in the callback method..
func audioRecorderDidFinishRecording(_ recorder: AVAudioRecorder, successfully flag: Bool) {
        if flag {
            performSegue(withIdentifier: "recordingFinished", sender: audioRecorder.url)
        }
        else {
            print("Recording failed")
        }
    }
The callback method provides a boolean flag that indicates if the recording was complete. We then use this flag to check if recording was successful and then call a method which is in every class that inherits from UIViewController known as performSegue(). This method takes in two parameters, the first is the unique identifier of the segue to be performed and in the code we have provided it with the "recordingFinished" string which identifies our segue. The second method is what we are sending across the segue, which could be of any data type, but in this case it is the path to the recorded audio file. This path is obtained by calling the audioRecorder.url property. If the flag is false, we print a statement to the console that recording has failed.
Next up, to use this callback, we have to actually ensure that an audio recorder delegate is created for which the AVAudioRecorderDelegate can actually delegate its functionalities to. This is done using one line of code in the initializeRecorder() method.
func initializeRecorder()  {
try! audioRecorder = AVAudioRecorder(url: filepath!, settings : [:])
audioRecorder.delegate = self
}
After the audioRecorder has been initialized in the try statement, its delegate property is set to self meaning to the class which extends the AVAudioRecorderDelegate protocol, in other words the SoundsRecordingController class.
Sending Reference URL across Controllers
Next up, we create a reference variable in our SoundsPlayingViewController class that would hold the sent url of the recorded file. See code below,
class SoundsPlayingController: UIViewController {

    var recordedAudioURL : URL!

}
We have created a URL variable called recordedAudioURL that will be used to reference the path to the recorded file.
Then in our SoundsRecordingController class, we override a method known as prepare() which takes in a UIStoryboardSegue parameter and an object sending parameter. This method notifies the view controller that a segue is to be carried out.
override func prepare(for segue: UIStoryboardSegue, sender: Any?) {

}
The segue parameter holds a reference object that contains information about the view controllers involved in the segue and the sender object is the object that started the segue. We then pass in the recorded URL through this method, see code below,
override func prepare(for segue: UIStoryboardSegue, sender: Any?) {
        if segue.identifier == "recordingFinished"{
            let soundPlayingVC = segue.destination as! SoundsPlayingController
            let recordedUrl = sender as! URL
            soundPlayingVC.recordedAudioURL = recordedUrl
        }
    }
In the code above, we first check that the segue identifier is the "recordingFinished" identifier we earlier created, if so a constant called soundPlayingVCis created which references the destination view controller. This destination view controller is obtained via the segue.destination call which returns a UIViewController object, this object is then downcast using the as! syntax into a SoundsPlayingController object.
A constant called recordedUrl is also created and set equal to the sender which has been downcast into a URL object which was what we initially sent in the performSegue() method. The soundPlayingVC constant is then used to call the recordedAudioURL variable of the SoundsPlayingController class and it is then set equal to the recordedUrl.
Thus we have our url in the SoundsPlayingController and this url can then be used for audio playback. Next up in the tutorial series, we will build the UI of the SoundsPlayingController and set up for playback of the recorded file.
Supplementary Resource
https://github.com/demistry/Audio-Editor/blob/master/Audio%20Editor/SoundsRecordingController.swift
https://github.com/demistry/Audio-Editor/blob/master/Audio%20Editor/SoundsPlayingController.swift
Curriculum
- Building an iOS Audio Editor with Swift (#1)-Introduction
- Building an iOS Audio Editor with Swift(#2)-Adding the Audio Recording Functionality

Thank you for your contribution.
While I liked the content of your contribution, I would still like to extend few advices for your upcoming contributions:
Looking forward to your upcoming tutorials.
Your contribution has been evaluated according to Utopian policies and guidelines, as well as a predefined set of questions pertaining to the category.
To view those questions and the relevant answers related to your post, click here.
Need help? Write a ticket on https://support.utopian.io/.
Chat with us on Discord.
[utopian-moderator]
Hey @davidemi
Thanks for contributing on Utopian.
We’re already looking forward to your next contribution!
Contributing on Utopian
Learn how to contribute on our website or by watching this tutorial on Youtube.
Want to chat? Join us on Discord https://discord.gg/h52nFrV.
Vote for Utopian Witness!