Byteball Bot Wars progress report #2 – Monetizing content and APIs with Byteball: Error Fare Alerts Bot

Intro
This is what happened until end of last week, you should read it before continuing with this post, if you have not read it yet, to get the context.
Here you can find the repo again.
I am still on my honeymoon and alive - and it is rainy today, so it is a good time to write the final report :)
This was the next steps plan from the last report:
- Create dummy DB and setup a stream and push functionality so that I get a notification for every new Error Fare into the Bot for testing.
- Change the code of the bot so it pushes the notification to the chat every time a new error fare comes.
- Change the code of the bot so that it only pushes deals into the chat if the balance of the user is enough and reduces the balance after each sent link.
- Change from local environment to hosting the bot on a VM.
- Add referral program.
- Dynamic pricing (at the moment price is hard coded, maybe I will change that, so that it is stable in EUR and dynamically generates the needed Bytes).
- Publish in Byteball Bot Store :)
If I want to survive my honeymoon vacation I don´t think I get it all done during the timeframe of the Great Byteball Bot Wars, but I hope to get point 1 to point 2 done until the Bot wars are over at least. If you don´t hear back from me I spent too much time on building this bot and my wife killed me :D
I got quite some progress and finished more than expected:
Point 1, 2, 3 and 4 are more or less done J So let´s have a deeper look on what has been done on those points and the Lessons Learned:
1. Create dummy DB and setup a stream and push functionality so that I get a notification for every new Error Fare into the Bot for testing.
Code:
First of all we need a server that can listen to push messages / POST requests.
This is how I have done it:
const http = require('http')
const server = http.createServer((req, res) => {
    if (req.method === 'POST') {
        // Handle post info...
        let body = '';
   req.on('data', chunk => {
       body += chunk.toString();
   });
   req.on('end', () => {
       console.log(body);
       res.end('ok');
   });
    }
    else {
      res.end(`
        <!doctype html>
        <html>
        <body>
        </body>
        </html>
      `);
    }
});
server.listen(3000);
For developing locally I also used ngrok.
With ngrok I can expose the localhost:3000 to the internet, which is neccessary to receive POST requests from our Notification Service. Simply download and install it in our project folder. Start your application with „node start.js“ and then open the ngrok.exe and type „ngrok http 3000“. This gives you back this:
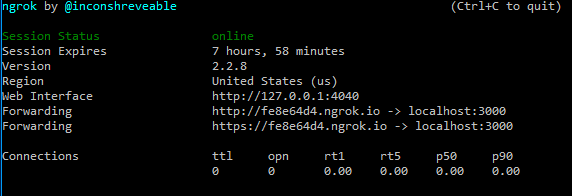
Now you have a URL you can send POST requests to.
Also the Web interface is very nice, as you can see everything that is happening there. We need that later for confirming the subscription to our notification service.
Cloud setup:
When playing around with AWS I recognized that for testing the push notifications, setting up a SNS topic is enough in the first step. Later on I can change that to our already running Dynamodb, where every new deal gets added. The SNS Topic observes every new entry and sends out the POST request to our application then.
Let me guide you shortly through the steps on AWS:
- Go to „Services“ and type „SNS“ or „Simple notification service“
- After that you create a new topic by clicking „Create topic“
- Choose a name you like
- Now we have to make a subscription with our application to this service: Select your topic, click „Actions“ and then „Subscribe to topic“.
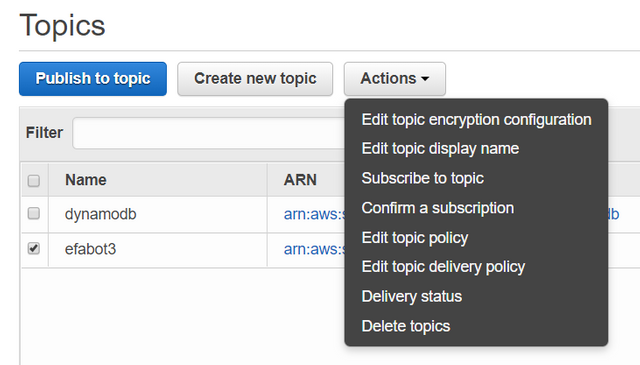
- Then you choose Protocol HTTP and copy your ngrok URL to Endpoint + click „Create subscription“
- With the inspection tool of ngrok which you can access via http://127.0.0.1:4040/inspect/http you now see the POST message that was sent. Here you need to copy the „SubscribeURL“:
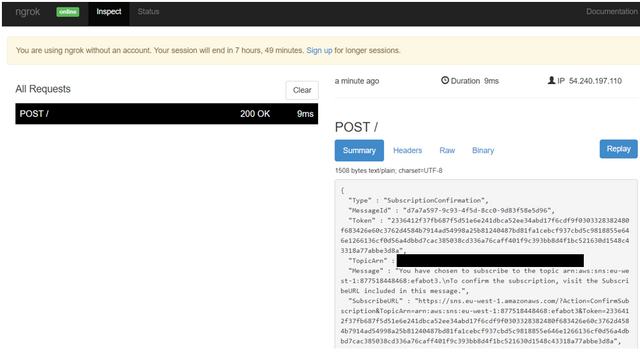
- Now go back to AWS, select your topic again, click „Action“, „Confirm a subscription“ and paste the URL there.
- Now you are subscribed with this endpoint to this topic and you also can now receive POSTs of the „Type“: „Notification“
If we want to send a POST manually for testing now, we just:
- Select our topic again
- Click „Publish to topic“
- Fill in subject and message

- Click „Publish message“
Now if you have a look on the ngrok inspector, you can see, that we have received the Notification:

Lessons Learned here:
- AWS SNS is really simple and powerful!
- Ngrok is very helpful when developing locally. Took me quite some time to find out, how to get the endpoint exposed to the internet.
- Confirming the subscription on the topic I first wasted a lot of time wanting to do that in the code. It is much simpler to do it via the SNS interface manually as described above, by just copy and pasting the SubscribeURL.
As we have the basic setup ready, we of course want to get the POST messages into the Byteball chat, which brings us tot he next point:
2. Change the code of the bot so it pushes the notification to the chat every time a new error fare comes.
On the code side I used a good example that I found at that was also again recommended in the Byteball Dev Telegram group by Luc: https://github.com/byteball/WCG-distribution/blob/master/send_announcement.js
The code is pretty much the same as in „send_announcement.js“ above.
I only changed the message that is sent into the chat of course. You can see below, that I send out „post.Subject + ':\n' + post.Message“ --> this directly sends the subject and message from the POST notfication in point 1.
const http = require('http')
const server = http.createServer((req, res) => {
    if (req.method === 'POST') {
        // Handle post info...
        let body = '';
	    req.on('data', chunk => {
	        body += chunk.toString();
	    });
	    req.on('end', () => {
	        let post = JSON.parse(body);
	        message = post;
	        res.end('ok');
	        if (post.Type = "Notification") {
	        	headlessWallet.setupChatEventHandlers();
	        	var device = require('byteballcore/device.js');
				db.query(
					"SELECT device_address FROM users",
					rows => {
						console.error(rows.length+" messages will be sent");
						async.eachSeries(
							rows,
							(row, cb) => {
								device.sendMessageToDevice(row.device_address, 'text', post.Subject + ':\n' + post.Message, {
									ifOk: function(){},
									ifError: function(){},
									onSaved: function(){
										console.log("sent to "+row.device_address);
										cb();
									}
								});
							},
							() => {
								console.error("=== done");
							}
						);
					}
				);
	        };
	    });
    }
    else {
      res.end(`
        <!doctype html>
        <html>
        <body>
        	Hiho
        </body>
        </html>
      `);
    }
});
server.listen(3000);
Lessons learned on point 2:
- The Byteball github is very rich and you find sample code for almost anything
- It took me a little to adapt it and to integrate it into my code, but with a little try and error it worked like a charm
Now we of course do not want to send the deals to everyone.
The whole idea is to monetize the service / content we are sending out, as written in our last steemit post.
This brings us to point 3:
3. Change the code of the bot so that it only pushes deals into the chat if the balance of the user is enough and reduces the balance after each sent link.
As you may remember from the last post we implemented a deposit and withdraw functionality into the bot:
- The Bot has a deposit and withdrawal functionality, that means a user can deposit Bytes and withdraw them.
- Deposited Bytes are used to pay for every deal (0,03 Euro per deal). The subscriber will get the link to every deal via the Chat interface of the bot.
- If there is not enough money deposited, the user will get a notification in the wallet that he missed a deal, because he had not enough funds deposited. If there are enough funds the user gets a notification and the link to the deal is posted directly in the Chat window.
Implementation of this part:
The code is not very nice, but I can make a refactoring at a later point of time, the deadline of the Byteball bot wars is approaching :)
I mainly added the „decBalance“ function from the dice-bot, to decrease the balance after each sent deal. If there are not enough funds, the user gets a message, that he missed a deal and that he should top up his balance, so that he gets future deals:
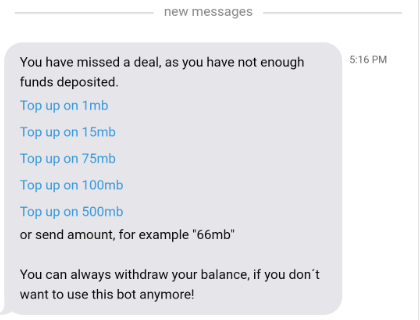
If there are enough the user gets the subject and link of the deal:

const efRate = 1;
const http = require('http')
const server = http.createServer((req, res, from_address) => {
    if (req.method === 'POST') {
        // Handle post info...
        let body = '';
	    req.on('data', chunk => {
	        body += chunk.toString();
	    });
	    req.on('end', async() => {
	        let post = JSON.parse(body);
	        message = post;
	        console.log(message);
	        res.end('ok');
	        if (post.Type = "Notification") {
	        	headlessWallet.setupChatEventHandlers();
	        	var device = require('byteballcore/device.js');
				db.query(
					"SELECT device_address FROM users",
					rows => {
						console.error(rows.length+" messages will be sent");
						async.eachSeries(
							rows,
							async(row, cb) => {
								let userInfo = await getUserInfo(row.device_address);
								console.log(userInfo.balance);
								if (userInfo.balance >= efRate){
									console.log(">1")
									device.sendMessageToDevice(row.device_address, 'text', post.Subject + ':\n' + post.Message, {
										ifOk: function(){},
										ifError: function(){},
										onSaved: async function(){
											console.log("sent to "+row.device_address);
											await decBalance(efRate, row.device_address);
											cb();
										}
									});
								}
								else if (userInfo.balance < efRate){
									console.log("<1")
									device.sendMessageToDevice(row.device_address, 'text', 'You have missed a deal, as you have not enough funds deposited.\n' +
										'[Top up on 1mb](command:1mb)\n' +
										'[Top up on 15mb](command:15mb)\n' +
										'[Top up on 75mb](command:75mb)\n' +
										'[Top up on 100mb](command:100mb)\n' +
										'[Top up on 500mb](command:500mb)\n' +
										'or send amount, for example "66mb"\n\n' +
										'You can always withdraw your balance, if you don´t want to use this bot anymore!', {
										ifOk: function(){},
										ifError: function(){},
										onSaved: async function(){
											console.log("sent to "+row.device_address);
											cb();
										}
									});
								}
							},
							() => {
								console.error("=== done");
							}
						);
					}
				);
	        };
	    });
    }
    else {
      res.end(`
        <!doctype html>
        <html>
        <body>
        	Hiho
        </body>
        </html>
      `);
    }
});
server.listen(3000);


function decBalance(amount, device_address) {
	return new Promise(resolve => {
		db.query("UPDATE users SET balance = balance - ? WHERE device_address = ?", [amount, device_address], () => {
			return resolve();
		});
	});
}
Lessons Learned:
- It took me a little to adapt it and to integrate it into my code also here. But try and error always helps, especially with the good logs.
- Async / await was an issue and declaring variables correctly. You can see that I added some „asysnc“.
So now that I have everything running locally, it is time to host the bot on a VM:
4. Change from local environment to hosting the bot on a VM.
I also chose to use AWS here.
Amazon Lightsail is very easy and quick to setup, as I learned.
Here are the steps:
Part 1: Creating the VM on AWS
- First go to AWS and select the Amazon Lightsail
- Click on „Create instance“
- This was my configuration:
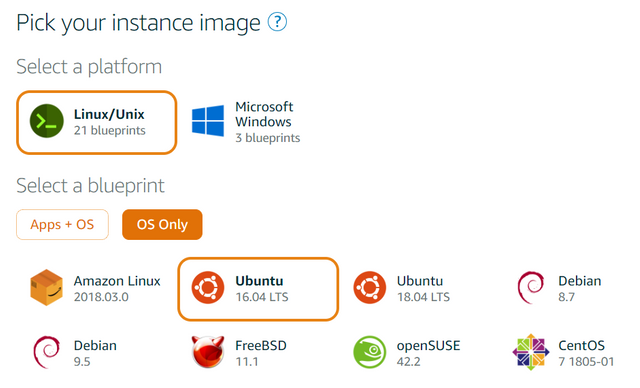
- After that, also click on „Change SSH key pair“ and then „Download“ to get the keys. We need them later to change them into a different format (for Windows user).
- The smallest instance plan should be fine for us and the first month is free:
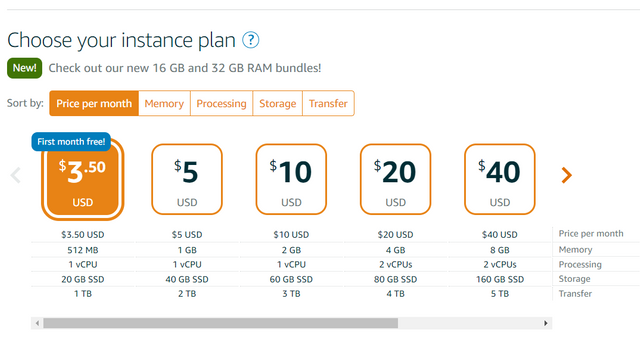
- Choose a name for your instance
- Create it
Part 2: PuTTY for accessing the instance and SSH keys (for Windows user)
- Download and install PuTTY https://www.putty.org/
- Change the Key from above with PuTTYgen
- Open PuTTYgen
- Click „Load“
- Select the file we downloaded in Part 1 above
- Click „Save private Key“ and save the file as .ppk
- Access the instance
- Open PuTTY
- Enter your Public IP into the respective PuTTY field + add „ubuntu@“ before the Public IP, as described in AWS:
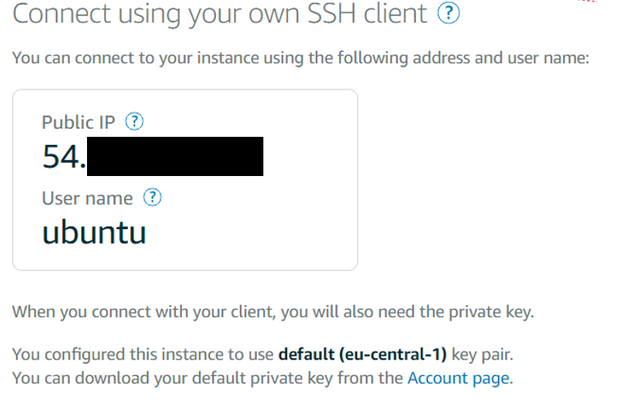
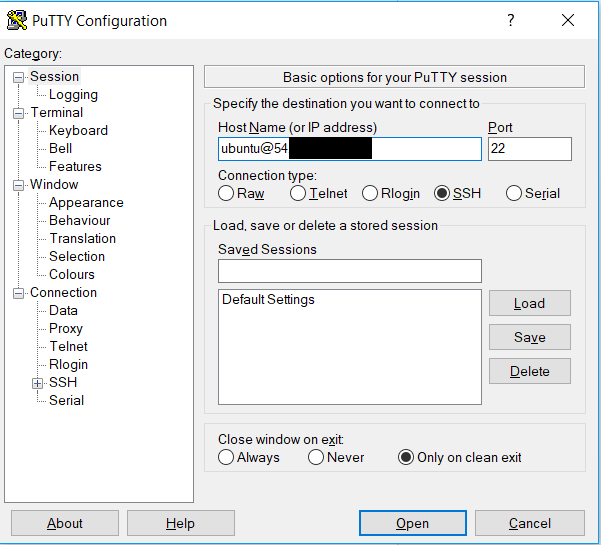
- Click on SSH on the left navigation panel, and then on „Auth“
- Then click on „Browse“ and open your ppk file you just generated
- Then click on „Open“ - now you should be on your VM.
Part 3: Initializing the machine
- Enter „sudo apt-get update“
- Then install the node version you have running locally, follow this guide

- Install also the build essentials as written in the link, you might need to add „sudo“: „sudo apt-get install -y build-essential“

- Then clone the repo of your bot with „git clone [URL Repo]“
- - „cd [project folder]“
- „npm install“
- Start your application, e.g. „node start.js“
You need to create some more tables in the Byteball sqlite database. Add the queries from the „db.sql“ file in your project folder to sqlite 3. You can also find some instructions on how to do this in the last steemit post.
Also I have experienced some difference with the callbacks „cb()“ for example in our code. This worked locally, but not on the VM, we had to comment it out on the VM code.
Thanks to Rui for his help on setting up the VM :)
Future development ideas:
I think this bot template can serve as a blueprint and inspiration for monetizing any kind content distribution, newsletters and APIs.
You can monetize APIs (both GET and POST type APIs are possible I am sure), and they don´t need to be posting into a Byteball Chatbot, but you can use the bot as a kind of „gatekeeper“. It means, if someone wants to use your API, you can ask him to add the bot that is connected to your notification service. Then the user deposits the money and can enter e.g. a custom endpoint like an eMail address or http endpoint (like in this bot), where he wants to receive the answers from the API. Also here – depending if the user has enough funds deposited – he gets the API messages or a hint that he should top up his balance.
You can also easily change the price for receiving one message by changing „const efRate = 1;“ from 1 to x MB (This is the price in the Byteball currency. 1 MB is ~0,03 € as of the time of writing).
I really think that solves a real world problem, as I tried to monetize some APIs in the past, and it was not easy to set up all this payment stuff and fullfill tons of regulations and huge documentation overload when you want to publish and monetize an API on an API platform.
Next steps
This was the next steps plan from the last report (1-4 done):
Create dummy DB and setup a stream and push functionality so that I get a notification for every new Error Fare into the Bot for testing.Change the code of the bot so it pushes the notification to the chat every time a new error fare comes.Change the code of the bot so that it only pushes deals into the chat if the balance of the user is enough and reduces the balance after each sent link.Change from local environment to hosting the bot on a VM.- Add referral program.
- Dynamic pricing (at the moment price is hard coded, maybe I will change that, so that it is stable in EUR and dynamically generates the needed Bytes).
- Publish in Byteball Bot Store :)
There are still some points open as you can see.
I see the priority of point 5 and 6 low at the moment.
So here is the new next step priority list:
- I think testing of the service by handing out the pairing code is much more important. I will do that soon after some more „internal“ testing and testing with a small peergroup of current ErrorFareAlerts.com subscribers.
- Maybe a second wave of testing with a Byteballer group, too ;)
- After that – Publish in Byteball Bot Store.
- Launch in the bot store could be combined with a small airdrop (distribution idea for Byteball ;)): Every subscriber of ErrorFareAlerts that is subscribed bye Mail before 11th of January 2019 gets a textcoin with 5 MB. This is enough that he can try out the service without financial risk and without having to buy Bytes. For Byteball it would mean new users. The current eMail list is very active and consists of a significant amount of eMail addresses.
- Add new features based on user feedback
- Add referral program
- Dynamic pricing (at the moment price is hard coded, maybe I will change that, so that it is stable in EUR and dynamically generates the needed Bytes).
Any hints, feedback and feature ideas are very welcome – let me know in the comments!
Ressources
- https://developer.byteball.org/
- https://github.com/xJeneKx/dicebot
- https://github.com/byteball
- https://aws.amazon.com/de/premiumsupport/knowledge-center/convert-pem-file-into-ppk/
- https://itnext.io/how-to-handle-the-post-request-body-in-node-js-without-using-a-framework-cd2038b93190
- Others as linked in this article
Git of this bot:
https://github.com/AnGrYxx/efa-bot
Thanks again to
- Evgenii from BIOT https://biot.ws/
- Luc from @devbyteball Telegram group
- The Byteball Community and team
- Rui Lun Tran
And again:
Any hints, feedback and feature ideas are very welcome – let me know in the comments, please ;)
Thank you for your contribution. Again a very high-quality post where you have explained each and everything very nicely. The only thing about the post is that you can improve a little bit of formatting when showing code as I can see a lot of unrelated indentation as well as blank spaces. Also, the indentation in the code should be improved.
Next, it is just my personal preference, to have two branches one for development and other for master and whenever you create contribution just create a pull request, it's very easy to track the changes.
The commit messages, as well as the comments in the code, could have improved, again it is just how you show your code to the public.
Your contribution has been evaluated according to Utopian policies and guidelines, as well as a predefined set of questions pertaining to the category.
To view those questions and the relevant answers related to your post, click here.
Need help? Chat with us on Discord.
[utopian-moderator]
Thank you again for the review, @codingdefined!
Can you guide me to a good source on how to make code blocks easily in the steemit editor, @codingdefined? Just spent >1 hour and ending up manually deleting stuff in the html code, as e.g. this https://help.github.com/articles/creating-and-highlighting-code-blocks/ markdown did not work for me.
@angr, you can use https://prettier.io/playground/, which pretties your code block.
And you need to wrap your code inside ```
Thank you for your review, @codingdefined! Keep up the good work!
Congratulations @angr! You have completed the following achievement on the Steem blockchain and have been rewarded with new badge(s) :
Click here to view your Board
If you no longer want to receive notifications, reply to this comment with the word
STOPTo support your work, I also upvoted your post!
Do not miss the last post from @steemitboard:
Hi @angr!
Your post was upvoted by @steem-ua, new Steem dApp, using UserAuthority for algorithmic post curation!
Your post is eligible for our upvote, thanks to our collaboration with @utopian-io!
Feel free to join our @steem-ua Discord server
Hello @angr! This is a friendly reminder that you have 3000 Partiko Points unclaimed in your Partiko account!
Partiko is a fast and beautiful mobile app for Steem, and it’s the most popular Steem mobile app out there! Download Partiko using the link below and login using SteemConnect to claim your 3000 Partiko points! You can easily convert them into Steem token!
https://partiko.app/referral/partiko