How to create Login page with Bootstrap like Google
What Will I Learn?
- You will learn how to create a login page like google
- You will learn how to use HTML5
- You will learn how to make pages responsive
- You will learn how to make the code become structured
Requirements
- You have basic about HTML
- You have basic about CSS
- You have basic about JavaScript
- You should Install or host the bootstrap file. If you don't want do that, you can add the bootstrap CDN.
Difficulty
- Basic
Tutorial Contents
Login form, usually used to restrict the permissions for the user to view and interact with the data. Only registered users can access confidential data.
Why use bootstrap, because in bootstrap for display there is a class name of each, and bootstrap can appear to be responsive to all devices. So we do not need much use CSS itself, because in bootstrap already have its own CLASS, but we also have to know the name of its class, to know class name or component at bootstrap please visit this link: https://getbootstrap.com/docs/4.0/getting-started/introduction/
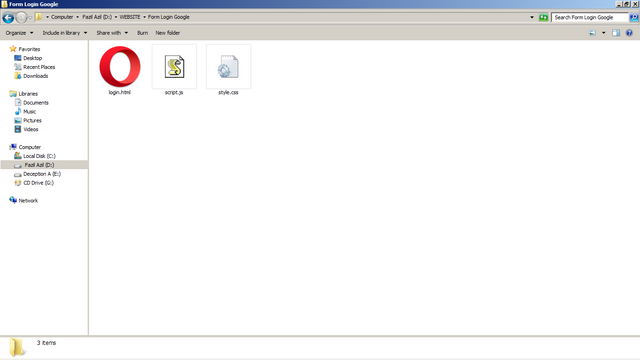
Create a file structure like this:

For more detail, pay attention to steps bellow :
- Open the text editor
- Open new file and save as htlm extention. For ex : login.html
- As we know for using bootstrap we should use HTML5 Doctype. Add the HTML5 element on your file.
<!DOCTYPE html>
<html lang="en">
<head>
<meta charset="UTF-8">
<meta name="viewport" content="width=device-width, initial-scale=1.0">
<meta http-equiv="X-UA-Compatible" content="ie=edge">
<title>Form Login Like Google</title>
</head>
</body>
</body>
</html>
- To use the bootstrap framework we have to install or host the bootstrap file first. If you do not want to do that, you can also add Bootstrap CDN instead. You can visit the official bootstrap site to get it. add and put in the element as follows:
<link rel="stylesheet" href="https://maxcdn.bootstrapcdn.com/bootstrap/3.3.7/css/bootstrap.min.css">
<link rel="stylesheet" href="style.css">
<script src="https://ajax.googleapis.com/ajax/libs/jquery/3.2.1/jquery.min.js"></script>
<script src="https://maxcdn.bootstrapcdn.com/bootstrap/3.3.7/js/bootstrap.min.js"></script>
<script src="script.js"></script>
- After adding all the above elements, Now we can start to create login page with bootstrap code.
- To create a basic login page, add the login login code to
<body>elements like this.
        <img id="profile-img" class="profile-img-card" src="http://ssl.gstatic.com/accounts/ui/avatar_2x.png" />
        <p id="profile-name" class="profile-name-card"></p>
        <form class="form-signin">
            <span id="reauth-email" class="reauth-email"></span>
            <input type="email" id="inputEmail" class="form-control" placeholder="Email address" required autofocus>
            <input type="password" id="inputPassword" class="form-control" placeholder="Password" required>
            <div id="remember" class="checkbox">
                <label>
                    <input type="checkbox" value="remember-me"> Remember me
                </label>
            </div>
            <button class="btn btn-lg btn-primary btn-block btn-signin" type="submit">Sign in</button>
        </form>(html comment removed:  /form )
        <a href="#" class="forgot-password">
            Forgot the password?
        </a>
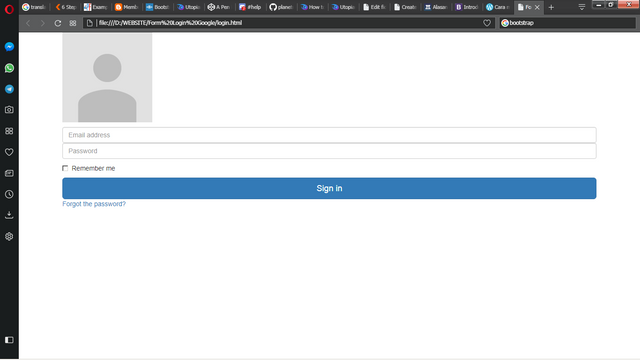
Save and try to run.

For a prettier look and add a picture behind, we add the CSS itself. in the
style.cssfile then copy the css code below:
body, html { height: 100%; background-repeat: no-repeat; background-image: linear-gradient(rgb(104, 145, 162), rgb(12, 97, 33)); }.card-container.card {
max-width: 350px;
padding: 40px 40px;
}.btn {
font-weight: 700;
height: 36px;
-moz-user-select: none;
-webkit-user-select: none;
user-select: none;
cursor: default;
}/*
- Card component
/
.card {
background-color: #F7F7F7;
/ just in case there no content/
padding: 20px 25px 30px;
margin: 0 auto 25px;
margin-top: 50px;
/ shadows and rounded borders */
-moz-border-radius: 2px;
-webkit-border-radius: 2px;
border-radius: 2px;
-moz-box-shadow: 0px 2px 2px rgba(0, 0, 0, 0.3);
-webkit-box-shadow: 0px 2px 2px rgba(0, 0, 0, 0.3);
box-shadow: 0px 2px 2px rgba(0, 0, 0, 0.3);
}.profile-img-card {
width: 96px;
height: 96px;
margin: 0 auto 10px;
display: block;
-moz-border-radius: 50%;
-webkit-border-radius: 50%;
border-radius: 50%;
}/*
- Form styles
*/
.profile-name-card {
font-size: 16px;
font-weight: bold;
text-align: center;
margin: 10px 0 0;
min-height: 1em;
}.reauth-email {
display: block;
color: #404040;
line-height: 2;
margin-bottom: 10px;
font-size: 14px;
text-align: center;
overflow: hidden;
text-overflow: ellipsis;
white-space: nowrap;
-moz-box-sizing: border-box;
-webkit-box-sizing: border-box;
box-sizing: border-box;
}.form-signin #inputEmail,
.form-signin #inputPassword {
direction: ltr;
height: 44px;
font-size: 16px;
}.form-signin input[type=email],
.form-signin input[type=password],
.form-signin input[type=text],
.form-signin button {
width: 100%;
display: block;
margin-bottom: 10px;
z-index: 1;
position: relative;
-moz-box-sizing: border-box;
-webkit-box-sizing: border-box;
box-sizing: border-box;
}.form-signin .form-control:focus {
border-color: rgb(104, 145, 162);
outline: 0;
-webkit-box-shadow: inset 0 1px 1px rgba(0,0,0,.075),0 0 8px rgb(104, 145, 162);
box-shadow: inset 0 1px 1px rgba(0,0,0,.075),0 0 8px rgb(104, 145, 162);
}.btn.btn-signin {
/background-color: #4d90fe; /
background-color: rgb(104, 145, 162);
/ background-color: linear-gradient(rgb(104, 145, 162), rgb(12, 97, 33));/
padding: 0px;
font-weight: 700;
font-size: 14px;
height: 36px;
-moz-border-radius: 3px;
-webkit-border-radius: 3px;
border-radius: 3px;
border: none;
-o-transition: all 0.218s;
-moz-transition: all 0.218s;
-webkit-transition: all 0.218s;
transition: all 0.218s;
}.btn.btn-signin:hover,
.btn.btn-signin:active,
.btn.btn-signin:focus {
background-color: rgb(12, 97, 33);
}.forgot-password {
color: rgb(104, 145, 162);
}.forgot-password:hover,
.forgot-password:active,
.forgot-password:focus{
color: rgb(12, 97, 33);
}
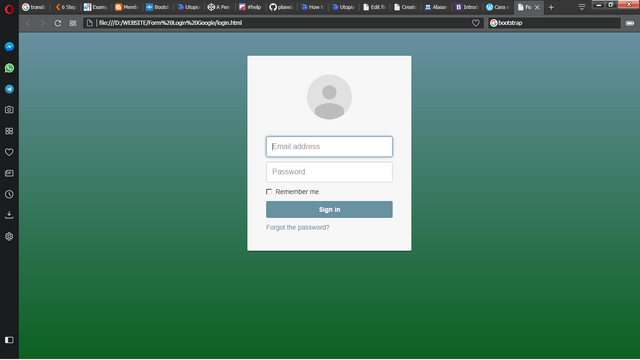
Save and try to run.

after that we open the javascript code into the file
script.jsto make the login page more functional and validate the page, copy the javascript code below:
$( document ).ready(function() { loadProfile(); }); function getLocalProfile(callback){ var profileImgSrc = localStorage.getItem("PROFILE_IMG_SRC"); var profileName = localStorage.getItem("PROFILE_NAME"); var profileReAuthEmail = localStorage.getItem("PROFILE_REAUTH_EMAIL"); if(profileName !== null && profileReAuthEmail !== null && profileImgSrc !== null) { callback(profileImgSrc, profileName, profileReAuthEmail); } } function loadProfile() { if(!supportsHTML5Storage()) { return false; } getLocalProfile(function(profileImgSrc, profileName, profileReAuthEmail) { $("#profile-img").attr("src",profileImgSrc); $("#profile-name").html(profileName); $("#reauth-email").html(profileReAuthEmail); $("#inputEmail").hide(); $("#remember").hide(); }); } function supportsHTML5Storage() { try { return 'localStorage' in window && window['localStorage'] !== null; } catch (e) { return false; } } function testLocalStorageData() { if(!supportsHTML5Storage()) { return false; } localStorage.setItem("PROFILE_IMG_SRC", "//lh3.googleusercontent.com/-6V8xOA6M7BA/AAAAAAAAAAI/AAAAAAAAAAA/rzlHcD0KYwo/photo.jpg?sz=120" ); localStorage.setItem("PROFILE_NAME", "ALLSAVE"); localStorage.setItem("PROFILE_REAUTH_EMAIL", "[email protected]"); }
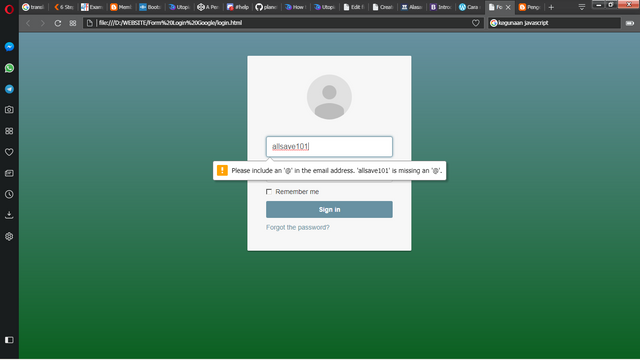
- After save, and run again, it will be like this:

You can see different Screen Shot. The first is Default html, then add CSS. And the last one added JavaScript.
- Done. That's all how to create login page like google by using bootstrap. For complete code in this tutorial you can get below:
DOWNLOAD
Posted on Utopian.io - Rewarding Open Source Contributors
Don't worry bro @allsave ,
Long pih ka dianggap plagiat 😂
Hahaha mantap jil, ka kaneuk anti si udin @sogata wkwkwkwkwkwkwkwk
Your contribution cannot be approved because it does not follow the Utopian Rules, and is considered as plagiarism. Plagiarism is not allowed on Utopian, and posts that engage in plagiarism will be flagged and hidden forever.
You have plagiarised the HTML, CSS and JavaScript from here or somewhere else.
You can contact us on Discord.
[utopian-moderator]