How to integrate a Rich WYSIWYG Text Editor in a website
What Will I Learn?
- You will learn about Quill Text Editor
- You will learn how to integrate Quill Text Editor on your web page
- You will learn how to lay out a form
Requirements
- You must have basic HTML and CSS knowledge
- You must have basic knowledge on how to create a form
- You need Text Editor, browser and internet to download resources
Difficulty
- Basic
Tutorial Contents
Quill is a free and open source WYSIWYG developed by Stargazers to give the world a rich text editor that is easy and simple to use but yet powerful. Quill text editor can be used by both small and large projects. For large projects, they have API that developers can tap into to power their applications.
When working with Quill, there’s no need to worry about compatibility because it works perfectly fine across different browsers and devices. It can be customized to fit your need by altering the CSS and JS files, but this is beyond this basic level tutorial.
In this tutorial we’re going to create a web page using Bootstrap framework and include a form where we will try out our Quill Text Editor integration. You can choose to integrate it into a comment section or something else on your website.
Preview of the Final Result
Steps
- First of all we need create our web page. Launch your text editor and create a file named “index.html”.
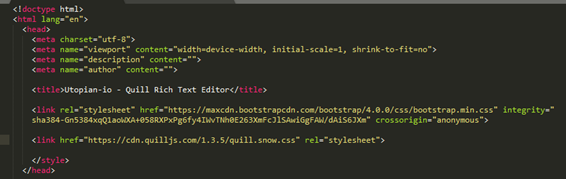
- Declare the standard HTML opening tags as seen below;
<!doctype html>
<html lang="en">
  <head>
    <meta charset="utf-8">
    <meta name="viewport" content="width=device-width, initial-scale=1, shrink-to-fit=no">
    <meta name="description" content="">
    <meta name="author" content="">
    <title>Utopian-io - Quill Rich Text Editor</title>
  </head>
<body>
</body>
</html>
- We will integrate bootstrap using CSS, JS and JQuery CDN links into our index.html file. Copy the CSS link and paste it below the
<title>tag and the JS at the bottom of the page before the closing</body>tag.
CSS:
<link rel="stylesheet" href="https://maxcdn.bootstrapcdn.com/bootstrap/4.0.0-alpha.6/css/bootstrap.min.css" integrity="sha384-rwoIResjU2yc3z8GV/NPeZWAv56rSmLldC3R/AZzGRnGxQQKnKkoFVhFQhNUwEyJ" crossorigin="anonymous">
JS:
<script src="https://maxcdn.bootstrapcdn.com/bootstrap/4.0.0-alpha.6/js/bootstrap.min.js" integrity="sha384-vBWWzlZJ8ea9aCX4pEW3rVHjgjt7zpkNpZk+02D9phzyeVkE+jo0ieGizqPLForn" crossorigin="anonymous"></script>
   <script src="//cdn.quilljs.com/1.3.5/quill.min.js"></script>
JQuery:
https://code.jquery.com/jquery-3.2.1.slim.min.js" integrity="sha384-KJ3o2DKtIkvYIK3UENzmM7KCkRr/rE9/Qpg6aAZGJwFDMVNA/GpGFF93hXpG5KkN" crossorigin="anonymous"
- Add the following piece of code after the tag to create a dark default bootstrap navigational bar. Visit https://getbootstrap.com/docs/4.0/getting-started/introduction/ for more examples.
<nav class="navbar navbar-expand-md navbar-dark bg-dark fixed-top">
    <div class="container">
      <a class="navbar-brand" href="#">Utopian-io</a>
      <button class="navbar-toggler" type="button" data-toggle="collapse" data-target="#navbarDark" aria-controls="navbarDark" aria-expanded="false" aria-label="Toggle navigation">
        <span class="navbar-toggler-icon"></span>
      </button>

      <div class="collapse navbar-collapse" id="navbarDark">
        <ul class="navbar-nav mr-auto">
          <li class="nav-item active">
            <a class="nav-link" href="#">Home <span class="sr-only">(current)</span></a>
          </li>
          <li class="nav-item">
            <a class="nav-link" href="#">Get Started</a>
          </li>
          <li class="nav-item">
            <a class="nav-link" href="#">Community</a>
          </li>
        </ul>

        <a class="btn btn-success my-2 my-sm-0" href="#"> <span class="glyphicon glyphicon-user"></span> Account</a>
      </div>
    </div>
    </nav>
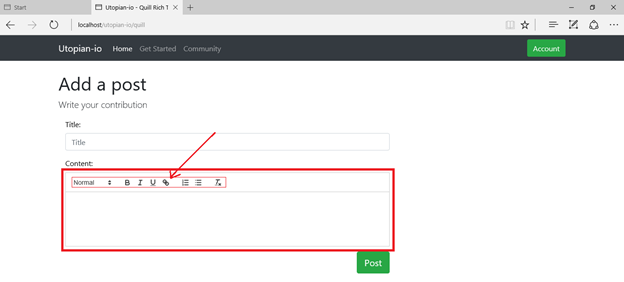
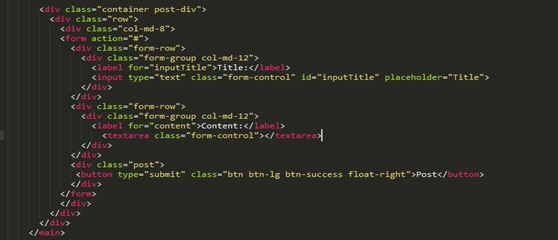
- Next, add the following piece code within the tag immediately after the tag to create a form with two inputs. We are going to integrate the Quill text editor to the tag within the form.
Preview
When you preview the page in your browser, you should have something similar to the screenshot below;

Integrating Quill Rich Text Editor
To integrate Quill Text Editor into the textarea we created, we need to add the Quill resources through CDN i.e. the CSS and JS link. Adding the files through CDN will help your website minimize load. The files can be found on the Quill website;
The CSS link:
<link href="https://cdn.quilljs.com/1.3.5/quill.snow.css" rel="stylesheet">
<link href="https://cdn.quilljs.com/1.3.5/quill.bubble.css" rel="stylesheet">
The Quill JS link:
<script src="//cdn.quilljs.com/1.3.5/quill.min.js"></script>
Next Steps
Getting back to our index.html file, we need to add one of the CSS file within the tag after the bootstrap CSS file and for our JS, it will be at the bottom of the page immediately after bootstrap’s JS file. The advantage of adding the JS files at the bottom of the page is to enable the page load faster.
Adding the Quill CDN CSS file;
Quill Rich Text Editor has two Themes;
• Snow, and
• Bubble
For this tutorial, we are going to use bubble. You are free to experiment with the theme by just changing the JS file to that of bubble.
Adding the Quill JS file

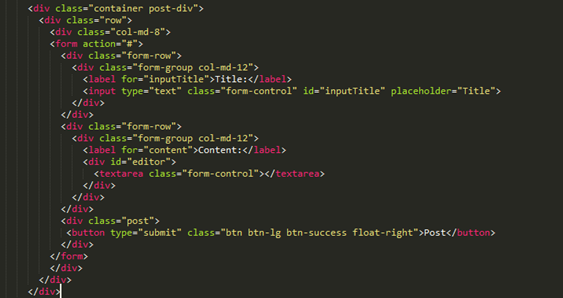
Making the textarea editable
Add the following piece code to make the textarea editable. Enclose the textarea as shown below;
<div id="editor">
</div>
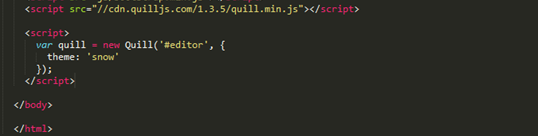
Add the following JS script to initialize the Quill Editor;
<script>
      var quill = new Quill('#editor', {
        theme: 'snow'
      });
    </script>
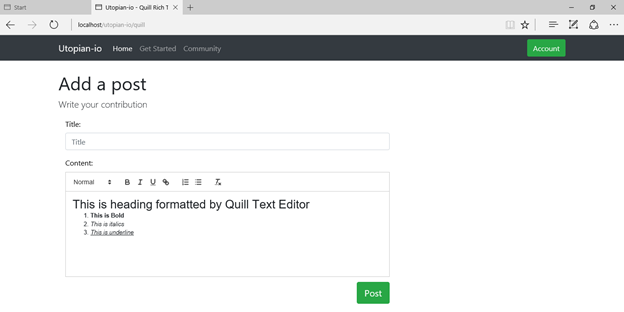
Final Preview!
It’s working…

Test: The text within the textarea was formatted using the Quill Text Editor.
Source Code:
Full source code here:
 <!doctype html>
<html lang="en">
  <head>
    <meta charset="utf-8">
    <meta name="viewport" content="width=device-width, initial-scale=1, shrink-to-fit=no">
    <meta name="description" content="">
    <meta name="author" content="">
    <title>Utopian-io - Quill Rich Text Editor</title>
    <link rel="stylesheet" href="https://maxcdn.bootstrapcdn.com/bootstrap/4.0.0-alpha.6/css/bootstrap.min.css" integrity="sha384-rwoIResjU2yc3z8GV/NPeZWAv56rSmLldC3R/AZzGRnGxQQKnKkoFVhFQhNUwEyJ" crossorigin="anonymous">
    <link href="https://cdn.quilljs.com/1.3.5/quill.snow.css" rel="stylesheet">
    </style>
  </head>
  <body>
    <nav class="navbar navbar-expand-md navbar-dark bg-dark fixed-top">
    <div class="container">
      <a class="navbar-brand" href="#">Utopian-io</a>
      <button class="navbar-toggler" type="button" data-toggle="collapse" data-target="#navbarDark" aria-controls="navbarDark" aria-expanded="false" aria-label="Toggle navigation">
        <span class="navbar-toggler-icon"></span>
      </button>
      <div class="collapse navbar-collapse" id="navbarDark">
        <ul class="navbar-nav mr-auto">
          <li class="nav-item active">
            <a class="nav-link" href="#">Home <span class="sr-only">(current)</span></a>
          </li>
          <li class="nav-item">
            <a class="nav-link" href="#">Get Started</a>
          </li>
          <li class="nav-item">
            <a class="nav-link" href="#">Community</a>
          </li>
        </ul>
        <a class="btn btn-success my-2 my-sm-0" href="#"> <span class="glyphicon glyphicon-user"></span> Account</a>
      </div>
    </div>
    </nav>

    <main role="main" class="container">
      <h1>Add a post</h1>
      <p class="lead">Write your contribution</p>
      <div class="container post-div">
        <div class="row">
          <div class="col-md-8">
          <form action="#">
            <div class="form-row">
              <div class="form-group col-md-12">
                <label for="inputTitle">Title:</label>
                <input type="text" class="form-control" id="inputTitle" placeholder="Title">
              </div>
            </div>
            <div class="form-row">
              <div class="form-group col-md-12">
                <label for="content">Content:</label>
                <div id="editor">
                  <textarea class="form-control"></textarea>
                </div>
              </div>
            </div>
            <div class="post">
             <button type="submit" class="btn btn-lg btn-success float-right">Post</button>
            </div>
          </form>
          </div>
        </div>
      </div>
    </main>

    <script src="js/jquery.min.js"></script>
    <script src="https://maxcdn.bootstrapcdn.com/bootstrap/4.0.0-alpha.6/js/bootstrap.min.js" integrity="sha384-vBWWzlZJ8ea9aCX4pEW3rVHjgjt7zpkNpZk+02D9phzyeVkE+jo0ieGizqPLForn" crossorigin="anonymous"></script>
    <script src="//cdn.quilljs.com/1.3.5/quill.min.js"></script>

    <script>
      var quill = new Quill('#editor', {
        theme: 'snow'
      });
    </script>

  </body>
  </html>
Curriculum
Place here a list of related tutorials you have already shared on Utopian that make up a Course Curriculum, if applicable.
Check the following tutorials to learn more.
- https://utopian.io/utopian-io/@aliyu-s/how-to-add-a-content-management-system-cms-to-an-existing-website
- https://utopian.io/utopian-io/@aliyu-s/how-to-create-a-quick-and-beautiful-landing-page-using-bootstrap-4
Posted on Utopian.io - Rewarding Open Source Contributors
Thank you for the contribution. It has been approved.
You can contact us on Discord.
[utopian-moderator]
Hey @gerginho, I just gave you a tip for your hard work on moderation. Upvote this comment to support the utopian moderators and increase your future rewards!
Hey @aliyu-s I am @utopian-io. I have just upvoted you!
Achievements
Suggestions
Get Noticed!
Community-Driven Witness!
I am the first and only Steem Community-Driven Witness. Participate on Discord. Lets GROW TOGETHER!
Up-vote this comment to grow my power and help Open Source contributions like this one. Want to chat? Join me on Discord https://discord.gg/Pc8HG9x