How to create a drag and drop event calendar using FullCalender.JS
What Will I Learn?
- You will learn about FullCalendar JavaScript library
- You will learn how to integrate a drag and drop calendar in your website
- You will learn how to customize/add events to your calendar
Requirements
- You must have basic HTML and CSS knowledge
- You must have basic JavaScript knowledge
- You need a Text Editor, Internet browser and internet connection to download some resources
Difficulty
- Basic
Tutorial Contents
Introduction
FullCalendar.JS is a free and open source JavaScript Event Calendar with drag and drop feature. FullCalendar UI was built with Bootstrap and JQuery UI so it supports mobile devices and works properly across different browsers. Its dependencies are JQuery and Moment JavaScript library.
Some of the FullCalendar advanced features are event management like rendering and selection, resizing, Google calendar support, scheduler, time zones, an Agenda Option and lots more.
For this tutorial, we are going to setup a simple web page that will showcase our Event Calendar. We will use HTML5, CSS and some JavaScript codes for the setup. There are a lot of features that we can add to our Event Calendar such as editing events and adding events through an interface rather than codes, but for the sake of simplicity, we’ll start with just the basics.
STEPS
Setup web page
To setup our web page we need to follow the following steps;
- Open your text editor and create a file “calendar.html” and save it in your development folder.
- Inside “calendar.html” write down the standard HTML5 elements we use in defining a HTML file. Something like this;
 <!DOCTYPE html>
<html lang="en">
  <head>
    <meta charset="utf-8">
    <title>Utopian-io – Drag and Drop Event Calendar</title>
  </head>
<body>

</body>
</html>
Now that our web page is setup correctly we’ll begin the next phase.
Integrating Event Calendar
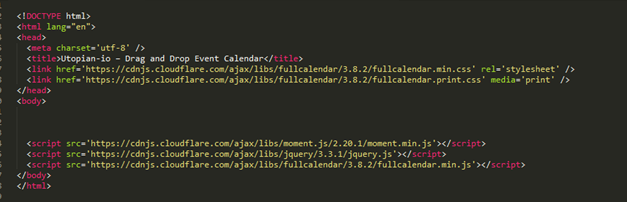
We are going to integrate our Event Calendar into our web page using two available options. One is to visit FullCalendar official website https://fullcalendar.io/download/ to download the necessary files and include them into our web page locally and the second option is to use the available CDN links. The necessary JS files are JQuery, Moment JS and FullCalendar JS file and two FullCalendar CSS files.
I will be using the CDN links for this tutorial and the links are;
CSS
<link href='https://cdnjs.cloudflare.com/ajax/libs/fullcalendar/3.8.2/fullcalendar.min.css' rel='stylesheet' />
<link href='https://cdnjs.cloudflare.com/ajax/libs/fullcalendar/3.8.2/fullcalendar.print.css' media='print' />
JS
<script src='https://cdnjs.cloudflare.com/ajax/libs/moment.js/2.20.1/moment.min.js'></script>
<script src='https://cdnjs.cloudflare.com/ajax/libs/jquery/3.3.1/jquery.js'></script>
<script src='https://cdnjs.cloudflare.com/ajax/libs/fullcalendar/3.8.2/fullcalendar.min.js'></script>
NB: Moment JS and JQuery must be loaded first before Full Calendar for it to work.
Now that all the necessary files are link correctly we’ll start structuring our calendar.
Steps:
i. Within the body section of the “calendar.html” file create a div with an id of “calendar”.
<div id='calendar'></div>
ii. Go to the bottom of “calendar.html” file and write down this JavaScript piece of codes to initialize FullCalendar.
    $(document).ready(function() {

    $('#calendar').fullCalendar({
        // our options and callbacks goes here
    })

    });
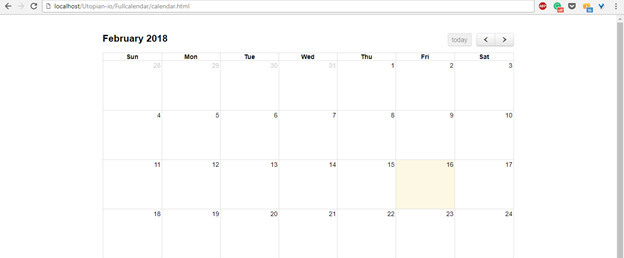
The piece of codes above gets our page ready then initialize FullCalendar. Visit your browser to see the result. It’s just a plain calendar without events and proper styling. Let’s add some styling without the <head> section of the file. You can play around with the styling to find something that suits you,
<style>
  body {
    margin: 40px 10px;
    padding: 0;
    font-family: "Lucida Grande",Helvetica,Arial,Verdana,sans-serif;
    font-size: 14px;
  }
  #calendar {
    max-width: 900px;
    margin: 0 auto;
  }
</style>
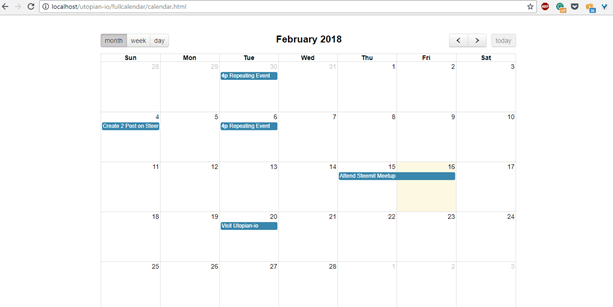
Let’s add options and Events to our Calendar
Update the codes within our <script> tag with the ones below;
$(document).ready(function() {

    $('#calendar').fullCalendar({
      header: {
        right: 'prev,next today', //positions the the prev/next button on the right
        center: 'title', //sets the title of the month to center
        left: 'month,basicWeek,basicDay' //positions the the prev/next button on the left
      },
      defaultDate: '2018-02-16',
      navLinks: true, // click on day/week names to navigate views
      editable: true,
      eventLimit: true, // add "more" link when there are too many events in a day
      events: [
        {
          title: 'Create 2 Post on Steemit', // title of an event
          start: '2018-02-05' // date of an event
        },
        {
          title: 'Attend Steemit Meetup',
          start: '2018-02-16',
          end: '2018-02-18'
        },
        {
          id: 999,
          title: 'Repeating Event',
          start: '2018-02-07T16:00:00'
        },
        {
          id: 999,
          title: 'Repeating Event',
          start: '2018-02-14T16:00:00'
        },
        {
          title: 'Visit Utopian-io',
          url: 'http://utopian.io/',
          start: '2018-02-20'
        }
      ]
    });

  });
All the options used to configure the full calendar has been described using a comment in the codes. For more options visit the official documentation of FullCalendar.
FulllCalender is a comprehensive JavaScript library with so much features which cannot be covered in a single tutorial session. I will try and make it into a series with three episodes.
Full Source Code
<!DOCTYPE html>
<html lang="en">
<head>
  <meta charset='utf-8' />
  <title>Utopian-io – Drag and Drop Event Calendar</title>
  <link href='https://cdnjs.cloudflare.com/ajax/libs/fullcalendar/3.8.2/fullcalendar.min.css' rel='stylesheet' />
  <link href='https://cdnjs.cloudflare.com/ajax/libs/fullcalendar/3.8.2/fullcalendar.print.css' media='print' />
  <style>
    body {
      margin: 40px 10px;
      padding: 0;
      font-family: "Lucida Grande",Helvetica,Arial,Verdana,sans-serif;
      font-size: 14px;
    }
    #calendar {
      max-width: 900px;
      margin: 0 auto;
    }
</style>
</head>
<body>

   <div id='calendar'></div>

  <script src='https://cdnjs.cloudflare.com/ajax/libs/moment.js/2.20.1/moment.min.js'></script>
  <script src='https://cdnjs.cloudflare.com/ajax/libs/jquery/3.3.1/jquery.js'></script>
  <script src='https://cdnjs.cloudflare.com/ajax/libs/fullcalendar/3.8.2/fullcalendar.min.js'></script>
  <script type="text/javascript">
    $(document).ready(function() {

    $('#calendar').fullCalendar({
      header: {
        right: 'prev,next today', //positions the the prev/next button on the right
        center: 'title', //sets the title of the month to center
        left: 'month,basicWeek,basicDay' //positions the the prev/next button on the left
      },
      defaultDate: '2018-02-16',
      navLinks: true, // click on day/week names to navigate views
      editable: true,
      eventLimit: true, // add "more" link when there are too many events in a day
      events: [
        {
          title: 'Create 2 Post on Steemit', // title of an event
          start: '2018-02-05' // date of an event
        },
        {
          title: 'Attend Steemit Meetup',
          start: '2018-02-16',
          end: '2018-02-18'
        },
        {
          id: 999,
          title: 'Repeating Event',
          start: '2018-02-07T16:00:00'
        },
        {
          id: 999,
          title: 'Repeating Event',
          start: '2018-02-14T16:00:00'
        },
        {
          title: 'Visit Utopian-io',
          url: 'http://utopian.io/',
          start: '2018-02-20'
        }
      ]
    });

  });
  </script>
</body>
</html>
Curriculum
Some of my previous works are;
- How to Create a Spreadsheet component using HTML5 and JavaScript
- How to introduce new feature to users of your application using Bootstrap Tour
- How to Create a quick and beautiful landing page using Bootstrap-4
Posted on Utopian.io - Rewarding Open Source Contributors
Thank you for the contribution. It has been approved.
You can contact us on Discord.
[utopian-moderator]
It’s not meant to be links. The Preview are shown in the screenshots I provided below. I will use another phrase/term next time. Thank you!
Hey @manishmike10, I just gave you a tip for your hard work on moderation. Upvote this comment to support the utopian moderators and increase your future rewards!
You are a professor, this is more than a tutorial. Thanks
Professor? Lol... not close. Thank you for stopping by.
Bro you need to go for a PhD straight away.. Wow!
PhD?! I don’t even have my MSc. yet lol. Thank you for stopping by.
I wanna go grab my laptop right now, let get this thing done.
Haha... you should. Thank you for stopping by
It looks cimplex a bit but great post.you are a genius
Thanks for sharing
@aliyu-s without doubt it is obvious that you are a programmer and a code man. Since my sign up on steemit i have learnt a few of them.
Your tutorial is great via your lines.. I will have to bookmark this to visit again because is like telling an accountant to go do someone operation in the theatre room..
Thanks for the piece.
I have upvoted your work.
Regards
wow! Thank you for this word of encouragement and support. You really made my day. I’m glad that you’re enjoying it.
Good luck! I wish you a successful operation haha..
Hey @aliyu-s I am @utopian-io. I have just upvoted you!
Achievements
Suggestions
Get Noticed!
Community-Driven Witness!
I am the first and only Steem Community-Driven Witness. Participate on Discord. Lets GROW TOGETHER!
Up-vote this comment to grow my power and help Open Source contributions like this one. Want to chat? Join me on Discord https://discord.gg/Pc8HG9x