Developing Live Weather application with Bash and OpenWeatherMap API - tutorial for beginners and programming enthusiasts

Before the start of developing
This is my first tutorial about programming ever. I will be trying to explain everything as simple as possible, step-by-step. If are you software engineer or total beginner I hope it will be interesting and valuable article for you. As the title suggests we will be creating Live Weather application in bash. Why? I have started IT engineering studies last year and my exercise was to build similiar application using bash so I find it is a good idea to show you my work and teach you something new.
First step - application concept
The goal is to build an app that shows current weather for chosen city. There are instructions our final product will be doing, which we have to implement:
- Executing with arguments- app user has to give some details like location (otherwise app will use default location), if dynamic updates are allowed (true or false) and expected degrees (Fahrenheit or Celsius).
- Downloading data- most important part of app. Before data are shown there is a need to download it and then display on the screen. We will use OpenWeatherMap API to receiving information about weather every 10 minutes.
- Saving data to file- we would not like download data every second when it is not necessary, so we will use file to keep receceived records.
- Displaying weather- last thing our app have to do is to show weather, with easy-to-understand visual effects.
What do we need?
Things we need to start developing:
Linux bash shell
If your operating system is Windows you have to install it. How?. Personally I prefer working with Linux installed on VPS Server I am paying about $5 monthly.
OpenWeatherMap API key
API key is a password which gives access to OpenWeatherMap API. You can create account on OpenWeatherMap here. After account is created go to Home -> API keys tab. Now you should see Dasboard tab with your API Key.
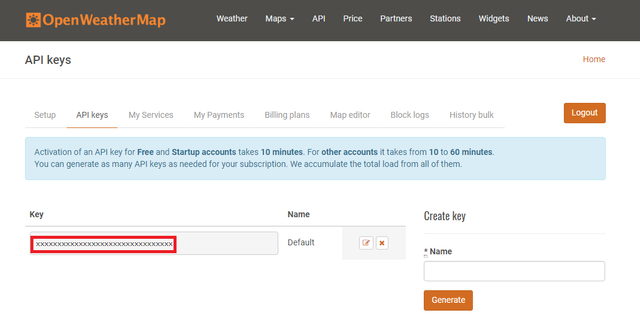
As you can read: Activation of an API key for Free and Startup accounts takes 10 minutes.
Jq (to parse JSON data)
Data downloaded from OpenWeatherMap must be parsed to extract records we need. Jq is very helpful here. If you have not installed Jq open Linux bash shell and use following command:
sudo apt-get install jq
Notepad++
It will help us while writing code by making it more readable. Download here.
Everything done?
Now you can ask "why do I need Notepad++?" The answer is: we need source code editor to create and then run our app on PC or VPS. OK. Let's code!
Notepad preparing
- Open Notepad++ and create new project (File -> New).
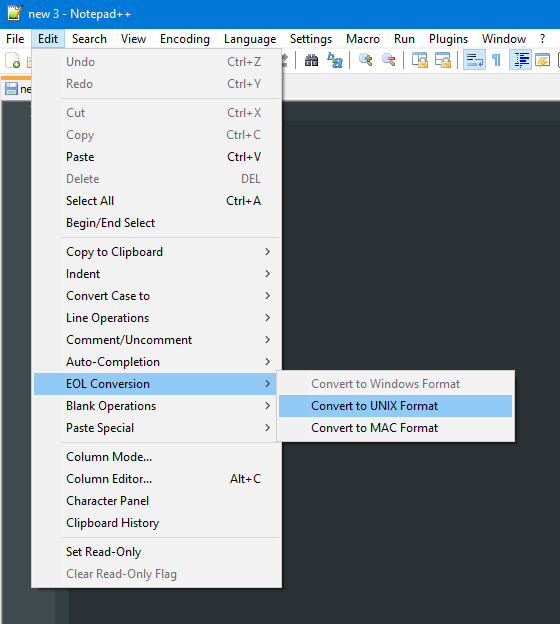
- Use Edit tab to change EOL (End of Line encoding) to Unix. It is vital to avoid some errors later while executing.
- Change Language to Shell (Language tab -> S -> Shell).
Coding
Now, according to aplication concept, first step is Executing with arguments. In order to make it more clear look:
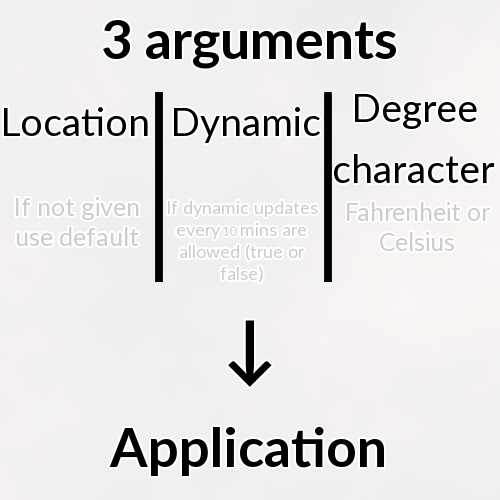
Don't worry, It is easy to implement.
First lines
Let's write some code in already created notepad++ file:
#!/bin/bash
apiKey="xxxxxxxxxxxxxxxxxxxxxxxxxxxxxxx"
defaultLocation="Warsaw"
dynamicUpdates=0
degreeCharacter="c"
data=0
lastUpdateTime=0
Explanation: first line is called a shebang tells the shell about program we want to use when executed. Then we have a few variables:
apiKey- put your API Key between quotes. It is string (text) variable.
defaultLocation- if there is no given location by user app will use this location.
dynamicUpdates- 0 means false, 1 is true. By deafult updates were disabled.
degreeCharacter- allowed values are: f (Fahrenheit) or c (Celsius). It is char (character) variable.
data and lastUpdateTime are temporary empty. data variable keeps downloaded data, while lastUpdateTime holds last update time.
Options
Now we have to implement options as easy access to app settings. I have mentioned about options several times. But what exactly are they? When we want to run bash script we have to use command. It looks like:
. LiveWeather.sh -l Berlin -d -f
It is possible to use following commands:
. LiveWeather.sh -l Berlin -f -d
. LiveWeather.sh -l Berlin -f
. LiveWeather.sh -l Belgium -d
. LiveWeather.sh -l Belgium
. LiveWeather.sh
And the like...
Explanation: In order to execute app we use command ". NAME.sh", then it is possible to insert options.
As you can see above every option is preceded by minus (-), expect word Berlin, because it is argument of option. The order of arguments doesn't matter, but argument of option always must be placed after option.
Differences at runtime
I would like to clarify differences between running app with options like:
. LiveWeather.sh -l Berlin -f -d
App will be displaying weather for Berlin with dynamic updates and Fahrenheit degrees. It means default setting will be replaced with:
defaultLocation="Berlin"
dynamicUpdates=1
degreeCharacter="f"
Next sample:
. LiveWeather.sh
App will be displaying weather for default location, with Celsius degrees and dynamic updates disabled.
I hope now you undertand what options consist of.
Back to code
Go back to Notepad++ and write down this code at the end:
while [ $# -gt 0 ]
do
option="$1"
    case $option
    in
    -l) defaultLocation="$2"
    shift
    shift ;;
    -d) dynamicUpdates=1
    shift ;;
    -f) degreeCharacter="f"
    shift ;;
    esac
done
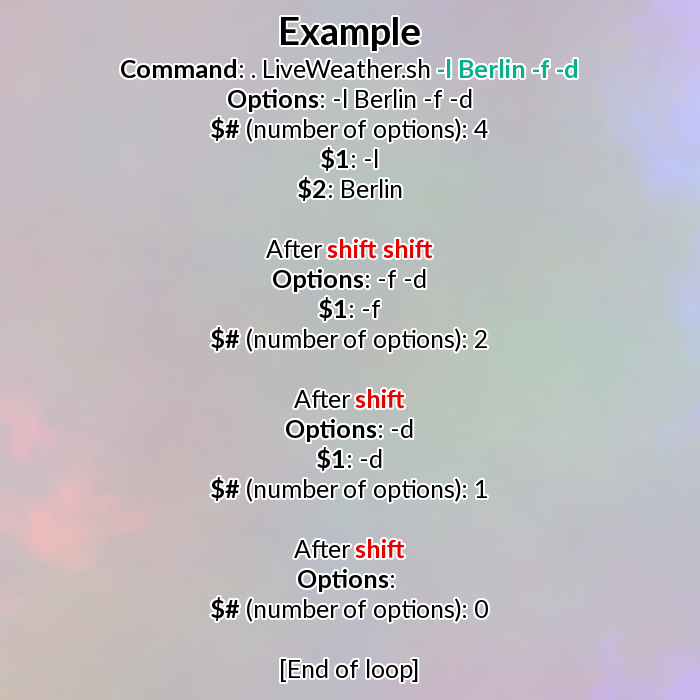
We have some new interesting points here. At the beginning of this part of code is "while ... do". While ... do ... done is a loop which executes some code as long as condition between brackets is true.
$#- at the runtime it contains information about number of given options.
-gt- means "greather than"
To sum up, while [ $# -gt 0 ] means: as long as number of given options is greather than 0 do commands between do ... done.
As you can see each time block inside do ... done is processed option variable is getting new value $1. It is first given option.
Then there is case ... in ... esac statements. It is great for managing options. When options were provided to app, there must be a way to process it if we want to use them. Every option will be used in other way so thanks to case ... esac statement we can do it very easy: after option gets new value, check it and do something if equal to: -l, -d or -f.
$2- second given option. We use it only if current option is -l (location), because there is argument of option after it.
shift- removes first option from options list ($#).
Downloading and storing data
Next step we have to focus on is data processing, in other worlds how to download and store it. Look at this code and insert it at the end of project:
dataPath="/tmp/wth-$defaultLocation.json"
if [ ! -e $dataPath ];
then
    touch $dataPath
    data=$(curl "http://api.openweathermap.org/data/2.5/weather?q=$defaultLocation&units=metric&appid=$apiKey")
    echo $data > $dataPath
else
    data=$(cat $dataPath)
fi
lastUpdateTime=$(($(date +%s) -600))
while true
do
lastfileupdate=$(date -r $dataPath +%s)
if [ $(($(date +%s)-$lastfileupdate)) -ge 600 ];
then
data=$(curl -s "http://api.openweathermap.org/data/2.5/weather?q=$defaultLocation&units=metric&appid=$apiKey")
echo $data > $dataPath
fi
if [ $(($(date +%s)-$lastUpdateTime)) -ge 600 ];
then
lastUpdateTime=$(date +%s)
clear
dataPath- string variable with path where we will keep our data, different for each location, contains location name. Path is: tmp (directory) -> wth-Location.json (data file). For example path for Warsaw is: /tmp/wth-Warsaw.json.
Line below contains if then ... else ... fi statement. It check if file with data for chosen location already exists. If created, data from file are being placed into data variable, otherwise file will be created, then using curl downloads data and save to created file using redirection (>).
lastUpdateTime- keeps as Unix Timestamp (by adding +%s option) last time when data were received. For example timestamp for 01/04/2018 @ 3:37pm (UTC) is 1515080278. OK, but why is -600 there? It's neccessary to enforce first update after execute. 600 seconds = 10 minutes. This way we are cheating and script thinks it's time for update (in thic case displays current weather). If there would not be -600 we would have to wait 10 mins for first update. Of course there are other ways to solve this issue. :)
Next while loop is called "infinite loop", because condition while true is always true. If dynamic updates are disabled, this loop will happen only once, otherwise it will work as long as user wants.
lastfileupdate- keeps as Unix Timestamp last time when data file were modified (by adding -r option and path as argument of option).
Then there are two conditions. First checks if file was updated 10 or more minutes ago (date +%s returns current time as timestamp). If false downloads data and save it to path. Second condition checks if app was updated 10 or more minutes ago. If false replaces value of lastUpdateTime with current time.
clear- clears terminal screen before displaying new data.
$(something)- returns output of something
$((something))- returns output of math operations of something
Reading and displaying data with effects
Add the code below:
echo -e '\033[0;30m\033[46m'$(echo $data | jq -r .name)'('$(echo $data | jq -r .coord.lon)','$(echo $data | jq -r .coord.lat)')''\033[40m\033[0m', $(echo $data | jq -r .sys.country)
echo $(echo $data | jq -r .weather[].main)
tempinc=$(echo $data | jq -r .main.temp)
tempcolour=97
if [ $(echo "$tempinc < 0" | bc) -eq 1 ];
then
tempcolour=94
elif [ $(echo "$tempinc >=0 && $tempinc < 10" | bc) -eq 1 ];
then
tempcolour=96
elif [ $(echo "$tempinc >= 10 && $tempinc < 20" | bc) -eq 1 ];
then
tempcolour=92
elif [ $(echo "$tempinc >=20 && $tempinc < 30" | bc) -eq 1 ];
then
tempcolour=93
else
tempcolour=91
fi
temperature=$tempinc
if  [ "$degreeCharacter" = "f" ]
then
temperature=$(echo 32+1.8*$tempinc | bc)
fi
echo -e '\033[0;'$tempcolour'm'$(echo $temperature)\\033[0m °${degreeCharacter^^}
wind=$(echo $data | jq .wind.deg)
winddir=$((2193-(${wind%.*}+45)/90))
if [ $winddir -eq 2192 ];
then
winddir=2190
elif [ $winddir -eq 2190 ];
then
winddir=2192
else
:
fi
echo- prints text on the screen. Thanks to -e option we are able to use visual effects.
echo $data | jq -r .name- sends data to jq (by |) script to exact .name value (city name). If you haven't working with API I think it will help you: that's how data variable looks like (example):
{
  "coord": {
    "lon": 21.01,
    "lat": 52.23
  },
  "weather": [
    {
      "id": 803,
      "main": "Clouds",
      "description": "broken clouds",
      "icon": "04n"
    }
  ],
  "base": "stations",
  "main": {
    "temp": 7,
    "pressure": 998,
    "humidity": 75,
    "temp_min": 7,
    "temp_max": 7
  },
  "visibility": 10000,
  "wind": {
    "speed": 4.6,
    "deg": 200
  },
  "clouds": {
    "all": 75
  },
  "dt": 1515081600,
  "sys": {
    "type": 1,
    "id": 5374,
    "message": 0.0032,
    "country": "PL",
    "sunrise": 1515048267,
    "sunset": 1515076689
  },
  "id": 756135,
  "name": "Warsaw",
  "cod": 200
}
tempinc- decimal variable that keeps exacted value of current temperature in Celsius degrees.
\033[0;30m\033[46m and similiar- special codes for colouring text. Complete list of possible foreground and background effects you can find here.
tempcolour- in default 97 because after when it will be concatenated to '\033[0;97m' code it will change text colour to white.
Afterwards there are if statements. Depending on current temperature (tempinc) value of tempcolour will be replaced with code:
| Temperature (in Celsius) | Code (colour) |
|---|---|
| Under 0 | 94 (Blue) |
| Between 0 and 9 | 96 (Cyan) |
| Between 10 and 19 | 92 (Green) |
| Between 20 and 29 | 93 (Yellow) |
| Above 29 | 91 (Red) |
temperature- copies current temperature in Celsius from tempinc variable, in order to calculate Fahrenheit degrees if selected character is equal f (next if statement).
bc- when there is need of using floating-point value it's necessary.
Then thanks to echo temperature will be displayed.
${degreeCharacter^^}- changes character to upper case (f -> F).
wind- keeps value of wind direction (in degrees).
winddir- keeps calculated value of 2193-(wind value without decimal places+45)/90. 2193 is code of down arrow (↓). This value will be changed to one of arrows, depending on wind value.
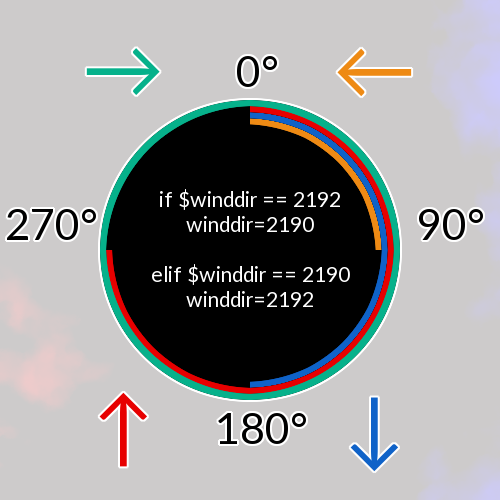
:- "do nothing"
It's time for wind speed and colouring:
windkph=$(echo $data | jq .wind.speed)
windcolour=97
if [ $(echo "$windkph >= 0 && $windkph < 10" | bc) -eq 1 ];
then
windcolour=92
elif  [ $(echo "$windkph >= 10 && $windkph < 20" | bc) -eq 1 ];
then
windcolour=93
elif  [ $(echo "$windkph >= 20 && $windkph <= 30" | bc) -eq 1 ];
then
windcolour=32
else
windcolour=91
fi
windkph- wind speed in km/h.
windcolour- similarly as tempcolour, will ebe used to change colour of wind speed on display thanks to ifs.
| Wind speed (in km/h) | Code (colour) |
|---|---|
| Between 0 and 9 | 92 (Green) |
| Between 10 and 19 | 93 (Yellow) |
| Between 20 and 30 | 32 (Dark green) |
| Above 30 | 91 (Red) |
And the last part of code:
echo -e \\u$winddir '\033[0;'$windcolour'm'$windkph\\033[0m km/h
echo $(echo $data | jq .main.pressure) hPa
echo Humidity: $(echo $data | jq .main.humidity)%
echo Cloud coverage: $(echo $data | jq .clouds.all)%
fi
if [ $dynamicUpdates -eq 0 ];
then
break
fi
done
A few echos in order to display wind speed, pressure, humidity and cloud coverage.
break- ends loop
In if statement above if dynamic updates are not enabled the loop will be ended immediately.
At now you can save the project as LiveWeather.sh.
There is complete code:
#!/bin/bash
apiKey="xxxxxxxxxxxxxxxxxxxxxxxxxxxxxxx"
defaultLocation="Warsaw"
dynamicUpdates=0
degreeCharacter="c"
data=0
lastUpdateTime=0
while [ $# -gt 0 ]
do
option="$1"
    case $option
    in
    -l) defaultLocation="$2"
    shift
    shift ;;
    -d) dynamicUpdates=1
    shift ;;
    -f) degreeCharacter="f"
    shift ;;
    esac
done
dataPath="/tmp/wth-$defaultLocation.json"
if [ ! -e $dataPath ];
then
    touch $dataPath
    data=$(curl "http://api.openweathermap.org/data/2.5/weather?q=$defaultLocation&units=metric&appid=$apiKey")
    echo $data > $dataPath
else
    data=$(cat $dataPath)
fi
lastUpdateTime=$(($(date +%s) -600))
while true
do
lastfileupdate=$(date -r $dataPath +%s)
if [ $(($(date +%s)-$lastfileupdate)) -ge 600 ];
then
data=$(curl -s "http://api.openweathermap.org/data/2.5/weather?q=$defaultLocation&units=metric&appid=$apiKey")
echo $data > $dataPath
fi
if [ $(($(date +%s)-$lastUpdateTime)) -ge 600 ];
then
lastUpdateTime=$(date +%s)
clear
echo -e '\033[0;30m\033[46m'$(echo $data | jq -r .name)'('$(echo $data | jq -r .coord.lon)','$(echo $data | jq -r .coord.lat)')''\033[40m\033[0m', $(echo $data | jq -r .sys.country)
echo $(echo $data | jq -r .weather[].main)
tempinc=$(echo $data | jq -r .main.temp)
tempcolour=97
if [ $(echo "$tempinc < 0" | bc) -eq 1 ];
then
tempcolour=94
elif [ $(echo "$tempinc >=0 && $tempinc < 10" | bc) -eq 1 ];
then
tempcolour=96
elif [ $(echo "$tempinc >= 10 && $tempinc < 20" | bc) -eq 1 ];
then
tempcolour=92
elif [ $(echo "$tempinc >=20 && $tempinc < 30" | bc) -eq 1 ];
then
tempcolour=93
else
tempcolour=91
fi
temperature=$tempinc
if  [ "$degreeCharacter" = "f" ]
then
temperature=$(echo 32+1.8*$tempinc | bc)
fi
echo -e '\033[0;'$tempcolour'm'$(echo $temperature)\\033[0m °${degreeCharacter^^}
wind=$(echo $data | jq .wind.deg)
winddir=$((2193-(${wind%.*}+45)/90))
if [ $winddir -eq 2192 ];
then
winddir=2190
elif [ $winddir -eq 2190 ];
then
winddir=2192
else
:
fi
windkph=$(echo $data | jq .wind.speed)
windcolour=97
if [ $(echo "$windkph >= 0 && $windkph < 10" | bc) -eq 1 ];
then
windcolour=92
elif  [ $(echo "$windkph >= 10 && $windkph < 20" | bc) -eq 1 ];
then
windcolour=93
elif  [ $(echo "$windkph >= 20 && $windkph <= 30" | bc) -eq 1 ];
then
windcolour=32
else
windcolour=91
fi
echo -e \\u$winddir '\033[0;'$windcolour'm'$windkph\\033[0m km/h
echo $(echo $data | jq .main.pressure) hPa
echo Humidity: $(echo $data | jq .main.humidity)%
echo Cloud coverage: $(echo $data | jq .clouds.all)%
fi
if [ $dynamicUpdates -eq 0 ];
then
break
fi
done
Executing script
Open your Linux bash shell and use sample command:
. LiveWeather.sh -l Berlin -d -f
Now you can be proud of yourself. :)
Conclusion
I have learnt a lot during creating this project and preparing such big mega-tutorial. I hope it will interesting post for you and it has improve yours knowledge. Let me know if you are interested in articles like this, so I will be posting more tutorials.
I will be very thankful for upvotes, comments and resteems. Thanks!
Dziękuję panu, właśnie zabieram się do nauki. :)
Its time to make some code. ;_;
Nie panu, jestem tylko studentem.
Bardzo się cieszę, że Cię zmotywowałem. :)
Awesome! :)
Thanks!
$archerbest = "really helpful tutorial please upload more like that";
echo $archerbest;
?>
Thank you. :)
Stay tuned.
welcome following you
Thanks
i like to read your post telling about an app. it's something extraordinary.
Thank you. :)
Congratulations @archerbest, this post is the most rewarded post (based on pending payouts) in the last 12 hours written by a Dust account holder (accounts that hold between 0 and 0.01 Mega Vests). The total number of posts by Dust account holders during this period was 9581 and the total pending payments to posts in this category was $4237.20. To see the full list of highest paid posts across all accounts categories, click here.
If you do not wish to receive these messages in future, please reply stop to this comment.
i will try an make a personal weather app thanks for this