Getting Started with wxWidgets on macOS (wxMac)
In this post, I will be documenting how to get up and running with wxWidgets on macOS. Official online documentation on this subject is somewhat sparse, and I want to make it easier for less experienced developers to develop cross-platform native apps.
To start, download the latest wxMac here. For this tutorial, I will be using wxWidgets 3.1.1. The download is in the form of a tarball. Extract it. Notice that we find some documentation in ./wxWidgets-3.1.1/docs/osx/
wxWidgets for OS X installation
wxWidgets can be compiled using Apple's Cocoa library.
Most OS X developers should start by downloading and installing Xcode
from the App Store. It is a free IDE from Apple that provides
all of the tools you need for working with wxWidgets.
After Xcode is installed, download wxWidgets-{version}.tar.bz2 and then
double-click on it to unpack it to create a wxWidgets directory.
Next use Terminal (under Applications, Utilities, Terminal) to access a command
prompt. Use cd to change directories to your wxWidgets directory and execute
the following sets of commands from the wxWidgets directory.
mkdir build-cocoa-debug
cd build-cocoa-debug
../configure --enable-debug
make
Build the samples and demos
cd samples; make;cd ..
cd demos; make;cd ..
After the compilation completes, use Finder to run the samples and demos
Go to build-cocoa-debug/samples to experiment with the Cocoa samples.
Go to build-cocoa-debug/demos to experiment with the Cocoa demos.
Double-click on the executables which have an icon showing three small squares.
The source code for the samples is in wxWidgets/samples
The source code for the demos is in wxWidgets/demos
Okay, it is finished. A few warnings, but no errors. What next? Back to the docs.
After the compilation completes, use Finder to run the samples and demos
Go to build-cocoa-debug/samples to experiment with the Cocoa samples.
Go to build-cocoa-debug/demos to experiment with the Cocoa demos.
Double-click on the executables which have an icon showing three small squares.
The source code for the samples is in wxWidgets/samples
The source code for the demos is in wxWidgets/demos
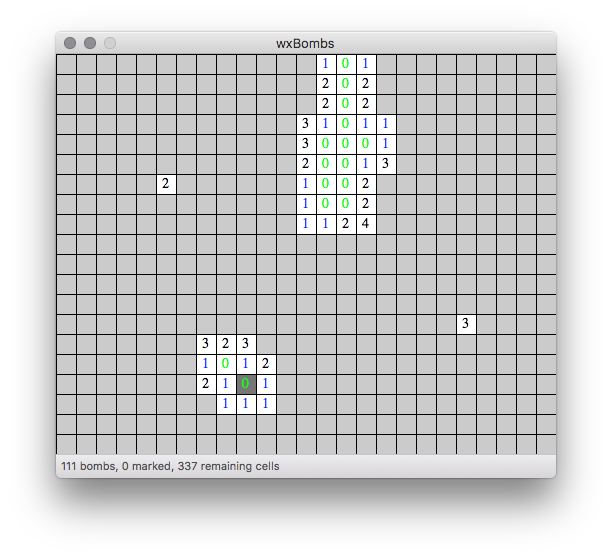
Well, there it is. We have Minesweeper running via wxWidegts—cool!

Posted from my blog with SteemPress : https://blog.coryatech.com/2018/07/18/getting-started-with-wxwidgets-on-macos-wxmac/
wxWidgets can be compiled using Apple's Cocoa library.
Most OS X developers should start by downloading and installing Xcode
from the App Store. It is a free IDE from Apple that provides
all of the tools you need for working with wxWidgets.
After Xcode is installed, download wxWidgets-{version}.tar.bz2 and then
double-click on it to unpack it to create a wxWidgets directory.
Next use Terminal (under Applications, Utilities, Terminal) to access a command
prompt. Use cd to change directories to your wxWidgets directory and execute
the following sets of commands from the wxWidgets directory.
mkdir build-cocoa-debug
cd build-cocoa-debug
../configure --enable-debug
make
Build the samples and demos
cd samples; make;cd ..
cd demos; make;cd ..
After the compilation completes, use Finder to run the samples and demos
Go to build-cocoa-debug/samples to experiment with the Cocoa samples.
Go to build-cocoa-debug/demos to experiment with the Cocoa demos.
Double-click on the executables which have an icon showing three small squares.
The source code for the samples is in wxWidgets/samples
The source code for the demos is in wxWidgets/demos
Okay, it is finished. A few warnings, but no errors. What next? Back to the docs.
After the compilation completes, use Finder to run the samples and demos Go to build-cocoa-debug/samples to experiment with the Cocoa samples. Go to build-cocoa-debug/demos to experiment with the Cocoa demos. Double-click on the executables which have an icon showing three small squares. The source code for the samples is in wxWidgets/samples The source code for the demos is in wxWidgets/demosWell, there it is. We have Minesweeper running via wxWidegts—cool!

Posted from my blog with SteemPress : https://blog.coryatech.com/2018/07/18/getting-started-with-wxwidgets-on-macos-wxmac/
✅ @stevecorya, I gave you an upvote on your post!
If you are interested in claiming free Byteballs ($10+), just for having a Steem account, please visit this post for instructions: https://steemit.com/steem/@berniesanders/do-you-want-some-free-byteballs
Congratulations @stevecorya! You received a personal award!
You can view your badges on your Steem Board and compare to others on the Steem Ranking
Do not miss the last post from @steemitboard:
Vote for @Steemitboard as a witness to get one more award and increased upvotes!