Build your own Super Computer with Raspberry Pi 3 Cluster
Raspberry pi is a single-board Linux-powered computer. They feature a 1 ghz ARM processor and include Video core IV GPUs. Model B, which is using, has 1GB of RAM, two USB ports, and a 10/100 Base T Ethernet port. For this project, overclocked the processor to 1GHz.
In this quick article, I’ll show you how to create your own Raspberry Pi parallelism through the MPI (Message Passing Interface) library. Due to the low price of the Raspberry Pi, we can now build this system without spending too much. Please see the list of items below that you will need and the entire package is priced with 4 Pi.
Building the cluster of Rpi’s
Build your own Super Computer with Raspberry pi 3 Cluster
The material that you will need is listed below with links included:
Hardware Requirements
4 x Raspberry Pi 3 model B = 4 x $35 = $120
4 x 16Gb microSD card (Kingston) = 4 x $4.84 = $19.36
4 x USB to Micro USB Cable 0.5m = 4 x $0.88 = $3.5
2 x Multi-Pi Stackable Raspberry Pi Case = 2 x $13 = $26
1 x 5 port desktop switch = 1 x $6.49 = $6.49
5 x Ethernet patch cable 0.3m = 5 x $2.90 = $14.5
1 x USB Hub = 1 x $2.53 = $2.53
Build your own Super Computer with Raspberry pi 3 Cluster
Total = $195.38 (without considering delivery)
*This is a common configuration but you can start with just 2 or 3 RPi’s and keep adding hardware later on.
Once all the components are assembled using the stackable case you should have something like the image below:
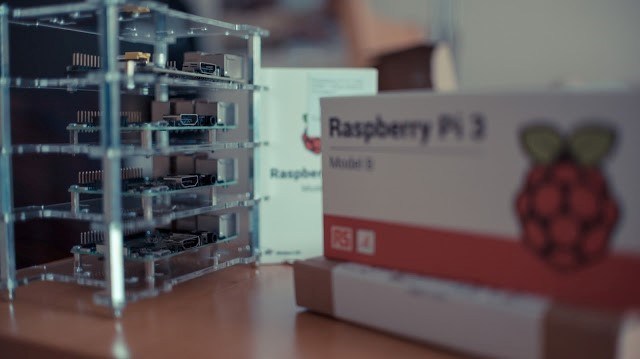
Below the image of my cluster up and running (see configuration section for more):
Build your own Supper Computer with Raspberry pi 3 Cluster
Configuring your cluster of RPi’s
The phenomena is to configure one of the RPi’s and then just clone the micro SD card and plug it to the next Raspberry pi . Here you’ll find a summary description of the steps to do to get you up and running:
Installing the OS
Download Raspbian image. I had some trouble downloading the zip file so I used the torrent link instead.
How to Build your own Super Computer with Raspberry pi 3 Cluster
NOOB Question? if you do not know how to install Rasbian Operating System in Raspberry pi then please Visit my previous tutorial so then you will come to know how to install a basic Rasbian (OS) in raspberry pi. How To install NOOB in Raspberry Pi
Login to your raspberry pi as: pi and password: raspberry (each Rpi uses same login/password)
Download PuTTY SSH client to connect to our Rpi’s with IP Address.
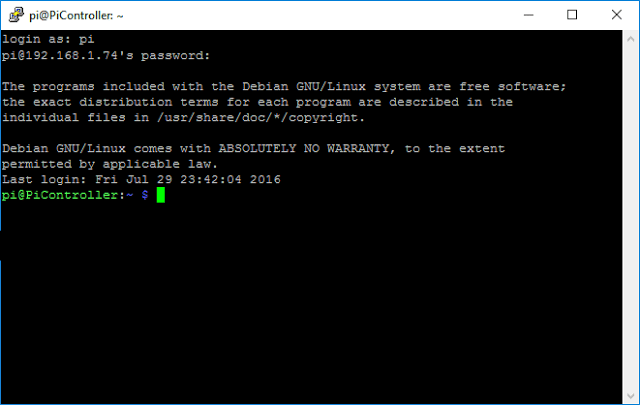
Type: sudo raspi-config to configure our device:
Visit to Expand File System
Visit to Advanced Options -> HostName -> set it to PiController
Visit to Advanced Options -> MemorySplit -> set it to 16.
Visit to Advanced Options -> SSH -> Enable.
Finish and leave the configuration.
So let’s just start installing MPICH3 and MPI4PY. So this project will take about to more than 4hour so arrange some free time for make it complete.
Installing MPICH3
update the system
sudo apt-get update
update packages
sudo apt-get dist-upgrade
create the folder for mpich3
sudo mkdir mpich3
cd ~/mpich3
download the version 3.2 of mpich
sudo wget http://www.mpich.org/static/downloads/3.2/mpich-3.2.tar.gz
unzip it
sudo tar xfz mpich-3.2.tar.gz
create folders for mpi
sudo mkdir /home/rpimpi/
sudo mkdir /home/rpimpi/mpi-install
mkdir /home/pi/mpi-build
install gfortran
sudo apt-get install gfortran
configure and isntall mpich
sudo /home/pi/mpich3/mpich-3.2/configure -prefix=/home/rpimpi/mpi-install
sudo make
sudo make install
edit the bash script using nano editor that runs everytime the Pi starts
cd ..
nano .bashrc
Add the following to the end of the file
PATH=$PATH:/home/rpimpi/mpi-install/bin
to save the details press “CTRL + ^x” -> using CTRL 6 and x
press “y” and hit enter to leave.
Reboot the Pi
sudo reboot
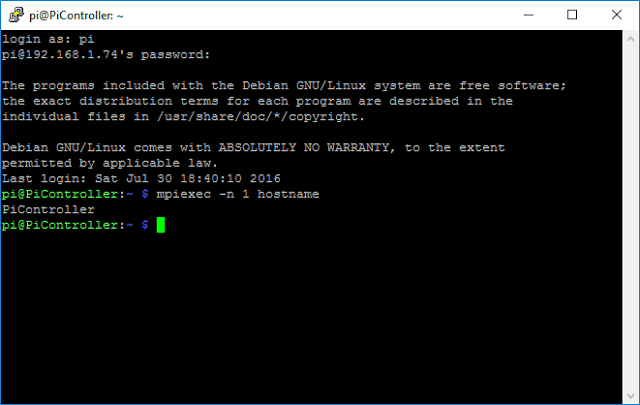
Test that MPI works
mpiexec -n 1 hostname
And once all the step has set this will show in terminal of putty
Installing MPI4PY
#Follow These steps to make it complete
download mpi4py
wget https://bitbucket.org/mpi4py/mpi4py/downloads/mpi4py-2.0.0.tar.gz
#unzip the file
sudo tar -zxf mpi4py-2.0.0.tar.gz
Visit to the directory
cd mpi4py-2.0.0
install python-dev package
sudo aptitude install python-dev
run the setup
python setup.py build
sudo python setup.py install
Set the python path
export PYTHONPATH=/home/pi/mpi4py-2.0.0
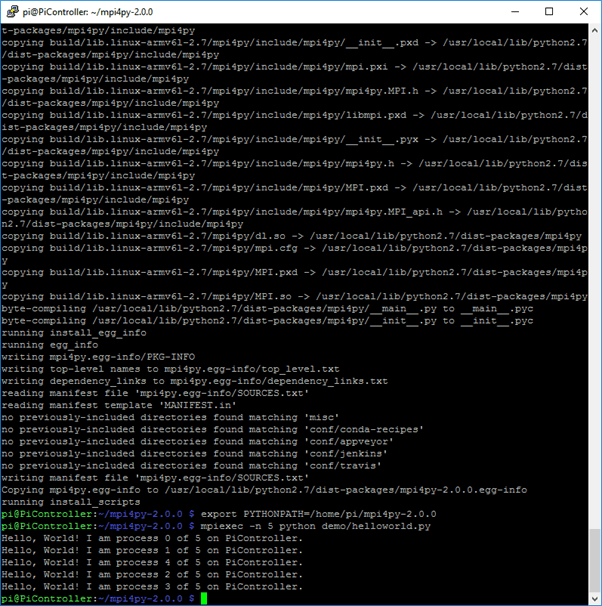
Test that MPI works on your device
mpiexec -n 5 python demo/helloworld.py
After it this will be showed in the terminal of putty
Now we are just finished the first raspberry pi so after please do the same step for every Raspberry PI,
Do the following for every new RPi added into the network:
pi01:
scan the network for a newly added device to find its IP address using a network scanner. Once you got the IP Address use PuTTY to access it and use the commands below to set it up:
Type: sudo raspi-config to configure our device:
Visit to Expand File System
Visit to Advanced Options -> HostName -> set it to pi01
Visit to Advanced Options -> MemorySplit -> set it to 16.
Visit to Advanced Options -> SSH -> Enable.
Finish and leave the configuration.
sudo reboot.
After All done 4 Raspberry pi Terminal will showed Like this

Once completed, each Rpi will have its own IP. So after it you need now to store every IP address into a host file besides known as machinefile. That file contains the hosts which will start the process of clustering.
Visit to your first RPi and type:
nano machinefile
and complement the following IP addresses: (Note that you will have to add your own such ip address ):
Configuring SSH keys for each RPi
So after it we need to be able to order each RPi without user / password. So after it, we must have to spawn SSH keys for each RPi and then share each key to each device under the licensed device raspberry pi. This is how MPI can talk with each device without having to worry about credentials. So that Process is monotonous, but once done, you will be able to run MPI without any difficulties.
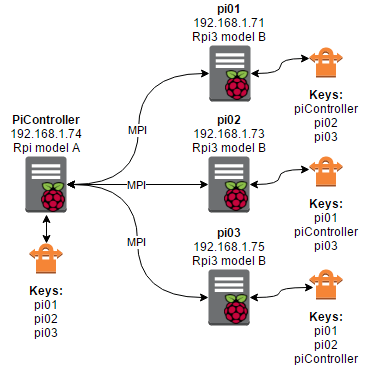
Run the following commands from the first Pi (PiController):
PiController (192.168.1.74)
ssh-keygen
cd ~
cd .ssh
cp id_rsa.pub PiController
pi01 (192.168.1.71)
ssh-keygen
cd .ssh
cp id_rsa.pub pi01
scp 192.168.1.74:/home/pi/.ssh/PiController .
cat PiController >> authorized_keys
exit
pi02 192.168.1.73
ssh-keygen
cd .ssh
cp id_rsa.pub pi02
scp 192.168.1.74:/home/pi/.ssh/PiController .
cat PiController >> authorized_keys
exit
pi03 192.168.1.75
ssh-keygen
cd .ssh
cp id_rsa.pub pi03
scp 192.168.1.74:/home/pi/.ssh/PiController .
cat PiController >> authorized_keys
exit
After putting the commands
So after it, we have to configure the link between Pi Controller to each device, but we still need another configuration. So you will have to run the following command from each individual device:
run this from PiController using PuTTY
cd ~
cd .ssh
scp 192.168.1.71:/home/pi/.ssh/pi01 .
cat pi01 >> authorized_keys
scp 192.168.1.73:/home/pi/.ssh/pi02 .
cat pi02 >> authorized_keys
scp 192.168.1.75:/home/pi/.ssh/pi03 .
cat pi03 >> authorized_keys
run this from pi01 using PuTTY
cd ~
cd .ssh
scp 192.168.1.73:/home/pi/.ssh/pi02 .
cat pi02 >> authorized_keys
scp 192.168.1.75:/home/pi/.ssh/pi03 .
cat pi03 >> authorized_keys
run this from pi02 using PuTTY
cd ~
cd .ssh
scp 192.168.1.71:/home/pi/.ssh/pi01 .
cat pi01 >> authorized_keys
scp 192.168.1.75:/home/pi/.ssh/pi03 .
cat pi03 >> authorized_keys
run this from pi03 using PuTTY
cd ~
cd .ssh
scp 192.168.1.71:/home/pi/.ssh/pi01 .
cat pi01 >> authorized_keys
scp 192.168.1.73:/home/pi/.ssh/pi02 .
cat pi02 >> authorized_keys
Inspect each authorized_keys file on each device and you will see the keys there for every device
Open The Authorizer key you will see more keys
open the authorized_keys files and you will see the additional keys there. Separately authorized_keys file on single device should contain 3 keys as I mention the diagram above
LET’s Test the Ready System
So keep that in your mind if your IP address changes, the keys will not be valid for the clustering and all the steps will have to be repeated.
TEST Cluster
If everything is configured correctly as I mention above, and all the following command should work correctly:
mpiexec -f machinefile -n 4 hostname
So after it you can see that every Device has ping you back with this link and every key is used without trouble.
Please Run the Following Command Called with Hello
mpiexec -f machinefile -n 4 python /home/pi/mpi4py-2.0.0/demo/helloworld.py
You will see something as I attach the image below
I used 6 Raspberry pi 3 in this Cluster video. But You Can Add More Raspberry Pi for make it more powerful,
Cheers ! Feel Free to ask question about it.
Stay Connected with Tech Geeks:
It was interesting to read! I will subscribe to your blog!
thank you :)