Practical Astronomy
Measuring the distance to the moon
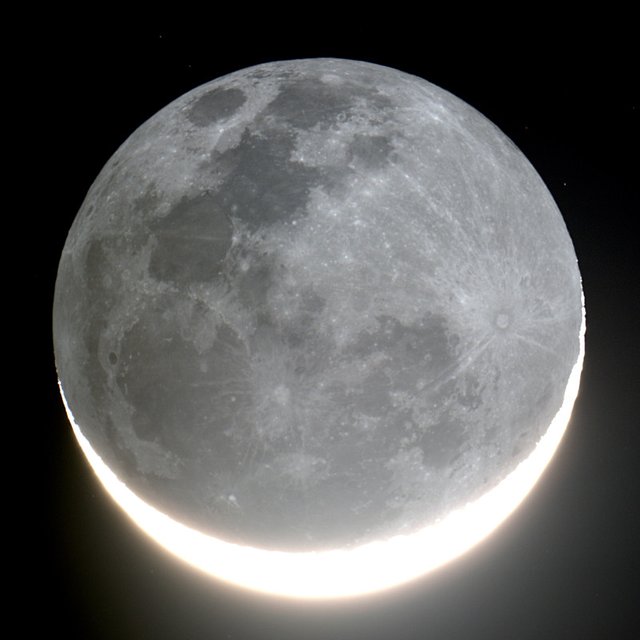
Taken with an Olympus OMD EM5 and SMC 200mm lens in August 2016. A photo like this can be used to estimate the moon's distance. This article explains how
This is the start of what I plan to be an ongoing series on practical astronomy which is focused on how anyone, with modest equipment, can make useful and interesting astronomical observations. We will examine how parallax measurements can be used to measure the distance to the moon. The technique can be expanded to other objects such as satellites, planets and even the stars.
It turns out there is a good opportunity in the eastern hemisphere on March 13 to observe the moons parallax as it passes through Hyades open star cluster. I will provide details of an observing campaign that has been organised for that evening (I also encourage Australian, Indonesian, NZ and Japanese Steemians to participate - see details below).
Parallax
Parallax is a perspective effect that causes nearby objects to displace more than distant objects as the observer moves. We see this all the time in real life, and our own vision uses parallax to gain depth perception. In the following clip the foreground trees speed past the car window, while the mountain in background remains almost fixed. The trees are displaying parallax relative to the mountain.
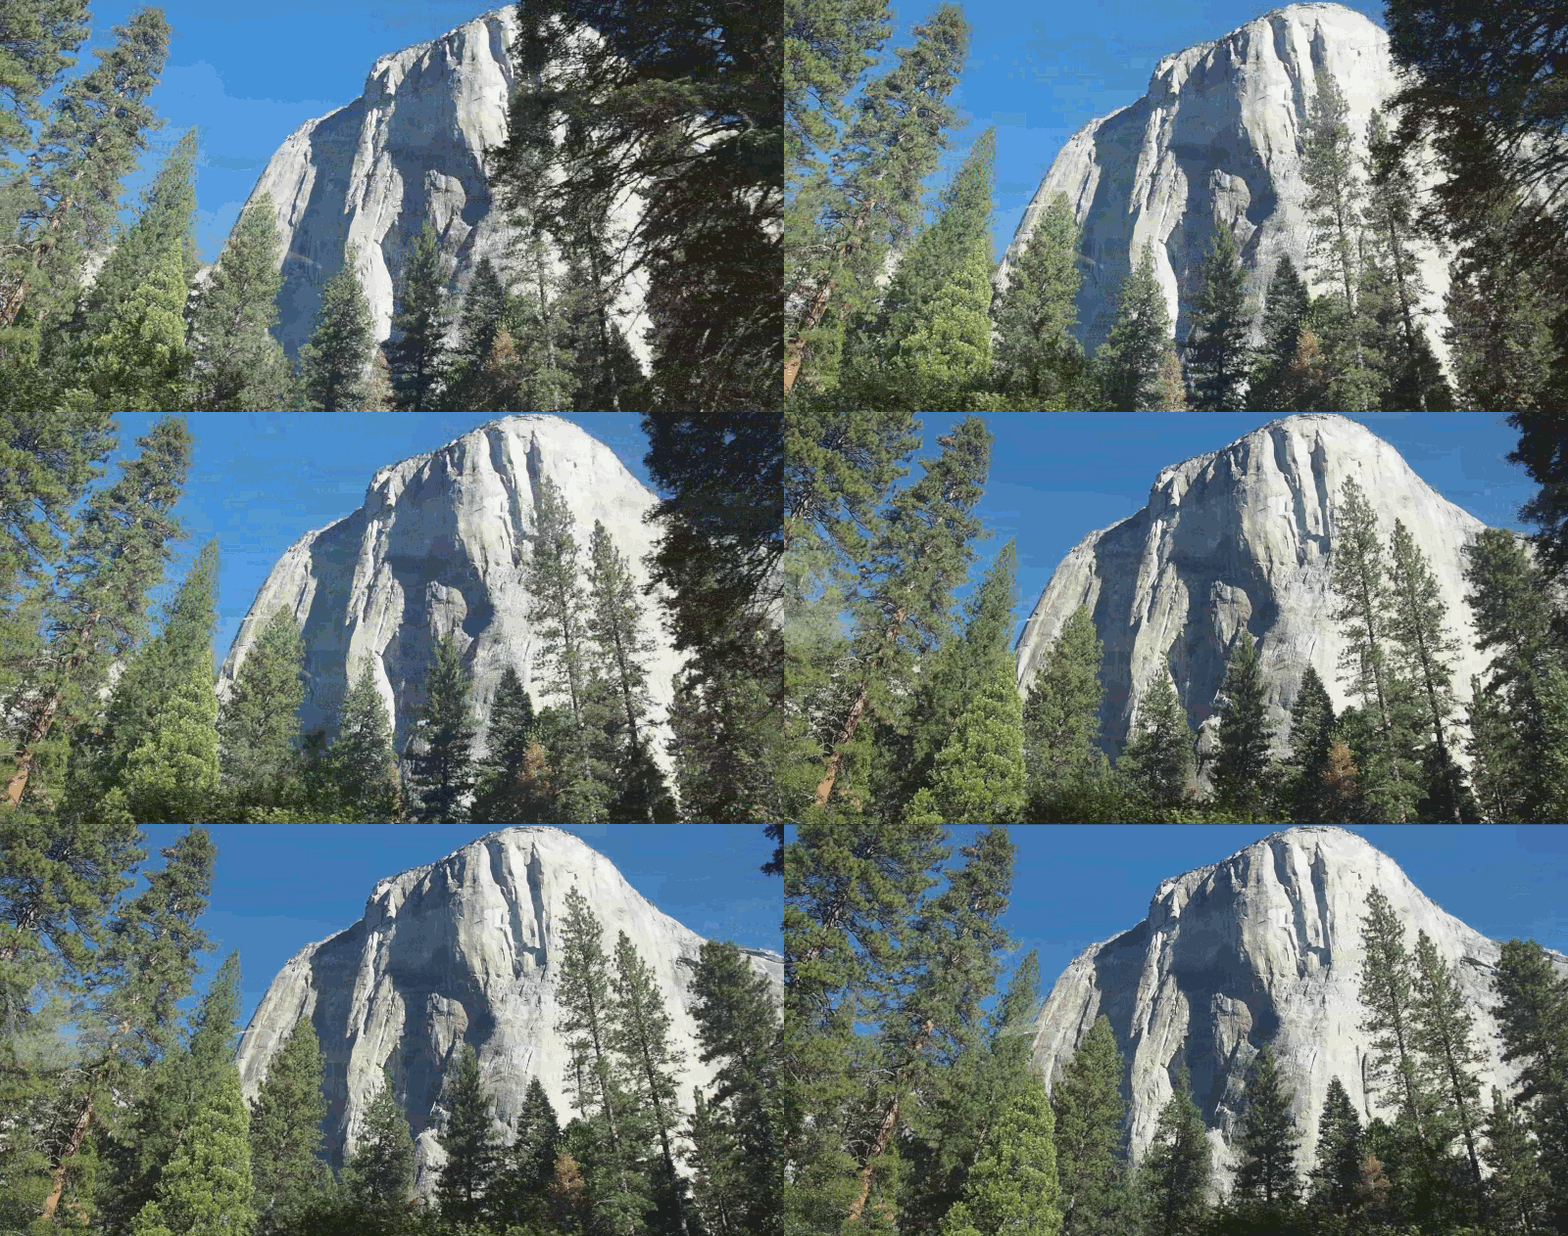
The foreground trees show parallax relative to the background mountain. This was extracted from a video I made in Yosemite National Park in 2015
In the above video if you consider the mountain to be the stars, and the foreground trees the moon, you can probably see how we might be able to compute the distance to the moon.
Parallax and Hipparchus (a brief History)

Hipparchus (center) is depicted in this painting by Italian painter Raphael. Credit: Public Domain
The ancient Greek astronomer Hipparchus (-190 to -120) is credited to being the first person to make an accurate estimate of the moon's distance. He noted that in -189 there was a total eclipse observed from Dardanelles, Turkey, but at the same time from Alexandria, Egypt appeared partially covered. By estimating the amount of coverage of the sun, he estimated the parallax of the moon between the 2 locations and was then able to deduce the moon's distance.
The following diagram demonstrates the geometry of the moon, earth and sun during the total solar eclipse of -189. As can be seen from the diagram, the moon was perfectly centered on the sun at Dardanelles and completely covered it (hence ir was a total solar eclipse). However, 1000km south of Dardanelles, in the city of Alexandria the moon appeared shifted, exposing a slither of the sun in what we call a partial solar eclipse
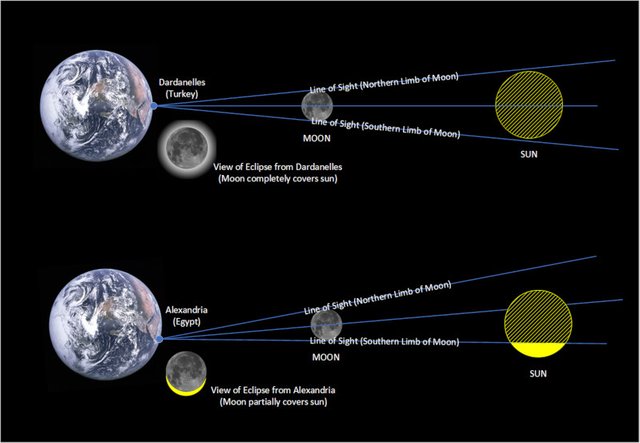
Hipparchus noted the moons parallax by observing that the sun which was totally eclipsed from Turkey, was partially eclipsed from Egypt. By estimating the amount of Sun visible from Egypt he was able to make a suprisingly accurate estimate of the moon's true distance
Repeating the Hipparchus Moon Distance Observation
We don't have to wait until the next Total Solar Eclipse to repeat the observation of Hipparchus. A far more convenient technique for observing the lunar parallax is to get 2 or more observers at different locations on the earth to take a photograph of the moon simultaneously and note it's shift with the background stars.
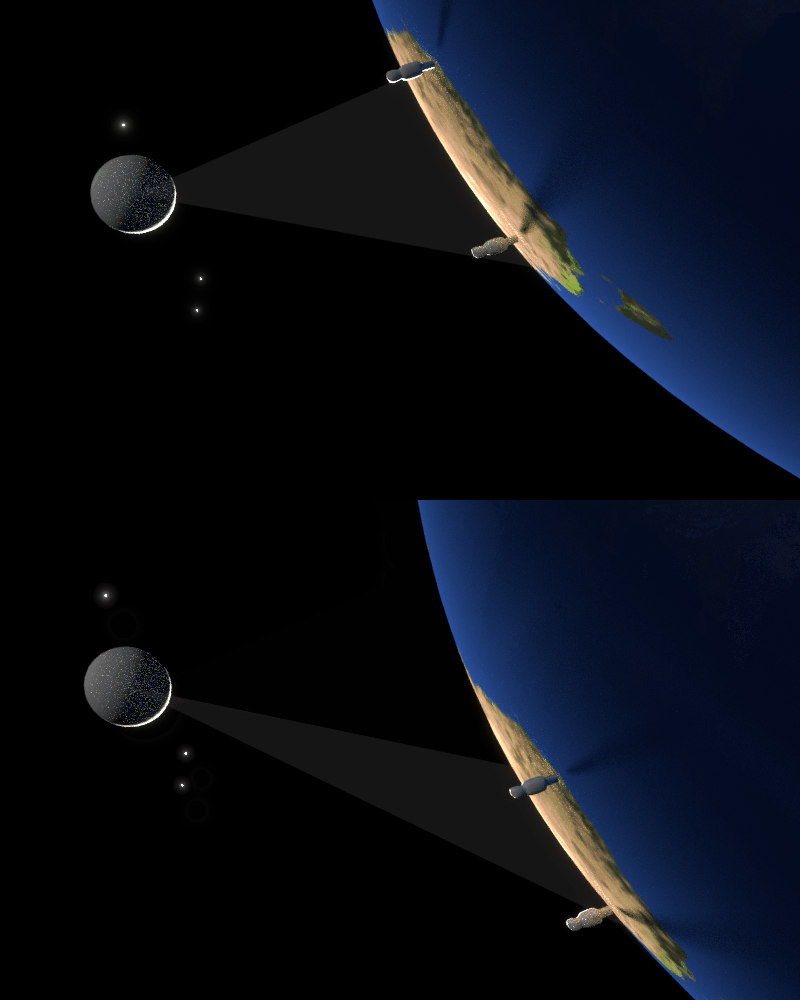
The effect of parallax on the moon relative to background stars is readily observed from earth when 2 observers from 2 locations make simultaneous observations
Computing distance to the Moon (Warning - Maths!)
With 2 observers photographing the shift in the moon's position relative to the background stars, it is possible to deduce the moon's distance with the following formula:

Where D1 is the distance to the target, b is the baseline length and PL (the parallax) is the angular shift of the target due to moving from one end of the baseline to the other. The following diagram shows the geometry, with Location 1 being Location 2 defining the observing locations on earth that define the baseline "b". C is the chord distance between both locations and can be computed using great circle geometry or using vectors.
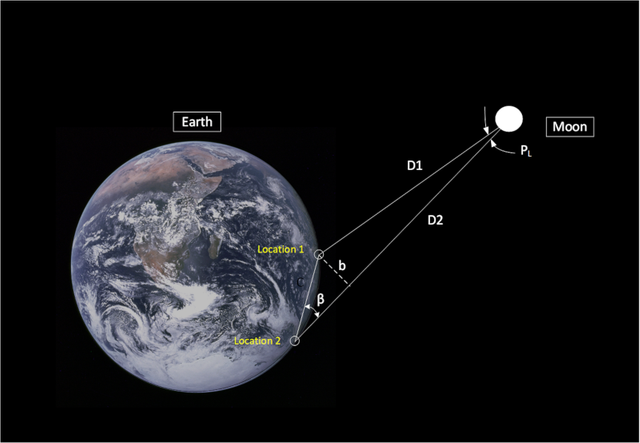
One might be tempted to set the Baseline distance "b" as the direct distance between location A and B, so that the angle β is set to 90 degrees. However, β is not going to be 90 degrees, although it may often be close enough in many instances so that this assumption can often give a reasonable approximation.
Determining β and C
To improve the accuracy of the measurement, we need to compute the true baseline distance b. Alternatively, we can compute the chord distance C and the angle β using vectors as we shall do here.
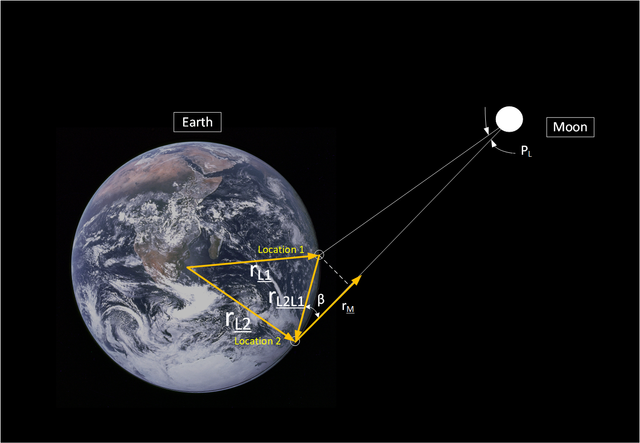
The parameter C is the chord distance between the 2 locations and can be solved using the vector method. In order to do this, we find the coordinate vectors of both location's relative to the center of the earth. The vectors are shown as rL1 and rL2 in the diagram above, and the values computed using the following spherical coordinate system formula:
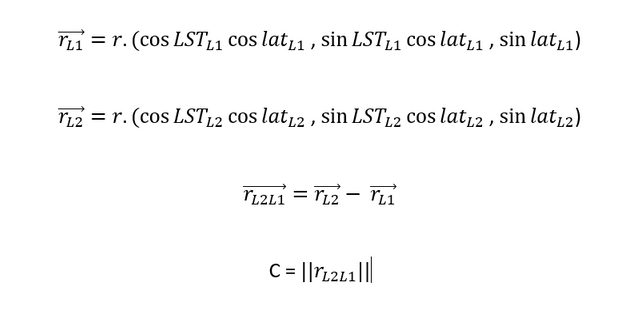
The value lat1 and lat2 are the latitudes of location 1 and 2, respectively. LST1 and LST2 are the Local Sidereal Times at either location which can be obtained via a calculated directly, via are planetarium or using an online calculator . The vectors rL1 and rL2 define vectors pointing straight up to the zenith at location 1 and 2, respectively. For a reasonable estimate, the value of r (the radius of the earth) can be set to 6371km. The vector between rL1 and rL2 is determined using vector subtraction and the result rL2L1 defines a vector pointing from Location 1 to Location 2. The chord length C between the 2 locations is computed from the magnitude of vector rL2L1.
Now that vector rL2L1 is determined, the directional vector rM to the moon needs to be calculated. rM will be used to compute the angle between it and rL2L1 (β )there is no need to assign it a magnitude, so we can use the moons celestial coordinates (right ascension αM and declination δM) to compute the following "unary" vector.

Now use the dot product method for computing angle (β) between the moon vector rM and rL2L1 as follows:

Finally, the distance D1 to the moon from location 1 can be calculated using the Law of Sines as follows:

Measuring Parallax between 2 images
Measuring parallax requires overlaying 2 images from 2 locations so that the stars are aligned in both images. This will likely require rotation and rescaling of one of the images to achieve this. Once this is done the parallax is simply the amount of shift in pixels of the moon. To convert to angular measurement the easiest method is to measure the diameter of the moon of the images in pixels, and knowing the angular size of the moon, we can compute parallax as follows:

Observing Campaign - March 13, 2019
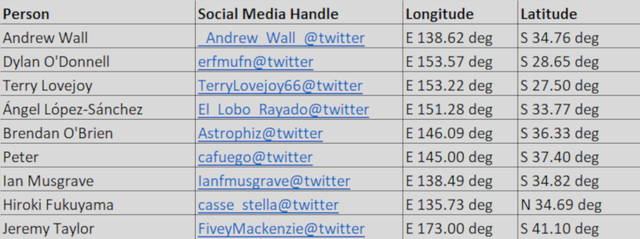
To test out the theory I organized a group of people to photograph the moon simultaneously on March 13, 2019, at 09:45 Hours Universal Time. The following people have shown interest in contributing photographs of the moon at that time.
In preparation, I made this image of the March 13 starfield using a focal length of 100mm and an Olympus MFT (Micro Four Thirds) camera. As MFT format has a crop factor of 2.0x, this view will be the same as using a 200mm focal length lens with a full frame camera.
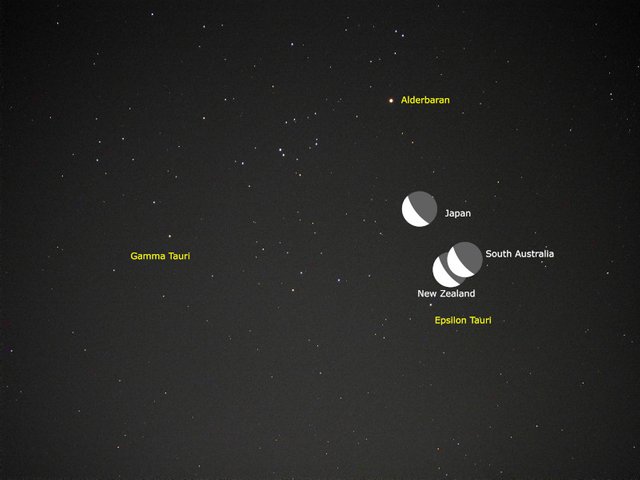
Predicted positions of the moon (from Guide 9.1) overlayed over an image the Hyades star cluster, a group of bright stars in the constellation Taurus
Recommended Camera Settings :
| Setting | Value |
|---|---|
| Target Focal Length | 200mm equivalent focal length (200mm for Full frame, 125mm for APSC, 100mm for MFT) |
| Target Focal Ratio | f5.6 |
| Exposure | 1/8 - 1 second |
| ISO | 200 |
| File format | RAW + jpg (optional) |
| Mode | Use a remote shutter or self timer mode to prevent camera shake |
| Mounting | Use a tripod if possible |
| Timing | March 13, 09:45 Hours UT, 2019. Note repeat observations 5 minutes later, and record accurate times +/- 10 seconds for photos |
Results
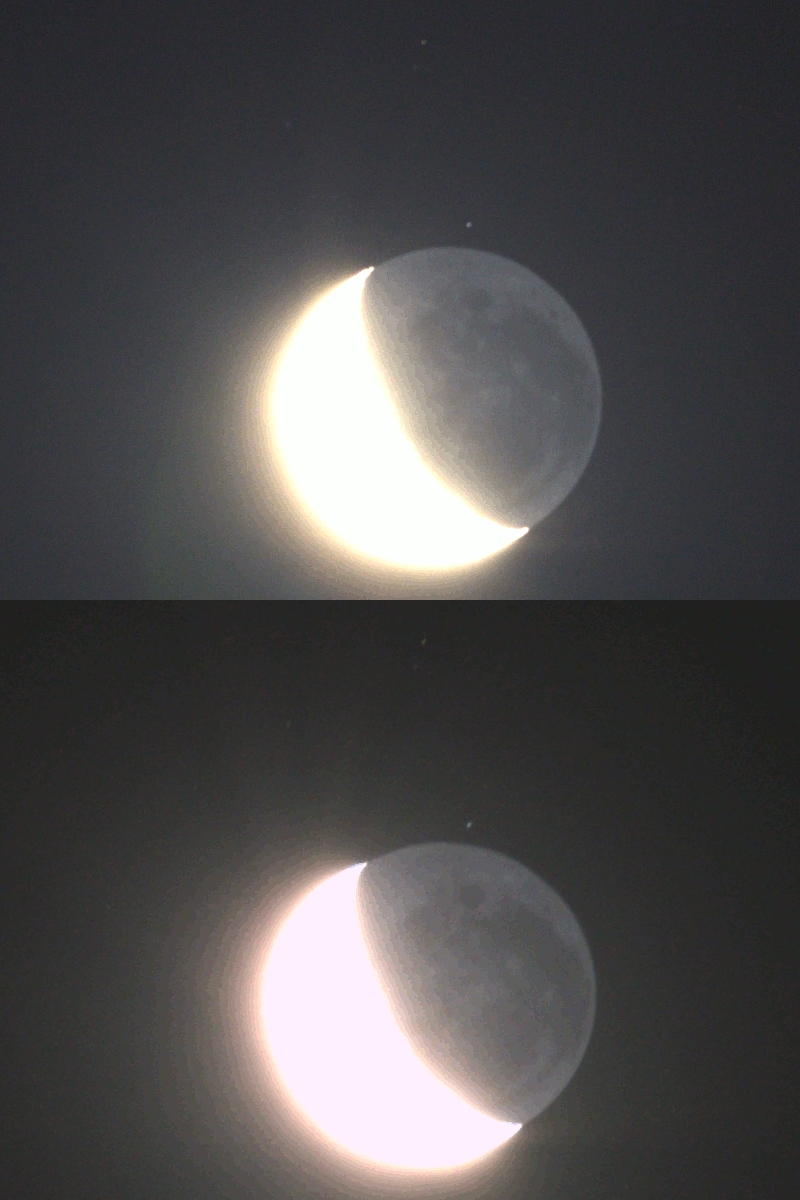
Preliminary result from March 12, 9:00hrs UT, 2019. Dylan O'Donnell and myself made photos of the moon simultaneously at locations 130km apart. I overlayed the images by Dylan and myself, registering them on the stars, to produce the animation that clearly shows the parallax of the moon.
Observations by several observers across 3 countries observed the moon simultaneously on March 12 and 13. When image scale was good and there was a good baseline distance the results were generally within 1 or 2% of the actual 380,000km distance to the moon. Here is a summary table of the results.

Further Reading
- Toomer G.J. (1974). "Hipparchus on the Distances of the Sun and Moon." Archives for the History of the Exact Sciences 14: 126–142.
- Beeson M. "Hipparchus Measures the distance to the Moon". Retrieved 3/3/2019. http://www.michaelbeeson.com/interests/GreatMoments/Hipparchus.pdf
Closing Comments
Capturing the moons parallax should be quite easy, but I plan to append the results here after March 13. It will be interesting to see how close we get to the moon's true distance. Let's hope for clear skies for everyone!
Best viewed here: https://www.steemstem.io/#!/@terrylovejoy/practical-astronomy-1551840519
This post has been voted on by the SteemSTEM curation team and voting trail in collaboration with @utopian-io and @curie.
If you appreciate the work we are doing then consider voting all three projects for witness by selecting stem.witness, utopian-io and curie!
For additional information please join us on the SteemSTEM discord and to get to know the rest of the community!
Pfff, it's well known that Moon is just 70 or so km high :D
Just for you @alex1320 :)
Go to 17:00 of this video of
A bit late to the party, but excellent post! It's incredible how precise you were able to get your measurement.
Indeed, and without anything terribly fancy. Just a group of guys with digital cameras and standard telephoto lenses (apart from Andrew who did use a small scope). Btw, it's great seeing you back here @proteus-h!
Great read Terry 😊
I wish you a great success. I would participate, but I‘m a Little bit too far away and the moon should not be visible here at 9:45 UTC.
Very curious of the upcoming articles 😊
Just checking for Berlin, Germany, the moon is up about 9 degrees, in the daytime. You might see Alderbaran in a telephoto image. However, at 18:30hrs UT on March 13, 97 Tauri, is near the moon so maybe there might be some other observers near you will to participate. Lets see if I get any more responses in the comments.
I will try it, even if no one else from Germany will be found. ;-)
Just hope to get a clear sky and to be allowed to go to the roof at work.
Just also want to say that Nikon has a crop factor of 1.5 because the DX-sensors are slightly bigger than Canon APS-C. Focal length for Nikon DX (APS-C) would be around 133 mm. Not that this cause some problems with the calculation. ;-)
Here are the crop factors for some Nikon cameras: https://de.wikipedia.org/wiki/DX-Format
Unfortunately, just in German.
Terry! I love that you're still going after it on Steemit my man. I'll be returning to the platform very soon. I miss writing and now that I finally got my life back in order, I'll be contributing weekly. I hope all is well!
Good to see you back @keephy!
To listen to the audio version of this article click on the play image.

Brought to you by @tts. If you find it useful please consider upvoting this reply.
I am fully encouraging, under the name of SteemSTEM, such an initiative! On top of that, everything was super nicely and clearly explained! :)
Update: Glad to see the animated gif :)
Loving and great moments to share about the moon. As a child I really thought of jumping to catch the moon at night, only to hide it from every one on earth... Lol
But that feeling stopped when I grew and learnt many great things about the moon.
I really enjoyed reading your word on your blog and hope to see more of you often
Posted using Partiko Android
Congratulations @terrylovejoy! You have completed the following achievement on the Steem blockchain and have been rewarded with new badge(s) :
You can view your badges on your Steem Board and compare to others on the Steem Ranking
If you no longer want to receive notifications, reply to this comment with the word
STOPDo not miss the last post from @steemitboard:
Vote for @Steemitboard as a witness to get one more award and increased upvotes!