Guide To Basic Astrophotography 10
Image Processing - Filters
Image processing filters encompass a group of tools that are extremely useful for astrophotography. Filters fall into two main categories, Kernel filters and Frequency domain filters. In this article, I will discuss some of the more commonly used filters that are useful for astrophotographers. These are also equally useful for normal daylight photography.
The Power of Filters
The easiest way to understand the importance of filters is to see some real examples. The following images are shown with the left hand half unprocessed and the right-hand half processed with a specific filter.
Sharpening : Perhaps the most important application of filters is sharpening. Here is the result of using a wavelet sharpening filter on the planet Jupiter. As can be seen, there is a vast improvement in visible detail.
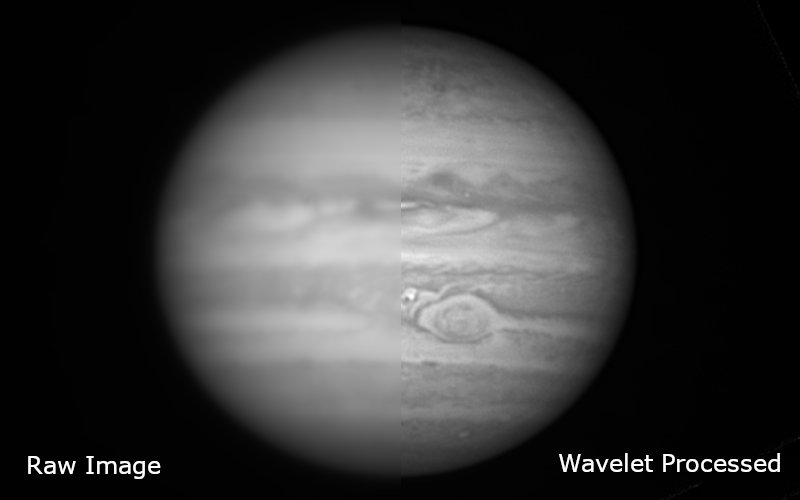
The original image on the left is very, but application of a wavelet filter dramatically improves detail
Star Removal : Another type of filter is called a "minimum" filter which is good at removing stars. This may seem an odd action to perform on a photograph of the stars, but there are times an image may contain so many stars that broader background detail such as dust lanes and nebula become obscured. Here is an example showing the Milky Way, an area with a high density of stars. Notice how much clearer the Milky Way dust lane structures are in the filtered right-hand side.
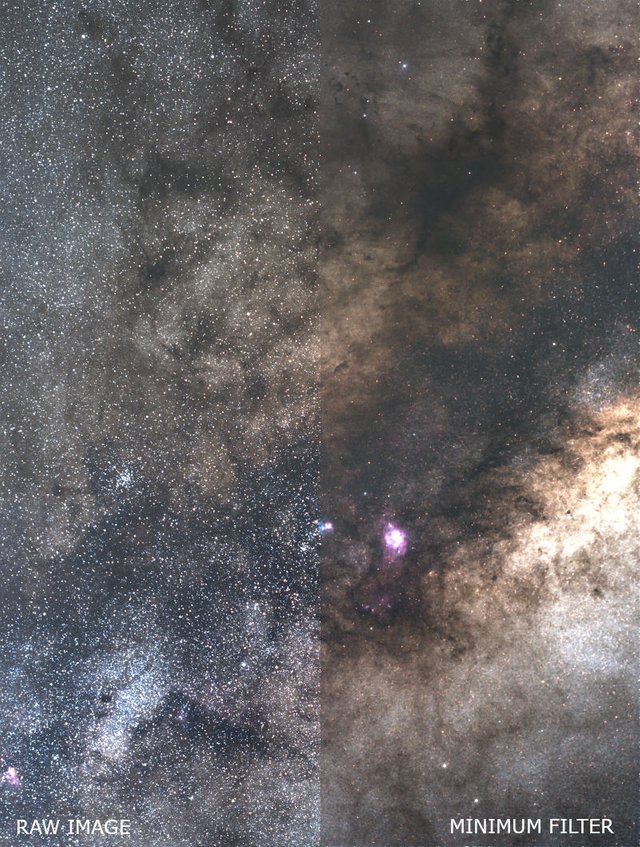
This image of the Milky Way is densely packed with stars. A minimum filter has been applied to the right-hand side of the image to remove most of the stars.
Remove Banding : It is unusual to see electrical interference or strong banding in images these days, but this can usually be repaired using a Fourier Transform "Notch" filter. Here is an example.
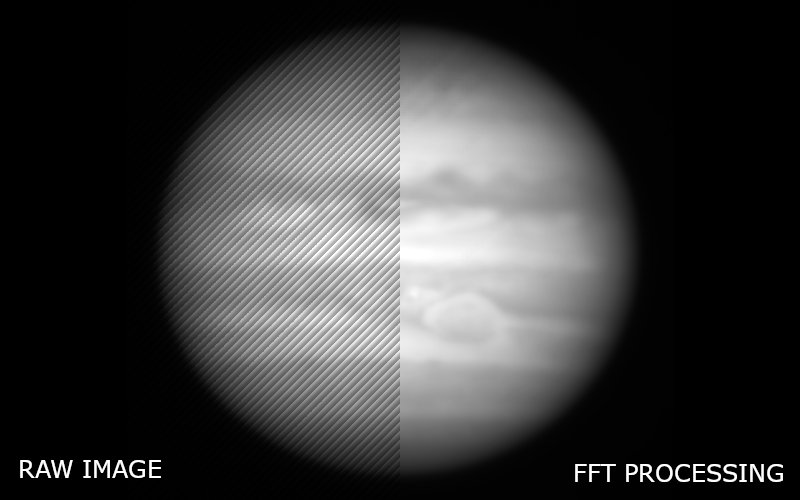
Image shows strong interference, resulting in zebra stripe pattern. The right half of the image has been processed using fourier transform techniques.

Kernel Filters
Kernel filters are a class of processing that recalculates a pixel brightness level based on the pixel levels of adjacent pixels. There are many useful applications of these filters including sharpening and noise suppression. We will now look at how a Kernel filter works.
Here is an image of a galaxy (NGC4945 in the constellation Centaurus) that has been enlarged to clearly show individual pixels. In this instance, we wish to apply a minimum filter with a 3 x 3 Kernel. The Kernel refers to the group of pixels used as the filter sample.
![]()
The following image demonstrates how a single pixel is processed using a minimum filter. At the left is a yellow 3x3 grid which represents the filter kernel which is the selection pixels used to compute the output pixel on the right.
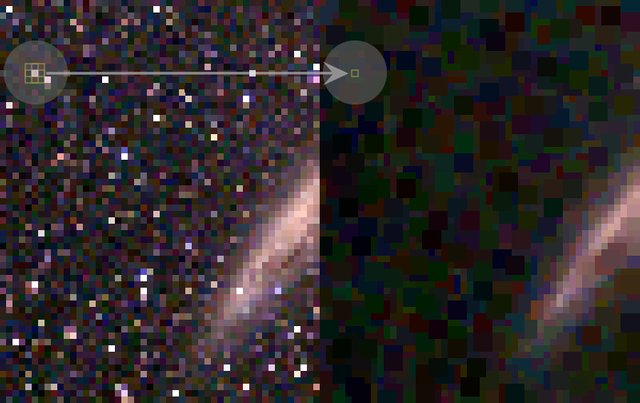
Zooming in to see the kernel pixels more clearly, the middle left pixel has the lowest value and is, therefore, the minimum value to be used for the output pixel. This process is then repeated for every pixel to complete the image.
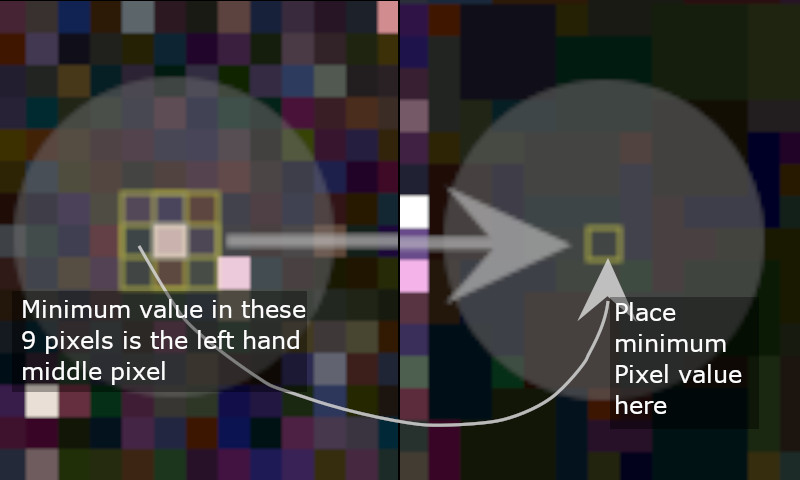
The 3x3 minimum filter is perhaps the most simple filter available. However, there is no restriction on the size and shape of the kernel.
Median Filter
In a median filter the filtered pixel brightness is equal to the median of all the kernel pixel values.
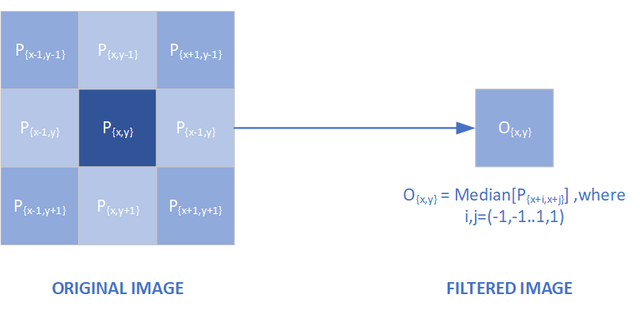
3x3 median filter. The median of the Kernel Pixel "P" brightness value is computed and inserted into Filtered Image Pixel "O'"
The median filter becomes stronger if the kernel size is increased beyond 3x3 (say to 5x5 or 7x7). The following image demonstrates the effect of increasing median filter strength. A typical application for this filter in noise reduction or as a low-pass filter.
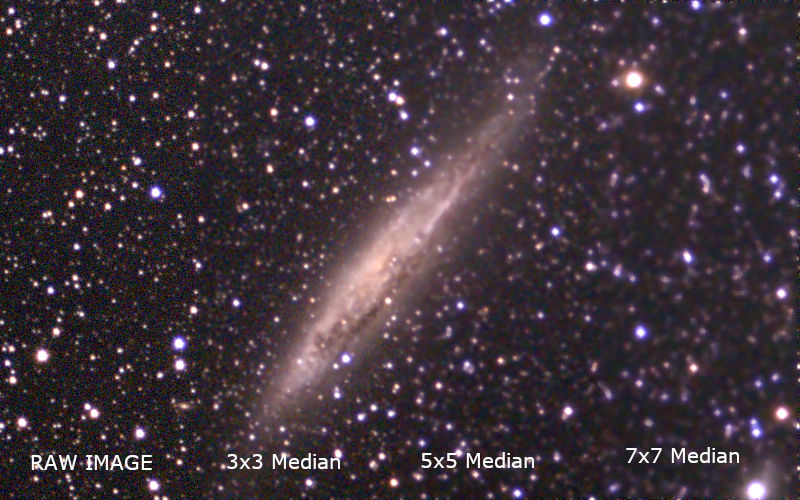
The effect of median filters of different strength on an image of galaxy NGC4945. Median filters are handy for reducing background noise in images
Gaussian Blur Filter
The Gaussian blur filter uses a kernel with unique weighting factors placed on each pixel that match a gaussian distribution. For example, in the simplest 3x3 gassian blur filter the weighting factors appear as shown here.
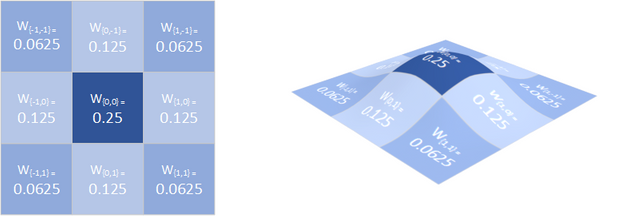
This means that in the input image the central pixel has the most weight for calculating the output pixel, with decreasing weight been given to adjacent pixels. In a mathematical sense it takes on the following form.
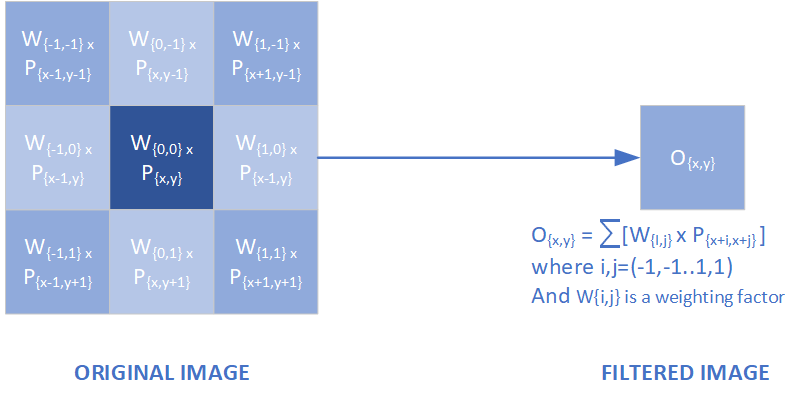
3x3 weighted filter used in Gaussian filters. The Filtered Image Pixel "O'" brightness is equal to the sum of the products of the Kernel Pixels "P" values and their weighting factor.
The result of applying a Gaussian filter is similar to the median filter but the overall brightness of objects are preserved giving a blur effect. By controlling the width of the Gaussian kernel the amount of blurring can be altered. Here is the effect of a Gaussian filter applied to the galaxy image.
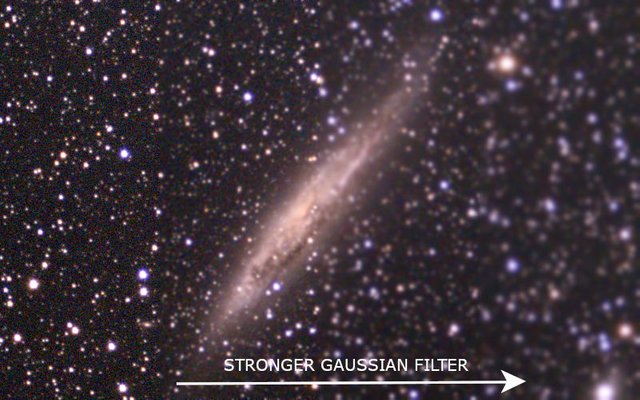
The effect of increasing strength of gaussian filter on an image of galaxy NGC4945
One application of a Gaussian filter is to reduce noise in an image, and if done gently will not impact detail significantly. Another big application of Gaussian filters is in sharpening, which will examine next.
Unsharp Masking
A major application of the Gaussian filter is Unsharp Masking, which is a technique for sharpening an image. Unsharp Masking is performed by simply subtracting a blurred copy of the image from itself. Let's look at this process by starting with an image of Jupiter and applying a Gaussian blur to it.
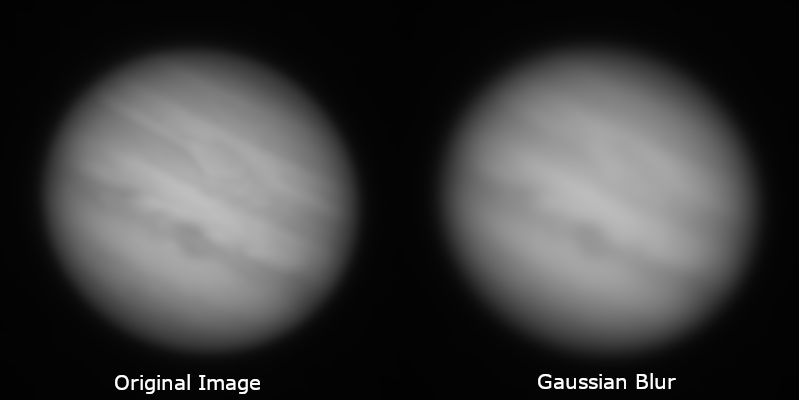
Jupiter unprocessed on the left, and the same image passed through a gaussian blur filter on the right
Watch what happens when we partly subtract the blurred imaged from the original unprocessed image. Note that the percentage given is the strength of subtraction (New Image = Original Image - Percentage x Blur Image).
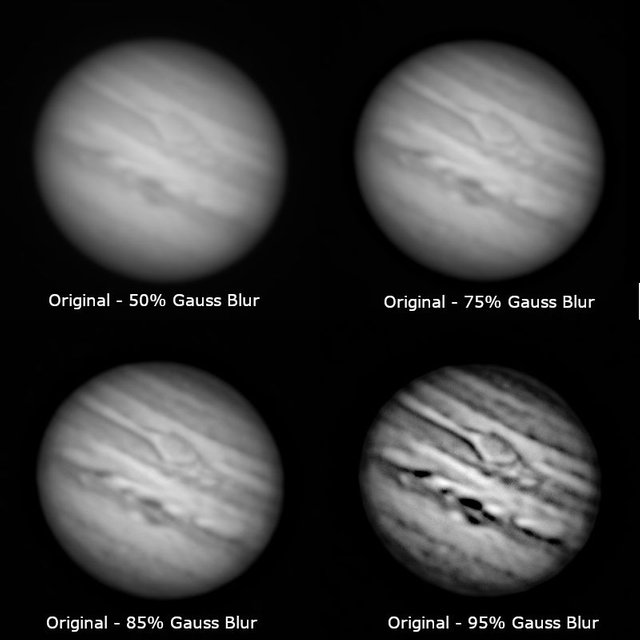
Various amounts of unsharp masking shows additional detail not visible in the original image above
It is very clear that there is a considerable amount of additional detail now visible in the. However, the last image is starting to look like "overprocessed". It is often a matter of balancing the strength of the filter.
Although there has been a good improvement in detail it is possible to do better, using wavelet filters. To understand wavelet filters imagine repeating the above unsharp mask operation but with several different levels of Gaussian blur. Here is an example of Unsharp masking versus wavelet filtering.
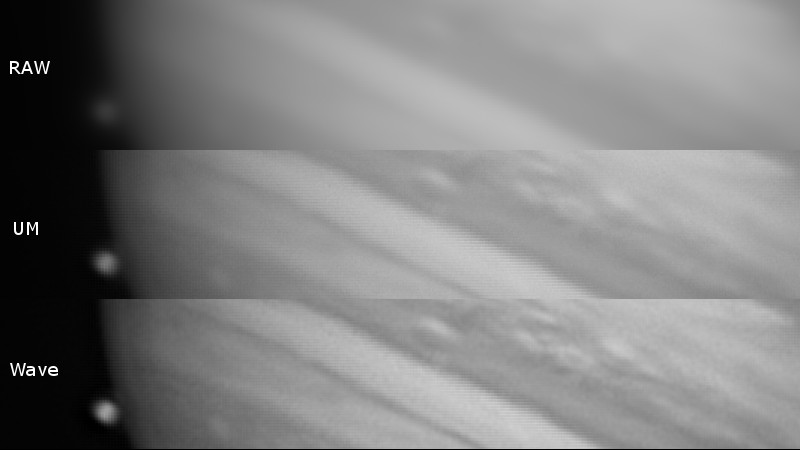
Comparision of an original image (RAW), compared to it's Unsharp Masked version (UM) and the version with Wavelet sharpening applied (Wave)

Filters - Frequency Domain
Frequency domain filters use Fourier transform functions to allow filtering based on frequency domain rather than the spatial domain. To see how this might be useful, let's look at the following example of an image that has been severely damaged by electrical interference. Although this looks unrecoverable it can be repaired using the following technique.
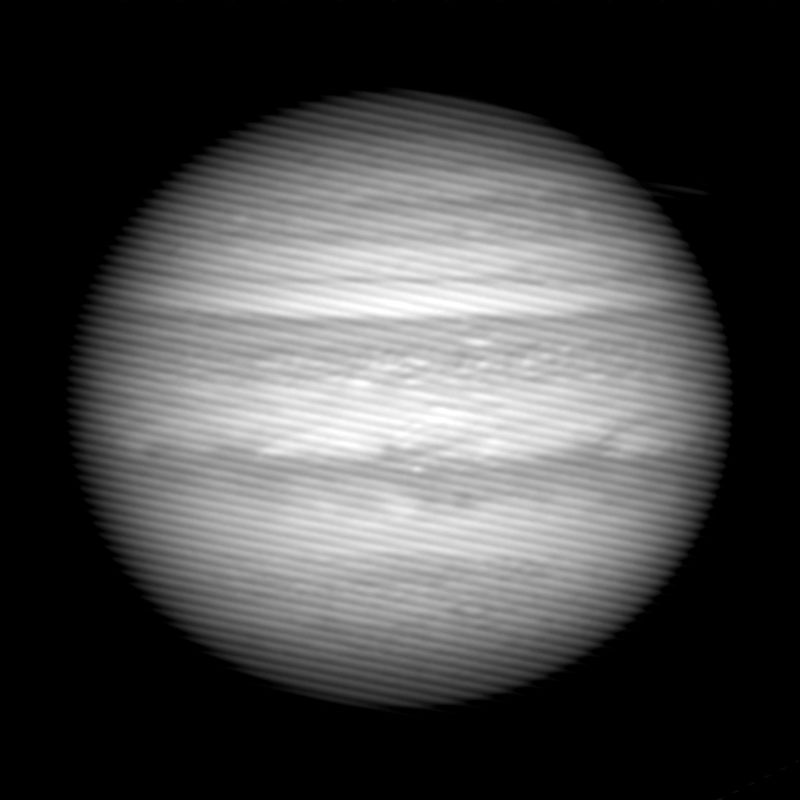
An image of Jupiter effected by electrical interference type banding
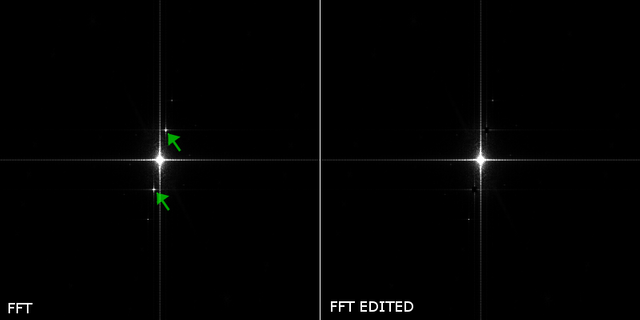
The first step is to transform the image into the frequency domain using a Fast Fourier Transform (FFT) function which is available in many processing applications. The output of the FFT will appear similar to the following (left-hand image). If the FFT image was normal it would typically just have a bright cross in the middle without the 2 satellite spots indicated with green arrows. These spots are caused by the banding we saw above. In the right-hand image, the 2 spots have been cloned out.
What happens when we now apply the inverse FFT to restore the right-hand FFT image from above? Here is the result and as you can see the bands have been removed and all the real detail is intact. Please note I used actual data, and FFT processing for this, the only thing that was simulated was drawing a set of bands across the image.
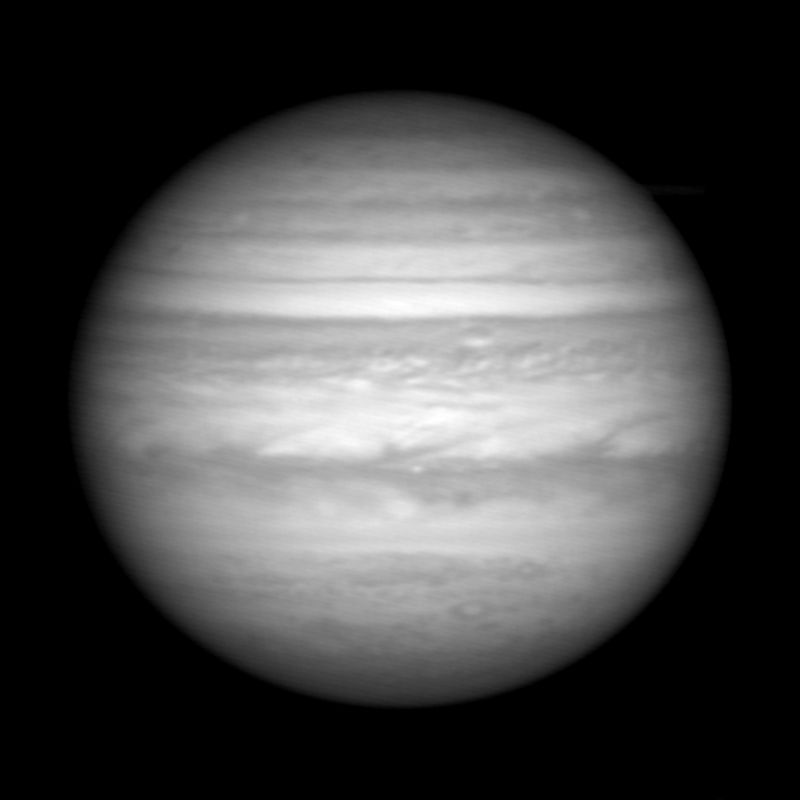
Like magic the interference bands are gone - using FFT's

Conclusions
This was an overview of some of the applications of filters in imaging processing of astronomical images. I hope you found this information useful and perhaps you will find some use for filters in your own photography.
References
- Buil, Christian. CCD Astronomy: Construction and Use of an Astronomical CCD Camera. Richmond, VA: Willmann-Bell, 1995.
- Berry, Richard, and James Burnell. The Handbook of Astronomical Image Processing. Richmond, VA: Willmann-Bell, 2011.
NOTE: All images in this article are the author's, please credit @terrylovejoy if you wish to use any of them.


It is truly amazing how you can use these filters to sharpen or blur distant images. It brings out out the detail one is trying to fix on. I wonder, are the filters and camera equipment professional and hard to find? or are these simple photography filters one can acquire in most photo stores? Thank you @terrylovejoy for the great blog, and all your effort to explain it to us.
Thank you @bernadino , check out my response to @motordrive. These are software filters and you can use freely available software to use them.
I did not realize these were software filters, I am so outdated! I thought these were camera filters.
This post is so good that I needed to give you 3 upvotes (on the post and on comments).
Only one question: have you tried the wavelet toolbox for Matlab? Maybe the choice of wavelets and the level of decomposition could help a bit (in most cases the benefit is small, but it could make the difference between "terrible image" and "very bad image")
That's very kind of you, re votes :) I haven't tried Matlab wavelets. They take a bit of tuning I found to get right, and it takes a bit of trial and error to get the scale/layers right. If you set the starting layer too fine it generates too much noise with no additional detail, set it too coarse and it oversharpens (you get "ringing" around highlights in the image).
Yes... After all those precise mathematical methods, at the end, it comes to the "artistic feelings".
The benefit could emerge from the different forms of wavelets, ranging from the "box-like" Haar to the "Mexican hat-like" Daubechies.
I wish there was a better way of doing, but I have settings for each telescope configuration. You will see specific artifacts appear if you have gone too far with the sharpening process, there is only a certain point you can go before there is no more real detail.
Interesting to know about these filters. Well, I heard some of them in the different microscopy we used to do and as you mentioned they play a crucial role in the image processing.
Indeed these filters really apply to all image processing, not just astronomy. Thanks for stopping by @vinamra.
amazing the difference that each filter accomplishes. Thank you for taking time the time to educate us. I truly enjoy your blog!!!
Thank you always @zest for your kind words! I try to make them as enjoyable and relatable as possible :)
Awesome article. I like the detailed length on your explanations. To be honest, I haven't read your other Astrophotography articles yet, however I have a question: How much does it cost to get the right equipment?
Thank you @dimitrisp ! It's hard answer the question regarding the cost of the right equipment as I normally suggest people start with minimal equipment and make sure this is the right hobby for them.
In that case maybe you can start around $2000-3000 USD. One alternative is to use rental scopes which are good way to get the right equipment without the big expenditure.
Great, thank you for replying! 😊
You wrote an amazing article on how to use filters. This article is very useful for any photography enthusiastic like me. I think the cameras capable of taking photos of astronomical objects must be very expensive. Can we take photos of those objects with our normal DSLR or other traditional cameras? If yes, how?
Hello @akdx, you may be interested in some of my earlier posts like this and this
Thank you @terrylovejoy for your response. Your post https://steemit.com/steemstem/@terrylovejoy/astronomical-imaging-using-just-a-smartphone is wonderful! It is surprising that this task can be performed with just a smartphone! I love it.
Wow, I always thought that images from space were RAW or maybe even minimally processed. I had no idea there were so many ways of image processing for adquiring even more detail!
Well done!
Thank's @deholt there are varying degrees of processing, mild application is best so as not to introduce artefacts in the image. When these filters are used too excessively they can introduce image artefacts.
You can see in the examples above for the unsharp masking the 85% and 95% are too aggressive IMO and are starting to introduce "ringing" around detail.
Hey @terrylovejoy, thanks for your efforts. I always enjoy your work and I'm sure you've realized by now.
Thanks for the education regarding filters. Looks like the effect of Median and Gaussian filters is almost the same, however the Gaussian filter product is a bit more blurry as you rightly pointed out. Is the Median filter used in sharpening as well?
Thank you @lordneroo ! I'm not aware of the median filter being used as a technique for generating the mask for the unsharp mask, but there is no reason you couldn't try. The only issue I think is that a median will not preserve the correct brightness of objects, whereas a Gaussian blur will.
Thanks for the detailed response!
this is very useful for photographers the process of astronomy picture filters. You explain with very detail! Great work
Thank you @yandot !
The filters remind my engineering school days. The DSP and signal processing courses. Great article by the way.
Thank you @dexterdev ! Your right DSP rely's very much on FFT's.