SEC S20W6 Practice cycles and Guess the number game
Hello everyone! I hope you will be good. Today I am here to participate in the contest of @sergeyk about the cycles and Guess the number game. It is really an interesting and knowledgeable contest. There is a lot to explore. If you want to join then:
.png)
Experiment with colors, maybe more? How to check it?
We can change the colour of the text in the terminal with the help of ANSI escape codes. There are different methods to apply different colours and styles. I will explain that how we can change the colour of the text, background colour. I will also explain how we can add styles to the text such as making it bold and underline.
Foreground (Text) Color
ANSI escape codes can change the color of the text in the terminal by using a special sequence that starts with "\e[<code>m". In this sequence the code defines the color.
Background Color
We can also change the background color of the text. In order to change the background color we can use specific code starting from \e[40m to \e[47m. Each code represents different and unique color of the background.
Bright Colors
We can change the brightness of the colors as well. It is also simple but it can only be done with the proper knowledge to change the color code. We can make the colors look bright by using the different variations of the codes.
Styles
We can also add different styles to the text by playing with the color codes. There are some specific codes which are used to apply the specific text styles.
Combining Text Colors, Backgrounds, and Styles
Further we can combine different colors, backgrounds as well as styles to get a unique and desired color for the text. So we can apply different things such as foreground color, background color, brightness as well as styles to the text at once.
Here’s a table that lists the ANSI escape codes for various text colors, background colors and text effects. Each code has corresponding color name.
| Color Name/Effect | Text Color Code | Background Color Code |
|---|---|---|
| Black | \e[30m | \e[40m |
| Red | \e[31m | \e[41m |
| Green | \e[32m | \e[42m |
| Yellow | \e[33m | \e[43m |
| Blue | \e[34m | \e[44m |
| Magenta | \e[35m | \e[45m |
| Cyan | \e[36m | \e[46m |
| White | \e[37m | \e[47m |
| Bright Black | \e[90m | \e[100m |
| Bright Red | \e[91m | \e[101m |
| Bright Green | \e[92m | \e[102m |
| Bright Yellow | \e[93m | \e[103m |
| Bright Blue | \e[94m | \e[104m |
| Bright Magenta | \e[95m | \e[105m |
| Bright Cyan | \e[96m | \e[106m |
| Bright White | \e[97m | \e[107m |
Additional Text Effects
| Effect | Code |
|---|---|
| Reset (Normal Text) | \e[0m |
| Bold | \e[1m |
| Underline | \e[4m |
| Inverse | \e[7m |
Example of Use:
In order to print red text on a yellow background we can use:
cout << "\e[31m\e[43mThis is red text on yellow background!" << "\e[0m" << endl;To print bold green text we can use:
cout << "\e[1m\e[32mThis is bold green text!" << "\e[0m" << endl;
Each combination starts with the escape codes for the desired color or effect and ends with the reset code \e[0m. This returns the terminal to its default state after printing the text.
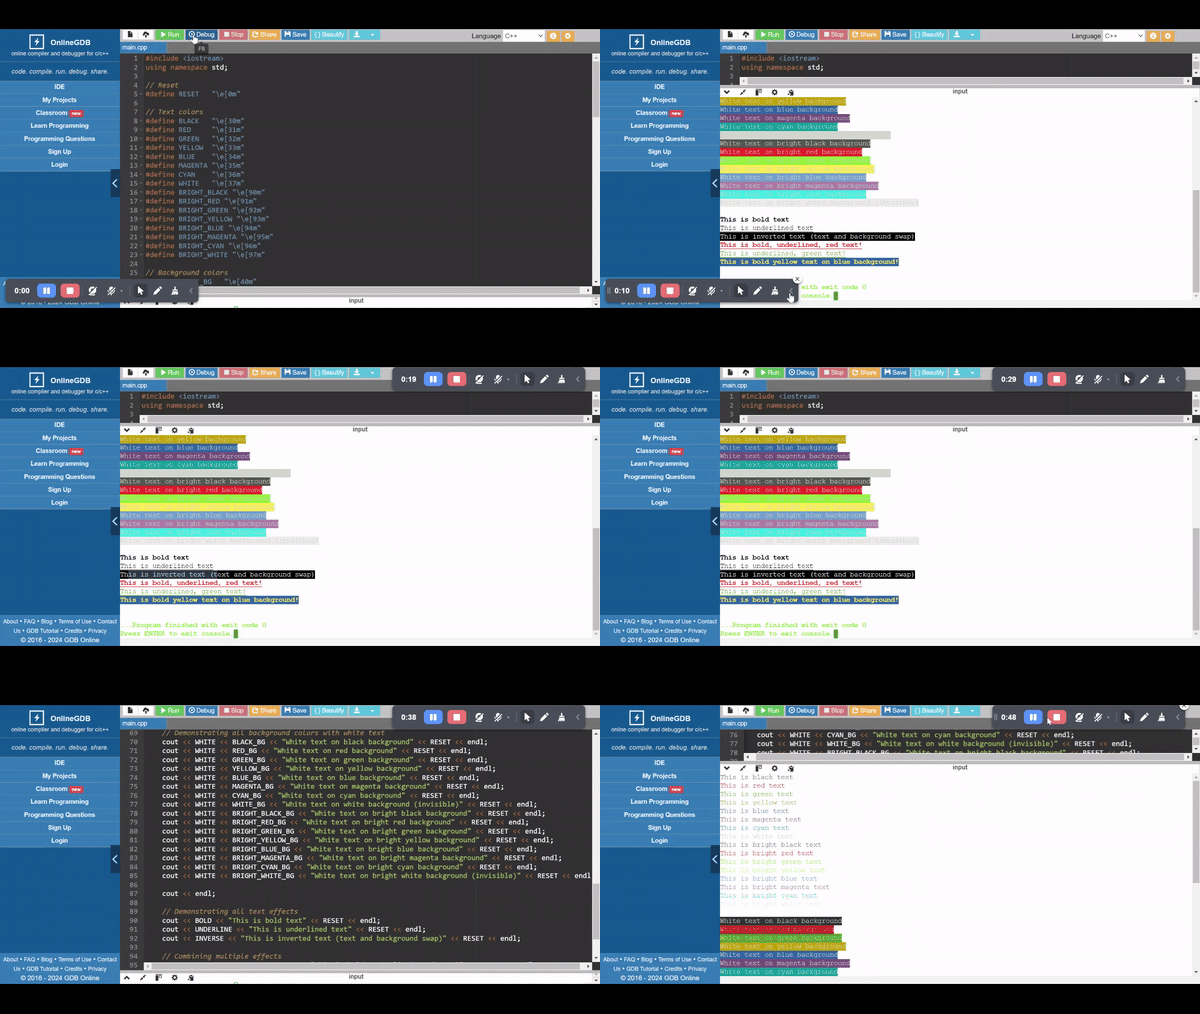
Sure! Below is an example C++ code that demonstrates all text colors, all background colors, and all text effects using the ANSI escape codes. Each combination will show how the colors and effects appear in the terminal.
#include <iostream>
using namespace std;

// Reset
#define RESET   "\e[0m"

// Text colors
#define BLACK   "\e[30m"
#define RED     "\e[31m"
#define GREEN   "\e[32m"
#define YELLOW  "\e[33m"
#define BLUE    "\e[34m"
#define MAGENTA "\e[35m"
#define CYAN    "\e[36m"
#define WHITE   "\e[37m"
#define BRIGHT_BLACK "\e[90m"
#define BRIGHT_RED "\e[91m"
#define BRIGHT_GREEN "\e[92m"
#define BRIGHT_YELLOW "\e[93m"
#define BRIGHT_BLUE "\e[94m"
#define BRIGHT_MAGENTA "\e[95m"
#define BRIGHT_CYAN "\e[96m"
#define BRIGHT_WHITE "\e[97m"

// Background colors
#define BLACK_BG   "\e[40m"
#define RED_BG     "\e[41m"
#define GREEN_BG   "\e[42m"
#define YELLOW_BG  "\e[43m"
#define BLUE_BG    "\e[44m"
#define MAGENTA_BG "\e[45m"
#define CYAN_BG    "\e[46m"
#define WHITE_BG   "\e[47m"
#define BRIGHT_BLACK_BG "\e[100m"
#define BRIGHT_RED_BG "\e[101m"
#define BRIGHT_GREEN_BG "\e[102m"
#define BRIGHT_YELLOW_BG "\e[103m"
#define BRIGHT_BLUE_BG "\e[104m"
#define BRIGHT_MAGENTA_BG "\e[105m"
#define BRIGHT_CYAN_BG "\e[106m"
#define BRIGHT_WHITE_BG "\e[107m"

// Text effects
#define BOLD      "\e[1m"
#define UNDERLINE "\e[4m"
#define INVERSE   "\e[7m"

int main() {
    // Demonstrating all text colors
    cout << BLACK << "This is black text" << RESET << endl;
    cout << RED << "This is red text" << RESET << endl;
    cout << GREEN << "This is green text" << RESET << endl;
    cout << YELLOW << "This is yellow text" << RESET << endl;
    cout << BLUE << "This is blue text" << RESET << endl;
    cout << MAGENTA << "This is magenta text" << RESET << endl;
    cout << CYAN << "This is cyan text" << RESET << endl;
    cout << WHITE << "This is white text" << RESET << endl;
    cout << BRIGHT_BLACK << "This is bright black text" << RESET << endl;
    cout << BRIGHT_RED << "This is bright red text" << RESET << endl;
    cout << BRIGHT_GREEN << "This is bright green text" << RESET << endl;
    cout << BRIGHT_YELLOW << "This is bright yellow text" << RESET << endl;
    cout << BRIGHT_BLUE << "This is bright blue text" << RESET << endl;
    cout << BRIGHT_MAGENTA << "This is bright magenta text" << RESET << endl;
    cout << BRIGHT_CYAN << "This is bright cyan text" << RESET << endl;
    cout << BRIGHT_WHITE << "This is bright white text" << RESET << endl;

    cout << endl;

    // Demonstrating all background colors with white text
    cout << WHITE << BLACK_BG << "White text on black background" << RESET << endl;
    cout << WHITE << RED_BG << "White text on red background" << RESET << endl;
    cout << WHITE << GREEN_BG << "White text on green background" << RESET << endl;
    cout << WHITE << YELLOW_BG << "White text on yellow background" << RESET << endl;
    cout << WHITE << BLUE_BG << "White text on blue background" << RESET << endl;
    cout << WHITE << MAGENTA_BG << "White text on magenta background" << RESET << endl;
    cout << WHITE << CYAN_BG << "White text on cyan background" << RESET << endl;
    cout << WHITE << WHITE_BG << "White text on white background (invisible)" << RESET << endl;
    cout << WHITE << BRIGHT_BLACK_BG << "White text on bright black background" << RESET << endl;
    cout << WHITE << BRIGHT_RED_BG << "White text on bright red background" << RESET << endl;
    cout << WHITE << BRIGHT_GREEN_BG << "White text on bright green background" << RESET << endl;
    cout << WHITE << BRIGHT_YELLOW_BG << "White text on bright yellow background" << RESET << endl;
    cout << WHITE << BRIGHT_BLUE_BG << "White text on bright blue background" << RESET << endl;
    cout << WHITE << BRIGHT_MAGENTA_BG << "White text on bright magenta background" << RESET << endl;
    cout << WHITE << BRIGHT_CYAN_BG << "White text on bright cyan background" << RESET << endl;
    cout << WHITE << BRIGHT_WHITE_BG << "White text on bright white background (invisible)" << RESET << endl;

    cout << endl;

    // Demonstrating all text effects
    cout << BOLD << "This is bold text" << RESET << endl;
    cout << UNDERLINE << "This is underlined text" << RESET << endl;
    cout << INVERSE << "This is inverted text (text and background swap)" << RESET << endl;

    // Combining multiple effects
    cout << BOLD << UNDERLINE << RED << "This is bold, underlined, red text!" << RESET << endl;
    cout << UNDERLINE << GREEN << "This is underlined, green text!" << RESET << endl;
    cout << BOLD << BLUE_BG << YELLOW << "This is bold yellow text on blue background!" << RESET << endl;

    return 0;
}
Explanation
- Text Colors: The code first displays different text colors.
- Background Colors: Then it shows white text with different background colors.
- Text Effects: Finally, the bold, underline and inverse effects are displayed.
- Combining Effects: Some combinations of colors and effects are used to show how to mix them.
.gif)
Write your version of the game "Guess the number" - this time it's about creativity, not efficiency.
Guess the number game is looking very interesting and its time to show up some creativity to build the guess the number game.
Here I have developed my version for the Guess the number game. In this I will use a story like approach. The game will not just directly ask the user to enter the number to guess the secret number. But it offers a friendly and narrative driven experience with some humor and personalization.
#include <iostream>
#include <cstdlib>
#include <ctime>
#include <string>

using namespace std;

// Function to display a quirky introduction
void quirkyIntroduction() {
    cout << "Welcome, brave soul, to the mystical realm of number guessing!" << endl;
    cout << "Behind this curtain of code lies a secret number, and your task is to unveil it." << endl;
    cout << "Will you rise to the challenge and defeat the mysterious keeper of numbers? Let's find out..." << endl;
    cout << endl;
}

// Function to personalize the game with the player's name
string getPlayerName() {
    string name;
    cout << "But first, tell me your name, adventurer: ";
    getline(cin, name);
    cout << "Ah, " << name << ", a name whispered by the winds of destiny. Let us proceed!" << endl;
    cout << endl;
    return name;
}

// Function to give a humorous hint based on the guess
void humorousHint(int guess, int secretNumber) {
    if (guess < secretNumber) {
        cout << "Too low, my friend! It's like trying to find treasure with a broken compass." << endl;
    } else {
        cout << "Too high! You're reaching for the stars when the answer lies much closer to the ground." << endl;
    }
}

// Function to narrate a dramatic conclusion when the player wins
void dramaticConclusion(string playerName, int attempts) {
    cout << "Behold! " << playerName << ", you have guessed the number in " << attempts << " attempts!" << endl;
    cout << "The stars align, and the keeper of numbers bows before your wit and wisdom." << endl;
    cout << "The world sings of your triumph, and your name will be etched in the annals of history forever!" << endl;
    cout << "Congratulations, oh victorious one!" << endl;
}

int main() {
    // Introduction
    quirkyIntroduction();

    // Player personalization
    string playerName = getPlayerName();

    // Generate a random number between 1 and 100
    srand(static_cast<unsigned int>(time(0))); // Seed random number generator
    int secretNumber = rand() % 100 + 1; // Random number between 1 and 100

    int guess = 0;
    int attempts = 0;

    // Main game loop
    while (guess != secretNumber) {
        cout << "Enter your guess (1-100): ";
        cin >> guess;
        attempts++;

        if (guess < 1 || guess > 100) {
            cout << "Whoa there, " << playerName << "! Let's stick to numbers between 1 and 100, okay?" << endl;
        } else if (guess == secretNumber) {
            dramaticConclusion(playerName, attempts);
        } else {
            humorousHint(guess, secretNumber);
        }

        cout << endl;
    }

    return 0;
}
Features
- Personalization: The game asks for the name of the player to make it more interactive and engaging.
- Quirky Narration: The game introduces a backstory. In this story the player is cast as an adventurer. The player tries to guess a secret number. There are fun responses for too high or too low guesses. It will add personality to the game.
- Dramatic Ending: When the player guesses the correct number then the game celebrates their victory in a grand and over the top fashion. It will make the win feel epic.
- Humorous Input Handling: If the player enters a number out of range then the game gives a playful answer to stay within the bounds of 1 to 100.
Output
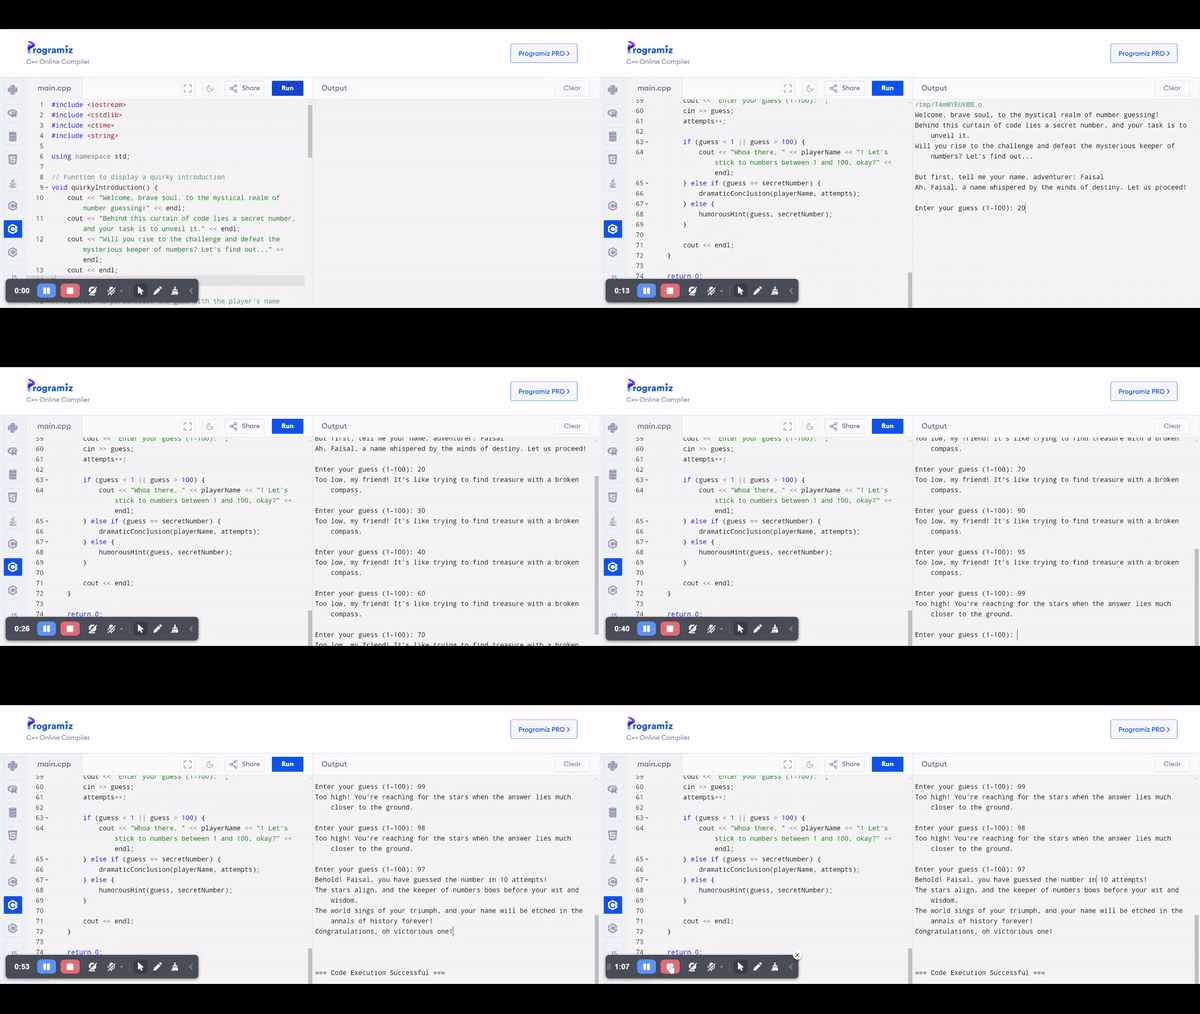
I really enjoyed while preparing this guess the number game. And while playing it was another moment of happiness and joy as well as excitement. I have used different libraries for the ease of use and efficiency.
#include <string>provides support for using strings in C++. It is used to access functions such aslength(),substr()andfind().#include <ctime>provides functions use use date and time. We can get current time from this library. It also helps to get a random number.cstdlibis used for the functions related to the memory allocation. It is also used for the process control and generating the random numbers such asrand().
All these libraries ensure the efficiency and reliability of the program. These libraries abstract away complex operations. And the developers can focus on the higher level logic of the applications.
You don’t need to write any code for this question—just estimate how long it would take to guess a number if the range is from 0 to 1000 or from 0 to 10,000
The time it takes to guess a number depends on the strategy used. If we are using a binary search strategy then the number of guesses will follow the formula based on logarithmic growth. Binary search is one of the most efficient ways to guess a number. Here is a logarithmic growth formula to find the number of guesses to find a target number.
This formula cuts the range in half after every guess. It works by dramatically reducing the total number of guesses required.
Range: 0 to 1000
According to the above given range the size of the range is 1001 because it has 0 also in it.
So by rounding up the maximum number of guesses will be 10 guesses.
Range: 0 to 10000
According to the above given range the size of the range is 10001 because it has 0 also in it.
So by rounding up the maximum number of guesses will be 14 guesses.
Explanation
Binary search divides the search space in half with each guess. For example if the range is from 0 to 1000 then after each guess it will eliminate half of the possible remaining numbers.
The larger the range the number of guesses increases slowly. It depends upon the logarithmic pattern. Because we can eliminate large amount of numbers with each guess.
Write a two-player game. There are 30 balls on the table, and players take turns picking between 1 and 5 balls. The winner is the one who takes the last ball. There's no need to develop a winning strategy. Just write code to enforce the rules, make the players take turns, and announce the winner.
Here's a simple implementation of the game with two players. The game rules are enforced so that players can only take between 1 and 5 balls on their turn, and the game declares the winner who takes the last ball.
#include <iostream>
using namespace std;

int main() {
    int totalBalls = 30; // Initial number of balls on the table
    int ballsTaken = 0;  // Number of balls taken in each turn
    int currentPlayer = 1; // Player 1 starts the game

    cout << "Welcome to the game! There are 30 balls on the table." << endl;
    cout << "Players take turns to take 1 to 5 balls. The player who takes the last ball wins!" << endl;

    while (totalBalls > 0) {
        // Show how many balls are left
        cout << "\nThere are " << totalBalls << " balls left." << endl;
        cout << "Player " << currentPlayer << "'s turn. How many balls would you like to take (1-5)? ";
        cin >> ballsTaken;

        // Validate input: players can only take 1 to 5 balls, and no more than the remaining balls
        while (ballsTaken < 1 || ballsTaken > 5 || ballsTaken > totalBalls) {
            if (ballsTaken > totalBalls) {
                cout << "There are only " << totalBalls << " balls left. Please choose a number between 1 and " << totalBalls << ": ";
            } else {
                cout << "Invalid input. You can only take between 1 and 5 balls. Please enter again: ";
            }
            cin >> ballsTaken;
        }

        // Subtract the taken balls from the total
        totalBalls -= ballsTaken;

        // Check if the current player has taken the last ball
        if (totalBalls == 0) {
            cout << "\nPlayer " << currentPlayer << " takes the last ball and wins the game!" << endl;
            break;
        }

        // Switch to the other player for the next turn
        currentPlayer = (currentPlayer == 1) ? 2 : 1;
    }

    return 0;
}
How the Game Works:
- Initial Setup: There are 30 balls on the table.
- Player Turns: Players take turns picking between 1 to 5 balls. The game validates that they take the correct number of balls within the range and according to how many are left.
- End of Game: The player who takes the last ball is declared the winner.
- Player Switch: After each turn the current player is switched.
Output and Live Working
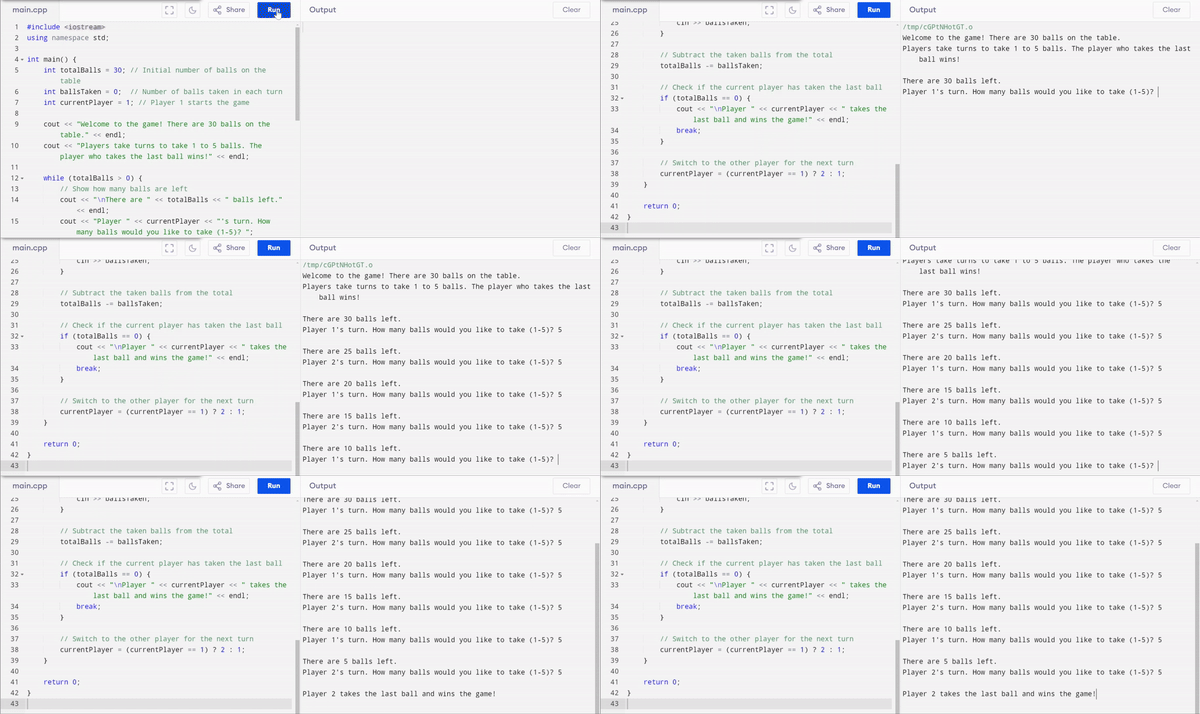
As there is the limit from 1 to 5 to choose the number of balls from the available balls so each time both the players are choosing 5 balls. And the game started from the player 1. And as we moved at the end only 5 balls were available and it was the turn of the player 2. So the player 2 wisely picked all the available 5 balls without giving any further chance to the player 1 and in this way the player 2 won the game. The player 1 and 2 both were I and ultimately I won the game in both ways, hahaha.
Follow the same path from a single star to a square, then transform the square into a triangle. Pick any triangle. Experienced students should choose one with a higher number, as it's more challenging. Triangle number 1 is for those who scored lower in previous lessons.
Here is the complete working that how we can create a single * and then we can move next a square and similarly we can transform the * of square to the triangle.
I will print a single * and then I will print a square of 25 stars * and then I will transform those 25 stars * to a triangle. The triangle will look like an increasing pyramid triangle.
#include <iostream>
using namespace std;

// Function to display a single star
void displaySingleStar() {
    cout << "*\n";
}

// Function to display a 5x5 square with 25 stars
void displaySquare() {
    for (int i = 0; i < 5; i++) {
        for (int j = 0; j < 5; j++) {
            cout << "*";
        }
        cout << endl;
    }
}

// Function to display a triangle with 25 stars
void displayTriangle() {
    int rows = 5; // Set the number of rows
    int totalStars = 0; // Track total stars to match the square

    for (int i = 1; i <= rows; i++) {
        // Print spaces for alignment
        for (int j = i; j < rows; j++) {
            cout << " ";
        }

        // Print stars per row
        for (int k = 1; k <= (2 * i - 1); k++) {
            cout << "*";
            totalStars++;
        }

        cout << endl;

        // Stop when we reach 25 stars
        if (totalStars >= 25) {
            break;
        }
    }
}

int main() {
    // Step 1: Display a single star
    cout << "Starting with a single star:\n\n";
    displaySingleStar();

    // Step 2: Move to the square
    cout << "\n--- Moving to the square ---\n\n";
    displaySquare();

    // Step 3: Transform the square into a triangle
    cout << "\n--- Transforming the square into a triangle with 25 stars ---\n";
    displayTriangle();

    return 0;
}
Output
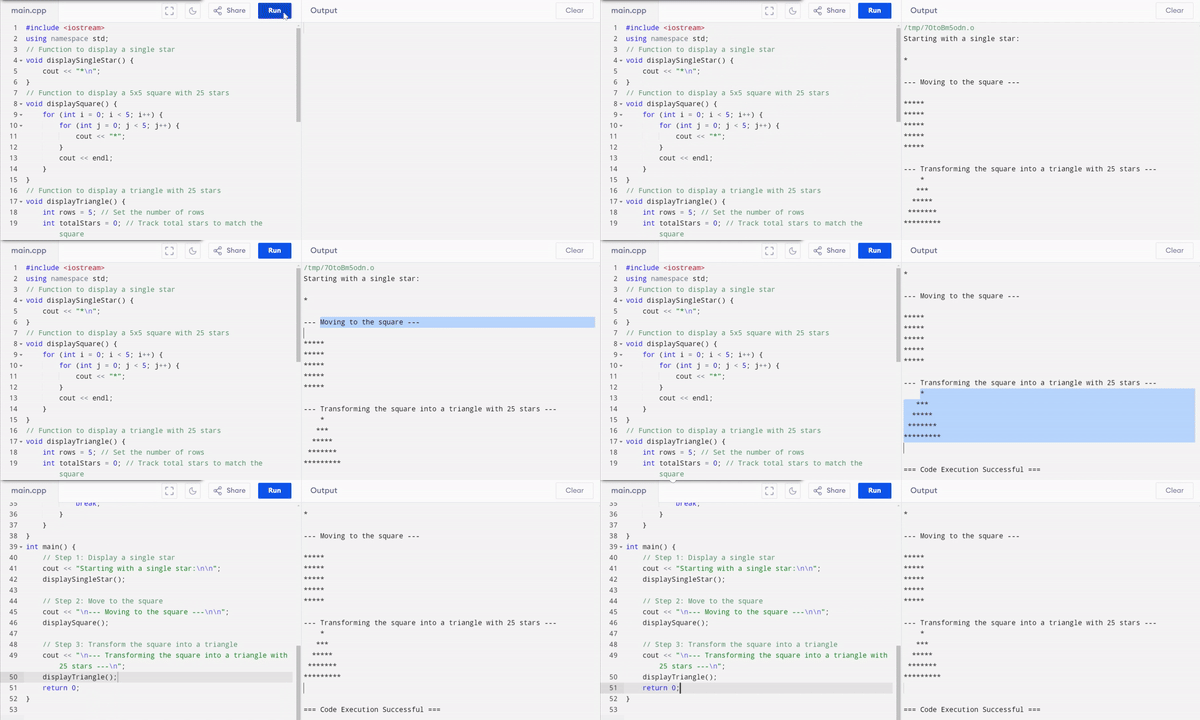
In this program I have created three functions to display 3 different things. displaySingleStar() is used to display a single star. displaySquare() this function is used to display a square with 25 stars. Similarly displayTriangle() is used to display and call the code to build a triangle. In the output you can see that the program is starting with a single star as it has been called at the start. Similarly while moving next the program is executing the block of code to print a square of stars. And then the program transforms the stars to a triangle.
X Promotion: https://x.com/stylishtiger3/status/1847153602168488150
Thank you so much @damithudaya