Hair Color Chemistry + DIY Coloring Advice!
image credit
Today’s article will feature something more lightweight and fun… hair color!
I’m sure most of you ladies (and some guys too!) have been experimenting with different hair dyes. Sometimes the result is simply amazing. Other times, something goes wrong! In this post I will explain the basics of hair color chemistry, and then I will present some basic tips and tricks for hair coloring at home.
PART 1: How it works
In order to understand how hair dyes work, we first need to know what our hair is made of and what the dye components do.
Our hair is mainly made of keratin, a type of protein. Two other proteins, eumelanin and pheomelanin, are responsible for our dark and golden/reddish colors respectively.
When you buy a box of permanent hair dye, it usually contains two bottles of ingredients, which you have to mix in order to “activate” them. What are these and what do they do?
The first bottle contains hydrogen peroxide, commonly known as “bleach”. The lighter the shade you want, the more concentrated will be the solution. Bleach has two main uses. Firstly, it reacts with our melanin molecules through a chemical process called "oxidation", removing some of the double bonds that cause the dark color and turning them colorless! Bleach reacts best with the eumelanin pigments, which is why a reddish/yellowish tint, residues of pheomelanin, is left after bleaching. Secondly, once it is mixed with the dye, the bleach reacts with it as well, oxidizing it and creating a new color!

image credit
The second bottle contains the hair dye product, as well as ammonia. Ammonia is very alkaline and its purpose is to swell the hair shaft and open up hair cuticles, so that the bleach and the dye can enter. It also helps to increase the activation of the hydrogen peroxide, especially for very light shades. This process can damage hair, especially if it's frequently dyed. There are milder hair dyes with ammonia substitutes; however, they are less effective in remaining permanent as well as in lightening hair.
Dye pigments are usually made of two main products. Firstly, paraphenylenediamine (PPD), which produces brown shades when exposed to oxidizing agents such as our bleach. PPD has been categorised as “sensitiser”, which means that one can become allergic after multiple exposures, even if they were not allergic at first. This is why most hair dyes advice to perform an allergy test each time before you dye your hair. There are alternatives to PPD, but to date, it is still the most effective compound. Secondly, the dye also contains other compounds in different concentrations that will react with the oxidized PPD and produce blue, red and green pigments. Mixed in different concentrations, our desired shade is achieved.
Most hair dye boxes also contain a small bottle of conditioner. After coloring, we need to apply this conditioner in order to seal the cuticles and trap the color pigments inside them! Post-coloring conditioners are usually more acidic than regular conditioners, which helps restore pH balance after the use of alkaline ammonia and re-seal the cuticle.

image credit
PART 2: Advice!
Now, some tips and tricks on coloring your own hair!
-Hair dye changes the very structure of your hair. Your hair will never get back to the shade it was before, unless it grows out. This is also true for semi-permanent hair dyes. They still contain a small amount of peroxide or ammonia, which will give your hair a slightly reddish tone even when they fade away.
-Hair colors are usually darker than what is claimed on the box. If a box says its dark blonde, expect it to turn out a light to medium brown. Unless your hair is bleached white to begin with, or it has never been dyed and you are planning to dye it a darker color.
-That being said, if you want to match your natural color in order to grow it out, pick a darker shade than your natural color. Since you will not be refreshing it it will fade away with time, and get closer to your natural color. If you pick a lighter shade, the bleach concentration will be higher and the color will fade to an orangey-reddish tint.
-If your hair is damaged, dyes will come out too dark at first and then fade away too fast. This is because your hair is left porous and absorbs and releases pigments faster than it should. What damages hair are the high concentrations of hydrogen peroxide and ammonia and it is therefore more common in lighter shades. In order to avoid damage, use the following technique to refresh your color:
Bleach your hair only the first time to lighten it to the desired shade. Do not use the same dye with bleach in it every time you recolor your hair! Hair is already bleached and lightened, and the only thing you need right now is to correct the tint. So when the color fades away to an orange tint, use a toner, a glaze or at most a semi-permanent color in an ash shade to correct the tone. This is how hair looks before and after a toner:
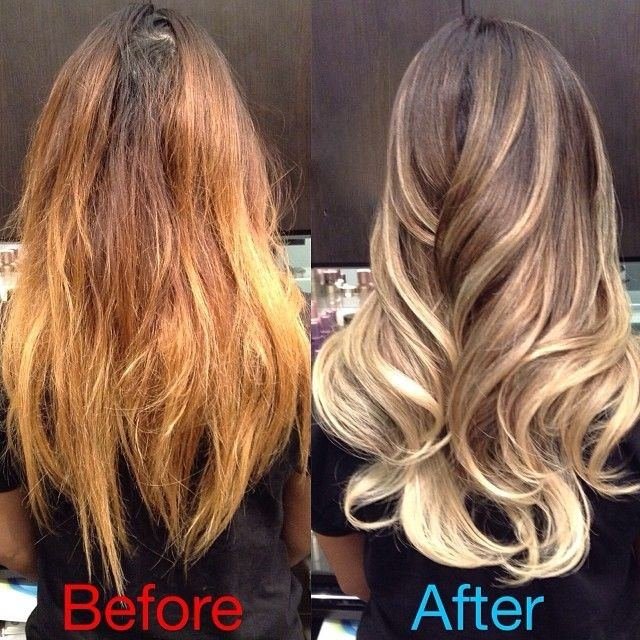
image credit
If the shade is much lighter than your natural color and you want the roots to match the rest of your hair, only use permanent dye with bleach to your roots to retouch. If you want a quick color refresh and have no other products at home, apply the same dye to the ends, but only in the last 5-10 minutes of the process.
-On the other hand, if you are going lighter than your current color and you are going to apply a permanent color that contains developer (bleach) in the whole head, do the opposite. Dye the whole head first leaving the roots for last. This is because the oxidation happens much faster near the head because of the heat it emits, and you can end up with “hot roots” (lighter roots with a reddish tint).
-If you are going darker, you can apply the shade all over. You can use semi-permanent dyes in between as a color refresh to minimize damage. Dark colors show white hairs much more though, so if you have some white strands you will need to retouch with a permanent dye much more often than a light color. You can apply the permanent dye in the roots to cover graying areas, and then apply to the whole head in the last 10 minutes for a refresh. Dark shades are not as damaging because they don’t contain as much peroxide and ammonia as the lighter shades and leave hair looking thicker and shinier.
-If you are blonde and want to go dark brown or black, do not do it in one step! You need to first add some red pigment, or the color will end up looking muddy or greenish after a few washes. Color it first with a semi-permanent warm brown or reddish shade, and then add the permanent dark shade.
-If you want to go one to two shades lighter, use a box color in an ash tone. This is because going lighter already leaves a reddish tint, and the ash tone will balance it out.
-If you want to go more than two shades lighter, you will need to use a high concentration of bleach to de-color the hair, which is damaging to the hair. It is best to do the bleaching and recoloring separately in a two-step process rather than use a box color; that means apply only the bleach and let it react with the color of your own hair. Then wash it out and use an ash toner and purple or silver shampoo to counteract the orange tint later. Use this colorwheel to determine which neutralizing shampoo color is best for your unwanted tones:
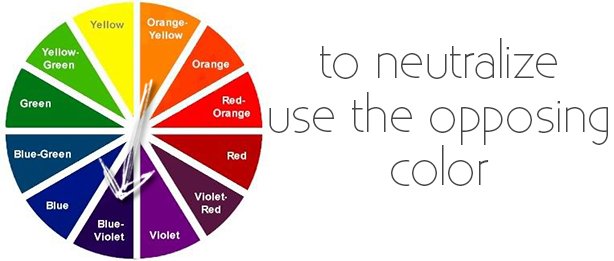
image credit
Toners usually do not contain any peroxide or ammonia and are therefore temporary. You will need to re-apply toners as soon as the color turns yellowish or reddish. It is best to lighten hair gradually in spaces of 3-4 months to avoid damage. You can also lighten only a few sections of hair every time, to space out damage. The girl in the below picture is lightening her hair gradually with highlights:
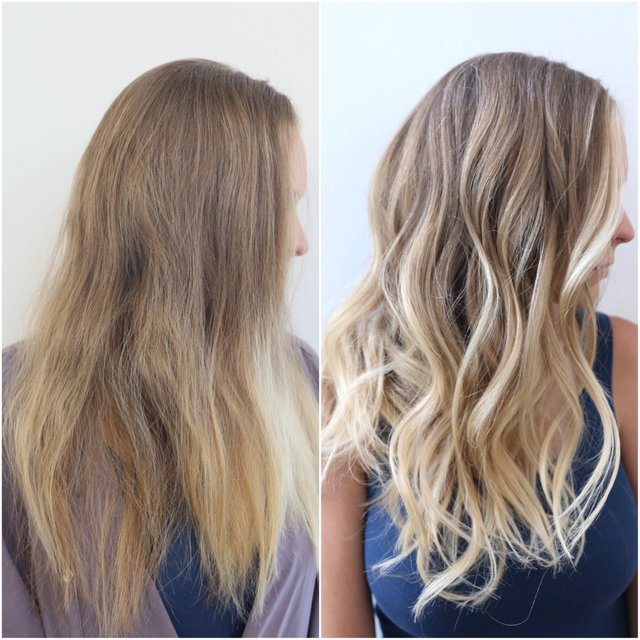
image credit
-To protect your color, use special shampoos for colored hair. They are sulfate-free, as sulfates will strip your color much faster. It is advised to trim your hair after coloring to avoid split ends. Also, do not use curling or straightening perms on bleached or home-dyed hair. The chemicals in these two products will react and your hair might even get chemically burned and fall out!
-It is advised to perform an allergy test each time you dye your hair, but, because I know that most of you can’t be bothered each and every time, you need to at least perform it:
-after a temporary “henna” tattoo. These are not actually made of henna but of PPD!
-if you haven’t colored your hair in longer than 3 months and this is your first time in ages
-if you are changing brands
-if you are going darker (darker shades contain higher concentration of PPD)
-Reactions to PPD can only be caused while it’s in the process of being oxidised. Once it is fully oxidized (meaning that all substance has reacted with the peroxide and color has been developed), PPD does not cause allergic reactions, which is why it is completely safe to use PPD-colored wigs. When mixing it with hair dye, PPD takes a while to get oxidised, but even then some partially oxidised proportions can remain on the skin after the hair coloring process without having fully developed. These will slowly oxidise in contact with the oxygen of the air on the surface and within the skin. This is why when performing an allergy test, it is best to use only an unmixed sample from the dye tube and let it oxidise slowly on your skin. If you mix it with peroxide, it might get fully developed as it is a small sample and you will not realize you are allergic.
-At least two shades lighter and two shades darker than your natural hair is probably unnatural to your skin, and you will often need to use at least a little makeup to avoid looking pale. You might also need to color your eyebrows for a more natural effect. Also, your root regrowth will be obvious. If you dye your hair blonde, your roots will look an ashy dark shade due to the color contrast, even if they are actually warm light brown! For the same reason, if you add highlights on brown hair, do not make them too light without an intermediary warmer color. The contrast will make your hair look grayish (unless this is what you want to achieve). On the other hand, if you dye your hair much darker than your natural shade, your roots will possibly make your hair look thinner and scarcer than it actually is.
In the below picture we can see an example of brown roots looking grayish due to the contrast with a golden blonde shade, as well as an example of hot roots that can happen when dye near the head develops faster (apologies to Ms Lawrence; you are still very pretty!)
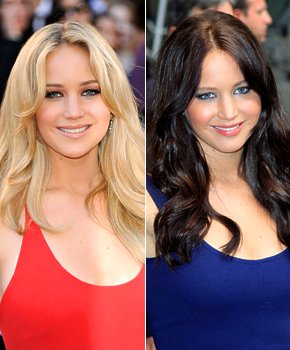
image credit
Finally, do not let ash tones confuse you: a light ash brown might be on the same “darkness” level as a golden dark blonde. It only looks “brown” because of its ashy tone, but it is actually a light shade. The amount of redness in your hair is different than its level of darkness. An easy trick to determine your current level is to think by how much your hair lightens in the summer, with sun exposure. The above will be useful in order to determine the shade of hair you are starting with. I am leaving you with a picture of some of the most commonly used shades:

image credit
For this post I consulted:
http://www.compoundchem.com/2015/05/14/hair-dyes/
https://www.thoughtco.com/salon-hair-color-chemistry-602183
http://chemistscorner.com/the-chemistry-of-hair-colors/
https://link.springer.com/chapter/10.1007/978-3-642-25611-0_5
http://scottcornwall.blogspot.com.cy/2012/08/what-does-ammonia-do-in-hair-colours.html
https://www.ncbi.nlm.nih.gov/pmc/articles/PMC5261844/
http://www.skinsmatter.com/eczema_and_skin_conditions/hair-care/articles/ppd-07-13.html
https://www.dermnetnz.org/topics/allergy-to-paraphenylenediamine/

What a great post.First time i seen post here about hairs.Very informative.Keep it up dear
Thank you, @alizabatool!
Okay I think you should also review some of these Hair toners. I really want to know how it feels and how what vibes it gives