Our latest remodel turned into an Air BNB. The before pictures will absolutely shock you
Please up vote and resteem if you found value in this.
*****Full review with before and after Pictures and Product used pictures and links ****
https://drive.google.com/file/d/1WqeM1UzZ6UmnU-tpsksHjiGD0NQjG4vO/view?usp=sharing
Welcome to our Brookside Airbnb project. While we don’t consider ourselves experts, this is our 5th renovation and we’ve learned some things along the way! Check out what we did! (WARNING: the before photos are terrifying)
It’s amazing what a little landscape clean up and paint can do for your curb side appearance. This transformation is literally night and day!!! For the exterior we selected Valspar Woodlawn Colonial Gray (also referred to as Soulful Grey) along with Valspar Bistro white for the trim and Valspar Cracked Pepper for the concrete foundation & steps. We decided on Valspar Beguile for our front door. We wanted a subtle pop of color. We also wanted to tie in our overall theme inside with our greenish grey cabinets. (Keep in mind paint can look a lot different than the swatch inside the store.)
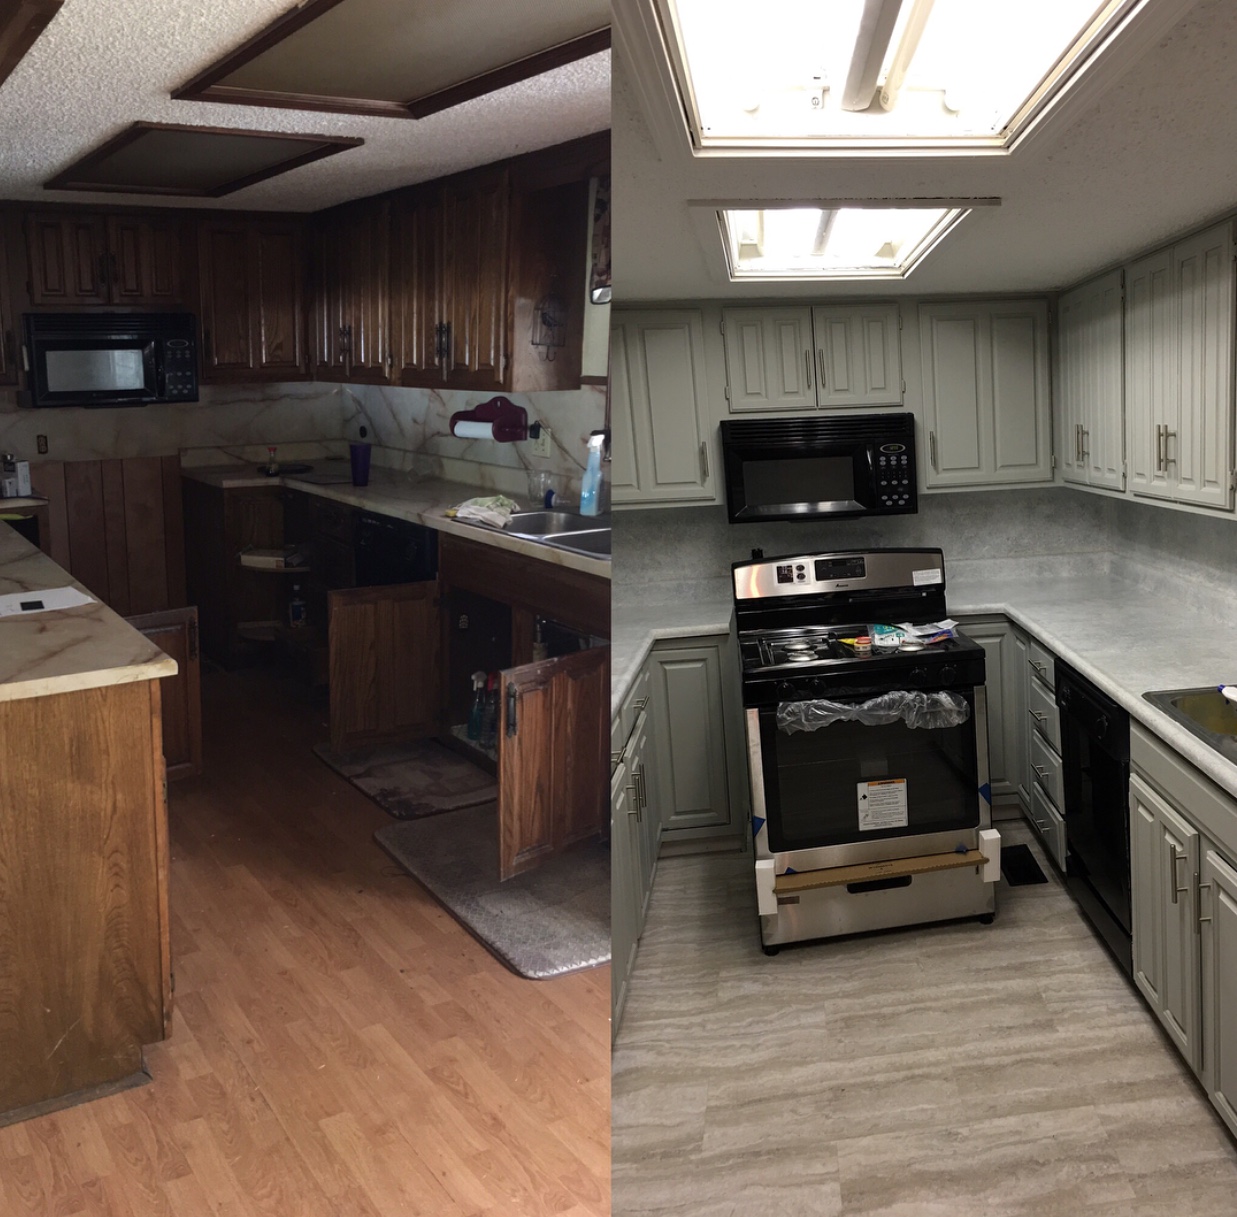
Let’s step inside, and I’ll show you the rest! Starting with the kitchen, we knew we wanted to update the rust colored marble laminate, but replacing it for granite or marble wasn’t in our budget...and especially not for a rental. Instead we used the Giani Countertop Paint Kits in White Diamond. The original laminate covered both the countertops and the backsplash (insert eye roll) and so to cut down on time and money, we went ahead and used the kit on both countertops and backsplash. It turned out fine, but the designer in me would have rather had a tiled backsplash of some sort. Overall, this was a very inexpensive way to transform our kitchen and make it look Beautiful. However, I will say that this product was a lot more detailed and took a lot more time than similar products from Rustoleum. When using this product you had to be mindful of the clear coat not pooling up in areas and drying with a slightly yellowish tint. But all in all for a rental I would use this product again in smaller areas like a bathroom or laundry room where it wouldn’t take as much time.
This seemingly small kitchen has quite a bit of cabinet space! And the previous owner of this house left not only their entire house trashed but the cabinets were very dirty with food/cooking residue. After scouring these cabinets 3 times, I wasn’t thrilled to have to sand them down as well! So after some research we found the Valspar Bonding Primer which can be painted on wood and it seals the original paint/stain as well as provides a superior bond for paint to adhere to. It’s basically sanding in a can!! So we went to work and painted each cabinet door, and the frames with this primer and the outcome was AMAZING! This has been one of our best finds to date! Do note: this primer is very very thick and you wouldn’t want to use this in a sprayer!
After the cabinets were primed and dry we opted for Valspar Granite Dust. This turned out to be a really pretty greyish green. We decided to go with bar handles for the cabinets and the drawers with tied in the stainless steel appliances beautifully!
We chose to paint over the pre-existing panelling with Valspar Ancient Stone and Valspar Swiss Coffee for the trim. We liked the panelling so much we decided to hang complimenting panel board (48-in x 8-ft Embossed Coastal Cedar MDF Wall Panel) from Lowes
on the opposite living room wall.
Let’s talk flooring! We are very big fans of vinyl flooring. They get a bad rap sometimes but I don’t know why! They are durable, waterproof, easy to install and they look beautiful! We typically use vinyl that looks like hardwood, but with this reno the pre-existing pergo flooring was in good shape so we decided to save some extra $$$ and leave them. Instead, we chose to use the TrafficMASTER Allure Luxury Vinyl TILE flooring for our kitchen. We chose Grey Travertine. To tie in the warm wood coloring from the living room.
There are multiple vinyl options, but we chose the stick strip because it is so simple to install. Another bonus is that the underlayment is optional so depending on the condition of your subflooring you might be able to save additional money. Unfortunately, our subflooring wasn’t in great shape so we added a very thin and semi-firm padded underlayment in our kitchen. The choice is yours but we always opt out of the foam padding because they make the vinyl too bouncy and add another cost. We would recommend a thin but semi-firm felt pad underlayment to give your flooring some depth and cushion without any bounce. We are not big fans of the foam options because . (not foam). The only issue we had with this product, was getting the tiles to perfectly but up next to each other. So in certain areas this issue left a small seem. It probably wouldn’t have been a big deal to most people, but my OCD kicked in and I had to have it resolved. So to solve this we we used MAPEI Keracaulk S-Pack 10.5-oz Cobblestone Sanded Paintable Caulk. This is a non-sanded grout caulking that can be applied directly to the vinyl tile seams. The negative is that you have to apply this to every single seam and it’s time consuming!! The positive is the overall finish looks even more like real tile and it’s stunning! Word from the wise: If you decide to do this step, make sure you use a wet rag to wipe off the excess as you go instead of waiting until you are done! TrafficMASTER does have a click together version of this tile, that may solve the seam issue as well. It’s approximately a dollar more per sq ft. but it might be worth the price depending on the size of your space. I haven’t personally tried the click together yet, but it may be my next venture!
Since this is a rental we decided our budge was going to remain as close to function as opposed to design as possible (I say that with a grain of salt ;)) So we decided although not pretty, we could leave the fluorescent lights this time. We did however put in a super trendy sleek pendant lamp that came with 3 edison bulbs!
Along with all new appliances, we needed a new kitchen sink faucet! It’s nearly impossible to find a nice looking faucet with sprayer for under $100.00 but we found stainless steel sprayer faucet on Amazon got for $54.00. They not only look great, but they work perfectly too.
Moving on to bathrooms. We had two horribly outdated bathrooms with 50 years of various wallpaper overlapping! It seriously just kept coming so we decided rather than attempt to peel sheet after sheet of orange retro wallpaper, we were going to just put up some panelling! A few screws and we were done!!
Similar to the wallpaper, this house had years worth of various laminate roll out flooring. After pulling it all up, we decided to go with nothing other than our favorite vinyl tile (TrafficMASTER Allure 12 in. x 24 in. Luxury Vinyl Tile Flooring). We went with the same tile size as we did in the kitchen, but this time we opted for a different shade and went with Light Carrara. We were even more thrilled with the turnout. Lastly, to save space we ripped out the pre-existing full sized vanity and put in a pre-assembled Single Sink Bathroom Vanity with Cultured Marble Top (Common: 36-in x 19-in; Actual: 36.5-in x 18.6-in) from Lowes for less than $200!!!
We used the same tile for the master bath, however, we decided to revamp the pre-existing vanity and add a new counter. This time we decided to go with a pre-cut formica laminate countertop. We cut out two holes and added two basic drop in oval white sinks.
To finalize we snagged this awesome 5 piece brushed chrome finish bathroom hardware. Plus did I mention the entire set was only $59!! I was skeptical but when this arrived, it was sturdy, and high-quality and not at all cheap looking! So this package was a no brainer!!
That’s a wrap!! Below are some more before and afters of the bedrooms. Next we will show you how we transformed this adorable little house with some basic staging!!
XO, Rachel & Jordan
looks great. Very detailed and very helpful