Installing Rust & Diesel for Rocket on Windows 10

I must warn you, it was a nightmare trying to get all these done on Windows. But I finally overcame it, and I hope this guide would help you too. If not, it's never too late for you to join the macOS camp.
Nevertheless, let's get started with installing Rust. It's pretty much straightforward compared to Diesel. But before that, we need to have Microsoft Visual C++ Build Tools 2013 and above.
In this guide, we will use Build Tools for Visual Studio 2017 that can be downloaded at https://visualstudio.microsoft.com/downloads/. Run the installer, follow the on-screen instructions and navigate to Individual Components.
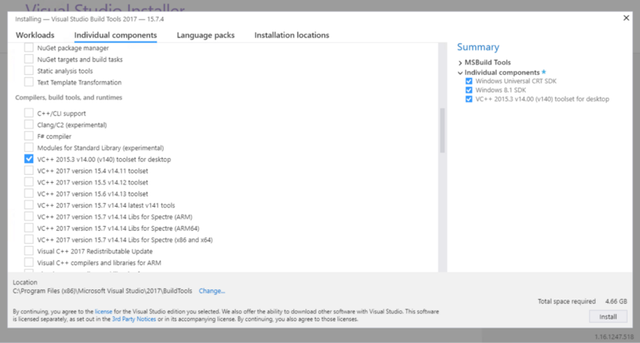
Select VC++ 2015.3 v14.00 (v140) toolset for desktop and the installer will automatically checked Windows Universal CRT SDK and Windows 8.1 SDK. Click Install and then sit back, grab yourself a coffee.

Now, let's head over to https://rustup.rs/ and download the executable file. Launch it and you will see something like this:
Welcome to Rust!

This will download and install the official compiler for the Rust programming
language, and its package manager, Cargo.

It will add the cargo, rustc, rustup and other commands to Cargo's bin
directory, located at:

C:\Users\mrblueberry\.cargo\bin

This path will then be added to your PATH environment variable by modifying the
HKEY_CURRENT_USER/Environment/PATH registry key.

You can uninstall at any time with rustup self uninstall and these changes will
be reverted.

Current installation options:
   default host triple: x86_64-pc-windows-msvc
   default toolchain: stable
   modify PATH variable: yes

1) Proceed with installation (default)
2) Customize installation
3) Cancel installation
All you have to do is type 1 and hit the Enter key. Then, enjoy your coffee and let it run for a while. This will install the stable version of Rust on your PC. But remember? Rocket needs the nightly version. So after it's done, fire up your command prompt or PowerShell and type:
rustup install nightly
[...]

rustup default nightly
[...]
We are now ready to install Diesel. If you aren't aware, Diesel is an ORM and Query Builder for Rust. At the time of writing, it supports PostgresSQL, SQLite and MySQL. For this guide, we will install all three of them on Windows. You may, however, want to choose the database provider that you prefer.
PostgresSQL
Go to https://www.postgresql.org/download/windows/. We will use the latest version 10 on 64-Bit Windows platform. After you've downloaded and run the installer, you should be greeted with the following screen:

Follow through the instructions and you will be done in a few minutes.
SQLite
Go to https://www.sqlite.org/download.html. Select the download file for 64-bit DLL (x64) under Precompiled Binaries for Windows. Unzip the file and you should see two things— sqlite3.def and sqlite3.dll
The interesting thing is Diesel requires the .lib file instead. We will generate one using sqlite3.def and VS2015 command prompt. Fire up VS2015 x86 x64 Cross Tools Command Prompt and enter the following:
cd C:\SQLite
lib /def:sqlite3.def /machine:X64 /out:sqlite3.lib
Note: You should cd to the directory where you unzip the two sqlite3 files.
MySQL
Go to https://dev.mysql.com/downloads/windows/ and download the installer. In this guide, we will use mysql-installer-community-8.0.11.0.msi because we're installing the database server as well.
Run the installer and proceed with the default setup. You can ignore the Connector/Python unless you're using it. The following MySQL products will be installed:
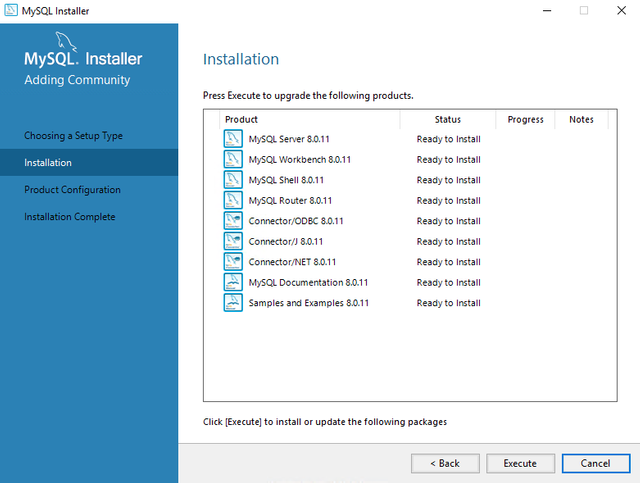
The fun fact is Diesel needs the Connector/C. It's not in the list but we'll come to that later! For now, carry on with the on-screen instructions.
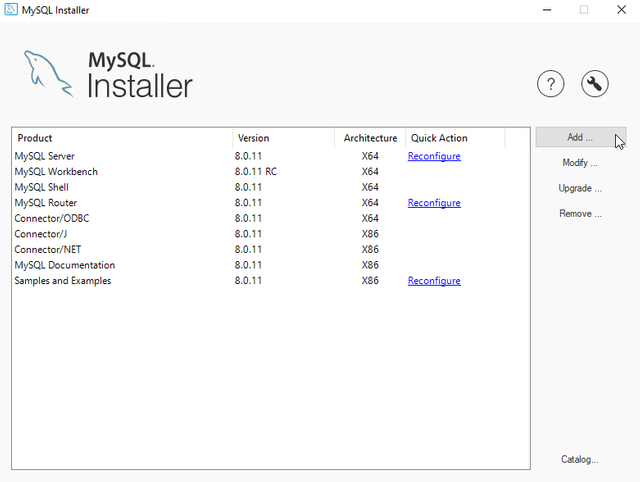
After you're done, run the installer again and select Add. This time we will install MySQL Connector/C for 64-bit Windows platform:
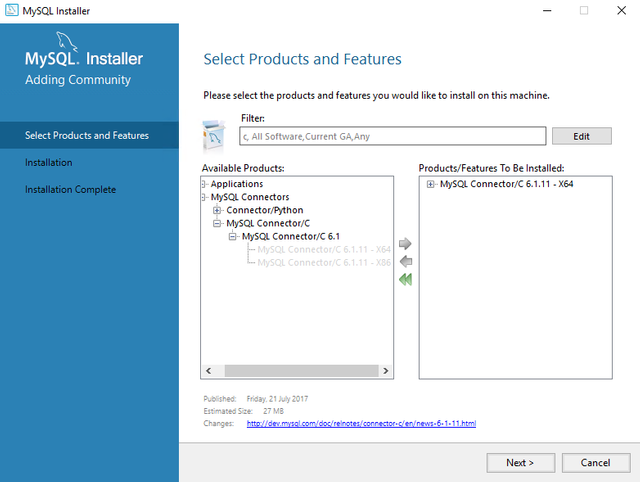
The installation should be pretty fast and then we're all set.
Welcome to Diesel
I thought installing Diesel was straightforward and the getting-started guide should be enough to help me with my setup. But I was wrong! I got stuck at the installation of Diesel's CLI tool. The guide is good on macOS/Linux but on Windows, it's a total nightmare!
If you go ahead with the recommended commands, you might encounter errors like these:
cargo install diesel --no-default-features --features postgres

[...]
 = note: LINK : fatal error LNK1181: cannot open input file 'libpq.lib'
[...]

cargo install diesel --no-default-features --features sqlite

[...]
 = note: LINK : fatal error LNK1181: cannot open input file 'sqlite3.lib'
[...]

cargo install diesel --no-default-features --features mysql

[...]
error: could not find native static library `mysqlclient`, perhaps an -L flag is missing?
error: aborting due to previous error
error: Could not compile `mysqlclient-sys`.
[...]
The solution is rather trivial. I wondered why it wasn't officially documented anywhere. What you have to do is simply set these environment variables:
- PQ_LIB_DIR
- SQLITE3_LIB_DIR
- MYSQLCLIENT_LIB_DIR
Enter the following in either command prompt or PowerShell:
setx PQ_LIB_DIR "C:\Program Files\PostgreSQL\10\lib"
[...]

setx SQLITE3_LIB_DIR "C:\SQLite"
[...]

setx MYSQLCLIENT_LIB_DIR "C:\Program Files\MySQL\MySQL Connector C 6.1\lib\vs14"
[...]
Note: You might have to change the path according to where these files are located in your PC:
- libpq.lib
- sqlite.lib
- mysqlclient.lib
Alright, now we can finally run diesel_cli installation with a breeze:
cargo install diesel_cli

Hope it helps you if you're a Windows developer trying out Rust! If you haven't heard of Rust, it's the most loved language of developers and you can write web applications with Rust & Rocket. And I will be sharing my experience in the coming series.

upvote for me please? https://steemit.com/news/@bible.com/2sysip
Congratulations! This post has been upvoted from the communal account, @minnowsupport, by mrblueberry from the Minnow Support Project. It's a witness project run by aggroed, ausbitbank, teamsteem, theprophet0, someguy123, neoxian, followbtcnews, and netuoso. The goal is to help Steemit grow by supporting Minnows. Please find us at the Peace, Abundance, and Liberty Network (PALnet) Discord Channel. It's a completely public and open space to all members of the Steemit community who voluntarily choose to be there.
If you would like to delegate to the Minnow Support Project you can do so by clicking on the following links: 50SP, 100SP, 250SP, 500SP, 1000SP, 5000SP.
Be sure to leave at least 50SP undelegated on your account.