Web application programming with php and javascript using jquery
In the previous post, i showed the basics of programming server side application using php as cgi behind an HTTP server.
https://steemit.com/programming/@h0bby1/web-application-programming-in-php-for-beginners-developpers
Summary of CGi execution
To summarize previous post, each time an HTTP request is received by the server targetting a file configured to be executed as CGI script, the CGI module will process the request and fill php built in variables with values contained in the request, and execute a new instance of this script with those variables set to the values contained in the request.
Those variables in PHP are
$_SERVER an associative array of which keys will contain information about the server and client sending the request.
$_COOKIE an associative array of which each key will be set to the value of the cookie contained in the request headers with the name of the key corresponding to the cookie name.
$_GET an associative array of which keys will be set to the value of the variables of the same name than the key passed as URL query string. Values contained in the array need to be url decoded before to be used.
$_POST an associative array of which keys will be set to the value passed in the HTTP post, such as HTML formular entries.
$_FILES an associative array of which keys will be set to an uploaded file entry, sent by the client via HTML formular.
HTTP requests without javascript
All the programs executed on the HTTP server as CGI will be good for storing and retrieve persistent data, and managing shared states between different clients applications, but their main inconvenient is that the client (such as browser) need to generate a new http request to execute them, and it needs to reload the whole document associated with the URL of the program to update the data.
The two ways the browser can do this without javascript are
Using link such as < a href="script.php?variable=value" > link < /a >
Using formular as < form action="script.php" method="get" > < input type ="text" name="variable" value="value" > < input type ="submit" value="send" > < /form >
In the two cases, when the user will click on the link or the submit button of the formular, the browser will generate a new HTTP request with the parameters contained in the href attribute of the link, or the value of the input fields of the formular, and load the response in the active window.
If the response has the content-type header field set to a format it can display, it will load the new content into the active window. Otherwise, it will download the response as a file.
An old trick to execute the request without reloading the page is to use the 'target' attribute in the form or a tag, and use an iframe to load the response into a separate frame, but it's not much used.
CSS Stylesheets
Each HTML tag is associated with a style, defining the display properties of the tag. Style are defined as a set of key:value; pairs, separated by a ';'.
The association of the style with a tag can be defined in two manners
Using the style attribute of the tag, such as adding the attribute style="color:red;" to the tag.
Defining those style as a class in a CSS stylesheet seperated from the HTML document.
When using CSS stylesheet, those classes can be associated with a tag in different manners using a prefix before the class name.
Using the '.' prefix before the class name. In that case the style must be associated with the tag using its class attribute matching the class name.
Using the '#' prefix before the class name. In that case the style will be associated with the tag of which id attribute will match the class name.
Using no prefix before the class name. In that case, the style will be associated with all the tags of which name match the class name.
Additionally to the prefix, some HTML tags can also have a class associated with different states, such as links can have a different style associated to them when the mouse pass over them by adding :hover to the class name, or when they are already visisted by adding :visisted suffix.
Different selectors can be added seperated by a space to apply the selector only to the tags contained in the first selector.
For example to apply a style to all links inside of a menu, can use #menu a { color:red; }
Some commonly used style are
| color | set the color used by text content inside of the tag. It can be set using hex color code, or _rgb(red,green,blue)_ |
| background-color | set the background color of the tag. |
| border | define color , style and size of the tag border, as the contour of the tag. |
| border-radius | set rounded corner on the border of the tag. |
| padding | define the size of empty space added around the content inside of the tag. |
| margin | define the size of empty space added around the tag. |
| text-align | define horizontal alignment of child tags and content inside of the tag. |
| vertocam-align | define vertical alignment of child tags and content inside of the tag. |
| width and height | define the size of the tag |
| display | define how the tag react with contingent tags. If the value is set to _block_ the tag will be displayed alone in the row. if the value is set to _inline_ , the tag will be displayed in the same line than previous tag. It also affect how the size and alignment is procesed. |
HTML as DOM
In order to add more interactivity in the page, modern browsers will associate each HTML tag to an object, and allow the execution of scripts inside of the page to manipulate those objects, either to modify their attribute, content, or children tags.
DOM stand for Document Object Model, and it refer to how HTML document are turned into a hierarchy of objects, that can be manipulated dynamically using scripts executed by the browser.
Manipulation of DOM using javascript
There is two way to execute a javascript inside of the browser
Embeding the script to be executed in the page directly using the < script > tag.
Defining the script to be executed as a function, and associating this function with an event handler.
Generally it's bad idea to embed the code to be executed directly into the page, as the order in which each elements of the document will be loaded and processed by the browser is not very well defined, so it's generally better to define the code as a function, and execution this function as an event handler.
If the code has to be executed automatically when the page load, an event handler can be associated with the root document object to execute the code when the browser reach a particular stage of processing the document.
$( document ).ready( function() { javascript code });
jQuery will generally be used as a layer above the browser javascript engine, as each browsers have differents javascript engines, and can each have their own specifities, it's generally better to use jQuery above the browser engine as it provides an uniform synthax to access the properties of all the elements of the document, and browser feature.
jQuery use selectors to target elements of the document, and provide an abstraction layer to access the properties of the objects. The jQuery selectors use the same synthax as CSS stylesheets.
To access the style of an element of the document, jQuery selector can be used like this
$('#id').css('color','red');
To change the style property color to red in the element with the id attribute set to 'id'.
The same prefiexes can be used than the CSS class selector, with '.' to select all elements having the class attribute set to the identifier , or without any suffix to select all tag with the name of the identifier.
General code structure
I will take on the example of the previous post, but instead of generating the HTML pages using php CGI with a view , it will use static HTML page and javascript queries to embed dynamic data into the page.
It will use a different controller to process the HTTP request coming from javascript and output the data from the model in JSON format.
HTML layout
In the previous example, there was 4 different functions in the user view used to display the different pages
- generate_register_view()
- generate_login_view()
- generate_account_view()
- generate_user_list_view()
They will be replaced with 4 differents static html pages
- register.html
- login.html
- account.html
- userlist.html
Javascript and CSS assets
Each html pages include the 2 scripts files, jQuery and api.js, as well as a basic CSS stylesheet.

- < script src="https://code.jquery.com/jquery-3.2.1.min.js" > < /script > include jQuery toolkit.
- < script src="api.js" > < /script > include the javascript function that will be used by the differents pages.
- < link rel="stylesheet" type="text/css" href="style.css" > include the stylesheet that will be used by the differents pages.
The file api.js is found at this address http://nodix.eu/phpTutos/2/api.js .
The file style.css is found at this address http://nodix.eu/phpTutos/2/style.css .
Server side code
The controller in index.php will be replaced by api.php and it will implement the function to fetch the dynamic data from the server, and output the result formatted in json for it to be processed in the browser with javascript.
index.php
<?php header('location:register.html'); ?>
The links to pages which were generated by the controller based on URL query string are replaced by links to the static HTML pages, and index.php will only be used to redirect to the default home page, which in the case will be the register page.
The model associated with users and session remain identical, but a new model is added to generate the top menu.
model_menu.php
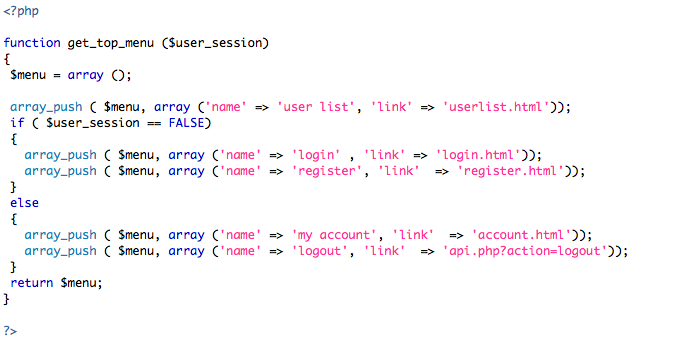
And it is inlcuded in the new controller api.php
include "model_users.php";
include "model_sessions.php";
include "model_menu.php";
And the view_users.php is removed.
Client server interaction using jQuery
The new controller is api.php, the basic initialization remain the same , but the processing of the requests is different, it now generates the data from the models to a php array, and output the result directly to the client as json data using the php function json_encode.
api.php
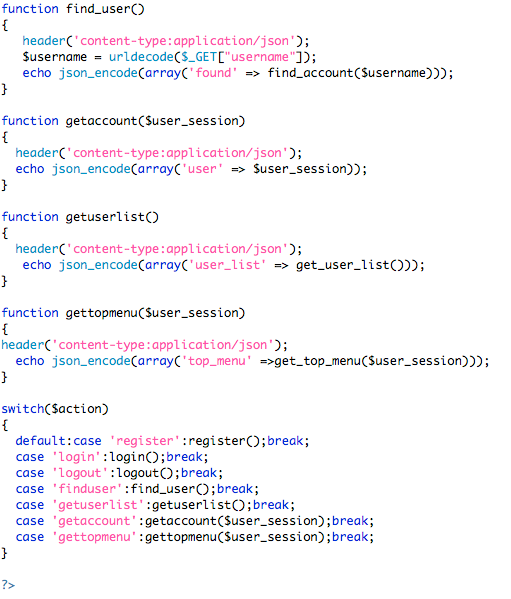
The data from the top menu is accessed via the URL http://nodix.eu/phpTutos/2/api.php?action=gettopmenu
{"top_menu":[
{"name":"user list","link":"userlist.html"},
{"name":"login","link":"login.html"},
{"name":"register","link":"register.html"}
]}
The first function used in api.js is the one to fetch the top menu infos, and generate the html using jQuery DOM manipulation.
This function loads the json data from the api.php file, and execute the function display_topmenu with data when it receive it.
function load_topmenu()
{
$.getJSON('api.php?action=gettopmenu', display_topmenu );
}
The HTML element will be added into the tag having the id attribute set to 'menu' as specified by the jQuery selector $('#menu'), as a link containing the infos for each entry received from the php script.
< div id="menu" > < /div >
function display_topmenu(data)
{
var menu=data.top_menu;
for(i=0;i<menu.length;i++)
$('#menu').append(''+menu[i].name+'');
}
The function load_topmenu is executed by embedding the following script in the page
< script type="text/javascript" >
$( document ).ready(load_topmenu);
< /script >
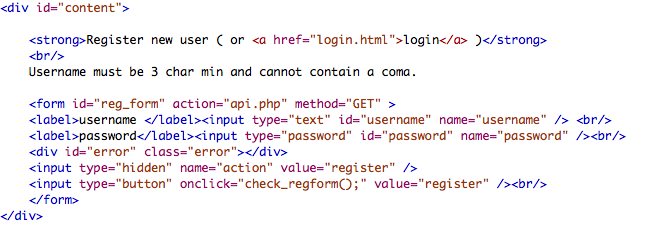
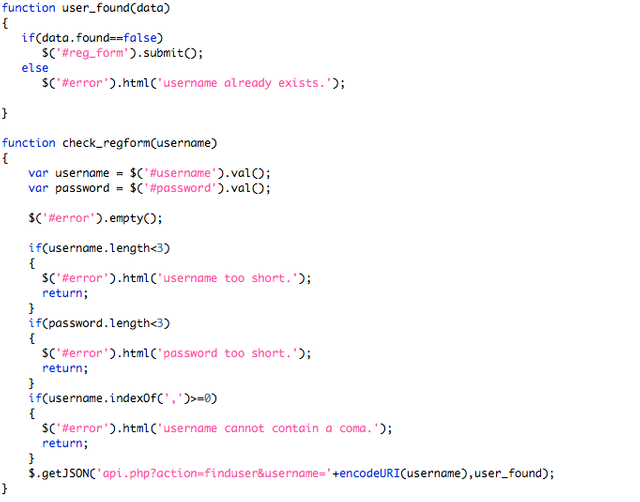
The formular of registration will also now be checked dynamically before to be sent to the php.
The submit input button is turned to a regular button, and the function 'check_regform' will be called well the user click the button, and the id attribute is also added to the input fields, additionally to the name attribute, in order to be able to select them easily them using a jQuery '#' selector.
The formular will only be submitted if the javascript validate the informations
The value of an input tag with an id attribute can be selected with
var value = $('#idvalue').val();
An error tag with the id error is also added into the HTML document to display the validation error.
api.js
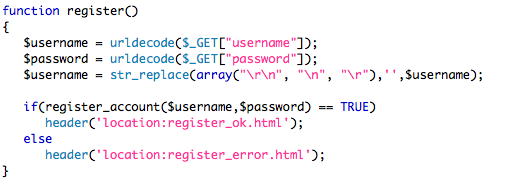
The form validation on the server side in php remain almost identical, it will just redirect to an error page if the registration fail, and a success page if the new user was registered properly.
api.php
The full register page can be tested on
http://nodix.eu/phpTutos/2/register.html
The login page is made in the same manner, it will attempt to log the user is using dynamic jQuery request, and redirect to the account page if it's successful, or display an error message in the HTML document.
login.html

api.js
function check_login(username) {
var username = $('#username').val();
var password = $('#password').val();$('#error').empty();
$.getJSON('api.php?action=login&username='+encodeURI(username)+'&password='+encodeURI(password),login_result);
}
function login_result(data) {
if(data.error==false)
window.location.href='account.html';
else
$('#error').html('login error.');
}
Similar functions are used to load the user list on the userlist page, and account information on the account page.
The demo for this tutorial can be seen at http://nodix.eu/phpTutos/2/ , and full code and files at http://nodix.eu/phpTutos/2.zip .
In the next tutorial, i was explain how to use bootstrap toolkit and template in conjunction with jquery to make a simple dynamic image gallery using php CGI on server side.
