Developing real Telegram bots (EPISODE 1: CryptoCurrency Price Monitor)

💰📱 Lᴇᴀʀɴ ʜᴏᴡ ᴛᴏ ᴅᴇᴠᴇʟᴏᴘ ʏᴏᴜʀ ᴏᴡɴ Tᴇʟᴇɢʀᴀᴍ ʙᴏᴛ ꜰᴏʀ ᴘʀᴀᴄᴛɪᴄᴀʟ ᴘᴜʀᴘᴏsᴇs 💲
One of the best Telegram features are bots. These are special Telegram accounts that are controlled by software instead of humans. Your software connects with the Telegram Bot API to properly control the bot. That means that you download the updates sent to the bot by the human users and you send responses to the same API in order to reply to users.
Depending on how they have been programmed, these bots can behave as human users do (chatbots), but with additional features that let them provide infinite and varied types of services. There are already tons of bots with different functions and capabilities, such as searching for images, integrating with Youtube and Instagram, searching on Amazon, playing chess, moderating groups etc. You can try them if you have not. That’s a good reference to better understand this topic.
Since Telegram allows these bots to be developed by a third-party, it is possible for you to develop your own bots. For that reason, I am starting this series of posts about developing Telegram bots with different purposes; something that may be interesting and/or practical. In the process, you will learn or consolidate the basics about the development of these interesting applications.
I have divided this first post in two parts: the first one will guide you through the basic concepts of programming this kind of bot (because it is always good to justify and review things) and the second one introduces the development of an actual bot for practical purposes. So, if you have already mastered the basics you can skip the first part.
I hope this is useful for you. Let us get started.
PART 1: Creating a Telegram bot
Purpose: you will learn the basics to develop and deploy your own Telegram bot.
As I mentioned before, you can create your own Telegram bot. That means you will develop the piece of software that will handle most of the bot and you are responsible for launching it and for keeping it working on your own. The next guideline summarizes this process:
- Getting a Telegram bot token
- Setting the programming language and library to connect with the Telegram Bot API
- Hosting and launching the bot
1) Getting a Telegram bot token:
Since all of these bots are Telegram accounts as well, you need to create them on Telegram. To accomplish this, you have to start a conversation with the @BotFather, if you have not already done this. BotFather is the Telegram bot “that rules them all” and it is necessary to handle many things about them. Use the search function from your Telegram application to find this bot as a contact (or click this link: @BotFather from the device where Telegram is installed) and start a conversation with it.

You will soon discover how to create a Telegram bot. Just type the command: /newbot and it will start a simple conversation where you will be asked about:
- The name of the bot: this is the common name that will be mainly displayed on Telegram, just as yours.
- The username of the bot: which must end in “bot”. This will be very practical to find the bot and share it with other people.
After this, BotFather will tell you that your bot has already been created. To expand the process you can add a picture (command /setuserpic), a description (command /setdescription) and an about-text (command /setabouttext) for the new bot. Also, you can send a "list of commands" to BotFather with those commands you want to support in your bot. BotFather will take this information only to improve the user experience (/setcommands).

The most important thing, however, is the token assigned to your bot by BotFather. This is an authentication code that is necessary to connect the software that you will create with the Telegram Bot API. In other words, it is a kind of password that you would need to allow your software to communicate effectively with Telegram through HTTPS. A typical token would look like this:
541859297:AAFCK1zo5mdWJ_brSEIM6Fi5crsgOpwa7b4You have to save the corresponding token and never share it with anyone. The token previously shown is only for didactic purpose. It has already been revoked (command /revoke in the chat with BotFather).
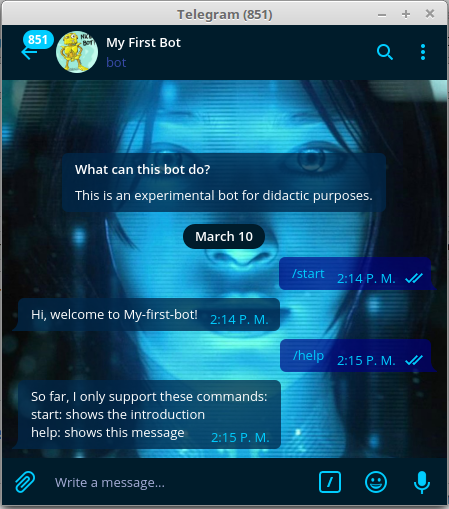
In addition, you can see how BotFather interacts with users, where the use of commands stands out. These are keywords that always start with the symbol “/” and a have different colour (usually blue) compared to the remaining texts. The commands indicate simple and clear instructions for the bot. Some commands will be implemented in the bot that you are going to develop.
2) Setting a programming language and library to connect with the Telegram Bot API:
Since all this is about software development, you will eventually need some amount of coding. Choose a suitable programming language for the development of web applications, especially one that supports a native library to interact with the Telegram Bot API. In this post, it has been chosen Python as programming language as well as the python-telegram-bot (ptb) library. The latter is a wonderful open source wrapper that makes the process to interact with the Telegram Bot API a lot easier. Also it it helpful to code different aspects of bot. To install this library just run:
$ sudo pip install python-telegram-bot After this, you can begin the coding process using this library, editors and interpreters. Create a file and renamed it as “my_first_bot.py”. Here you will eventually add some code portions like the ones below:
from telegram.ext import Updater, CommandHandler Here you are importing a couple of important classes from the python-telegram-bot library: Updater and CommandHandler. Among other things, Updater allows you to implement a dispatcher object to receive the updates from Telegram, so you don't need to worry about doing it yourself through HTTPS requests. The CommandHandler class will be explained later. Now, let us focus on the main function for the application:
def main():
  Updater("YOUR-TOKEN-HERE")
   dp = updater.dispatcher
   dp.add_handler(CommandHandler("start", start))
   dp.add_handler(CommandHandler("help", help)
   updater.start_polling()
   updater.idle()
As you may have noticed, an instance of the Updater class mentioned above has been created, where you must replace the text “YOUR-TOKEN-HERE” with the corresponding valid token previously assigned by BotFather.
The next step is the creation of a dispatcher object, which is useful to implement handlers. In this case, three CommandHandler instances are being added to the dispatcher, with which the updater pays attention to the commands sent to the bot by the human users and treats all this as an event, sending its data to the corresponding handler function. This is shown as follows:
dp.add_handler(CommandHandler("start", start_function))
dp.add_handler(CommandHandler("help", help_function))
So, the first argument for the CommandHandler class is the word that matches the command that users will enter in Telegram (for example: “start”). The second argument corresponds to the function which would handle that event (for example: start_function). This function has to be implemented by you (it will be shown later).
In this case, the start and help commands are standard since Telegram recommends developer to always support them. “Start” is a command used mainly when new users appear, so your bot can introduce itself and the users can start a nice conversation. “Help”, on the other hand, is a command that is meant to assist the users by giving them important information about the use of the bot. Of course, the way the bot reacts specifically to these commands is up to you.
The main function ends with a couple of routine instructions that allow the bot to start running. It works with the “polling” method (different from the “webhook” method), with which your software is completely responsible for requesting updates from Telegram servers.
Now, let us focus on the functions that manage the incoming events (commands, in this case):
def start(bot, update):
  text = "Hi, welcome to My-first-bot
   update.message.reply_text(text)
This simple function does the trick. It receives at least two required arguments:
- -
Bot: this is an instance of the running bot which allows you to use the typical methods of the Telegram Bot API, such as sendMessage, sendPhoto, sendVideo, etc. - -
Update: This object contains the incoming information from Telegram (update), such as the message content, the user data, the chat data, etc.
Then, in the previous function, you are simply defining a variable that contains a string with a greeting that will be sent to the user. The line update.message.reply_text(text) implements a shortcut that executes it. It is that easy!
The help_function is quite similar:
def help(bot, update):
   text = “So far, I only support these commands:” \
   “\nstart: shows the introduction” \
   “\nhelp: shows this message”
   update.message.reply_text(text)
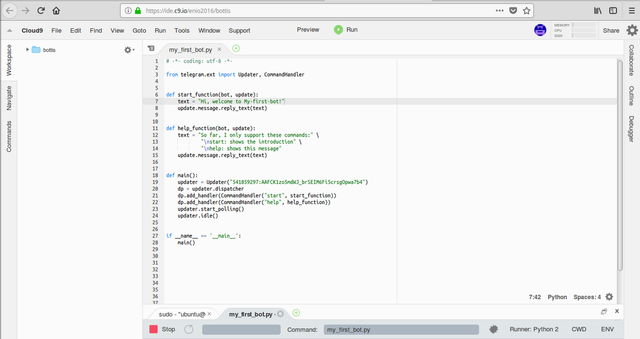
Displaying all the code:
 from telegram.ext import Updater, CommandHandler

 def start_function(bot, update):
     text = "Hi, welcome to My-first-bot!"
    update.message.reply_text(text)

 def help_function(bot, update):
     text = "So far, I only support these commands:" \
    "\nstart: shows the introduction" \
    "\nhelp: shows this message
    update.message.reply_text(text)

 def main():
     updater = Updater("YOUR-TOKEN-HERE")
    dp = updater.dispatcher
    dp.add_handler(CommandHandler("start", start_function))
    dp.add_handler(CommandHandler("help", help_function
    updater.start_polling()
    updater.idle()

 if __name__ == '__main__':
   main()
3) Launching the bot (Hosting service)
You can run the bot from your own computer, regardless of whether it is a dedicated server or not. Actually, this is practical for testing pursposes. Just run the created script this way:
$ python my_first_bot.py Also, you could code using some online integrated development enviroment and test your bot from it. Cloud9 is a nice alternative to run and debug your scripts.

However, this is no longer practical if you want to launch your bot as a 24/7 service or a least keep it active for many hours a month. In that case, you can purchase a full plan on Cloud9, or host the bot in other VPN or hosting service. Even if you don’t have an Premier plan, you can effectively host your bot on Heroku under the free plan. Just follow the guidelines to deploy a Python Application on Heroku. And that's all with respect to the basics for developing a Telegram bot. Now, let us add some interesting functionality to our newly created bot.
PART 2: Telegram bot to request the Cryptocurrencies price
Purpose: you will apply the previous knowledge to develop a real Telegram bot that requests the live price of some cryptocurrencies.
Almost everyone knows Bitcoin and other cryptocurrencies as well as their real importance in the world. Their price is constantly reviewed and monitored by thousands of operators, traders, users and fans of cryptocurrencies through dozens of cryptocurrency trading platforms and it seems that it is never enough. So, why not develop a Telegram bot to search the current price of some of these cryptocurrencies? Considering the advantages of Telegram and its huge communities of cryptocurrency fans, a bot to monitorize this value could be very practical.
Specifically, a bot with these features is being proposed: support for three commands: start, help and price. With this last one, the user will be able to consult the price of any cryptocurrency that he/she wishes. The bot will take care of giving appropriate answers in any case.
Let us get started.
1) Creating a Telegram account for the bot
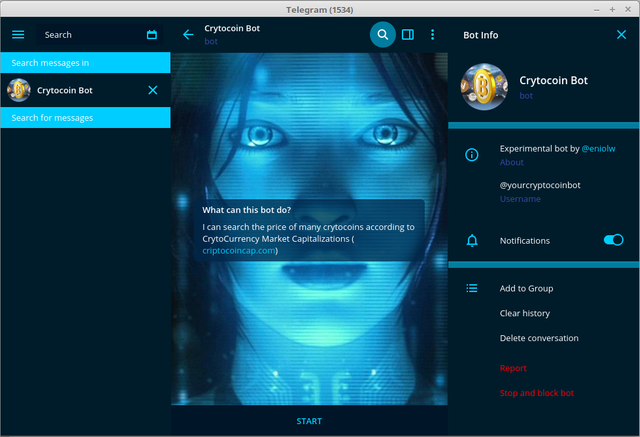
First of all, create the bot account in Telegram by chatting with BotFather. In my case, I will name it: “Crytocoin Bot” and set the username: “yourcrytocoinbot”. Also, I will add a nice picture, a description and an about-text. The newly created bot could look like this:

2) Implementing the coinmarketcap module to extend functions to the previous bot
The previous bot is perfect to achieve this. That code can work as a base to the new practical project, so you can copy it and make some modifications in order to get the data on a specific cryptocurrency. This is shown as follows:


You can see that the new functionality of the bot can be achieved by using the coinmarketcap module (line 2). Like the python-telegram-bot library (line 3), this module is also a Python wrapper but it works around the coinmarketcap.com API. It is distributed under the Apache 2.0 license. It can be installed like this:
$ sudo pip install coinmarketcap Then, you see the get_price function, which is actually a function to handler the updates produced by the “price” command, set in the main function (line 66). You can see that the CommandHandler class receives the pass_args parameter, which in turn allows the bot to pay attention to the text that users pass with the “price” command. The purpose of this feature is to allow users to specify the crytocurrency whose price they would like to know. In their devices with Telegram, they would do it in the following way:
/price bitcoin
/price ethereum
Where "/price" corresponds to the command and "bitcoin" and "ethereum" are input texts that would be treated as arguments by the handler function.
In this sense, the get_price function validates if there are arguments or not, that is, the currency name entered by users (lines 24-27), creates a valid currency ID for the CoinMarketCap API (line 30), sends this data and requests some results from the aforementioned API (lines 34-39), and finally prepares a response to the user taking into account the name of the cryptocurrency and its value in USD terms (lines 42-53).
Finally, a few additional changes in the start and help functions to adapt the messages properly. That is all. Of course, the bot can be improved in the interaction with the user to make the process even simpler and intuitive. Also, keep in mind that the CoinMarketCap API requires that client applications “limit requests to no more than 10 per minute”, which becomes a pending issue for this version of the bot. But all of these issues can be covered in a forthcoming post. Now, you can clone the code and deploy it yourself.
The full code in text format is shown as follows:
# -*- coding: utf-8 -*- import coinmarketcap
from telegram.ext import Updater, CommandHandler
def start_function(bot, update):
text = "Hi, welcome to Your CryptoCoin Bot! I will help you to search" \
" the current price of many cryptocurrencies according to" \
" coinmarketcap.com. Type /help for further information."
update.message.reply_text(text)
def help_function(bot, update):
text = "So far, I only support these commands:" \
"\nstart: shows the introduction" \
"\nhelp: shows this message" \
"\nprice <cryptocoin_name>: searches the price of the specified cryptocurrency"
update.message.reply_text(text)
def get_price(bot, update, args=None):
# Checking if the user specified a cryptocurrency:
if len(args) == 0:
text = "You have to specify a cryptocoin. For example: /price bitcoin"
update.message.reply_text(text)
return
# Joining all of the arguments to create an unique ID:
currency_id = "-".join(args)
# Requesting the price for the given cryptocurrency ID:
marquet = coinmarketcap.Market()
try:
results = marquet.ticker(currency_id)
except:
text = "Something went wrong. Try later."
update.message.reply_text(text)
return
# Checking if there are valid results:
try:
# Setting values for name and price (USD):
coin_name = results[0]["name"]
price_usd = results[0]["price_usd"]
except:
text = "Aparently, the cryptocurrency name you have given does not exist" \
" or is not supported."
update.message.reply_text(text)
else:
# Preparing and sending the answer:
text = "%s price (USD): %s" % (coin_name, price_usd)
update.message.reply_text(text)
def main():
# Creating the Updater and dispatcher:
updater = Updater("YOUR-TOKEN-HERE")
dp = updater.dispatcher
# Adding some CommandHandlers:
dp.add_handler(CommandHandler("start", start_function))
dp.add_handler(CommandHandler("help", help_function))
# This CommandHandler will receive arguments from the user:  
dp.add_handler(CommandHandler("price", get_price, pass_args=True))
# Running the bot through me polling method:
updater.start_polling()
updater.idle()
if __name__ == '__main__':
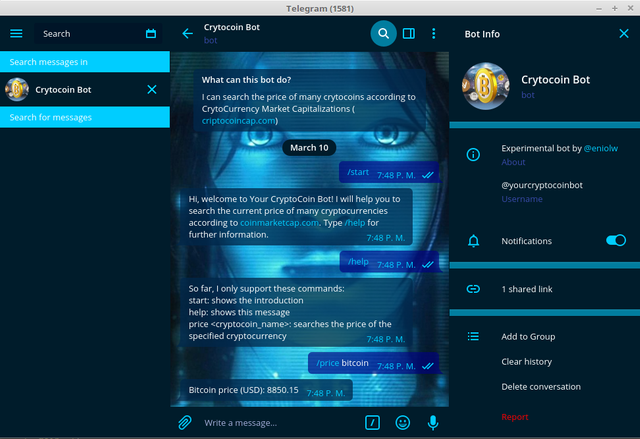
main() And here is a screenshot of the running bot:

Note: all the images used here have been created by the post author.
@Yourcryptocoinbot on Telegram
Yourcryptocoinbot on Github
excellent, this article is well prepared, you should use the #utopian-io tag, they may like your work
Thank you for your tip!