3D-printing a camera-mount screw using the Bolt-Factory addon in Blender
Why on earth can't we just agree to use the metric system? Recently I had to make some camera mounts for a couple of depth censors. This was part of a research project I am doing with a few colleagues.
The depth censors have standard camera mounting threads so it should be easy to get some threaded pins to use .... Not so. the only way was to either import it from the UK or buy a full camera tripod and cannibalize the threaded pin.
both of these options would be a factor 10 more expensive than the actual bolt, so I tried to find a cheaper solution.
Enter: my favourite 3d-program Blender.
It turns out blender has an in-build addon which does all kinds of threads and bolts. It is called bolt-factory. It does both nuts and bolt.

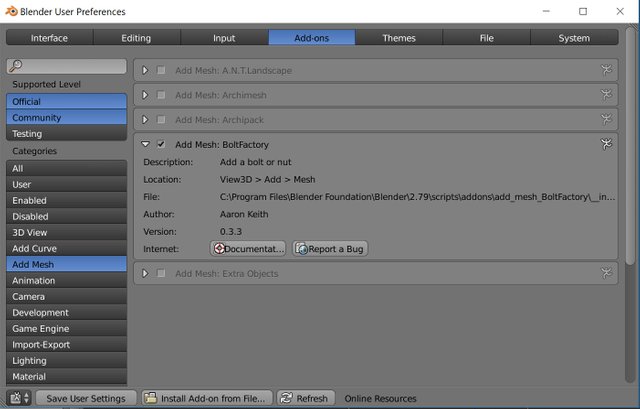
I installed the addon by opening the user preference tab and ticking the boltfactory addon under addons->add mesh. These addons are really neat and someday I will make an overview of my favourites. For now I will just say: If Blender cant do it look here and it probably can.
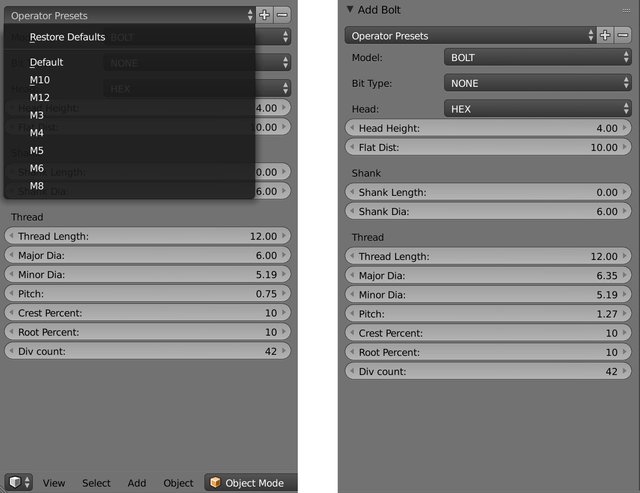
I did some research( on Wikipedia ) and found the specification of the thread used in camera mounts. It is the british standard UNC-20 which is a 1/4 inch diameter (6.35 mm) and has a pitch of 0.05 inches(1.27 mm). Pitch is the distance the thread changes in one revolution, so the distance from the top of one thread to the next.
Bolt Factory has some nice presets(but unfortunately very metric-centric). I chose the M6 (stands for metric 6 mm) coarse which is the one closest to UNC-20.
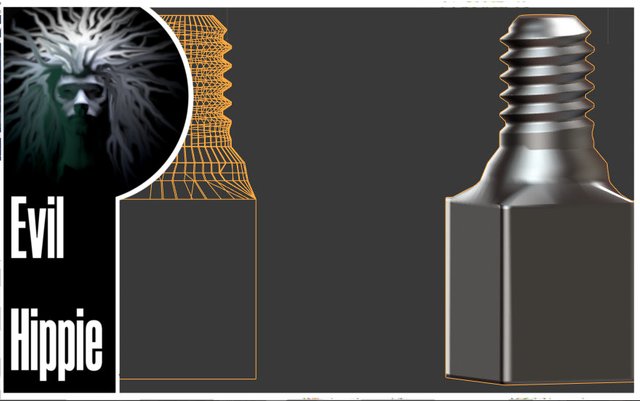
You click the create button and then BEFORE starting to tweak around with the bolt in the 3d view, you set the parameters in the add bolt windows that opens just above the create button. There's options for both the bit type and the head-shape, but these where not needed for this project since it was to be mounted in a fixture.

After making the thread correct, you can go in edit mode and build the rest of the bolt. I just used a cube as fixture so this part was quite simple.
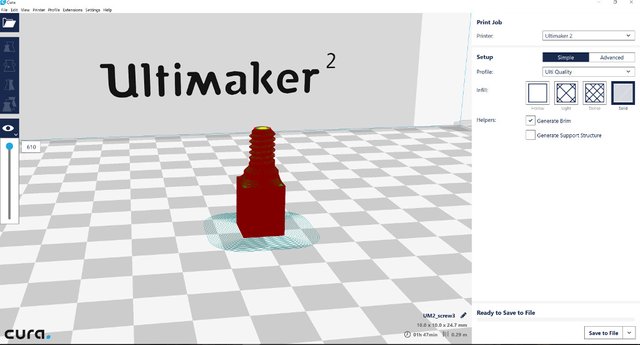
When the bolt was ready in Blender I exported it to stl and opened it in CURA(2.1.3). I wanted to print it on the ultimaker, since the resin from my wanhao gets a little brittle sometimes and this had to be fairly durable.
I chose the best setting (called ulti quality) and chose 100% infill. this was to get the smoothest possible surface and the highest possible durability. I even tweaked the print so that the material-feed was set to 105%. this gives just that little extra material to make sure it is completely solid, without compromising the smoothness of the surface.
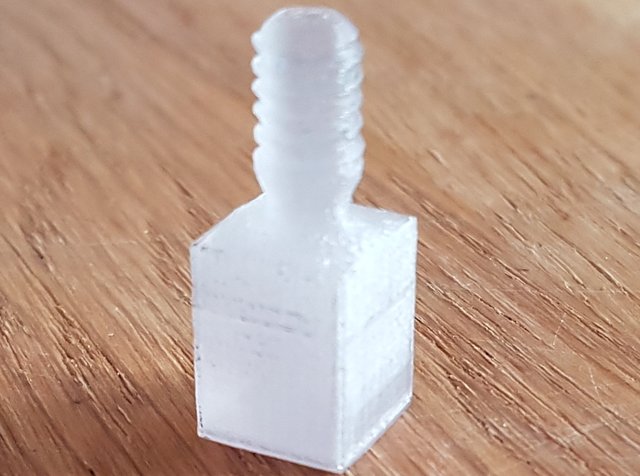
Finally i tested the thread on my camera as well as on the phone holder i have got. It worked perfectly and was both tight with no give or rattle, and could be screwed in without any resistance.
if you cannot be bothered to make your own thread, but still want to be able to make your custom cameramount here is an stl of my screw released under creative commons ![]()

Im EvilHippie, a compulsive creative and jack o' trades. If you want to know more about me, check out my introduction post here
If you like what you see, feel free to upvote, follow and resteem
or you can check out these recent posts
Nice job!
I'm expecting the non-metric folk to express speed in furlongs/fortnight shortly, just to annoy the rest of the world.
:D
Excellent, I like your resourcefulness! Since the first time I heard about it, I have been thinking that 3d printing would be the bet way to make your special playmobil and lego pieces, but it is still on my list of to-do things (or, better, to-buy list).
Can it be used to print ornaments for the swords you forge? Like, details on the pommel or the point where the blade meets the hilt?
It can and I do. I have a few older posts like this one where I print part of a sword pommel. It has to then be cast in bronze or silver to be durable enough for a sword pommel but yeah I do that.
It is also quite good for legos. My son has printed a few gears that he was missing, and those can be used as is and are almost as durable as real lego bricks.
Heh, I had that coming, of course you've tried it -- and posted about it too! There are so many things to try with 3d printing, I really can't wait to get my hands on one.
Nice trick, do you have some good resources to dive into Blender ?
I think the best resources are to begin with their own getting started tutorials here. otherwize there is a guy which does some nice videotutorials on youtube his channel is called blender guru those have been really good for specifics. Other than that it is just download and jump down the rabbit hole, se how far it goes and maybe surface a few years later :-)
Yes, it feels a bit this way.
If you are doing a lot of (non-organic) modeling for 3D printing, I'd highly suggest you look into learning Fusion360. It is free, and fairly easy to use once you get the hang of sketches. It completely changed the way I model functional parts now.
After using it for less than a year, I got a gig doing CAD design and prototyping of an electric moped (using 3D printing and CNC machining).
thanks I will check it out. I have recently looked into more cad like modelling (in preparation for hopefully buying a desktop cnc soon)
Because the metric system is dumb. And the metric threads are not as good, strong or durable. I can prove all of this, but it really gets tedious and metric threads work good enough.
When science figures out that the universe is base 12, and so using a base 12 measuring system makes so much more sense, what will become of the metric system?
:-) At least it seems the world of cameras is base 12.
Great thimking sir.....creative mind...
keep it up......i followed you