POSQ:Masternode Tutorial

QT Wallet (Windows/Linux/OS X)
Requirements:
- Windows: Windows 7, Server 2013 or higher.
- OSX: MacOS 10.9 or higher.
- Linux: Ubuntu 14.04 or 16.04.
- Static IP Address.
- Port 5510 forwarded/open.
- Preferably running on VPS.
Wallet Install:
- Download the POSQ Wallet:
- Prepare for installation.
- Extract POSQ -QT to preferred location.
- Run POSQ -QT & install to preferred location.
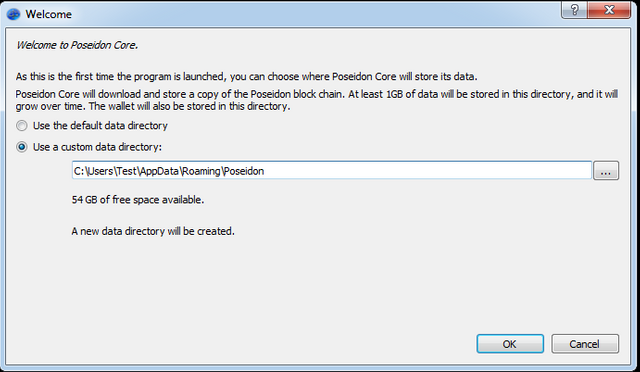
- Close QT wallet and head to installation directory.
- Windows:Default directory is AppData\Roaming\POSQ
- Linux:Default directory is ~/.posq/
- OS X:Default directory is ~/Library/Application Support/POSQ
- Edit posq.conf
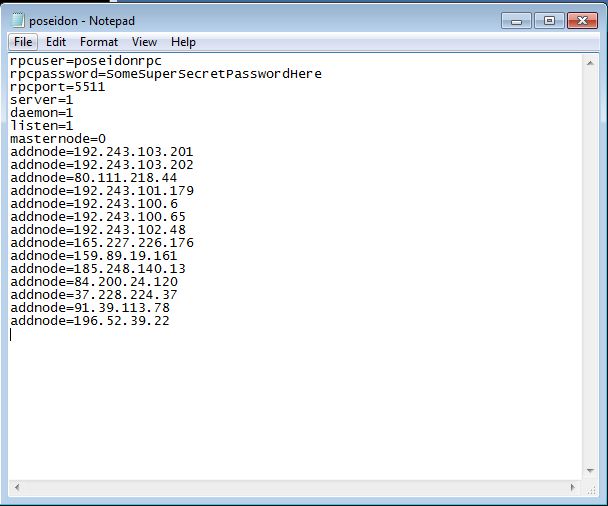
- Restart QT wallet.
- Check that you're connecting to multiple peers. Tools >Debug >>Peers
- Allow wallet to sync until you see the following symbol.

- Encrypt your wallet for safety.
- To encrypt the wallet, go to Settings > Encrypt wallet. Enter the passphrase, click ok. You will then have to restart the wallet and then go to Settings > Unlock Wallet and then enter the passphrase to unlock the wallet, for staking, controlling the masternode or sending POSQ.
- Choose a LONG/STRONG password. Write it down or save it somewhere OFFLINE.

- Backup your wallet for safety.
- Save to multiple locations. Encrypted USB drives are ideal.
Masternode Setup
- Unlock Wallet.
- Settings > Unlock Wallet
- Open Console.
- Tools>Debug>Console.
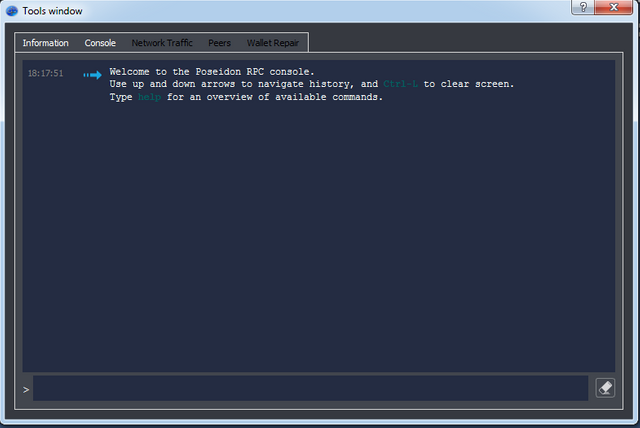
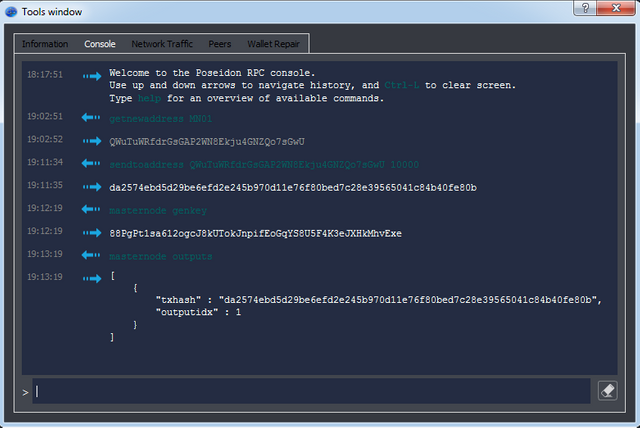
- Create receiving collateral address.
- Run
getnewaddress MN01. - A new receiving address will show. Copy address.
- Run
- Send the required 5,000 POSQ to run masternode to newly created address.
sendtoaddress copied-address 5000.
- Run the command
masternode genkey.- Copy address, we will use it later.
- Run the command
masternode outputs.- Copy complete output, we will use it later.
- Edit masternode.conf file.
- Go to Tools -> Open Masternode Configuration File and add a line in the newly opened masternode.conf file with a text editor.

Open/edit masternode.conf file.
- Following the format in this file, input all of your information.
- Format:
MN01 your_vps_ip_address:5510 your_masternode_key_output_from-masternode_genkey txhash_from-masternode_outputs Outputidx_from-masternode_outputs. 173.239.218.20Is your IP. Unsure? runifconfig88PgPt1sa612ogcJ8kUTokJnpifEoGqYS8U5F4K3eJXHkMhvExeis your masternode key frommasternode genkey.da2574ebd5d29be6efd2e245b970d11e76f80bed7c28e39565041c84b40fe80bis your txhash frommasternode outputs.- Example:
MN01 173.239.218.20:5510 88PgPt1sa612ogcJ8kUTokJnpifEoGqYS8U5F4K3eJXHkMhvExe da2574ebd5d29be6efd2e245b970d11e76f80bed7c28e39565041c84b40fe80b 1 1is your outputidx frommasternode outputs.

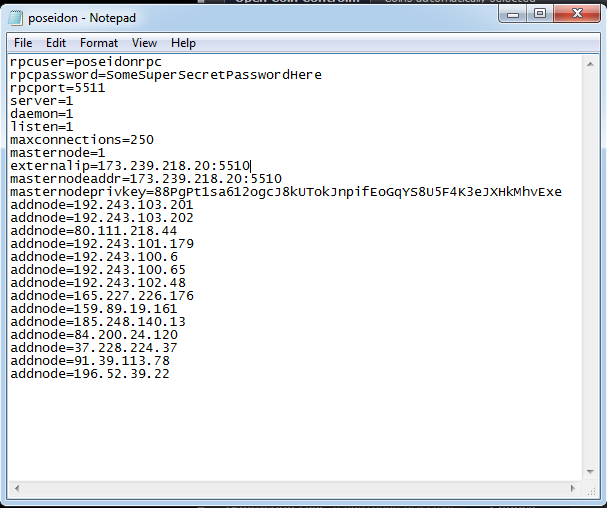
- Open the posq.conf wallet configuration file and add the following:
maxconnections=250

masternode=1

externalip=<ip_address_here>:5510

masternodeaddr=<ip_address_here>:5510

masternodeprivkey=<wallet_genkey_value_here>
- Example:
- Restart QT Wallet.
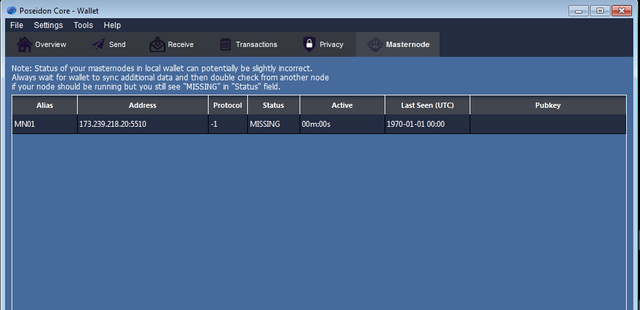
- Head to Mastenodes tab.
- Your Masternode instance should be visible.
- Current status will be
MISSING.
- Enable the Masternode.
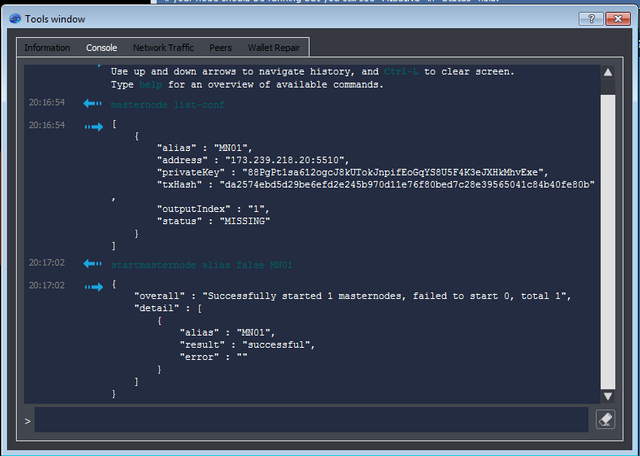
- Open Tools > Debug console.
- Enter the command
masternode list-conf.- You should now see the newly added MasterNode with a status of
MISSING.
- You should now see the newly added MasterNode with a status of
- Enter the command
startmasternode alias false MN01.
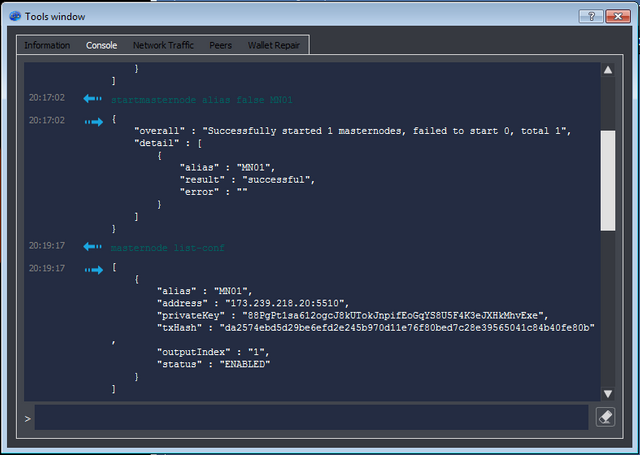
- Verify that the MasterNode is enabled and contributing to the network.
- Enter the command
masternode list-conf.
- Enter the command
- You should see the status of
ENABLED.
- Check for your new Masternode on mn.zone.
Masternode setup is complete!
CLI Daemon Install
- Download the latest POSQ Linux wallet.
- Linux Wallet
wget https://posq.space/POSQ_Linux.zip --no-check-certificate
- Install the required libraries.
apt-get update

apt-get upgrade -y

apt-get install wget nano unrar unzip libboost-all-dev libevent-dev software-properties-common -y

add-apt-repository ppa:bitcoin/bitcoin -y

apt-get update

apt-get install libdb4.8-dev libdb4.8++-dev -y

apt-get install libzmq3-dev libminiupnpc-dev -y
- Configure swap to avoid running out of memory:
fallocate -l 1500M /mnt/1500MB.swap

dd if=/dev/zero of=/mnt/1500MB.swap bs=1024 count=1572864

mkswap /mnt/1500MB.swap

swapon /mnt/1500MB.swap

chmod 600 /mnt/1500MB.swap

echo '/mnt/1500MB.swap  none  swap  sw 0  0' >> /etc/fstab
- Open Port for Masternode communication:
ufw allow 22/tcp

ufw limit 22/tcp

ufw allow 5510/tcp

ufw logging on

ufw --force enable
- Unzip POSQ wallet and set up initial conf file:
unzip POSQ_Linux.zip

cd POSQ_Linux

./posqd- You will receive an error "
To use posqd, or the -server option to posq-qt, you must set an rpcpassword in the configuration file" This is correct as we need to configure that file for proper operation.
- You will receive an error "
- Edit posq.conf file:
- Example w/peers can be found here. Use "masternode" setup for MN.
- Default directory is ~/.posq/
- Open/create posq.conf file with
nano /root/.posq/posq.conf - Add everything from conf example listed in link above.
- Save and exit file CTRL+O, CTRL+X.
- Start POSQ for initial Masternode setup.
./posqd
- Allow the daemon to sync. After a few minutes verify block count.
./posq-cli getinfo- Verify block count against block explorer found here.
- Begin Masternode configuration.
- Create Collateral address
./posq-cli getnewaddress MN01 - Generate masternode private key and copy it for later
./posq-cli masternode genkey - Send exactly 5,000 POSQ to new address
./posq-cli sendtoaddress copied-address 5000 - Wait about a minute and run
./posq-cli masternode outputs. Save it for later.
- Create Collateral address
- Open/edit masternode.conf file.
nano /root/.posq/masternode.conf- Following the format in this file, input all of your information.
- Format:
MN01 your_vps_ip_address:5510 your_masternode_key_output_from-masternode_genkey txhash_from-masternode_outputs Outputidx_from-masternode_outputs. 173.239.218.20Is your IP. Unsure? runifconfig88PgPt1sa612ogcJ8kUTokJnpifEoGqYS8U5F4K3eJXHkMhvExeis your masternode key frommasternode genkey.da2574ebd5d29be6efd2e245b970d11e76f80bed7c28e39565041c84b40fe80bis your txhash frommasternode outputs.- Example:
MN01 173.239.218.20:5510 88PgPt1sa612ogcJ8kUTokJnpifEoGqYS8U5F4K3eJXHkMhvExe da2574ebd5d29be6efd2e245b970d11e76f80bed7c28e39565041c84b40fe80b 1 -
1is your outputidx frommasternode outputs. - Save and exit file CTRL+O, CTRL+X.
- Stop/restart posqd daemon.
- Reopen posq.conf with
nano /root/.posq/posq.conf - Enter your IP for
externalip=.
externalip=173.239.218.20:5510 - Enter your IP for
masternodeaddr=.
masternodeaddr=173.239.218.20:5510 - Enter
masternodeprivkey=frommasternode genkey.
masternodeprivkey=88PgPt1sa612ogcJ8kUTokJnpifEoGqYS8U5F4K3eJXHkMhvExe - Save and exit file CTRL+O, CTRL+X.
- Reopen posq.conf with
- Stop/restart posqd daemon.
./posq-cli stop- Run the following command until the posqd process disappears.
ps aux | grep posqd | grep -v grep - Restart POSQ
./posqd
- Check for your new Masternode on mn.zone.
- Enable the Masternode.
./posq-cli masternode list-conf- You should now see the newly added masternode with a status of
MISSING.
- You should now see the newly added masternode with a status of
- Run the following command, in order to enable it:
./posq-cli startmasternode alias false MN01
- Verify that the MasterNode is enabled and contributing to the network.
- Let the process run for a few minutes then check on it with:
./posq-cli masternode status - You should be greeted with
Masternode successfully started - If instead you get
Masternode not found in the list of available masternodes. Give it a little bit of time to sync up with the network and try again.
- Let the process run for a few minutes then check on it with:
- Check for your new Masternode on mn.zone.
Process complete. Congratulations on your new POSQ Masternode!
If this article was helpful, please make sure to up-vote it. Thanks!
i want to add 2 masternodes on 1 system with one ip, is it possible,
if yes, can you please send settings, how to do that!
mn02 not started, i tried my best as per your guide
pos.JPG
good guide ... plese do other guide like this
Congratulations @sicxnull! You have received a personal award!
Click on the badge to view your Board of Honor.
Do not miss the last post from @steemitboard:
Congratulations @sicxnull! You received a personal award!
You can view your badges on your Steem Board and compare to others on the Steem Ranking
Vote for @Steemitboard as a witness to get one more award and increased upvotes!