Deploying Your Laravel Application on Shared Hosting (The Easier way)
Laravel is one of the best things that happened to PHP, it makes sure that users focus more on business logic of their application rather than how things work deeply behind the scenes. Having worked with Laravel for almost a year starting from version 5.3 I am always tempted to use it for even smaller web applications because it provides every boilerplate needed to start building a web application. Building with Laravel requires the use of command line which is not a problem during development because every system has a terminal by default. The real issue comes up when you are done building your app and ready to deploy.
Two major types of hosting
- VPS Hosting
- Shared Hosting
VPS Hosting:
Every user here has his/her own private environment with enough power to make significant changes ranging from installing different operating systems to installing needed dependencies without the need of technical support.
Shared Hosting:
Physical and non physical resources here are shared between users who are making use of the same operating system. Access to shared hosting service is limited and you always have to contact technical support anytime you have technical issues.
Requirements for hosting a Laravel Application on shared hosting
- Domain name
- Shared Host
- Your web Application
For the purpose of this tutorial we will be using a free domain from freenom which will be pointed to our shared host nameservers. Knowledge of shared hosting and app deployment is assumed in this tutorial.
Steps:
- Point domain name to a shared host nameserver.
- Create addon domain on cpanel.
- Copy the whole content of your laravel application to the server.
- Create database
- Configuring .env file
- Set up magic route
- Run migrations and other artisan commands
Point Domain to nameservers
After acquiring a domain go ahead and point the domain to an already existing shared host nameservers as illustrated in the picture below.
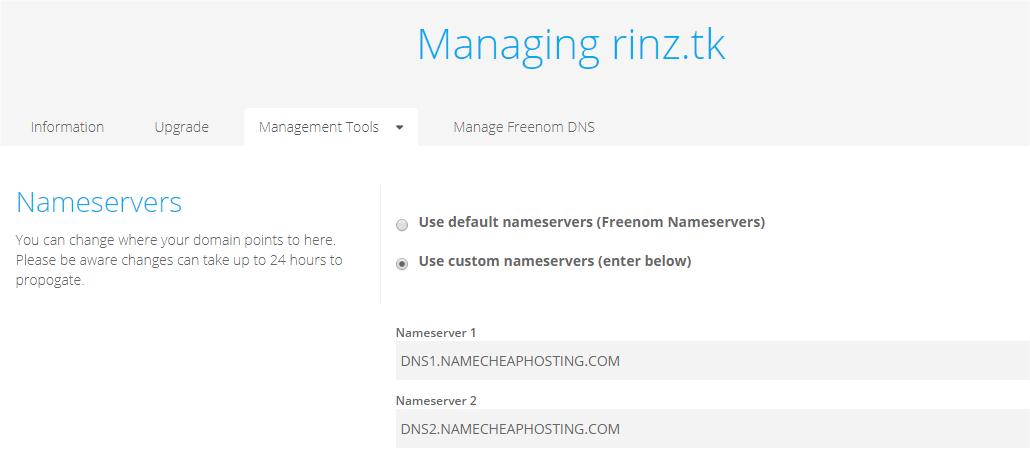
For more technical details on how to point domain names to servers from different registrars refer to this tutorial.
Create addon domain on cpanel
Next, create addon domain by clicking on Addon Domains on cpanel

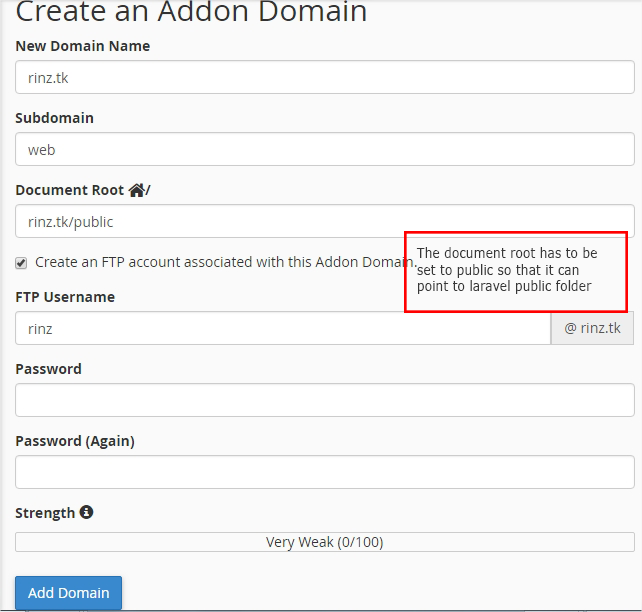
Copy the whole content of your laravel application to the server
We can create an ftp if we like to enable us easily copy or transfer our files to the server but for this tutorial we will be using the file manager on the cpanel. To make it easier we zip the whole laravel file and upload the zipped version to the folder that will be created after adding the domain e.g rinz.tk
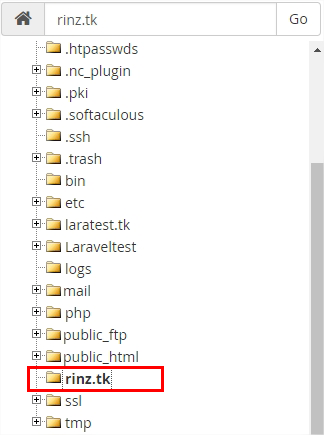
Upload the zipped file by clicking on the upload link while still inside the addon domain folder, select or drop the file to start upload as shown on the image below

Once upload is done, go back to file manager and refresh the page to see the uploaded file, right click on the file and select extract.
Create a database
To create a database click on the database link on the cpanel and enter the name of your database, it usually comes with a prefix so the full name of your database will be a prefix followed by underscore and the name you entered.

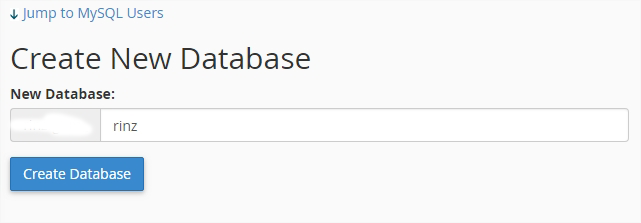
Create a user and assign privileges
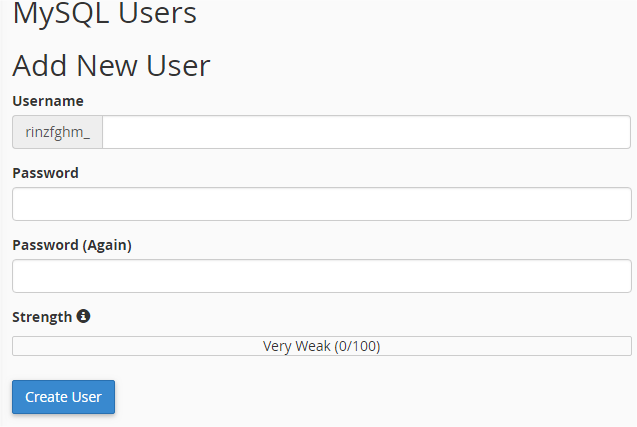
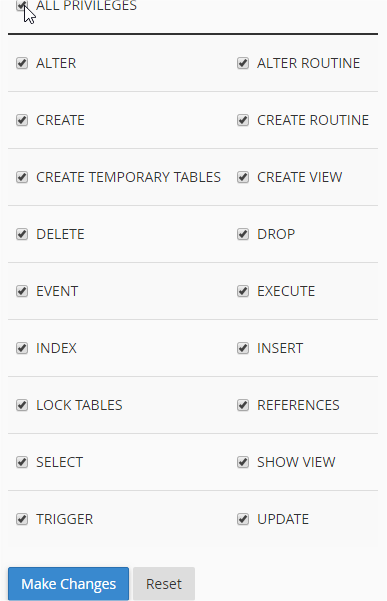
Next up after creating database is to create a user and then give them access to the already created database as well as grant them the necessary privileges.
Configure .env file
APP_NAME=Laravel

APP_ENV=local

APP_KEY=base64:lqxETOnvR+tr9HRSB6JQlBlvUD8UxgAibBA17/KYUvQ=

APP_DEBUG=true

APP_URL=http://localhost

LOG_CHANNEL=stack
DB_CONNECTION=mysql

DB_HOST=127.0.0.1

DB_PORT=3306

DB_DATABASE=mydatabase_name

DB_USERNAME=mydatabase_username

DB_PASSWORD=mydatabase_userpassword
BROADCAST_DRIVER=log

CACHE_DRIVER=file

SESSION_DRIVER=file

SESSION_LIFETIME=120

QUEUE_DRIVER=sync
REDIS_HOST=127.0.0.1

REDIS_PASSWORD=null

REDIS_PORT=6379
MAIL_DRIVER=smtp

MAIL_HOST=smtp.mailtrap.io

MAIL_PORT=2525

MAIL_USERNAME=null

MAIL_PASSWORD=null

MAIL_ENCRYPTION=null
PUSHER_APP_ID=

PUSHER_APP_KEY=

PUSHER_APP_SECRET=

PUSHER_APP_CLUSTER=mt1
Create Magic Route
In your route file i.e web.php located in route folder create a magic route that will enable us run artisan commands from the browser.
<?php
use Illuminate\Support\Facades\Request;
Route::get('/artisan', function () {

   //gets the artisan command from query string passed

   $data = Request::get('data');

   //executes the artisan command

   return shell_exec('php ../artisan '.$data);

});
//Alternatively you can use this but it can't execute all commands
Route::get('/artisan', function () {

      //gets the artisan command from query string passed

      $data = Request::get('data');

      return Artisan::call($data);

});
Run Migrations
Once this route is setup we can easily run artisan commands by parsing the commands via query strings. The url will be in the following form http://domain.tld/artisan?data=command e.g http://rinz.tk/artisan?data=migrate N:B When using unique() keyword on a column whose type is string in your migrations it is advisable to limit the number of character to something like 100 because laravel doesn't do this by default in users and password reset table. Ensure you change the php version of the server to 7.1 and above.


Summary
To deploy a laravel application on shared hosting we go through the following processes
- Get a domain free/paid
- Point the domain to shared host nameservers
- Create an addon domain on your cpanel
- Upload the content of your application to the server
- Setup the database and configure the .env
- Setup the magic route
- Run artisan commands
Conclusion
Laravel is just too awesome and shared hosting services should not be a restriction to whomever wants to build an awesome application. This tutorial is a form of hack to get things done and should be your last resort. Always disable the magic route by wiping the block of code off or commenting it out once you are done running the artisan commands and always refer to the official documentation of laravel here for more.
Congratulations @franko4don! You have completed some achievement on Steemit and have been rewarded with new badge(s) :
Click on any badge to view your own Board of Honor on SteemitBoard.
For more information about SteemitBoard, click here
If you no longer want to receive notifications, reply to this comment with the word
STOPDo not miss the last announcement from @steemitboard!
Seems you need to pay attention to the code samples, for example, your //comments dropping to the next line would definitely throw errors. And for beginners (which i believe this post is for) it would be a serious issue.
You should also mention that its not ideal to do this, though, when there is no choice, like... totally last resort...
Thanks, I will definitely look into that right away
SO now are you saying anyone can come to my app and run command by passing commands in my url?
is this secure?
Or how can i secure this?
you can create a middleware to protect that route or simply turn environment to production in .env when you are done running artisan commands.
Congratulations @franko4don! You received a personal award!
You can view your badges on your Steem Board and compare to others on the Steem Ranking
Do not miss the last post from @steemitboard:
Vote for @Steemitboard as a witness to get one more award and increased upvotes!