Essential Photoshop Keyboard Shortcuts
These keyboard shortcuts will keep your fingers flying from the moment you create a new file until you make the final touch-ups on your photo retouching.
Groundwork

- To open a flattened version of a layered PSD file, press Shift-Option/Alt and double-click the image. This works as long as the file was saved using Preferences > File Handling > Maximize PSD File Compatibility. (OS X only)
- To create a document the same size as an open document, choose File > New, and select the open document’s file name from the Preset menu. (CS only)
- For a quick way to see the actual pixel dimensions of a document, Option/ Alt-click the image info area at the bottom of the document window (or the Status bar in Windows), and you’ll see the document’s Width, Height, Channels, and Resolution (1).
- To scroll through all open documents simultaneously, select the Hand tool, and check Scroll All Windows in the Options bar. Select the Zoom tool, and check Zoom All Windows to zoom all open documents at once. (CS only)
- While dragging out a guide from the rulers, press Option/Alt to change the orientation of the guide.
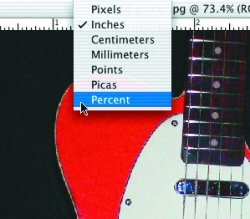
- To find the center of an image, Control/ Right-click on a ruler and choose Percent from the contextual menu (2).
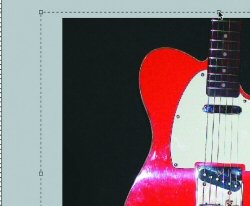
- To add canvas to an image, drag out a crop with the Crop tool. Now drag the crop handles outside the image, and press Return/Enter to apply the crop. The area outside the image fills with the Background Color. To add transparency instead, convert the Background layer by double-clicking it (3).
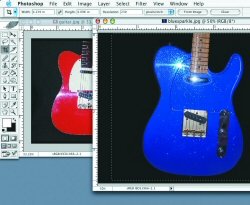
- To use cropping dimensions from one image to another, apply a crop to the first image, click Front Image in the Options bar, and you’ll see the Width, Height, and Resolution entered. Switch to the other file, and drag the Crop tool. The aspect ratio is constrained and will be at the desired dimensions (4).
- To play a single command in an Action, double-click the name of the command while pressing Command/Ctrl.
- To view the Actions palette as clickable buttons, choose Button Mode from the palette’s menu (below).
Transformations
- Free Transform (Command/Ctrl-T) a selection from its center by pressing Option/Alt while dragging a Transform box handle.
- To distort a transform box, press Command/Ctrl while dragging.
- To skew, Press Shift-Command/Ctrl while dragging.
- To change perspective, press Shift- Option-Command (Shift-Alt-Ctrl) while dragging.
- To repeat a transformation setting, load a selection, and press Shift- Command/Ctrl-T.
- To create a copy on its own layer while creating a duplicate transformation, load the selection, and press Shift- Option-Command-T (Shift-Alt-Ctrl-T).
Masks
- After adding a mask to a layer, press Command/Ctrl-Tilde (~) to target the image thumbnail on the layer. Target the mask thumbnail by pressing Command/Ctrl-Backslash ().
- Press Backslash to toggle the display of a layer mask (as a red rubylith overlay). In the Channels palette, the shortcut toggles the channel’s visibility.
- To duplicate a layer mask to another layer, select the target layer (unmasked layer), and click-drag the layer mask thumbnail of the layer with the desired mask to the Add a Mask icon at the bottom of the Layers palette.
- To paste a selection into a layer mask, Option/Alt-click the layer mask thumbnail, then Paste (Command/Ctrl-V).
- To add a layer mask to hide a selection (as opposed to the default of revealing a selection), Option/Alt-click the Add a Layer Mask icon.
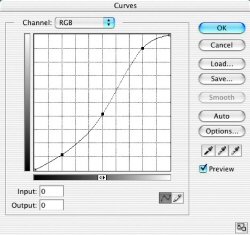
- To access the Curves dialog box with the previous settings applied, press Option-Command-M (Alt-Ctrl-M).
- To show additional grid lines, Option/ Alt-click in the grid area.
- Tab-Control/Right-click to cycle through multiple Curves points. Add Shift to go in the opposite direction.
- To move multiple Curves points, Shift-click each one first.
- To sample color for the Background Color swatch in the toolbox, press Option/Alt while clicking with the Eyedropper tool.
- Press Shift-Delete/Backspace to access the Fill command dialog box.
- The Paint Bucket has two additional Modes in the Options bar: Behind fills transparent images, and Clear erases based on the color you click on (similar to the Magic Wand tool).
- With all vector/shape tools, the Comma and Period keys move to the previous or next preset in the Style list in the Options bar. Add Shift to move directly to the first or last style.
- To access the Brushes palette while using a brush, Control/Right-click anywhere in the image area.
- To select the Airbrush, press Shift- Option/Alt-P. When selected, the numeric keys change the Flow. When deselected, they change Opacity. Press Shift while entering numbers to use the opposite setting. (PS 7 and later)
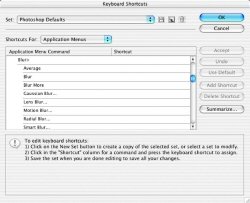
- To assign a keyboard shortcut to a filter, choose Edit > Keyboard Shortcuts > Application Menus > Filter. (CS only)
Curves
Artistic Touches