How To Photograph A Solar Eclipse
Our guide to safely and successfully photographing this rare celestial phenomenon
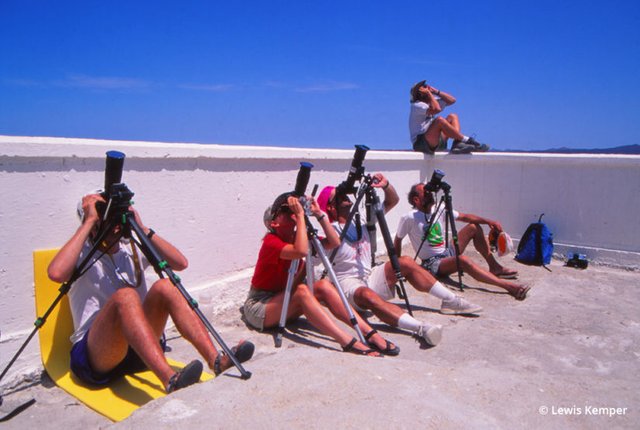
Photographing the solar eclipse in Baja California, Mexico, 1991.
It is being billed as “The Great American Eclipse.” On August 21, 2017, a total solar eclipse can be witnessed from one end of the U.S. to the other. The eclipse will be starting in Oregon at 10:16 PDT and ending in South Carolina at 2:48 EDT. The path of totality is approximately 70 miles wide and if you really want to experience the awe-inspiring phenomena of a solar eclipse you need to be in the path of totality. It is only within this 70-mile area that you will be able to see the sun totally obscured by the moon, allowing you to witness the darkness that will make stars appear in the daylight, the dancing of Baily’s Beads around the sun at the beginning and end of totality and the amazing light show of the sun’s corona.
I remember just after my high school graduation in 1972, my best friend Gary Levine and I drove to the Gaspé Peninsula in Canada to meet our science teachers to view a total eclipse of the sun. We had a great location on the edge of the St. Lawrence River with wide-open views. Unfortunately, Mother Nature had other plans for us and it was cloudy for miles in every direction. We only caught glimpses of the sun as the moon was obscuring it. We did get to experience the shadow of night moving quickly across the river towards us, engulfing us in darkness in the middle of the day, the eerie feeling of something “unnatural” happening and just a faint glimpse of the strange glow in the sky. I remember running inside and watching totality on the television and wishing for another chance at an eclipse.
I got my second chance in 1991. This time, Gary and a few others joined me in Baja, Mexico. That year the eclipse was known as “The Big One,” with totality lasting over 6 minutes. Again I was perched on the edge of water, this time the Pacific Ocean stretched out before us as we looked west for the shadow to appear. It is astonishing how fast the shadow moves, barreling towards you like a freight train. As the shadow engulfs you and you first notice the amazing light, as if sunset is happening on the horizon 360 degrees around you, the temperature drops, the air becomes still, and everything seems unusually quiet. Watching through your “eclipse glasses” you see the moon first kiss the sun and watch in amazement as more and more of the sun’s disc is covered. Just as the moon covers the sun you hope to have a fleeting glimpse of Baily’s Beads, the bright glow of lights on edge of the moon, caused by the sun peeking around mountain peaks on the moon. And then it happens!
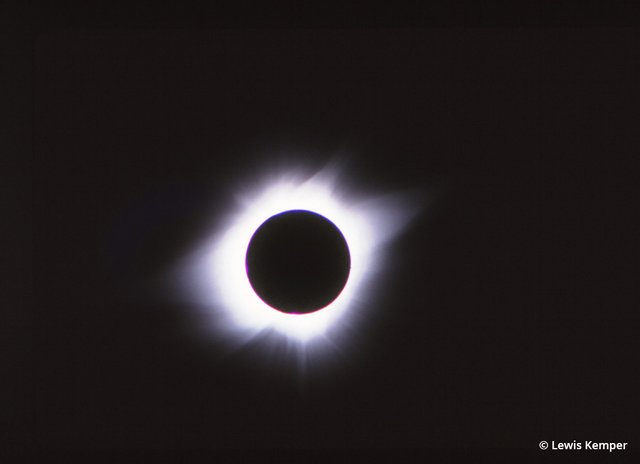
Sun and corona, Baja California, Mexico, 1991.
Totality. The moment you have been waiting for, when the moon obscures the sun and darkness descends. Only now is it safe to remove the eclipse glasses and look at the sun. The corona glows and dances around the black sun, stars are out and you find you are forgetting to breathe much less press the shutter. Unfortunately, totality does not last long; the six plus minutes in 1991 were special. 2017's totality will be between just under 2 minutes to about 2.5 minutes, depending on your location.
Anywhere but in the path of totality will give you a view of a partial eclipse which will you leave you totally disappointed. To witness the whole show and experience the reason people travel the world to see eclipses (my friend Gary has seen 8 eclipses in 8 different countries around the world) you must make an effort to be in the totality zone.
Now that you are excited about witnessing and photographing an eclipse, let’s talk about preparations. You need to prepare for a variety of variables: location, position of the sun, safety considerations, photographic equipment, exposure settings and the experience itself.
Location: Where To Witness The Solar Eclipse
As I mentioned earlier, to really experience a total eclipse of the sun you must be in the path of totality. The path will cross through parts of the following states: Oregon, Idaho, Montana (although only less than 8 square miles of an uninhabited area), Wyoming, Nebraska, Kansas, Iowa (again like Montana only a very tiny section of the state), Missouri, Illinois, Kentucky, Tennessee, Georgia, North Carolina and South Carolina. The amazing part is the shadow will cover all those states from west to east in about 1.5 hours! The shadow band is relatively narrow, about 70-miles wide, so 35 miles south of the centerline and 35 miles north. The longest duration of totality will be found on the centerline. Lodging in most of these areas has been sold out for up to a year. I made my reservations in Jackson, Wyoming, in April of 2015 and got one of the last rooms at the location I wanted! Those planning late will need to drive the morning of the eclipse to get into position. There is a great map and information available for all the states at eclipse2017.org/2017/path_through_the_US.htm
Position Of The Sun
The sun will be fairly high in the sky throughout most of the country during the eclipse, so unless you are right up next to a mountain range or a tall building this will not be a major concern. One drawback as far as photography is concerned it may be difficult to include any landscape in your images without using a wide-angle lens, which in turn will make the sun so small you will not be able to see the effect of the eclipse. You may consider finding some trees or tall rocks nearby so you can position yourself to have a foreground element to go along with your eclipse images. On the positive side, it will be very easy to use telephoto lenses and fill your frame with the sun and moon without having to worry about having distractions in the frame. Using a photo-planning app such as PhotoPills (photopills.com) or The Photographer’s Ephemeris (photoephemeris.com) can help you pick the best spot in an area or help you visualize what you will experience.
Safety Considerations
Viewing an eclipse is a wonderful experience, but also a risky experience if you don’t take some safety precautions. Anytime you look directly into the sun — even just for a few seconds — you risk eye damage. And if you think about taking pictures, you risk damaging your camera equipment as well. I will talk about camera equipment safety in a moment, but first let’s concentrate on our eyes.
Assuming you are not going to want to use a pinhole device and project an image of the sun on the ground, the only safe way to view the eclipse is with safety glasses. Inexpensive “eclipse glasses” can be ordered from many places online. Make sure yours are coming from a reputable source. These glasses are made of frames of lightweight cardboard or plastic with viewable Mylar as lenses. This Mylar is a very dark (black) film that blocks all the harmful rays of the sun and act as a very powerful neutral density filter, allowing only the brightest light of the sun to shine through. These glasses are roughly equivalent to 16 stops of neutral density!
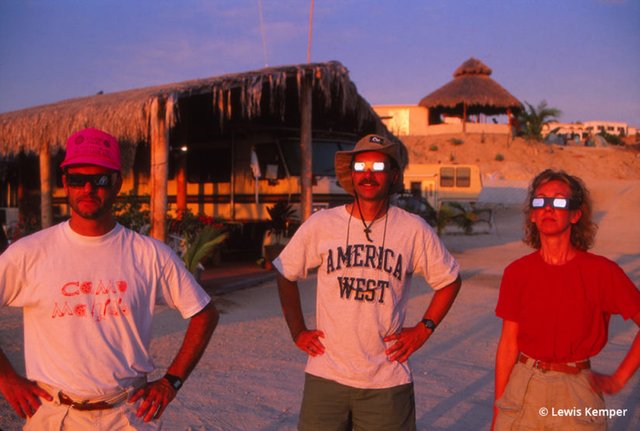
Gary Levine, Bill Clark and Heidi Satter wearing eclipse glasses at the Baja California eclipse in 1991.
Wear these before the eclipse starts as you aim your cameras to the sky and throughout the eclipse, only removing them during totality. Never look through the optical viewfinder of your camera when it is pointing towards the sun without these glasses! It is best to use Live View on your camera. Only when the moon covers the entire disc of the sun is it safe to view without the glasses.
Photographic Equipment For A Solar Eclipse
You will want to use a camera with interchangeable lenses to photograph the eclipse. The longer the lens the better!
Lenses. For full-frame cameras you will want to ideally use lenses from 400mm to 1000mm. At 400mm the sun is only 3.7mm in size in your frame (a full-frame sensor is 36x24 mm). At 1000mm, the sun is 9.2mm in size. During totality, the sun’s corona, which is normally invisible, will extend more than the size of the sun in all directions from center, therefore a lens in the range of 500mm to about 800mm will fill your frame with the sun and the corona. Since most of us don’t have lenses longer than 500mm or 600mm, I would recommend using a “crop sensor” (APS or Micro Four Thirds) camera for your eclipse photography, if you have one available. With a crop sensor camera, a lens such as a 100-400mm will give you the equivalent of 160-560mm (assuming 1.6x magnification) and a lens such as a 150-600mm will give you a 240-960mm equivalent, which would be ideal.
You also may want to have a second camera with a wider lens set up to record the environment and the eclipse within the landscape. I plan to have a second camera with a wider-angle lens set on a tripod with the intervalometer timer set to take a picture every 15 seconds during the event. I just have to keep it close enough to remove my filter during totality while working my primary camera with the longer lens. (As you can see, having 3 or 4 arms would really help during an eclipse!)
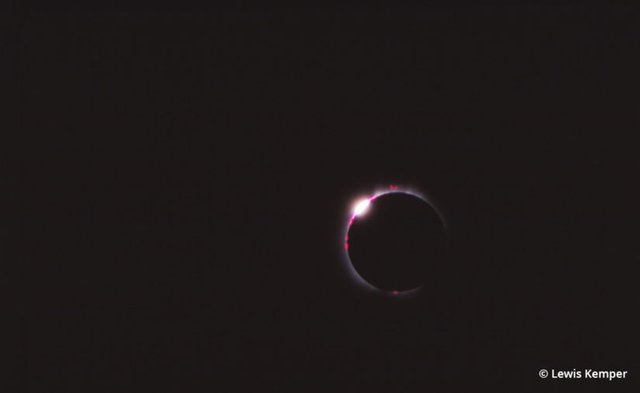
"Diamond Ring" effect, solar eclipse, Baja California, 1991.
Filters. To protect all this expensive camera gear you need some special filters. There are a variety of solar filters available for you lenses. Some of these filters are made of optical-quality film and some are made from glass. Most of these solar filters are equivalent to 16- to 20-stop neutral density filters. The filters range in price from about $100 to $200, depending on filter size. A cheaper alternative is to use optical Mylar film. The most common of these films is Baader AstroSolar Film and Thousand Oaks Optical Black Polymer Filter Sheets. You can make your own filter by cutting a very precise circle of this film and fitting inside the filter ring of a skylight or UV filter. Just make sure the film covers all the glass of the filter and has no light leaks. It is even easier to use a square filter holder such as those made by LEE Filters, buy a glass or resin filter that fits the holder and cut a rectangle that covers the whole filter. It is easier to cut a rectangle to cover the filter than a precise circle. You can use masking tape to seal the filter on all four sides and then just insert it in the holder over your lens. This way you can make a very good filter without spending hundreds of dollars for something you may only use once. I photographed the Baja eclipse using this method.
For the 2017 eclipse, I bought a solar filter for my telephoto lens and will use the Mylar/polymer and square filter method for the wider lens. The film tends to give you a white sun, while the filter I purchased will render a yellow sun.
If you purchase a solar filter, it is still a very good practice to use Live View and not look through the optical viewfinder. Some of these filters will even have a warning on the box, “Not for optical viewing, use Live View or an electronic viewfinder.”
Some people mention using strong neutral density filters to view the eclipse but remember real solar filters are at least 16.5 stops in density and the strongest “normal” neutral density filter is 15 stops, which lets in twice as much light as a 16-stop filter. NASA, the National Science Foundation, Sky & Telescope magazine and all the other scientific agencies all recommend using certified solar filters to block not only the visible light but the UV and IR light as well. You don’t want to gamble with your eyesight or your equipment when it comes to an eclipse.
Live View & rangefinders. With these filters over your lenses, it can be difficult to actually find the sun with your telephoto lens when you first set up your shot. There are several methods for making this easier. The first is to use Live View when aiming the camera. Live View is extremely sensitive on most cameras and will be able to see through the filters, even though you cannot. And as mentioned, using Live View, there is no chance that you will damage your eyes looking into the sun.
The second method is to build a rangefinder. This you would want to do in the days preceding the eclipse. The rangefinder can be something as simple as taping a piece of cardboard to the top of the prism on your camera that you can use to line up with the sun. The angle and height of the cardboard will be dependent on the focal length of your lens, but with some trial and error you should be able to create a pointing device that will allow you to locate the sun. Just make sure you use your solar glasses when trying to align the camera this way.
Camera support. Another piece of equipment to consider is your tripod. As the earth rotates, the sun will be moving in the frame of your camera. Since it is going to be rising it will be moving upward and to the right of its original position. You need a tripod head that will make it easy for you to track and move with the sun. A video head, gimbal head or ball head will work best for this kind of work. Conversely, a three-axis tripod head will be clumsy and difficult to use.
Using an electronic or remote shutter release will prevent you from shaking the camera and also jostling the camera position during the eclipse.
Exposure Settings To Photograph A Solar Eclipse
For the majority of the time, the light during an eclipse is fairly uniform. But when the light does change as the moon begins to cover more and more of the sun, it happens quickly. Since the sun is so bright, we really do not see these changes until the eclipse is approaching totality. During the partial phases the exposure will be fairly constant.
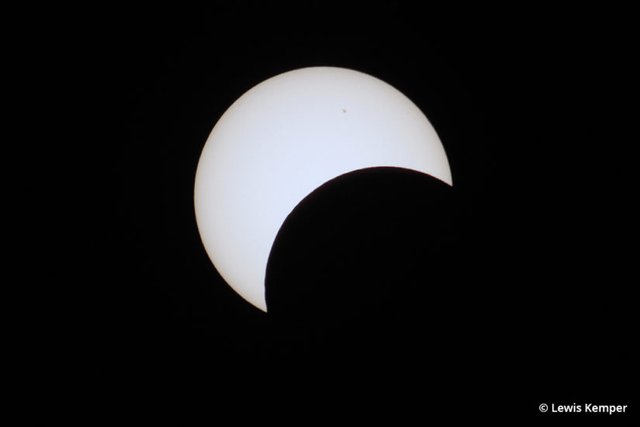
Partial solar eclipse, Baja California, 1991
To prepare, in the days or weeks leading up to the eclipse, go out with the camera equipment you plan to use and practice finding and photographing the sun with your solar filter on. Practice focusing with the filter on your lens using Live View on your camera. Bracket your exposures and find the one that does not blow out the sun, and can even show detail on the sun (you may even see sunspots). This will be the exposure you will use for the majority of the eclipse.
Once you establish this base setting, I would use that ISO (best if you use the lowest native ISO of your camera), shutter speed and aperture combination with your camera in manual mode when shooting the eclipse.
The exposure will start to change when the sun is about 90-percent covered and then you will need to bracket your exposures. There is as much as a 12-stop difference between the brightness of the inner and outer corona. There is no way to capture this difference in one exposure. You need to bracket your exposures to capture all the nuances of the corona.
If you are in manual mode on your camera and set the automatic bracketing feature, this will bracket your shutter speed, which is what you want to do during an eclipse. Have your camera set to bracket as many shots and stops possible. If you have a camera that only can bracket 3 exposures, then be prepared to use the exposure compensation feature along with the bracketing feature. If you are set to bracket 3 exposures at 2 stops apart and move the exposure compensation down to -5, then your exposures will be -7; -5; -3. Next move your exposure compensation back to 0 and then you will be exposures will be -2; 0; +2. Then move your exposure compensation to +5 and your exposures will be +3; +5; +7 (see illustration below). This combination will give 14 stops of dynamic range. I would then repeat the sequence in reverse order and keep doing this as many times as you can during totality
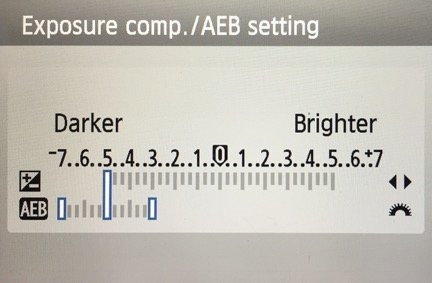
3-shot bracket, 2 stops apart, exposure compensation set to -5.
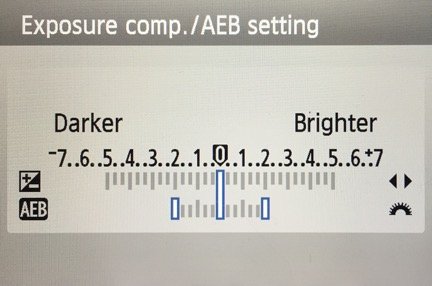
3-shot bracket, 2 stops apart, exposure compensation set to 0.
If you are fortunate enough to have a camera that can bracket up to 7 exposures, just set the camera to bracket 2 stops apart.
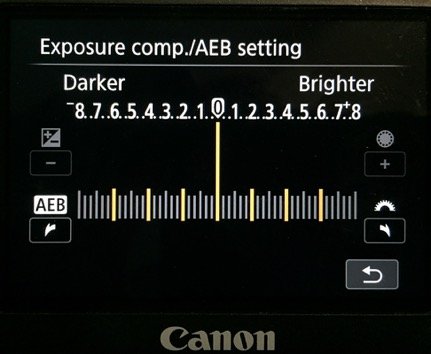
7-shot bracket, 2 stops apart.
As soon as the moon begins to leave the sun, you need to put your solar glasses back on and your solar filters!
If you are using two camera bodies, pause and take some time to use a wider lens and capture some to the surrounding scenery during totality. Work quickly, since this eclipse will have a relatively short duration of totality.
The Solar Eclipse Experience
Since this total eclipse is likely the only one you will witness in your lifetime, make it count. Don’t get so wrapped up in the photography that you forget to experience it. Make sure you look around, check out the glow of the light as the sun diminishes, listen to the sounds (I remember even the birds stopped singing) and appreciate what is happening.
If things start to go wrong with your picture taking, give it up. There will be plenty of excellent images on the Internet you can look at. If you are experiencing this with friends or family that may not be involved in photography, have them video it on their phones. Make it an experience you will remember for a lifetime. Maybe it will inspire you to be an eclipse follower like my friend Gary and you’ll travel the world chasing eclipses. I am just glad I am going to get to experience one more with him. Enjoy your total eclipse!