Elektronikprojekt Teil 7 / Electronics project part 7
Hallo Elektronikfreunde.
Heute will ich mit der Endmontage und Verdrahtung des DSP 5015 – Moduls beginnen und die ersten Tests durchführen. Ich will nochmal erwähnen, dass diese Beiträge hier keine 1:1 Nachbauanleitung sind, sondern nur Denkanstöße und Hintergrundwissen für eigene Projekte bringen sollen. Ströme bis 1A sind recht gut beherrschbar und es gibt im Niedervoltbereich wenige Gefahren. Hier geht’s aber um Ströme bis 20 Ampere, im Kurzschlussfall sogar bis 50A. Damit kann man schon schweißen und einen kräftigen Lichtbogen erzeugen. Also entsprechende Sicherungen sind ein unbedingtes Muss, um im Fehlerfall die Stromversorgung zu unterbrechen!!
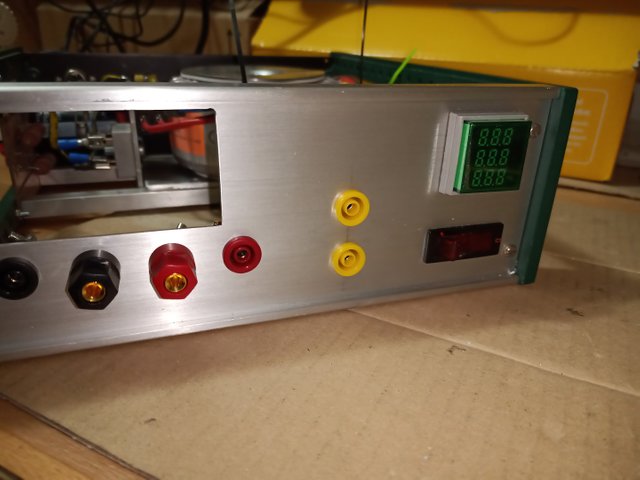
Bild 01
Da ich in der Frontplatte noch ein ungenutztes Loch hatte, habe ich mir Überlegt, dass man manchmal auch eine Wechselspannung zum Testen von Modulen braucht. Deshalb habe ich das Loch auf 12mm erweitert und ein Zweites gebohrt, um die im Bild 01 zu sehenden gelben Buchsen zu montieren. Da der Trafo eine Mittelanzapfung mit 18 Volt DC besitzt, habe ich diese Spannung an die gelben Buchsen über eine vorhandene Sicherung von 20A, geführt. 18 Volt sind nicht gerade optimal. 12 Volt währen besser, doch man kann nicht alles haben.
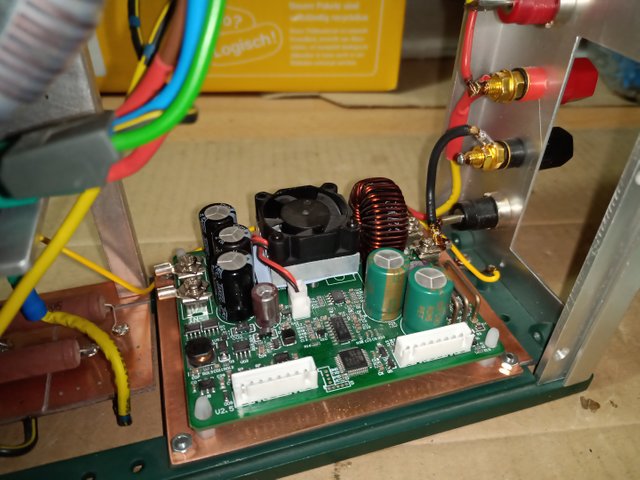
Bild 02 zeigt die installierte Leiterplatte im Gehäuse und die verdrahteten Ausgangsbuchsen. Schwarz für Minus und Rot für Plus. Als Hinweis: Zum Löten dieser stärkeren Kabel und Anschlussbuchsen, reicht der normale Elektroniklötkolben nicht aus. Diese haben oft nur 30Watt Heizleistung. Die Wärmeerzeugung reicht nicht aus, um eine schnelle, saubere Lötverbindung zu erzeugen, weil die Wärme viel zu schnell abgeführt wird.
Ich habe zum Löten einen Kolben mit 60 Watt benutzt. Damit waren saubere Verbindungen möglich. Nachteil ist die Größe. Man kommt schlechter an die Lötpunkte und muss aufpassen, dass man nicht andere Kabel und Bauteile verbrennt.
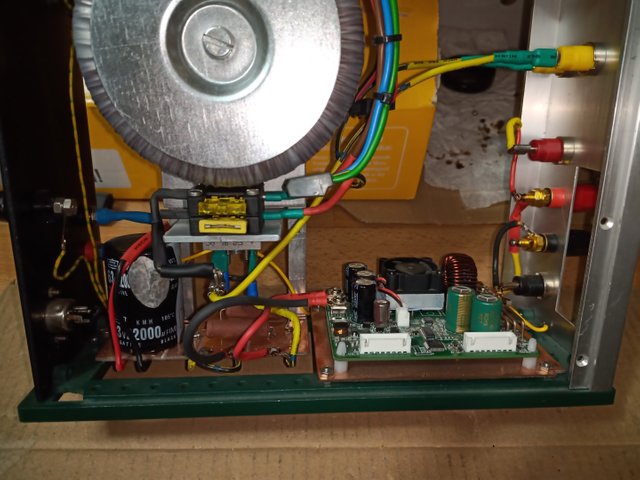
Bild 03 das angeschlossene Modul noch ohne die Anzeigeeinheit.
Beim Anschluss der Anzeige ist nur zu beachten, dass man Key mit Key und LCD mit LCD verbindet.
Stecker und Buchsen haben zwei Nuten und Federn, so dass ein verkehrtes Einstecken nur unter Gewalt möglich ist.
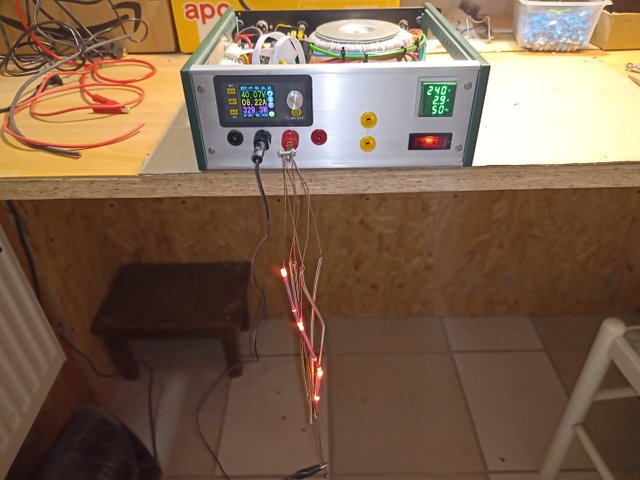
Im Bild 04 nun der Belastungstest über zwei Stunden im zulässigen Bereich von 300Watt, für den auch der Trafo ausgelegt ist. Es ist nicht einfach passende Widerstände zu finden, welche diese Wärme über lange Zeit aushalten können. In der Bastelkiste hatte ich diese, im Bild schön glühenden Heizspiralen, welche früher in Heizsonnen und ähnlichen Wärmegeräten zum Einsatz kamen. Wie man sehen kann, sind bei Volllast noch 40Volt bei 7,5Ampere entnehmbar. Der Trafo und der Gleichrichter waren nach einer Stunde Betrieb nur Handwarm. Also alles wie es sein soll. Das die Spannung auf 40Volt zusammenbricht war zu erwarten, denn der Kondensator ist für diese Stromstärke von 7,5A trotz 22000uF noch viel zu klein. Erwartet hatte ich sogar nur 36Volt!!
Was nicht korrekt ist, die Stromanzeige des Netzmoduls zeigt den doppelten Strom. Richtig wären 1,35A was ungefähr 324 Watt Primärleistung entspricht. Einstellmöglichkeiten gibt es nicht. Das scheint ein Herstellungsfehler zu sein. Ich werde mal bei einem anderen Lieferanten eine ähnliche Anzeige bestellen, doch das dauert bis zur Lieferung meist 6 Wochen. Als Hinweis auch hier, durch die Fühlerspule wird immer nur ein Draht (L oder N, nicht PE) geführt. Werden beide Leiter durch die Messsonde geführt, heben sich beide Ströme der Leiter auf und die Stromanzeige bleibt auf Null.
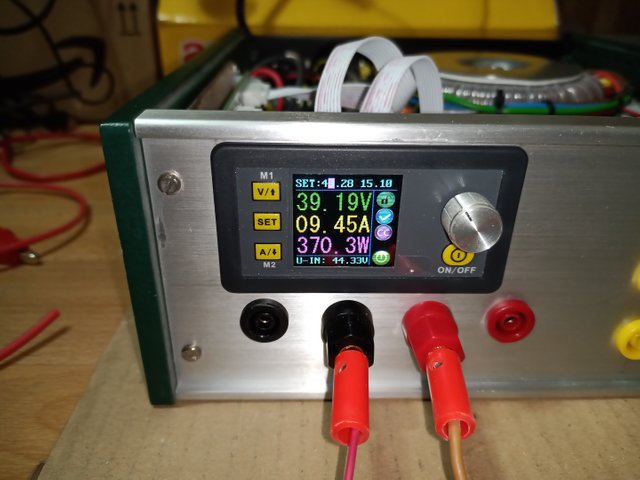
Hier noch ein Bild 05 zur Auflockerung des Textes
Nach dem zwei Stunden Test geht es nun um die erreichbare Maximalleistung die etwa 30 Minuten ohne Wärmeschaden entnommen werden kann. Ich erwarte eine Spannung von ca. 35 Volt und 15Ampere (Maximalleistung des DSP-Moduls). Dazu benötige ich einen Lastwiderstand von ca. 2,3Ohm mit sehr hoher Belastbarkeit (550Watt)
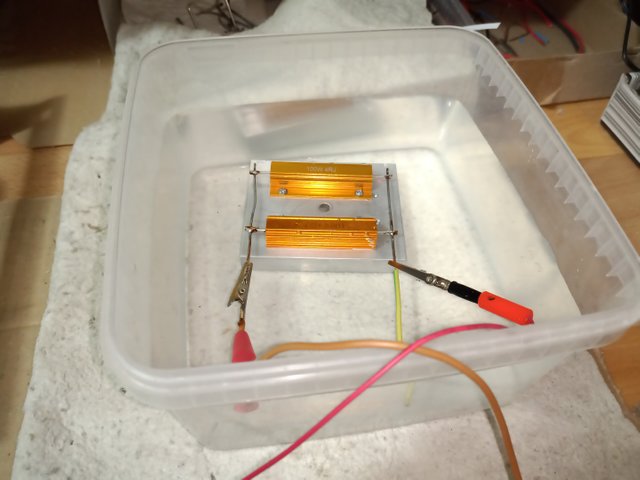
Bild 06 zeigt meine Konstruktion. Zu sehen zwei parallel geschaltete 4 Ohm Widerstände mit einer Belastbarkeit von 100Watt auf einem Aluminiumkühlkörper. Das sind schonmal 200Watt. Eigentlich sind dies meine Lastwiderstände für Verstärkeranlagen um geräuschlos Messungen an diesen Amps durchzuführen, aber ich habe keine anderen alternativen greifbar. Zudem sind diese Typen von Widerständen nicht ganz billig, aber was solls. Zusätzlich habe ich das Ganze im destillierten Wasser zur zusätzlichen Kühlung eingebracht.
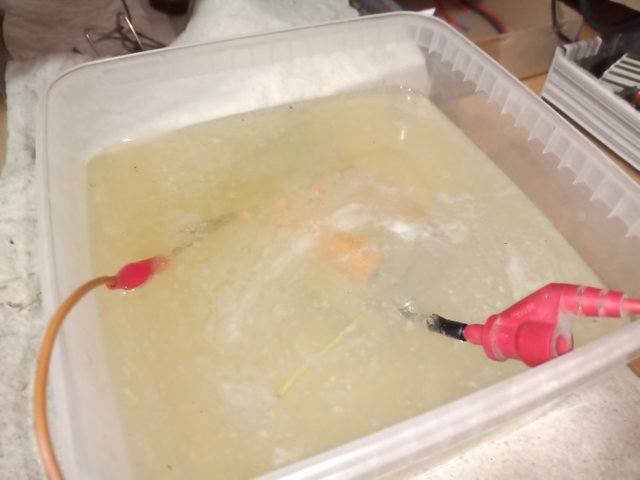
Bild 07
Hier das Ganze nach 30 Minuten. Das Wasser ist ca. 75Grad heiß und trüb. Und schonwieder ein wichtiger Hinweis und eine Warnung. Der chemische Vorgang, der im Wasserbad abläuft, nennt sich Elektrolyse. Trotz destilliertem Wasser sind genug Verunreinigungen an den Materialen. Nein, nicht der Strom ist hier gefährlich, sondern die entstehenden Gase. Vielleicht erinnert sich mancher an den Chemieunterricht in der Schule. Die Knallgasprobe war eines der ersten chemischen Reaktionen die man mit viel Effekt vorgeführt bekam.
Das bedeutet am Minuspol entsteht Wasserstoff und am Pluspol die Bläschen sind Sauerstoff. Wer mehr wissen will, sollte Wiki bemühen oder mir einen Kommentar schreiben, dann erkläre ich das gern in einem anderen Post. Hier muss man nur wissen, dass das entstehende Gemisch explosiv sein kann. Also gut Lüften während des Tests!!!! Das Gleiche gilt auch beim Laden alter Bleibatterien. (Die neueren GEL-Batterien betrifft das nicht mehr).
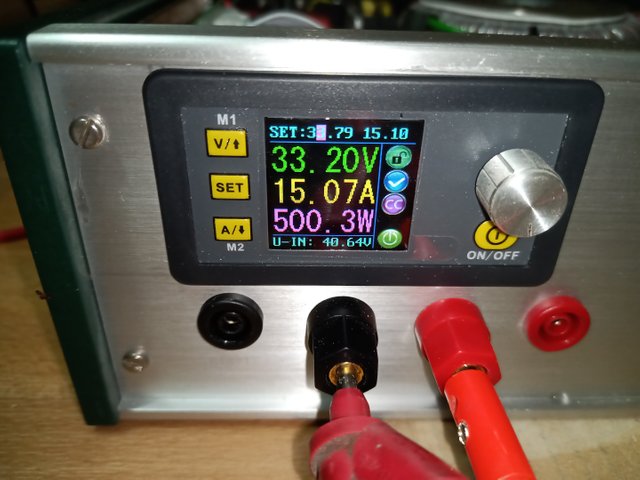
Bild 08 zeigt die erreichten Maximalwerte. 500 Watt sind schon eine beachtliche Leistung. Die Eingangsspannung ins Modul beträgt 40,64 Volt. Nutzbar sind an den Ausgangsbuchsen noch 33Volt bei 15 Ampere. Das heißt, im Gerät werden gut 100 Watt an den Shunts in Wärme umgesetzt. Die Welligkeit habe ich noch nicht gemessen. Das kommt vielleicht mal später, interessiert mich im Moment auch nicht so sehr, da ich, wenn ich eine brummfreie Spannung brauche, auf ein Schaltnetzteil zurückgreife.
Der Trafo wird bei dieser Überlast schon mehr wie Handwarm, hat aber eine Thermosicherung die bei 105 Grad auslösen würde. Der Gleichrichter hat keine Wärmeprobleme.
Ich werde für den täglichen Gebrauch über Set den Strom auf maximale 10 Ampere begrenzen und die internen Sicherungen auf 15 Ampere verringern. So sollte ein sicherer Betrieb des Gerätes gewährleistet sein und keine Wärmeprobleme auftauchen.
Nun verbleibt das Gehäuse zu komplettieren und noch einige kleinere Test durchzuführen.
Doch diese Arbeiten zeige ich mal in einem Werkstattbericht wie ich ihn von Zeit zu Zeit mal hier poste.
Hier folgt also keine Fortsetzung mehr. Die kleine Serie ist beendet.
Bis zum nächsten Mal in meiner Werkstatt.
Kommentare sind immer gern gesehen, auch Kritik.
see you later
google Translator
Today I want to start with the final assembly and wiring of the DSP 5015 module and do the first tests. I want to mention again that these articles are not 1: 1 instructions, but should only provide food for thought and background knowledge for your own projects. Currents up to 1A are quite manageable and there are few dangers in the low voltage range. This is about currents up to 20 amps, in the event of a short circuit even up to 50A. With this you can already weld and generate a powerful arc. Corresponding fuses are an absolute must to interrupt the power supply in the event of a fault !!

Image 01
Since I still had an unused hole in the front panel, I considered that sometimes you also need an AC voltage to test modules. So I expanded the hole to 12mm and drilled a second one to mount the yellow bushings shown in picture 01. Since the transformer has a center tap with 18 volts DC, I connected this voltage to the yellow sockets via an existing 20A fuse. 18 volts are not ideal. 12 volts would be better, but you cannot have everything.

Figure 02 shows the circuit board installed in the housing and the wired output sockets. Black for minus and red for plus. As a note: the normal electronic soldering iron is not sufficient to solder these stronger cables and connection sockets. These often only have 30 watts of heating power. The heat generation is not sufficient to produce a quick, clean solder connection because the heat is dissipated far too quickly.
I used a 60 watt iron for soldering. This made clean connections possible. The disadvantage is size. It is harder to get to the soldering points and you have to be careful not to burn other cables and components.

Fig. 03 the connected module without the display unit.
When connecting the display, all you have to do is connect Key with Key and LCD with LCD.
Plugs and sockets have two grooves and tongues, so that incorrect insertion is only possible with force.

In picture 04, the load test over two hours in the permissible range of 300 watts, for which the transformer is also designed. It is not easy to find suitable resistors that can withstand this heat for a long time. In the craft box I had these heating coils, beautifully glowing in the picture, which used to be used in heating suns and similar heating devices. As you can see, at full load, 40 volts can still be removed at 7.5 amps. The transformer and the rectifier were only lukewarm after one hour of operation. So everything as it should be. The voltage collapsed to 40Volt was to be expected, because the capacitor is still too small for this current of 7.5A despite 22000uF. I only expected 36Volt !!
What is not correct, the power indicator of the power module shows twice the current. 1.35A would be correct, which corresponds to approximately 324 watts of primary power. There are no setting options. That seems to be a manufacturing defect. I will order a similar advertisement from another supplier, but it usually takes 6 weeks before delivery. As a note here, too, only one wire (L or N, not PE) is passed through the sensor coil. If both conductors are led through the measuring probe, both currents of the conductors cancel each other and the current display remains at zero.

Here is a picture 05 to loosen up the text
After the two-hour test, it is now a question of the achievable maximum output that can be removed for about 30 minutes without heat damage. I expect a voltage of approx. 35 volts and 15 amps (maximum output of the DSP module). For this I need a load resistance of approx.2.3Ohm with a very high load capacity (550Watt)

Picture 06 shows my construction. You can see two 4 ohm resistors connected in parallel with a load capacity of 100 watts on an aluminum heat sink. That's 200 watts. Actually, these are my load resistors for amplifier systems to make noiseless measurements on these amps, but I have no other alternatives available. In addition, these types of resistors are not cheap, but who cares. In addition, I put the whole thing in distilled water for additional cooling.

Image 07
Here the whole thing after 30 minutes. The water is about 75 degrees hot and cloudy. And again an important tip and a warning. The chemical process that takes place in a water bath is called electrolysis. Despite distilled water, there are enough impurities on the materials. No, it is not the electricity that is dangerous here, but the resulting gases. Maybe some people remember chemistry classes at school. The oxyhydrogen sample was one of the first chemical reactions to be demonstrated with great effect.
That means hydrogen is generated at the negative pole and the bubbles are oxygen at the positive pole. If you want to know more, you should try Wiki or write me a comment, then I would like to explain it in another post. Here you just have to know that the resulting mixture can be explosive. So ventilate well during the test !!!! The same applies to the charging of old lead batteries. (The newer GEL batteries are no longer affected).

Figure 08 shows the maximum values reached. 500 watts is a remarkable achievement. The input voltage to the module is 40.64 volts. 33 volts at 15 amps can still be used at the output sockets. This means that a good 100 watts of the shunts are converted into heat in the device. I have not yet measured the ripple. Maybe that will come later, I'm not really interested at the moment, because if I need a hum-free voltage, I use a switching power supply.
With this overload, the transformer becomes more like lukewarm, but has a thermal fuse that would trigger at 105 degrees. The rectifier has no heat problems.
For daily use via set, I will limit the current to a maximum of 10 amps and reduce the internal fuses to 15 amps. In this way, safe operation of the device should be ensured and no heat problems should arise.
Now the case remains to be completed and some small tests to be carried out.
But I show this work in a workshop report as I post it here from time to time.
So there is no continuation here. The small series has ended.
Until next time in my workshop.
Comments are always welcome, including criticism.
see you later
Congratulations @qwertm! You have completed the following achievement on the Steem blockchain and have been rewarded with new badge(s) :
You can view your badges on your Steem Board and compare to others on the Steem Ranking
If you no longer want to receive notifications, reply to this comment with the word
STOPTo support your work, I also upvoted your post!
Do not miss the last post from @steemitboard:
Vote for @Steemitboard as a witness to get one more award and increased upvotes!
Du hast einen Vote von @portalvotes bekommen.
Du hast ein Upvote von mir bekommen, diese soll die Deutsche Community unterstützen. Wenn du mich unterstützten möchtest, dann sende mir eine Delegation. Egal wie klein die Unterstützung ist, Du hilfst damit der Community. DANKE!