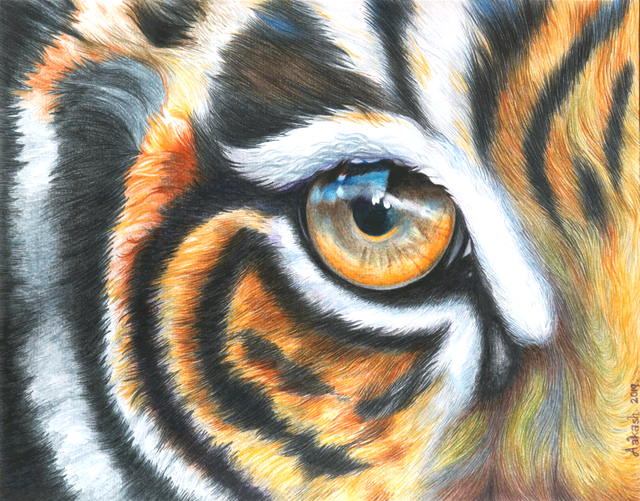
Eye of The Tiger - A Practice Painting
Hello fellow steemians!
Let's get into some painting stuff!!

© @aakashsinghbais
It is very usual for beginners and intermediate level artists to pick up a painting made by other professionals and try to replicate it in order to learn and practice new techniques. Even professional artists try to replicate, but they take a photograph and try to replicate in paint!
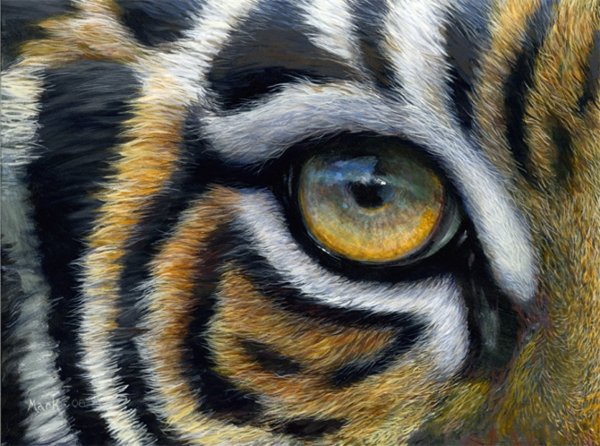
So, I randomly picked an image from the internet...this will act as a reference, and we'll try to replicate it as best as we can...

[ Title of Original Painting: Tiger Eye | Image Credits: Lauramarkfinberg.com]
Now let's get started...
Materials Needed
- A-4 size sheet of cartridge paper.
- Good quality pencil colours.
- An eraser, a small sharpener (it shouldn't be long-point because the colour-pencil leads are very fragile and break very often).
[This much should be sufficient.]
Now, let's see how to start our work..
Step-1
Sketch the basic outlines of important features like stripes and eyes. We can do this with light shade colour pencil itself (no need of graphite pencil, though if you are not very confident you can go for the graphite one.)
Step-2
Next we start filling in the colours following the reference drawing as strictly as possible. Make sure to mentally divide the painting into patches or sections. We'll do one section at a time. When we are absolutely done with one section, we move to the next (I had divided my painting into three sections.).
Completing the painting in sections helps prevent colours at places which are complete from getting smothered by our hands as we work in newer sections.
Make sure you follow a basic thumb rule....
THUMB RULE: The regions which have to be very dark will be first coated with an appropriate lighter shade, followed by the darker shade seen in the final painting.
The reason for the need of this rule is very simple. Pencil colours tend to leave out white spaces between adjacent strokes especially in the fur. More over they are not very dark. So, if we need a jet-black like effect in a painting, it is better to first coat the area with grey. Then coat it with the required black.

[First coat on section-1 | © @aakashsinghbais ]

[Second coat on section-1 | © @aakashsinghbais ]
section-1 of my painting is complete. Now, we'll move to the next section which is the left cheek of the tiger.
Make sure you rest your wrist only on the blank part of the painting and never in the sections already completed.

[Section-3 first coat on black stripes. | © @aakashsinghbais ]

[Section-3 first coat on orange stripes. | © @aakashsinghbais]
Now we'll complete the second coat on section-2 and move to section-3which is the remaining portion.

[Second coat on section-2 complete, first coat on section-3. | © @aakashsinghbais]
With this, our painting is nearing completion...we'll complete the second coat on section-3 and move on to the last step.
Step-3
Now that all the sections are done, we need to give the painting final touches. Special care needs to be given to the boundaries of the sections. We need to make sure that the colour at the section-boundaries is homogeneous and that any two sections do not stand out at the boundary.
Also recheck the intensity of colour with the reference image, and make any additions if needed (subtractions are nearly impossible, so be careful).

[Painting is now complete!! | © @aakashsinghbais]
Yay!! Painting complete! Time for celebration!
Here is something more on a slightly serious note...
HELP SAVE THE MAJESTIC TIGER:
The tiger is an iconic species. As of 2015, the global wild tiger population was estimated to number between 3,062 and 3,948 mature individuals, down from around 100,000 at the start of the 20th century, with most remaining populations occurring in small pockets isolated from each other. Major reasons for population decline include habitat destruction, habitat fragmentation and poaching.(Text taken from Wikipedia).
WHAT CAN WE DO?
We can avoid using products made from tiger parts. We can help report illegal activities related to poaching and use of animal parts. We can contribute or donate to any project working on conservation of this great feline.

[ Image Credits: https://nirmusic.wordpress.com/2014/11/05/save-the-tiger/ ]
..and finally..
Thank you for sparing your valuable time.
See you next time.
Aakash
Congratulations @aakashsinghbais! You have completed the following achievement on the Steem blockchain and have been rewarded with new badge(s) :
You can view your badges on your Steem Board and compare to others on the Steem Ranking
If you no longer want to receive notifications, reply to this comment with the word
STOPVote for @Steemitboard as a witness to get one more award and increased upvotes!
Wonderful execution and technique demonstrated. The application of lines of color for the fur is especially well done. But, the photo-realistic eye really stands out for me.
Resteemed and curated to art-curation in @c-squared on Discord
Thank you so much!
Your post was upvoted by the @art-venture account after manual review and included in Art-Venture magazine. The upvote and support of Art-venture magazine would greatly appreciated!

Thanks a lot!
This post was shared in the Curation Collective Discord community for curators, and upvoted and resteemed by the @c-squared community account after manual review.
@c-squared runs a community witness. Please consider using one of your witness votes on us here
Very well done! You perfectly captured the depth and shininess of the eye, and all that with color pencils... Respect!
Thank you so much!!
Posted using Partiko Android